SlideShare une entreprise Scribd logo
1  sur  19
The 8 Basic Steps to Photo Editing Adobe Photoshop Elements 6 Editing an image can be looked at as a series of basic functions or steps that can be accomplished in any editing software program. This tutorial will focus on accomplishing these tasks in Adobe Photoshop Elements version 6.
The 8 Basic Steps to Photo Editing Step 1: Rotate and Crop Step 2: Fix Flaws using the Clone Stamp Tool Step 3: Expanding the Tonal Range using Image: Adjust: Levels Step 4: Add Contrast using Image: Adjustments: Curves Step 5: Adjust Color using Levels Step 6: Improve Sharpness using UnsharpMask Step 7: Save Step 8: Compare
Step 1: Rotate and Crop  Your first step is to rotate and crop the image.  Rotating lets you straighten the image.  Cropping gets rid of any image you aren't going to be using.  It’s important to rotate then crop!
Step 1: Rotate and Crop Crop Rotate Choose Image: Crop Selection area will appear Drag the crop tool to the new size you desire then double click area to crop Choose Image, Rotate: Free Rotate Layer Grab the small squares in the corners to rotate image Double click in this area to accept the rotation changes
[object Object],dragging on the control handles, the small squares located in the corners and on the sides of the crop box. ,[object Object]
 Reposition the crop box by dragging inside it.
To accept the changes click the green check mark at the bottom right.,[object Object]
Step 3: Expanding the Tonal Range using Image: Adjust: Levels Digital cameras are limited in the range of colors they can capture. This can be compensated for using the Levels command. Choose Enhance: Adjust: Lighting: Levels.  The mountain in the middle of the dialog box is actually called a Historgram.  Historgram
Step 3: Expanding the Tonal Range using Image: Adjust: Levels A histogram is a graph of all the tones in the image, ranging from the darkest to the lightest. The triangles beneath the histogram represent the range of colors that the output device is capable of reproducing.
Step 3: Expanding the Tonal Range using Image: Adjust: Levels In the histogram you typically see a gap in the lighter tones (on the right) and a gap in the dark tones (left). There is no information there for the printer or monitor to use to reproduce these tones. Drag the white triangle towards the left, Drag the black triangle towards the right. Leave the middle triangle alone. Watch the image carefully to see how the adjustment effects it. Light Tones Dark Tones
Step 4: Add Contrast using Image: Adjustments: Curves The Curves command is one of the most powerful features of Photoshop. It allows you to change specific ranges of colors while leaving others untouched. For example, in Step 3 we adjusted the shadows and highlights. They are as we want them to be and we don't want to change them.  In this step we will add contrast to the image by adjusting the shadow, highlight and mid tones.
Step 4: Add Contrast using Image: Adjustments: Curves Choose Enhance: Adjust Color: Adjust Color Curves… dialog box opens.  The Adjust Color Curves dialog box will appear Adjust Color Curves dialog box
Step 4: Add Contrast using Image: Adjustments: Curves Select the style of curve that works best from the Select a Style presets. Make additional adjustments by using Adjustment Sliders
Step 5: Adjust Color using Levels When colors in an image are shifted towards a color that isn't intentional, this is considered to be a color cast. Fixing a color cast using the Levels palette will be very intuitive.
Step 5: Adjust Color using Levels Target the specific channel in the Levels palette by choosing it from the drop down menu titled Channel. Click in the middle arrow a drag it up or down, depending on the requirements of the image.  For example, if the image is too red, you can target the Red channel and reduce the red by dragging downwards. If the image is too green, you can reduce the amount of green by dragging upwards in the Red channel, or by dragging downwards in the Green channel. Every image will be slightly different, and will often require slight adjustments in all three channels (Red, Green, Blue).
Step 6: Improve Sharpness using Unsharp Mask The final adjustment is to sharpen the image.  Every time you scale, rotate, or change the color of an image, you add slight blurring to it. This is in addition to any blurriness that existed in the image before you started working with it. You can compensate for this to a certain degree using the Unsharp Mask filter. Choose Enhance: Unsharp Mask.
Step 6: Improve Sharpness using Unsharp Mask The settings for each image will differ, but generally the Radius and the Threshold will be under 5 pixels, while the Amount will be greater than 50%. Move the sliders for each setting while watching the results in the image.  The goal is to make the image appear crisper and less blurry without over-sharpening. Oversharpening can appear as "haloing" or mottling near areas where colors contrast sharply, or as an overall "plasticy" appearance. Amount Threshold Radius
Step 7: Save Save your edits as a new file.  By doing this you will preserve the original image. Later, if you determine the edits were not adequate or different edits need to be accomplished, you will have the option to re-edit the original photo. Click Save As, select JPEG as the Format from the Format drop down menu Format drop down Select JPEG
Step 8: Compare The last step is to open the original file and the edited file side by side and compare. Edited Original

Contenu connexe

Tendances

Photography terminology powerpoint
Photography terminology powerpointPhotography terminology powerpoint
Photography terminology powerpointsnailguinproductions
 
Photoshop booklet 2016
Photoshop booklet 2016Photoshop booklet 2016
Photoshop booklet 2016missfcmay
 
217 quick guide to photoshop cs6
217 quick guide to photoshop cs6217 quick guide to photoshop cs6
217 quick guide to photoshop cs6Rodel Morales
 
How to Edit in Photoshop (Part 2): Adding Background and Using Adjustment Tools
How to Edit in Photoshop (Part 2): Adding Background and Using Adjustment ToolsHow to Edit in Photoshop (Part 2): Adding Background and Using Adjustment Tools
How to Edit in Photoshop (Part 2): Adding Background and Using Adjustment ToolsMaria Eloisa Blanza
 
Photoshop How To
Photoshop How ToPhotoshop How To
Photoshop How Towaltersart1
 
Photoshop editing booklet 2019
Photoshop editing booklet 2019Photoshop editing booklet 2019
Photoshop editing booklet 2019missfcmay
 
Create a canvas banner in photoshop
Create a canvas banner in photoshopCreate a canvas banner in photoshop
Create a canvas banner in photoshopNaomiPB
 
How to Edit in Photoshop (Part 1): Inserting, Cropping, and Fixing Images
How to Edit in Photoshop (Part 1): Inserting, Cropping, and Fixing ImagesHow to Edit in Photoshop (Part 1): Inserting, Cropping, and Fixing Images
How to Edit in Photoshop (Part 1): Inserting, Cropping, and Fixing ImagesMaria Eloisa Blanza
 
Simple edits - zmina
Simple edits - zminaSimple edits - zmina
Simple edits - zminahwthrne
 
Screenshot analysis
Screenshot analysisScreenshot analysis
Screenshot analysisJenniferEse
 
Editing with PIXLR
Editing with PIXLREditing with PIXLR
Editing with PIXLRAnna Polud
 
Photoshop techniques
Photoshop techniquesPhotoshop techniques
Photoshop techniquesHeywoodmedia
 
Computer Techniques In Photoshop 1
Computer Techniques In Photoshop 1Computer Techniques In Photoshop 1
Computer Techniques In Photoshop 1moncrief
 

Tendances (19)

Juliet evangelista
Juliet evangelistaJuliet evangelista
Juliet evangelista
 
Photography terminology powerpoint
Photography terminology powerpointPhotography terminology powerpoint
Photography terminology powerpoint
 
Unit 57 photography terminology
Unit 57 photography terminologyUnit 57 photography terminology
Unit 57 photography terminology
 
Photoshop booklet 2016
Photoshop booklet 2016Photoshop booklet 2016
Photoshop booklet 2016
 
217 quick guide to photoshop cs6
217 quick guide to photoshop cs6217 quick guide to photoshop cs6
217 quick guide to photoshop cs6
 
How to Edit in Photoshop (Part 2): Adding Background and Using Adjustment Tools
How to Edit in Photoshop (Part 2): Adding Background and Using Adjustment ToolsHow to Edit in Photoshop (Part 2): Adding Background and Using Adjustment Tools
How to Edit in Photoshop (Part 2): Adding Background and Using Adjustment Tools
 
Photoshop How To
Photoshop How ToPhotoshop How To
Photoshop How To
 
Photoshop editing booklet 2019
Photoshop editing booklet 2019Photoshop editing booklet 2019
Photoshop editing booklet 2019
 
Smooth and soften skin in a photo with photoshop
Smooth and soften skin in a photo with photoshopSmooth and soften skin in a photo with photoshop
Smooth and soften skin in a photo with photoshop
 
Create a canvas banner in photoshop
Create a canvas banner in photoshopCreate a canvas banner in photoshop
Create a canvas banner in photoshop
 
Adobe Photoshop: Selection Tools
Adobe Photoshop: Selection ToolsAdobe Photoshop: Selection Tools
Adobe Photoshop: Selection Tools
 
How to Edit in Photoshop (Part 1): Inserting, Cropping, and Fixing Images
How to Edit in Photoshop (Part 1): Inserting, Cropping, and Fixing ImagesHow to Edit in Photoshop (Part 1): Inserting, Cropping, and Fixing Images
How to Edit in Photoshop (Part 1): Inserting, Cropping, and Fixing Images
 
Simple edits - zmina
Simple edits - zminaSimple edits - zmina
Simple edits - zmina
 
Screenshot analysis
Screenshot analysisScreenshot analysis
Screenshot analysis
 
Editing with PIXLR
Editing with PIXLREditing with PIXLR
Editing with PIXLR
 
Edgy Colors
Edgy ColorsEdgy Colors
Edgy Colors
 
Writing de materials11
Writing de materials11Writing de materials11
Writing de materials11
 
Photoshop techniques
Photoshop techniquesPhotoshop techniques
Photoshop techniques
 
Computer Techniques In Photoshop 1
Computer Techniques In Photoshop 1Computer Techniques In Photoshop 1
Computer Techniques In Photoshop 1
 

Similaire à The 8 Basic Steps Elements 6

How to Sharpen an Image in Photoshop
How to Sharpen an Image in PhotoshopHow to Sharpen an Image in Photoshop
How to Sharpen an Image in PhotoshopZenith Clipping
 
PaintShop Pro 7 Manual
PaintShop Pro 7 ManualPaintShop Pro 7 Manual
PaintShop Pro 7 ManualLaurel Eddy
 
Create a Photo Collage in Photoshop.pdf
Create a Photo Collage in Photoshop.pdfCreate a Photo Collage in Photoshop.pdf
Create a Photo Collage in Photoshop.pdfPinkverge
 
Non Destructive Color Correction
Non Destructive Color CorrectionNon Destructive Color Correction
Non Destructive Color CorrectionAnn Elliott
 
quicktip_scanphotoshop
quicktip_scanphotoshopquicktip_scanphotoshop
quicktip_scanphotoshoptutorialsruby
 
quicktip_scanphotoshop
quicktip_scanphotoshopquicktip_scanphotoshop
quicktip_scanphotoshoptutorialsruby
 
adobephotoshop_frerking
adobephotoshop_frerking adobephotoshop_frerking
adobephotoshop_frerking Agung Yuwono
 
Learning image retouch with Photoshop CS6 with 100 practical exercises
Learning image retouch with Photoshop CS6 with 100 practical exercisesLearning image retouch with Photoshop CS6 with 100 practical exercises
Learning image retouch with Photoshop CS6 with 100 practical exercisesMCB Press
 
Photoshop getting started part4
Photoshop getting started part4Photoshop getting started part4
Photoshop getting started part4Kermit Agbas
 
Digital work station intro
Digital work station introDigital work station intro
Digital work station introWhitney Brooks
 
ETECH_WEEK7-Image-Manipulation-Techniques-1.pdf
ETECH_WEEK7-Image-Manipulation-Techniques-1.pdfETECH_WEEK7-Image-Manipulation-Techniques-1.pdf
ETECH_WEEK7-Image-Manipulation-Techniques-1.pdfbongsantiago96
 
Photoshop the whole thing
Photoshop the whole thingPhotoshop the whole thing
Photoshop the whole thingGareth Hill
 
Photoshop Tutorial Booklet
Photoshop Tutorial BookletPhotoshop Tutorial Booklet
Photoshop Tutorial BookletGraveney School
 

Similaire à The 8 Basic Steps Elements 6 (20)

Writing de materials1
Writing de materials1Writing de materials1
Writing de materials1
 
How to Sharpen an Image in Photoshop
How to Sharpen an Image in PhotoshopHow to Sharpen an Image in Photoshop
How to Sharpen an Image in Photoshop
 
PaintShop Pro 7 Manual
PaintShop Pro 7 ManualPaintShop Pro 7 Manual
PaintShop Pro 7 Manual
 
Create a Photo Collage in Photoshop.pdf
Create a Photo Collage in Photoshop.pdfCreate a Photo Collage in Photoshop.pdf
Create a Photo Collage in Photoshop.pdf
 
Non Destructive Color Correction
Non Destructive Color CorrectionNon Destructive Color Correction
Non Destructive Color Correction
 
quicktip_scanphotoshop
quicktip_scanphotoshopquicktip_scanphotoshop
quicktip_scanphotoshop
 
quicktip_scanphotoshop
quicktip_scanphotoshopquicktip_scanphotoshop
quicktip_scanphotoshop
 
adobephotoshop_frerking
adobephotoshop_frerking adobephotoshop_frerking
adobephotoshop_frerking
 
Learning image retouch with Photoshop CS6 with 100 practical exercises
Learning image retouch with Photoshop CS6 with 100 practical exercisesLearning image retouch with Photoshop CS6 with 100 practical exercises
Learning image retouch with Photoshop CS6 with 100 practical exercises
 
Photoshop getting started part4
Photoshop getting started part4Photoshop getting started part4
Photoshop getting started part4
 
Basic tutorials
Basic tutorialsBasic tutorials
Basic tutorials
 
Basic tutorials
Basic tutorialsBasic tutorials
Basic tutorials
 
Digital work station intro
Digital work station introDigital work station intro
Digital work station intro
 
ETECH_WEEK7-Image-Manipulation-Techniques-1.pdf
ETECH_WEEK7-Image-Manipulation-Techniques-1.pdfETECH_WEEK7-Image-Manipulation-Techniques-1.pdf
ETECH_WEEK7-Image-Manipulation-Techniques-1.pdf
 
Photoshop basics
Photoshop basicsPhotoshop basics
Photoshop basics
 
Photoshop the whole thing
Photoshop the whole thingPhotoshop the whole thing
Photoshop the whole thing
 
Cours photoshop
Cours photoshopCours photoshop
Cours photoshop
 
Photoshop basics
Photoshop basicsPhotoshop basics
Photoshop basics
 
Tutorials
TutorialsTutorials
Tutorials
 
Photoshop Tutorial Booklet
Photoshop Tutorial BookletPhotoshop Tutorial Booklet
Photoshop Tutorial Booklet
 

Plus de joelk

Future of rock
Future of rockFuture of rock
Future of rockjoelk
 
Getting wired at csm fall 2014
Getting wired at csm fall 2014Getting wired at csm fall 2014
Getting wired at csm fall 2014joelk
 
Getting wired at csm spring2013
Getting wired at csm spring2013Getting wired at csm spring2013
Getting wired at csm spring2013joelk
 
Ce building time lapse
Ce building time lapseCe building time lapse
Ce building time lapsejoelk
 
Middle states csm ver2
Middle states csm ver2Middle states csm ver2
Middle states csm ver2joelk
 
Self-Study Groups
Self-Study GroupsSelf-Study Groups
Self-Study Groupsjoelk
 
Turning response clickers
Turning response clickersTurning response clickers
Turning response clickersjoelk
 
Getting wired at CSM Spring 2011
Getting wired at CSM Spring 2011Getting wired at CSM Spring 2011
Getting wired at CSM Spring 2011joelk
 
Introduction to Blackboard 9.1
Introduction to Blackboard 9.1Introduction to Blackboard 9.1
Introduction to Blackboard 9.1joelk
 
Test a of audio in Slideshare
Test a of audio in SlideshareTest a of audio in Slideshare
Test a of audio in Slidesharejoelk
 
Video mania and dlf showcase
Video mania and dlf showcaseVideo mania and dlf showcase
Video mania and dlf showcasejoelk
 
Getting Wired Spring 2011
Getting Wired Spring 2011Getting Wired Spring 2011
Getting Wired Spring 2011joelk
 
Blackboard Mashups: Multimedia Just Got a Little Easier!
Blackboard Mashups: Multimedia Just Got a Little Easier!Blackboard Mashups: Multimedia Just Got a Little Easier!
Blackboard Mashups: Multimedia Just Got a Little Easier!joelk
 
Week 1 intro to dp, history why digital, basic
Week 1 intro to dp, history why digital, basicWeek 1 intro to dp, history why digital, basic
Week 1 intro to dp, history why digital, basicjoelk
 
Week 2 aperture, shutter speed and iso
Week 2 aperture, shutter speed and isoWeek 2 aperture, shutter speed and iso
Week 2 aperture, shutter speed and isojoelk
 
Week 8 landscape pictures for slideshare
Week 8 landscape pictures for slideshareWeek 8 landscape pictures for slideshare
Week 8 landscape pictures for slidesharejoelk
 
Week 7 Portraits
Week 7  PortraitsWeek 7  Portraits
Week 7 Portraitsjoelk
 
The 8 Basic Steps Elements 6
The 8 Basic Steps  Elements 6The 8 Basic Steps  Elements 6
The 8 Basic Steps Elements 6joelk
 
Faculty Web Pages At CSM
Faculty Web Pages At CSMFaculty Web Pages At CSM
Faculty Web Pages At CSMjoelk
 
Week 3 Lens And Focal Lenghts
Week 3 Lens And Focal LenghtsWeek 3 Lens And Focal Lenghts
Week 3 Lens And Focal Lenghtsjoelk
 

Plus de joelk (20)

Future of rock
Future of rockFuture of rock
Future of rock
 
Getting wired at csm fall 2014
Getting wired at csm fall 2014Getting wired at csm fall 2014
Getting wired at csm fall 2014
 
Getting wired at csm spring2013
Getting wired at csm spring2013Getting wired at csm spring2013
Getting wired at csm spring2013
 
Ce building time lapse
Ce building time lapseCe building time lapse
Ce building time lapse
 
Middle states csm ver2
Middle states csm ver2Middle states csm ver2
Middle states csm ver2
 
Self-Study Groups
Self-Study GroupsSelf-Study Groups
Self-Study Groups
 
Turning response clickers
Turning response clickersTurning response clickers
Turning response clickers
 
Getting wired at CSM Spring 2011
Getting wired at CSM Spring 2011Getting wired at CSM Spring 2011
Getting wired at CSM Spring 2011
 
Introduction to Blackboard 9.1
Introduction to Blackboard 9.1Introduction to Blackboard 9.1
Introduction to Blackboard 9.1
 
Test a of audio in Slideshare
Test a of audio in SlideshareTest a of audio in Slideshare
Test a of audio in Slideshare
 
Video mania and dlf showcase
Video mania and dlf showcaseVideo mania and dlf showcase
Video mania and dlf showcase
 
Getting Wired Spring 2011
Getting Wired Spring 2011Getting Wired Spring 2011
Getting Wired Spring 2011
 
Blackboard Mashups: Multimedia Just Got a Little Easier!
Blackboard Mashups: Multimedia Just Got a Little Easier!Blackboard Mashups: Multimedia Just Got a Little Easier!
Blackboard Mashups: Multimedia Just Got a Little Easier!
 
Week 1 intro to dp, history why digital, basic
Week 1 intro to dp, history why digital, basicWeek 1 intro to dp, history why digital, basic
Week 1 intro to dp, history why digital, basic
 
Week 2 aperture, shutter speed and iso
Week 2 aperture, shutter speed and isoWeek 2 aperture, shutter speed and iso
Week 2 aperture, shutter speed and iso
 
Week 8 landscape pictures for slideshare
Week 8 landscape pictures for slideshareWeek 8 landscape pictures for slideshare
Week 8 landscape pictures for slideshare
 
Week 7 Portraits
Week 7  PortraitsWeek 7  Portraits
Week 7 Portraits
 
The 8 Basic Steps Elements 6
The 8 Basic Steps  Elements 6The 8 Basic Steps  Elements 6
The 8 Basic Steps Elements 6
 
Faculty Web Pages At CSM
Faculty Web Pages At CSMFaculty Web Pages At CSM
Faculty Web Pages At CSM
 
Week 3 Lens And Focal Lenghts
Week 3 Lens And Focal LenghtsWeek 3 Lens And Focal Lenghts
Week 3 Lens And Focal Lenghts
 

The 8 Basic Steps Elements 6

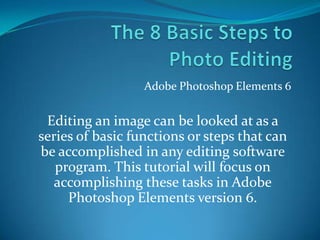
  • 1. The 8 Basic Steps to Photo Editing Adobe Photoshop Elements 6 Editing an image can be looked at as a series of basic functions or steps that can be accomplished in any editing software program. This tutorial will focus on accomplishing these tasks in Adobe Photoshop Elements version 6.
  • 2. The 8 Basic Steps to Photo Editing Step 1: Rotate and Crop Step 2: Fix Flaws using the Clone Stamp Tool Step 3: Expanding the Tonal Range using Image: Adjust: Levels Step 4: Add Contrast using Image: Adjustments: Curves Step 5: Adjust Color using Levels Step 6: Improve Sharpness using UnsharpMask Step 7: Save Step 8: Compare
  • 3. Step 1: Rotate and Crop Your first step is to rotate and crop the image. Rotating lets you straighten the image. Cropping gets rid of any image you aren't going to be using. It’s important to rotate then crop!
  • 4. Step 1: Rotate and Crop Crop Rotate Choose Image: Crop Selection area will appear Drag the crop tool to the new size you desire then double click area to crop Choose Image, Rotate: Free Rotate Layer Grab the small squares in the corners to rotate image Double click in this area to accept the rotation changes
  • 5.
  • 6. Reposition the crop box by dragging inside it.
  • 7.
  • 8. Step 3: Expanding the Tonal Range using Image: Adjust: Levels Digital cameras are limited in the range of colors they can capture. This can be compensated for using the Levels command. Choose Enhance: Adjust: Lighting: Levels. The mountain in the middle of the dialog box is actually called a Historgram. Historgram
  • 9. Step 3: Expanding the Tonal Range using Image: Adjust: Levels A histogram is a graph of all the tones in the image, ranging from the darkest to the lightest. The triangles beneath the histogram represent the range of colors that the output device is capable of reproducing.
  • 10. Step 3: Expanding the Tonal Range using Image: Adjust: Levels In the histogram you typically see a gap in the lighter tones (on the right) and a gap in the dark tones (left). There is no information there for the printer or monitor to use to reproduce these tones. Drag the white triangle towards the left, Drag the black triangle towards the right. Leave the middle triangle alone. Watch the image carefully to see how the adjustment effects it. Light Tones Dark Tones
  • 11. Step 4: Add Contrast using Image: Adjustments: Curves The Curves command is one of the most powerful features of Photoshop. It allows you to change specific ranges of colors while leaving others untouched. For example, in Step 3 we adjusted the shadows and highlights. They are as we want them to be and we don't want to change them. In this step we will add contrast to the image by adjusting the shadow, highlight and mid tones.
  • 12. Step 4: Add Contrast using Image: Adjustments: Curves Choose Enhance: Adjust Color: Adjust Color Curves… dialog box opens. The Adjust Color Curves dialog box will appear Adjust Color Curves dialog box
  • 13. Step 4: Add Contrast using Image: Adjustments: Curves Select the style of curve that works best from the Select a Style presets. Make additional adjustments by using Adjustment Sliders
  • 14. Step 5: Adjust Color using Levels When colors in an image are shifted towards a color that isn't intentional, this is considered to be a color cast. Fixing a color cast using the Levels palette will be very intuitive.
  • 15. Step 5: Adjust Color using Levels Target the specific channel in the Levels palette by choosing it from the drop down menu titled Channel. Click in the middle arrow a drag it up or down, depending on the requirements of the image. For example, if the image is too red, you can target the Red channel and reduce the red by dragging downwards. If the image is too green, you can reduce the amount of green by dragging upwards in the Red channel, or by dragging downwards in the Green channel. Every image will be slightly different, and will often require slight adjustments in all three channels (Red, Green, Blue).
  • 16. Step 6: Improve Sharpness using Unsharp Mask The final adjustment is to sharpen the image. Every time you scale, rotate, or change the color of an image, you add slight blurring to it. This is in addition to any blurriness that existed in the image before you started working with it. You can compensate for this to a certain degree using the Unsharp Mask filter. Choose Enhance: Unsharp Mask.
  • 17. Step 6: Improve Sharpness using Unsharp Mask The settings for each image will differ, but generally the Radius and the Threshold will be under 5 pixels, while the Amount will be greater than 50%. Move the sliders for each setting while watching the results in the image. The goal is to make the image appear crisper and less blurry without over-sharpening. Oversharpening can appear as "haloing" or mottling near areas where colors contrast sharply, or as an overall "plasticy" appearance. Amount Threshold Radius
  • 18. Step 7: Save Save your edits as a new file. By doing this you will preserve the original image. Later, if you determine the edits were not adequate or different edits need to be accomplished, you will have the option to re-edit the original photo. Click Save As, select JPEG as the Format from the Format drop down menu Format drop down Select JPEG
  • 19. Step 8: Compare The last step is to open the original file and the edited file side by side and compare. Edited Original
  • 20. The 8 Basic Steps to Photo Editing REVIEW Rotate and Crop Fix Flaws Expanding the Tonal Range Add Contrast Adjust Color Improve Sharpness Save Compare