
Recommandé
Contenu connexe
Similaire à 2013 cucabot procedure
Similaire à 2013 cucabot procedure (20)
Plus de Jose
Plus de Jose (20)
Dernier
Dernier (20)
2013 cucabot procedure
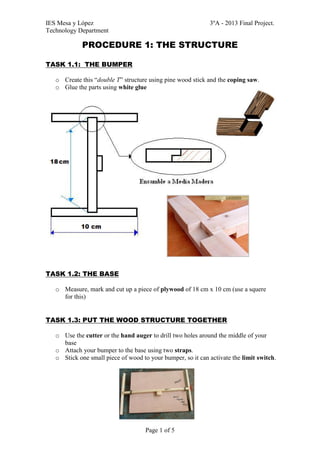
- 1. IES Mesa y López 3ºA - 2013 Final Project. Technology Department Page 1 of 5 PROCEDURE 1: THE STRUCTURE TASK 1.1: THE BUMPER o Create this “double T” structure using pine wood stick and the coping saw. o Glue the parts using white glue TASK 1.2: THE BASE o Measure, mark and cut up a piece of plywood of 18 cm x 10 cm (use a squere for this) TASK 1.3: PUT THE WOOD STRUCTURE TOGETHER o Use the cutter or the hand auger to drill two holes around the middle of your base o Attach your bumper to the base using two straps. o Stick one small piece of wood to your bumper, so it can activate the limit switch.
- 2. IES Mesa y López 3ºA - 2013 Final Project. Technology Department Page 2 of 5 PROCEDURE 2: THE ELECTRIC CIRCUIT This is the electric circuit that you have to create: The limit switch is a toggle (in Spanish, conmutador), with three connections, named C, NO and NC o ‘C’ stands for Common; it is the connection that goes to the motor o ‘N.O.’ stands for Normally Open; this connection goes to one side of your battery holder o ‘N.C.’ stands for Normally Closed; this connection goes to the other side of your battery holder TASK 2.1: TESTING 1. Place all the components (switch, engine, limit switch, batteries) on your table 2. Connect the components using the wire 3. Check that the circuit works TASK 2.2: DRAWING 4. When you have tested the circuit, think how you are going to place the components on your structure 5. Use a pencil to copy the electric circuit on the of your structure Your final circuit will be similar to this:
- 3. IES Mesa y López 3ºA - 2013 Final Project. Technology Department Page 3 of 5
- 4. IES Mesa y López 3ºA - 2013 Final Project. Technology Department Page 4 of 5 PROCEDURE 3: THE MECHANICAL PART The mechanical part of your project will consist of a motor with mechanical reduction, and two shafts. The back shaft is going to be attached to the motor. The front shaft is going to move freely. This is what we call in Spanish “tracción trasera” TASK 3.1: ATTACHING THE MOTOR 1. Use the hot glue gun to attach the motor vertically to one side of your structure TASK 3.2 ATTACHING THE FRONT SHAFT 1. Use the tape measure, the marker and the hacksaw to saw a 14 cm. piece of threaded rod 2. File the threaded rod sides until it is safe 3. Find a small empty tube (a drinking straw or an empty Bic pen is perfect) and insert your shaft inside. This tube will allow your shaft to move freely 4. Glue the tube and to the structure using the hot glue gun. Make sure you glue the shaft perfectly parallel (using a square is a good idea). Otherwise, your car will drift to one side TASK 3.3 ATTACHING THE BACK SHAFT 1. In this task, you need to add an extension to the motor shaft 2. Measure how long is the extension that you need 3. Mark and saw a piece of threaded rod of the desired length 4. Attach this piece of threaded rod to your motor shaft using a terminal block 5. Check the picture for inspiration TASK 3.4 THE WHEELS 1. Use your imagination to create four wheels. You can use bottle lids, tuna cans, used cars lids or you can create your own wheels by sawing them in plywood 2. Attach your wheels to the shafts using a nut and a washer
- 5. IES Mesa y López 3ºA - 2013 Final Project. Technology Department Page 5 of 5 KEY QUESTIONS Can you help me with this, please? Can you give me the (…hacksaw, threaded rod, sand paper, ….), please? How do I (saw, file, attach) this? Is this OK? KEYWORDS o To attach: to connect two parts mechanically o Motor: engine o Battery holder = a place to keep your batteries o To solder = to put together metals using heat o Switch = a device to open and close electric circuits o Limit switch = a device to divert electricity to one way or to other o Tin = a special metal used to solder o Solder = a device used to solder. It can get really hot o Wire = cable o To connect = to join parts of an electric circuit o Shaft = a long piece of metal used to connect wheels FILE or RASP HACKSAW NUT WASHER BRUSH WHITE GLUE PLASTIC STRAPS
- 6. IES Mesa y López 3ºA - 2013 Final Project. Technology Department Page 6 of 5 COPING SAW LIMIT SWITCHHAND AUGER TAPE MEASURE PLYWOOD SANDPAPER THREADED ROD TERMINAL BLOCK PINE WOOD STICKS