Circular swipe gesture gallery – looping through images
•Télécharger en tant que DOC, PDF•
1 j'aime•735 vues

This is another update to the regular swipe gesture gallery that I created in two of my earlier post – post1, post2. This time I have implemented the looping feature for the images. The gallery never ends, instead you swipe it in a circular motion. So, whenever you reach the end of the list, swipe again from right to left across your device’s screen to see the first image and also when you reach the beginning of the list you swipe from left to right of your device’s screen to see the last image again. For the full post download this file or visit the actual blog post link: http://jbkflex.wordpress.com/2012/09/19/circular-swipe-gesture-gallery-looping-through-images/

Recommandé
Contenu connexe
Dernier
Dernier (20)
En vedette
En vedette (20)
Circular swipe gesture gallery – looping through images
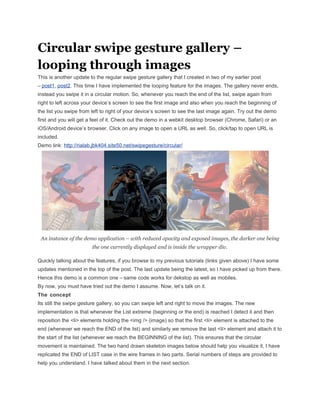
- 1. Circular swipe gesture gallery – looping through images This is another update to the regular swipe gesture gallery that I created in two of my earlier post – post1, post2. This time I have implemented the looping feature for the images. The gallery never ends, instead you swipe it in a circular motion. So, whenever you reach the end of the list, swipe again from right to left across your device’s screen to see the first image and also when you reach the beginning of the list you swipe from left to right of your device’s screen to see the last image again. Try out the demo first and you will get a feel of it. Check out the demo in a webkit desktop browser (Chrome, Safari) or an iOS/Android device’s browser. Click on any image to open a URL as well. So, click/tap to open URL is included. Demo link: http://rialab.jbk404.site50.net/swipegesture/circular/ An instance of the demo application – with reduced opacity and exposed images, the darker one being the one currently displayed and is inside the wrapper div. Quickly talking about the features, if you browse to my previous tutorials (links given above) I have some updates mentioned in the top of the post. The last update being the latest, so I have picked up from there. Hence this demo is a common one – same code works for dekstop as well as mobiles. By now, you must have tried out the demo I assume. Now, let’s talk on it. The concept Its still the swipe gesture gallery, so you can swipe left and right to move the images. The new implementation is that whenever the List extreme (beginning or the end) is reached I detect it and then reposition the <li> elements holding the <img /> (image) so that the first <li> element is attached to the end (whenever we reach the END of the list) and similarly we remove the last <li> element and attach it to the start of the list (whenever we reach the BEGINNING of the list). This ensures that the circular movement is maintained. The two hand drawn skeleton images below should help you visualize it, I have replicated the END of LIST case in the wire frames in two parts. Serial numbers of steps are provided to help you understand. I have talked about them in the next section.
- 2. Implementation There are 7 images in total for the demo that I have created. You can use any number of images you want. The images are considered as slides and I have put them inside <li> elements within a <ul> element. All the basic concepts to set up the HTML, CSS and create the image slides is explained in
- 3. detail in my previous posts. You can start from here. Once you are done with the HTML markup and creating your image slides, its time to add interactivity. I have another post which explains that. You can start here. In this post I will just talk on the changes that I have made to implement the circular feature. First and the major change is adding a transition end event listener to the slide container which is the <ul> element. swipey.slideContainer.addEventListener("webkitTransitionEnd",swipey.handleTra nsitionEnd,false); So whenever the slide container transitions (moves or changes its position) then at the end of each such movement thehandleTransitionEnd function is called. Let us see what is inside it, handleTransitionEnd:function(){ if(swipey.currentDistance == -(swipey.maxDistance - swipey.preferredWidth)) { //console.log("END OF LIST"); swipey.slideContainer.appendChild(swipey.slides[0]); swipey.slideContainer.style.webkitTransitionDuration = "0"; swipey.slideContainer.style.webkitTransform = "translateX(-" + (swipey.maxDistance - 2*swipey.preferredWidth) + "px)"; swipey.currentDistance = -(swipey.maxDistance - 2*swipey.preferredWidth); } if(swipey.currentDistance == 0) { //console.log("BEGINNNING OF LIST"); swipey.slideContainer.insertBefore(swipey.slides[swipey.slides.length - 1],swipey.slides[0]); swipey.slideContainer.style.webkitTransitionDuration = "0";
- 4. swipey.slideContainer.style.webkitTransform = "translateX(-" + swipey.preferredWidth + "px)"; swipey.currentDistance = -swipey.preferredWidth; } } Inside the function I have two if conditions, the first one is when the END of LIST is reached and the second one is when the BEGINNING of LIST is reached. Let’s tackle one by one. END of LIST When user has swiped to the last image, then we need to put our first slide image to the end of the list so that if he swipes again from right to left we have something to show – which should be our first slide image. That’s exactly what I have done in the first statement, the first slide image is appended to the end of the list. swipey.slideContainer.appendChild(swipey.slides[0]); Next, we have to compensate for the removal of the first slide image, due to which a void was created and our second image in the slide filled that up and took the first position in the list due to which each image in the list shifted one position to the left and the current image that is being displayed (inside the wrapper) is also shifted one position to the left and goes out of view, which you don’t want. To compensate that, the next two line are important, swipey.slideContainer.style.webkitTransitionDuration = "0"; swipey.slideContainer.style.webkitTransform = "translateX(-" + (swipey.maxDistance - 2*swipey.preferredWidth) + "px)"; And lastly I update the current position of the slide container. Now, lets see the other one, BEGINNING of LIST Similarly, I handle this case also. When user swipes to the first image, first thing I do is insert the last image slide at the beginning of the list. This is how I do it, swipey.slideContainer.insertBefore(swipey.slides[swipey.slides.length - 1],swipey.slides[0]);
- 5. Next step is to compensate for the removal of the last slide image and putting it to the beginning. This is how I do it, swipey.slideContainer.style.webkitTransitionDuration = "0"; swipey.slideContainer.style.webkitTransform = "translateX(-" + swipey.preferredWidth + "px)"; And then the last statement is to update the current distance. This is it, the two if blocks that we discussed just now makes sure that our swipeable gallery is circular. The rest of the swiping concept is similar to what I have talked in details in my previous posts. So please check them out. Code You can checkout the source code from Google Code using an SVN client: http://rialab.googlecode.com/svn/trunk/looping_swipe_gesture