Step 2 creating a digital urban graffiti wall
•
2 j'aime•3,813 vues

Step 2 creating a digital urban graffiti wall

Recommandé
Contenu connexe
En vedette
En vedette (17)
Plus de ArtfulArtsyAmy
Plus de ArtfulArtsyAmy (20)
Dernier
Dernier (20)
Step 2 creating a digital urban graffiti wall
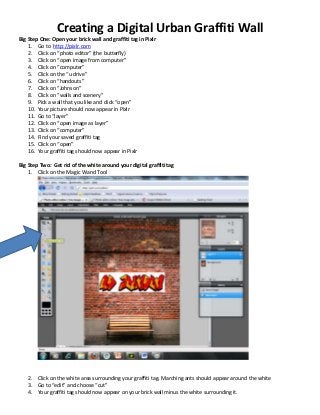
- 1. Creating a Digital Urban Graffiti Wall Big Step One: Open your brick wall and graffiti tag in Pixlr 1. Go to http://pixlr.com 2. Click on “photo editor” (the butterfly) 3. Click on “open image from computer” 4. Click on “computer” 5. Click on the “u drive” 6. Click on “handouts” 7. Click on “Johnson” 8. Click on “walls and scenery” 9. Pick a wall that you like and click “open” 10. Your picture should now appear in Pixlr 11. Go to “layer” 12. Click on “open image as layer” 13. Click on “computer” 14. Find your saved graffiti tag 15. Click on “open” 16. Your graffiti tag should now appear in Pixlr Big Step Two: Get rid of the white around your digital graffiti tag 1. Click on the Magic Wand Tool 2. Click on the white area surrounding your graffiti tag. Marching ants should appear around the white 3. Go to “edit” and choose “cut” 4. Your graffiti tag should now appear on your brick wall minus the white surrounding it.
- 2. 5. Click on the “Toggle Layer Settings” button 6. The “opacity” scale should appear. This will help you make your graffiti tag look more realistic because you can make some of the bricks visible in it. 7. Play with the opacity scale until you like the way your graffiti tag looks.
- 3. 13. Click on “Edit” and scroll down and click on “Free Transform” 8. A sizing box should appear around your graffiti tag. Play with the sizing box until you like the way your graffiti tag looks. When you are done, click outside the box and click “Yes.”
- 4. 9. CONGRATULATIONS! You have made a graffiti wall. Using the previous steps, add more graffiti to your wall. And, remember, it doesn’t just have to words. . .You can add cartoon characters too!! 10. MAKE SURE YOU SAVE! Big Step Three: Making it Awesome 1. You can make your graffiti look even cooler by adding “filters” which effect texture look of your graffiti tags. 2. Click on one of your graffiti layers.
- 5. 3. Click on “Filter” and pick ANY option! 4. Play with the filters and see you like anything. 5. Click on “Adjustments” and see what you can create!