Linux in vbox_install_stepbystep
•
0 j'aime•166 vues

Hi there, here is a pdf with steps to create a virtual disk in the Oracle VM VirtualBox. Oracle VM VirtualBox is a robust virtualisation tool. It also includes steps to install different distributions. I use Debian 8.0 and Cent OS 6.4 as examples here. In creating this document, I also had beginners especially in mind

Recommandé
Contenu connexe
Tendances
Tendances (15)
Similaire à Linux in vbox_install_stepbystep
Similaire à Linux in vbox_install_stepbystep (20)
Dernier
Dernier (20)
Linux in vbox_install_stepbystep
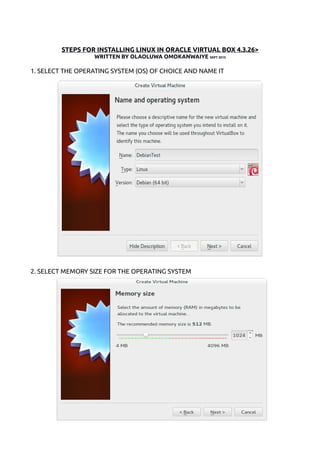
- 1. STEPS FOR INSTALLING LINUX IN ORACLE VIRTUAL BOX 4.3.26> WRITTEN BY OLAOLUWA OMOKANWAIYE SEPT 2015 1. SELECT THE OPERATING SYSTEM (OS) OF CHOICE AND NAME IT 2. SELECT MEMORY SIZE FOR THE OPERATING SYSTEM
- 2. 3. LEAVE AS DEFAULT WITHOUT CHANGES FOR HARD DRIVE 4. HARD DRIVE FILE TYPE -LEAVE AS DEFAULT
- 3. 5. STORAGE ON HARD DRIVE, YOU CAN CHOOSE EITHER OR LEAVE AS DEFAULT 6. SELECT FILE LOCATION SIZE
- 4. 7. YOUR NEW OS IS CREATED 8. SELECT YOUR NEW OS - GO TO SETTINGS AND SELECT STORAGE, THEN SELECT EMPTY AND THEN THE DISC ICON ON THE EXTREME RIGHT TO NAVIGATE TO THE INSTALLATION SOURCE OF YOUR OS (FOR EXAMPLE, AN ISO FILE OR CD-ROM DRIVE). WHEN DONE SELECT OK
- 5. STEPS FOR DEBIAN INSTALLATION 1. AFTER CONCLUDING THE ABOVE STEPS SELECT YOUR NEW OS AND CLICK START 2. YOUR OS WILL BOOT FOR INSTALLATION, SELECT YOUR INSTALLATION CHOICE (SERVER INSTALL OR GUI – IN THIS EXAMPLE, WE DO A SERVER INSTALL)
- 6. 3. SELECT LANGUAGE OF CHOICE 4. SELECT LOCATION
- 7. 5. SELECT KEYBOARD TYPE 6 ENTER HOSTNAME – THIS WILL BE THE NAME OF YOUR COMPUTER ON THE NETWORK
- 8. 7. YOU PUT A DOMAIN NAME (FOR EXAMPLE: SURVEILLANCE.LOCAL, YOU CAN IGNORE THIS STEP AND CONTINUE IF YOU DO NOT NEED IT) 8. SET UP ROOT PASSWORD (FEEL FREE TO READ THE PIECE OF INFORMATION IF YOU DO NOT WANT ROOT PASSWORD)
- 9. 9 SET UP THE NORMAL USER ACCOUNT 10. GIVE YOUR USER NAME
- 10. 11 SELECT AND CONFIRM A PASSWORD FOR YOUR USER 12 PARTITION DISK (SINCE ITS WITHIN A VIRTUAL ENVIRONMENT, SELECT ENTIRE DISK AND USE LVM FOR BETTER FEATURES – PRESS ENTER)
- 11. 13 PRESS ENTER 14. CHOOSE AND PRESS ENTER
- 12. 15. PRESS TAB TO SELECT YES AND PRESS ENTER TO CONFIRM 16. PRESS ENTER TO FINISH PARTITIONING
- 13. 17. SELECT YES USING THE TAB KEY TO FINISH WRITING TO DISK 18. INSTALLATION COMMENCES – TAKE A CUP OF TEA AND SIP
- 14. 19. CONFIGURING PACKAGE MANAGER - SELECT NO 20 PARTICIPATE IN SURVER – SELECT NO EXCEPT YOU FEEL OTHER WISE
- 15. 21. SELECT SPECIFIC SOFTWARES YOU WANT TO INSTALL BUT SINCE IT'S A SERVER, IN THIS EXAMPLE WE CHOOSE SSH & STANDARD SYSTEM UTILITIES ALONE. (USE SPACEBAR TO SELECT OR DESELCT WHEN DONE, PRESS ENTER) 22. FINISH BY SELECTING YES, USING TAB, TO INSTALLING GRUB TO MASTER BOOT RECORD (MBR).
- 16. 23 TO AVOID YOUR NEWLY INSTALLED OS GOING TO INSTALLATION MODE ON REBOOT, USE THE CLOSE BUTTON TO POWER IT OFF AND THEN GO TO SETTINGS FOR YOUR NEW OS 24. USE THE ARROW KEYS TO MAKE HARD DISK FIRST AND CD/DVD SECOND, YOU CAN DESELECT THE FLOPPY. WHEN DONE SELECT OK AND START YOUR OS.
- 17. STEPS FOR CENT OS INSTALLATION 1. Here we will be Desktop installation using Cent OS 6.4 (64bit). To start create a virtual disk space for the Cent OS as by following the steps in “STEPS FOR INSTALLING LINUX IN A VIRTUAL BOX” above. 2. Now that the Cent OS Virtual Disk is created, navigate to the installation source of your OS (for example, an ISO FILE OR CD-ROM DRIVE) by going to settings and select storage, then select empty and then the disc icon on the extreme right. When done, select OK
- 18. 3. Navigate to source location of the OS 4. When done, select OK.
- 19. 5. Time to start your OS 6. Press Enter
- 20. 7. Media Test – You can press tab to skip, then press enter 8. Click on Next
- 21. 9. Select Installation language 10. Select keyboard type
- 22. 11. Select type of device installation will involve - Select Basic Storage Devices. 12. Type a host name to identify your CentOS on the network
- 23. 13. Select your geographic location. 14. Create a secure root password for the root user
- 24. 15. Save by writing changes to disk. 16. Now, choose software to install and most importantly, select “Customize now”
- 25. 17. Install applications of your choice 18. For a Desktop install, select Desktop Manager(s) of your choice
- 26. 19. When done, click on Next to continue installation. 20. Installation commences...
- 27. 21. ...and progresses so take a cup of tea or smoothies. 22. When done, reboot your newly installed Cent OS system.
- 28. 23. Click Forward on the Welcome screen. 24. Agree with License and continue
- 29. 25. Create a standard user. 26. Set date and time and click forward.
- 30. 27. Ignore kdump error and click finish. 28. Log in with username...
- 31. 29. ...and enjoy your new system. 30. When you power off your Cent OS, remember to make hard disk first and CD/DVD second. Go to Settings, then System and use the arrow keys to switch boot medium. WHEN DONE SELECT OK