1. The Grass IS Greener - Step By Step
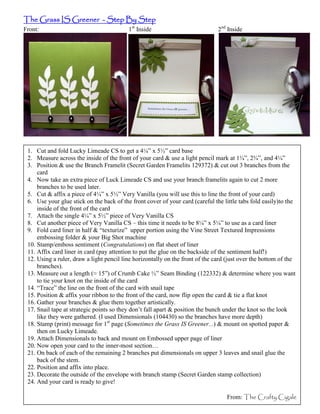
Front: 1st Inside 2nd Inside
1. Cut and fold Lucky Limeade CS to get a 4¼” x 5½” card base
2. Measure across the inside of the front of your card & use a light pencil mark at 1¼”, 2¾”, and 4¼”
3. Position & use the Branch Framelit (Secret Garden Framelits 129372) & cut out 3 branches from the
card
4. Now take an extra piece of Luck Limeade CS and use your branch framelits again to cut 2 more
branches to be used later.
5. Cut & affix a piece of 4¼” x 5½” Very Vanilla (you will use this to line the front of your card)
6. Use your glue stick on the back of the front cover of your card (careful the little tabs fold easily)to the
inside of the front of the card
7. Attach the single 4¼” x 5½” piece of Very Vanilla CS
8. Cut another piece of Very Vanilla CS – this time it needs to be 8¼” x 5¼” to use as a card liner
9. Fold card liner in half & “texturize” upper portion using the Vine Street Textured Impressions
embossing folder & your Big Shot machine
10. Stamp/emboss sentiment (Congratulations) on flat sheet of liner
11. Affix card liner in card (pay attention to put the glue on the backside of the sentiment half!)
12. Using a ruler, draw a light pencil line horizontally on the front of the card (just over the bottom of the
branches).
13. Measure out a length (≈ 15”) of Crumb Cake ½” Seam Binding (122332) & determine where you want
to tie your knot on the inside of the card
14. “Trace” the line on the front of the card with snail tape
15. Position & affix your ribbon to the front of the card, now flip open the card & tie a flat knot
16. Gather your branches & glue them together artistically.
17. Snail tape at strategic points so they don’t fall apart & position the bunch under the knot so the look
like they were gathered. (I used Dimensionals (104430) so the branches have more depth)
18. Stamp (print) message for 1st page (Sometimes the Grass IS Greener...) & mount on spotted paper &
then on Lucky Limeade.
19. Attach Dimensionals to back and mount on Embossed upper page of liner
20. Now open your card to the inner-most section…
21. On back of each of the remaining 2 branches put dimensionals on upper 3 leaves and snail glue the
back of the stem.
22. Position and affix into place.
23. Decorate the outside of the envelope with branch stamp (Secret Garden stamp collection)
24. And your card is ready to give!
From: The Crafty Cigale