Howdy Bluebonnet Sign Instructions
•Télécharger en tant que DOCX, PDF•
1 j'aime•130 vues


Recommandé
Contenu connexe
Tendances
Tendances (12)
En vedette
En vedette (11)
Similaire à Howdy Bluebonnet Sign Instructions
Similaire à Howdy Bluebonnet Sign Instructions (20)
Plus de LSC-CyFair Academy for Lifelong Learning
Plus de LSC-CyFair Academy for Lifelong Learning (20)
Dernier
Dernier (20)
Howdy Bluebonnet Sign Instructions
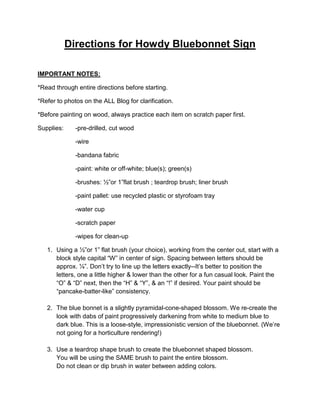
- 1. Directions for Howdy Bluebonnet Sign IMPORTANT NOTES: *Read through entire directions before starting. *Refer to photos on the ALL Blog for clarification. *Before painting on wood, always practice each item on scratch paper first. Supplies: -pre-drilled, cut wood -wire -bandana fabric -paint: white or off-white; blue(s); green(s) -brushes: ½”or 1”flat brush ; teardrop brush; liner brush -paint pallet: use recycled plastic or styrofoam tray -water cup -scratch paper -wipes for clean-up 1. Using a ½”or 1” flat brush (your choice), working from the center out, start with a block style capital “W” in center of sign. Spacing between letters should be approx. ¼”. Don’t try to line up the letters exactly--It’s better to position the letters, one a little higher & lower than the other for a fun casual look. Paint the “O” & “D” next, then the “H” & “Y”, & an “!” if desired. Your paint should be “pancake-batter-like” consistency. 2. The blue bonnet is a slightly pyramidal-cone-shaped blossom. We re-create the look with dabs of paint progressively darkening from white to medium blue to dark blue. This is a loose-style, impressionistic version of the bluebonnet. (We’re not going for a horticulture rendering!) 3. Use a teardrop shape brush to create the bluebonnet shaped blossom. You will be using the SAME brush to paint the entire blossom. Do not clean or dip brush in water between adding colors.
- 2. Liberally dip the brush into the white paint for the tip of blossom. Gradually add a bit of the med. blue paint, without cleaning your brush, (white paint is still on). The desired effect is to see both colors with each dab. Make a few more dabs for blossoms, interweaving the spacing, & leaving some background showing through. Now, again without cleaning your brush, add the dark blue dabs of paint & make the bottom of the blossom a little wider than the rest of your strokes. The overall look of the blossom should be white at the top; a mix of white & blue in the middle to create a medium color blue; and finally a darker blue at the bottom of the blossom. After practicing the blossom to your satisfaction, strategically place the blossoms to the sides and around your HOWDY letters to enhance , but not to obscure your letters. 4. Using a small, thin liner brush, twist the brush slightly in your hand while loading it with the green & white paint for stems, grasses, & leaves. After practicing on scratch paper, add small stems, grasses &/or leaves to your bluebonnets. 5. Insert the hanging wire from back to front of sign through pre-drilled holes. Twist approximately 1” of the ends a swirly knot using a pair of needlenose pliers to secure the ends. 6. Tie on the little bandana accent to wire hanger. HAPPY TRAILS!