
Recommandé
Contenu connexe
Tendances
Tendances (15)
En vedette
En vedette (20)
Similaire à Ppt c busilacchi
Similaire à Ppt c busilacchi (20)
Plus de María Ernestina Alonso
Plus de María Ernestina Alonso (9)
Dernier
Dernier (20)
Ppt c busilacchi
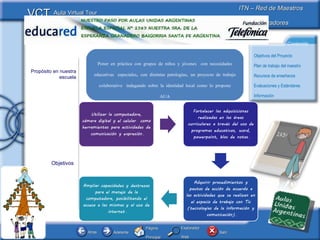
- 1. Propósito en nuestra escuela Objetivos Poner en práctica con grupos de niños y jóvenes con necesidades educativas especiales, con distintas patologías, un proyecto de trabajo colaborativo indagando sobre la identidad local como lo propone AUA formando una comunidad diversa .
- 2. Software Edades Alumnos con necesidades educativas especiales de 12 a 21 años con diversas patologías .
- 3. Autores Profesora Carolina Busilacchi en la Escuela Especial N° 1383 Educared Argentina desarrolló este proyecto colaborativo a través de internet para conformar una comunidad de aprendizaje en red AUA ofrece orientación y capacitación para las instituciones y docentes participantes, y un espacio de trabajo, intercambio y publicación .
- 4. Plan de trabajo del maestro
- 6. Áreas de aprendizaje Contenidos
- 8. Evaluaciones
- 9. Estándares tomados en cuenta para evaluar
- 10. Información VIDEOS http://www.dailymotion.com/Carito36 DESPEDIDA BLOG AUA 2009 http://proyectoaua09.blogspot.com/2009/11/nuestros-mensajes-y-despedida.html FESTIVAL DE PRESENTACIONES AUA 2007 http://www.educared.org.ar/aua/2007/festival/index.asp ESPACIO DE TRABAJO http://www.educared.org.ar/aua/2007/proyectos/formatob.asp?id=18&pag=2&tra=19&sub=0 ESPACIO DE TRABAJO 2008 http://www.educared.org.ar/comunidades/aua/2008/proyectos/formatoa.asp?id=9&pag=1&tra=25&sub=0 BLOG AUA 2010 http://aulasunidas2010.blogspot.com/search?updated-max=2010-06-21T18%3A58%3A00-07%3A00&max-results=7 PORTAL GLOBAL EDUCARED http://www.educared.org/global/esc uela-blog-06/celebramos-el-25-de-mayo-en-2010
Notes de l'éditeur
- This Virtual Classroom Tour template has been provided so you can develop your own Virtual Classroom Tours. Use the template to record a special learning project that you have found particularly successful in your classroom. Then share the project with other teachers in your school, district or beyond. Here’s how: Follow the prompts on each slide and in the embedded Word documents, in this PowerPoint document, to insert your project information. When you have finished inputting all of the project information that is requested, delete the prompts. Select each one and press the Delete key. Note: To enter the title of your Virtual Classroom Tour you must select View , Slide Master , and enter it on the slide master. You might also wish to insert a picture illustrating the subject of your Classroom Learning Resource. Then click Close Master View . This will cause the title and picture to appear on each of the slides. From the Office Button menu choose Save As … and save the document as a PowerPoint Presentation . You can then distribute the Virtual Classroom Tour.
- Open the Word documents at the bottom of each slide by double clicking the icons. Follow the prompts [in the yellow boxes] for inserting information about your learning project.
- On this slide, embed the student handouts and the resources created for this project. Some examples are a student project overview, Internet and other resources, directions for art projects, or instructions to students for peer editing of projects. To embed the resources, follow these steps: Have the resource document available. From the Insert menu choose Object . Select Create from File… and click Browse… . Find the file you want to include and click OK . Select Display as icon and click Change Icon… and add a suitable caption. Click OK to add the caption and click OK to embed the file. Position the document icon at the bottom of the slide. You can go to View , Grid and Guides , and click Display Grid on Screen for a grid on which to line up your icons. Remember to activate an Object action from the Insert banner.
- Add any assessment materials you developed for the project to this slide. Have the resource document available. From the Insert menu choose Object . Select Create from File… and click Browse… . Find the file you want to include and click OK . Select Display as icon and click Change Icon… and add a suitable caption. Click OK to add the caption and click OK to embed the file. Position the document icon at the bottom of the slide. You can go to View , Grid and Guides , and click Display Grid on Screen for a grid on which to line up your icons. Remember to activate an Object action from the Insert banner. To include the Standards targeted through your learning project, open the Mapping the Standards document and then add your own standards at the bottom of the document. Links are included to help you search for local curriculum and technology standards.
- On this slide you should add pictures and information about your school and yourself.