
Recommandé
Contenu connexe
Tendances
Tendances (19)
En vedette
En vedette (15)
Similaire à Quilted Chair Caddy
Similaire à Quilted Chair Caddy (20)
Dernier
Dernier (15)
Quilted Chair Caddy
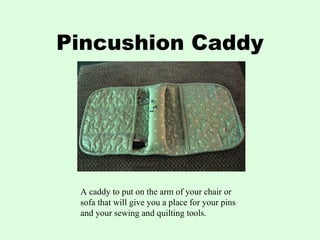
- 1. Pincushion Caddy A caddy to put on the arm of your chair or sofa that will give you a place for your pins and your sewing and quilting tools.
- 2. What Do You Need? • 1/2 Yard Fabric* • Coordinating Thread • Scraps of Batting • Stuffing * I used slightly more because I cut the binding on the bias since I rounded the corners. This is optional.
- 3. Step One From fabric, cut two strips across the width of the fabric 2-1/4” or your preferred binding width. Cut two 9” x 22” pieces and four 7” x 9” pieces. From batting, cut one 9” x 22” piece and two 7” x 9” pieces.
- 4. Step Two Sandwich the batting between the layers of the pieces of fabric with the wrong sides of the fabric facing the batting. You should have one large and two small “sandwiches.” Use your preferred method to baste the layers together for quilting. You could hand baste, use pins or use basting spray. At this point ONLY quilt the two small 7” x 9” sandwiches. I used a meandering stitch but straight lines would work great too.
- 5. Step Three Join the two strips that you cut for binding and press in half.
- 6. Step Four Trim the two small pieces that you have quilted to a finished size of 6” x 8”. Cut two 8” pieces of your pressed binding and sew binding to one 8” edge of each piece. Finish binding as desired by machine or by hand.
- 7. Step Five Before you quilt the large sandwich you need to do some measuring and marking. You are going to quilt the piece, but NOT a 4” strip down the middle. You can mark it however you prefer but I used blue painter’s tape to mark the area that you do not want to quilt. My tape is on the inside of the 4” strip. After marking, quilt both ends in the same manner you quilted the smaller pieces.
- 8. Step Six After quilting the larger piece, trim it to a finished size of 8” x 20”. Don’t remove the tape or marking yet. Be sure when you trim that the 4” unquilted strip is in the center of the rectangle.
- 9. Step Seven The next step is to fold the long piece in half. The unquilted end should be folded exactly in half. Remove one piece of your tape (if you used tape) and then sew along the other through both layers. This will make a tube of the unquilted 4” center section. Remove tape.
- 10. Step Eight Open out the long quilted piece with the “tube” on the top. Flatten the tube on one end and sew the end shut with a very narrow seam. Stuff the tube with polyester stuffing from the open end. When you decide it’s full enough, flatten out the open end and sew flat to the rectangle with a narrow hem.
- 11. Step Nine Next pin the two smaller pieces to each end of the large rectangle. Decide if you want to create any narrow pockets. If so, stitch from the edge of the binding in a straight line to the bottom. The photo isn’t great, but I did sew two pockets on the right side.
- 12. Step Ten If you want to round the corners (which means you should really cut your binding on the bias) the quickest and easiest way is to place something round on the corner and draw around it with a pencil or marking pen and cut on the line.
- 13. Step Eleven To finish all you need to do is add the binding around the outside edge and add your scissors, a pencil, some pins and you’re ready to do something productive.
- 14. And…That’s All Until Next Month!