SlideShare une entreprise Scribd logo
1  sur  22
Télécharger pour lire hors ligne
BASIC COMMANDS
#### TO CHECK THE PRESENT WORKING LOCATION ####
# pwd
#### TO CHECK THE CONTENTS OF DIRECTORY ####
# ls
#### TO CHECK THE PROPERTIES OF FILES & DIRECTORIES ####
# ll
#### TO CHECK THE HIDDEN FILES & DIRECTORIES ####
# ls –a
#### TO CHECK THE INODE NUMBER OF FILES & DIRECTORIES ####
# ls –i
#### TO CREATE A FILE WITH DATA ####
# cat > (filename)
# cat > linux
This is linux
Press ctrl+D to save & quit the file
# cat linux (to read the file)
#### TO APPEND THE DATA WITHOUT OVERWRITING ####
# cat >> linux
Added data by root
Press ctrl+D to save & quit the file
# cat linux (read the file)
#### TO CREATE MULTIPLE FILES WITHOUT DATA ####
# touch unix solaris redhat
# ls (to check)
#### TO CREATE A DIRECTORY ####
# mkdir <dir_name>
# mkdir zoom
# ls (to check)
# cd zoom (to enter into dir)
# cd (to come out)
#### TO CREATE A MULTIPLE DIRECTORIES ####
# mkdir zoom1 zoom2 zoom3 zoom4
# ls (to check)
#### TO CREATE A PARENT DIRECTORY ####
# mkdir –p world/asia/india/ap/hyd/dsnr/zoom
# ls –R world (to check)
#### NAVIGATION OF DIRECTORIES ####
# cd world/asia/india/ap/hyd/dsnr/zoom
# pwd (to check)
# cd .. (to come 1 step back)
# cd ../.. (to come 2 step back)
# cd ../../.. (to come 3 step back)
# cd – (to go at last working directory)
# cd (to go at user home directory)
# pwd (to check)
#### TO CHECK AND CHANGE THE DATE & TIME ####
# date (to check)
# date –s “wed Mar 19 12:00:00 IST 2014”
#### TO CHECK THE CALENDER ####
# cal (for current month & year)
# cal 2014 (for year)
# cal 5 2014 (for particular month & year)
#### TO OPEN THE CALCULATOR ####
# bc
1+2+3
7
Type „q‟ to come out
#### TO GET THE HELP RELATED TO ANY COMMAND ####
# man <command name>
# man cat (for example)
Type „q‟ to come out
#### TO SHUTDOWN THE SYSTEM ####
# init 0
#### TO RESTART THE SYSTEM ####
# init 6
#### TO SEARCH FILES OR DIRECTORIES ####
# find / -iname <filename or dirname>
#### TO ACCESS ANY LOCATION IN GUI ####
# nautilus <Path>
# nautilus /etc (for example)
#### TO COPY A EXISTING FILE WITH NEW NAME ####
# cp <source_file> <new_name>
# cp linux unix
# ls (to check)
# cat unix (to read)
#### TO COPY FILE INTO DIFFERENT LOCATION ####
# cp (filename) (destination)
# cp linux /opt
# ls /opt (to check)
#### TO COPY MULTIPLE FILES ####
# cp unix redhat solaris /opt
# ls /opt (to check)
#### TO COPY DATA FROM SOURCE FILE TO DESTINATION WITHOUT
OVERWRITING ####
# cat (source_file) >> (destination_file)
# cat linux >> redhat
# cat redhat (to check)
#### TO COPY A DIRECTORY ####
# cp –rv (source_dir) (destination)
# cp –rv zoom /opt
# ls /opt (to check)
#### TO COPY MULTIPLE DIRECTORIES ####
# cp –rv zoom1 zoom2 zoom3 /opt
# ls /opt (to check)
#### TO COPY COMPLETE DATA FROM PRESENT WORKING LOCATION ####
# cp –rv * /media
# ls /media (to check)
#### TO CUT & PASTE FILE OR DIRECTORIES ####
# mv (source_dir or file) (destination)
# mv zoom /mnt
# ls (to check)
# ls /mnt (to check)
#### TO RENAME A FILE OR DIRECTORY ####
# mv (existing_name) (new_name)
# mv zoom1 zoomgroup
# ls (to check)
#### TO REMOVE A FILE OR DIRECTORY ####
# rm (filename)
# rm –rf (directory_name)
#### TO OPEN THE TASK MANAGER ####
# ps –aux
#### TO KILL THE PROCESS OF RUNNING APPLICATION ####
# kill -9 (process_id)
# kill -9 2354 (for example)
#### TO CHECK THE CONFIGURATION OF CPU ####
# cat /proc/cpuinfo
#### TO CHECK THE RUNNING PROCESS OF CPU ####
# top
#### TO CHECK THE OS VERSION ####
# cat /etc/redhat-release
#### TO CHECK THE LAST LOGIN TIME ####
# last
(1)USER ADMINISTRATION PRACTICAL STEPS
'#### TO CREATE A USER ####'
# useradd <username>
# useradd tom
'#### TO CHECK THE USER DETAILS ####'
# cat /etc/passwd (for complete details)
# tail /etc/passwd (for last 10 users details)
# tail -3 /etc/passwd (for last 3 users details)
# head /etc/passwd (for top 10 users details)
# head -3 /etc/passwd (for top 3 users details)
# grep tom /etc/passwd (for particular user details)
'#### ASSIGNING A PASSWORD TO USER ####'
# passwd <username>
# passwd tom
Password: 1
Re-Password: 1
'#### TO CHECK THE USER PASSWORD DETAILS ####'
# cat /etc/shadow
# tail /etc/shadow
'#### TO CHECK THE PASSWORD ENCRYPTION TOOL ####'
# passwd -S <username>
# passwd -S tom
'#### TO CHANGE THE PASSWORD ENCRYPTION TOOL ####'
# authconfig-tui
By pressing spacebar key uncheck the option USE MD5
Click on NEXT
# useradd jack (create a user)
# passwd jack (assign the password)
# passwd -S jack (check the password tool)
'#### TO LOGIN WITH A USER ####'
# su - tom (In root Console)
# exit (to logout)
# gdmflexiserver (to open extra graphical console)
Select the user and enter the password
Create Some Data
Go to root console by pressing ctrl+alt+F1
And check the user data
# ls /home/tom/Desktop
# who (to get the details of active users)
'#### TO LOCK A USER ####'
# usermod -L <username>
# usermod -L tom
# grep tom /etc/shadow (to check)
'!' sign indicates that a user is lock
# gdmflexiserver
Try to login with user tom
'#### TO UNLOCK A USER ####'
# usermod -U <username>
# usermod -U tom
# grep tom /etc/shadow (to check)
# gdmflexiserver
Try to login with user tom
'#### TO CHECK THE MAIL ACCOUNT OF USERS ####'
# cd /var/spool/mail
# ls (to check)
'#### TO CHECK THE GROUP OF THE USER ####'
# tail /etc/group
'#### TO CHECK THE AVAILABLE SHELLS ####'
# cat /etc/shells
(2)USER MODIFCATION PRACTICAL STEPS
'### TO ASSIGN THE COMMENT ###'
# useradd tom (create one user)
# tail /etc/passwd (to check)
# usermod -c <comment> <username>
# usermod -c "Sales Dept" tom
# grep tom /etc/passwd (to check)
'### TO CHANGE THE UID ###'
# useradd jack (create one more user)
# tail -2 /etc/passwd (to check)
To Provide User:jack Previlages to User:tom
# usermod -u <ID> -o <username>
# usermod -u 501 -o tom
# tail -2 /etc/passwd (to check)
Login with both the user's to check the result
'### TO CHANGE THE GID ###'
# groupmod -g <ID> <username>
# groupmod -g 600 tom
# grep tom /etc/passwd (to check)
Changing the GID means,taking the Group Previlages
'### TO CHANGE THE SHELL ###'
# cat /etc/shells (to check availabel shells)
# usermod -s <shell> <username>
# usermod -s /sbin/nologin tom (to block account)
# grep tom /etc/passwd (to check)
# su - tom (try to access tom account)
'### TO LOCK THE USER ACCOUNT ###'
# usermod -L <username>
# usermod -L jack (to lock)
# grep jack /etc/shadow (to check)
'!'sign indicates that the user account is lock
# gdmflexiserver (open one gui console)
Select the User:jack & try to login
# usermod -U tom (to unlock)
# grep jack /etc/shadow (to check)
# gdmflexiserver (open one gui console)
Select the User:jack & try to login
'### TO CHANGE THE USER HOME DIRECTORY ###'
# vi /etc/default/useradd (open this file)
Do the Modification in the HOME line,as below
HOME=/media
:wq(save & quit the file)
# useradd jerry (create one user)
# tail /etc/passwd (to check)
'### TO CHANGE THE USERNAME ###'
# usermod -l <newname> <oldname>
# usermod -l tom123 tom
# tail /etc/passwd (to check)
'### TO REMOVE A USER ###'
# userdel jack (to remove a user without its home directory &
mail account)
# tail /etc/passwd (to check)
# ls /home (to check home dir)
# ls /var/spool/mail (to check mail accout)
# userdel -r tom123 (to remove a user with its home directory &
mail account)
# tail /etc/passwd (to check)
# ls /home (to check)
# ls /var/spool/mail (to check)
(3)GROUP ADMINISTRATION PRACTICAL STEPS
Create 5 Users
'#### TO CREATE A GROUP ####'
# groupadd <group_name>
# groupadd zoom
# tail /etc/group (to check)
'### TO ADD A SINGLE USER INTO GROUP ###'
# gpasswd -a <username> <groupname>
# gpasswd -a a1 zoom
# grep zoom /etc/group (to check)
'### TO ADD MULTIPLE USERS INTO GROUP ###'
# gpasswd -M a2,a3,a4 zoom
# grep zoom /etc/group (to check)
Note:-Adding Multiple Users Into the Group may get overwrite on
the existing users.So Without Overwriting to add a user then use
the above option(gpasswd -a)
'### TO REMOVE A USER FROM GROUP ###'
# gpasswd -d <username> <groupame>
# gpasswd -d a4 zoom
# grep zoom /etc/group (to check)
'### TO MAKE A USER AS GROUP ADMIN ###'
# gpasswd -A <username> <groupname>
# gpasswd -A a2 zoom
# grep zoom /etc/gshadow (to check)
# su - a2 (to check,login as a user)
# gpasswd -d a3 zoom (try to remove)
# gpasswd -a a5 zoom (try to add)
# grep zoom /etc/group (to check)
# exit (logout)
# gpasswd -A "" zoom (to remove the previlages)
# grep zoom /etc/gshadow (to check)
'### TO RENAME A GROUP ###'
# groupmod -n <newname> <oldname>
# groupmod -n zoomgroup zoom
# tail /etc/group (to check)
'### TO REMOVE A GROUP ###'
# groupdel zoomgroup
# tail /etc/group (to check)
(4)PERMISSIONS PRACTICAL STEPS
#### BASIC PERMISSION ####
'### APPLYING A BASIC PERMISSION ON DIRECTORY ###'
# useradd tom (create one user)
# su - tom (login as a user)
# cd /root (try to access root dir)
# exit (logout)
# ls -ld /root (check the permission)
(1)To Apply Execute Permission on Directory
# chmod 751 /root
# ls -ld /root (to check)
# su - tom
# cd /root (try to access)
# ls (to read - ERROR)
# exit (logout)
(2)To Apply Read & Execute Permission on Dir
# chmod 755 /root
OR
# chmod u=rwx,g=rx,o=rx /root
# ls -ld /root (to check)
# su - tom
# cd /root
# ls (to read)
# touch tom (to write - ERROR)
# exit (logout)
(3)To Apply Read,Write & Execute Permission on Dir
# chmod 777 /root
OR
# chmod u=rwx,g=rwx,o=rwx /root
OR
# chmod a=rwx /root
# ls -ld /root (to check)
# su - tom
# cd /root
# ls (to read)
# touch tom (to write)
# exit (logout)
'#### BASIC PERMISSION ON FILE ####'
# cat > linux (create one file in /root dir)
# su - tom
# cd /root
# cat linux (to read)
# cat >> linux (to write - ERROR)
# exit
# ll linux (check the permission)
To Apply Read & Write Permission file
# chmod 666 linux
# ll linux (to check)
# su - tom
# cd /root
# cat linux (to read)
# cat >> linux (to write)
# exit
'#### TO CHANGE THE OWNER OF THE FILE ###'
Create 3 more users (for ex:a1,a2,a3)
# cat > unix (create one more file in /root)
# ll unix (check the permission)
For the User:a1-rw permission on unix file
# chown <username> <filename>
# chown a1 unix
# ll linux (to check)
# su - a1 (to check-login as a user)
# cd /root
# cat unix (to read)
# cat >> unix (to write)
# exit (logout)
'#### TO CHANGE THE GROUP OWNER OF THE FILE ####'
For the User:a2,a3-zero permission on unix file
# groupadd zoom (create one group)
# gpasswd -M a2,a3 zoom (add two users in group)
# chgrp <groupname> <filename>
# chgrp zoom unix (to change group owner)
# chmod 604 unix (provide zero permision in group)
# ll unix (to check)
To Check the Result Login As a User:a2,a3 and access the unix
file in /root directory
###### ADVANCE PERMISSION ######
TO APPLY ADVANCE PERMISSION ON DIRECTORY
# chmod 1777 /root
'1'for applying advance (sticky bit) permission only on
directories to avoid data deleting
# ls -ld /root
't'sign is the indication of Advance Permission
# su - tom (login as a normal user)
# cd /root (access root directory)
# rm -rf * (try to remove the data)
# exit (logout)
###### ACL PERMISSION ######
Create 6 Users (for ex:a1 to a6)
# cat > linux (create one file in /root)
# ll linux (to check the permission)
'For the User:a1 - Read & Write Permission'
# setfacl -m u:a1:rw linux (to assign acl)
# ll linux (to check)
'+'sign is the indication of acl permission
# su - a1 (to check-login as a user)
# cd /root
# cat linux (to read)
# cat >> linux (to write)
# exit (logout)
'For the User:a2 - Read & Execute Permission'
# setfacl -m u:a2:rx linux
# getfacl linux (to check acl permission in detail)
Login as a User:a2 & Check the Result
'For the User:a3 - Read,Write & Execute Permision'
# setfacl -m u:a3:rwx linux
# getfacl linux (to check)
Login as a User:a3 & Check the Result
'For the User:a4 - Write Permission'
# setfacl -m u:a4:w linux
# getfacl linux (to check)
Login as a User:a4 & Check the Result
'For the User:a5,a6 - Zero Permission'
# groupadd zoom (create one group)
# gpasswd -M a5,a6 zoom
# setfacl -m g:zoom:0 linux (to assign on group)
# getfacl linux (to check)
Login as a user:a5,a6 & check the result
'To Remove the ACL Permission from single user'
# setfacl -x u:a4 linux (to remove)
# getfacl linux (to check)
'To Remove the ACL Permission Completely from file'
# setfacl --remove-all linux
# getfacl linux (to check)
# ll linux (to check)
(5)PARTITIONS PRACTICAL STEPS
'Step 1:-Check the Existing Partitions'
# fdisk -l (to check)
'Step 2:-To create a New Partition'
# fdisk /dev/sda
Press 'm' for help
Press 'p' to check the exisiting partitions
Press 'n' to create a new partition
Enter the Size: +1G (for example)
Press 'p' to check
Press 'w' to save & quit
'Step 3:-Activate the New Changes to Kernel'
# partx -a /dev/sda (run this 2 times)
'Step 4:-Format the Partition'
# mkfs.ext4 <partition_no>
# mkfs.ext4 /dev/sda8 (for example)
'Step 5:-To Use the Partition-Create Mount Point'
# mount <partition_no> <mount_point>
# mount /dev/sda8 /mnt
# mount (to check)
# cd /mnt (to access the partition)
# ls (to check)
'lost+found' dir is the indication of partition
# mkdir zoom{1..100} (create some data)
# ls (to check)
'#### TO CHECK THE FILESYSTEM OF PARTITIONS ####'
# blkid
'#### TO CHECK THE FREE SPACE OF THE PARTITION ###'
# df -h
'#### TO CHECK THE USED SPACE OF THE PARTITION ####'
# du –sh
'#### TO CHECK THE FREE SPACE OF THE HARDISK ####'
# parted
Type: print free
Type: quit (to come out)
'#### TO REMOVE THE MOUNT POINT(LINK) ####'
# umount <partition_no>
# umount /dev/sda8 (for example)
# mount (to check)
'#### TO DO THE PERMANENT MOUNTING ####'
# vim /etc/fstab (open this file)
Come at last & do the changes as given below
/dev/sda11 /mnt ext4 defaults 0 0
'partition_no' 'mount_pt' 'filesystem'
:wq(save & quit the file)
# init 6 (reboot the pc)
# mount (to check the permanent mount point)
(6)LVM PRACTICAL STEPS
##### TO IMPLEMMENT LVM ON PARTITIONS #####
'Step 1:-Create 3 Raw Partitions'
# fdisk -l (to check)
# fdisk /dev/sda (to create-see partition notes)
# partx -a /dev/sda (to update kernel)
'Step 2:-Create Physcial Volume'
# pvcreate <partition_no's>
# pvcreate /dev/sda{12..14} (for example)
# pvdisplay (to check)
'Step 3:-Create Volume Group'
# vgcreate <vg_name> <partition_no's>
# vgcreate zoom /dev/sda{12..14}
# vgdisplay (to check)
'Step 4:-Create Logical Volume'
# lvcreate -L <size> <vg_name> -n <lv_name>
# lvcreate -L +500M zoom -n linux
# lvdisplay (to check)
'Step 5:-Format LV & Mount to Use'
# mkfs.ext4 /dev/zoom/linux
# mkdir /lvm (create new dir for mount point)
# mount /dev/zoom/linux /lvm (to mount)
# mount (to check)
# cd /lvm (access mount point to use LV)
# mkdir zoom{1..100} (create some data)
# ls (to check)
# df -h (to check the free space of partition)
'Step 6:-To Resize the Partition'
# cp -rv /usr/* /lvm (to make partition size full)
# df -h (check the size)
# lvresize -L +500M /dev/zoom/linux (to resize)
# resize2fs /dev/zoom/linux (to resize filesystem)
# df -h (check the extended size)
'Step 7:-To Extend the Volume Group Size'
# vgdisplay (to check vg size)
# fdisk /dev/sda (create one partition)
# partx -a /dev/sda (to update)
# pvcreate /dev/sda15 (add in pv)
# vgextend zoom /dev/sda15 (to extend vg size)
# vgdisplay (to check extended vg size)
'Step 8:-To Remove LVM Concept from Partition'
# umount /lvm (un mount the lv)
# lvremove /dev/zoom/linux (1st remove lv)
# lvdisplay (to check)
# vgremove /dev/zoom (2nd remove vg)
# vgdisplay (to check)
# pvremove /dev/sda{12..15} (3rd remove pv's)
# pvdisplay (to check)
(7)SWAP PARTITION PRACTICAL STEPS
##### TO CREATE A SWAP PARTITION #####
'Step 1:-Check the RAM size'
# free -m (to check the RAM size in MB)
'Step 2:-Create One Partition'
# fdisk /dev/sda (to create)
Press 'n' to create new partition
Enter the size: +4G (for example 4GB)
Press 't' to change the ID of Partition
Enter Partition No:16 (for example)
Press 'L' to get the list of availabel ID's
Enter 82 for swap
Press 'p' to check
Press 'w' to save & quit
'Step 3:-Update & Format the Partition'
# partx -a /dev/sda (to update)
# mkswap /dev/sda16 (to create swap filesystem)
# blkid /dev/sda16 (to check)
'Step 4:-Enable the Swap Service'
# swapon /dev/sda16 (to enable)
# free -m (to check RAM size)
# swapon -s (to check the status of swap partition)
'Step 5:-To Disable the Swap Service'
# swapoff /dev/sda16 (to disable)
# free -m (to check the RAM size)
# swapon -s (to check the status)
(8)RAID PRACTICAL STEPS
#### TO IMPLEMMENT RAID 5 ON PARTITIONS ####
'Step 1:-Create 3 Raw Partitions for Raid 5'
# fdisk /dev/sda (to create)
# partx -a /dev/sda (to update kernel)
'Step 2:-Create a Metadisk'
# mdadm -C <metadisk_name> -n3 <partition_no's> -l5
# mdadm -C /dev/md0 -n3 /dev/sda{15..17} -l5
# mdadm -D /dev/md0 (to check)
'Step 3:-Format & Mount the Metadisk to Use'
# mkfs.ext4 /dev/md0 (to format)
# mkdir /raid (create new mount point)
# mount /dev/md0 /raid (to mount)
# mount (to check)
# cd /raid (to access the metadisk)
# mkdir zoom{1..100} (create some data)
# ls (to check)
# cd (come out)
'Step 4:-To check Raid-5 is Working or Not-Then in this case
make one partition faulty & remove'
# mdadm -D /dev/md0 (to check the status)
# mdadm -f /dev/md0 /dev/sda15 (to make faulty)
# mdadm -D /dev/md0 (to check)
# mdadm -r /dev/md0 /dev/sda15 (to remove)
# mdadm -D /dev/md0 (to check)
# ls /raid (to check the data in metadisk)
'Step 5:-To work with Raid-5,add one Partition'
# fdisk /dev/sda (to create)
# partx -a /dev/sda (to updat kernel)
# mkfs.ext4 /dev/sda18 (for example-to format)
# mdadm -a /dev/md0 /dev/sda18 (to add in metadisk)
# mdadm -D /dev/md0 (to check)
# ls /raid (check the data)
'Step 6:-To Stop the Raid Level 5'
# umount /raid (un mount the metadisk)
# mdadm -S /dev/md0 (to stop)
# mdadm -D /dev/md0 (to check)
# ls /raid (to check data in mount point)
'Step 7:-To Start the Raid Level 5'
# mdadm -A /dev/md0 /dev/sda{16..18} (to start)
# mdadm -D /dev/md0 (to check)
# mount /dev/md0 /raid (to access metadisk)
# ls /raid (to check the data in metadisk)
(9)DISK QUOTAS PRACTICAL STEPS
#### TO IMPLEMMENT THE DISK QUOTAS ON PARTITION ####
'Step 1:-Create One Partition & Format'
# fdisk /dev/sda (to create)
# partx -a /dev/sda (to update)
# mkfs.ext4 /dev/sda8 (for example-to format)
# mkdir /quota (create a new mount point)
'Step 2:-Apply Quotas Permission on the Partition'
# mount -o usrquota,grpquota /dev/sda8 /quota
# mount (to check)
'Step 3:-Create Quota Database in the Partition'
# quotacheck -cugv /quota
'Step 4:-Enable the Quota Service'
# quotaon /quota (to enable)
# quotaon -p /quota (to check)
'Step 5:-Apply Full Permission on Mount Point'
# chmod 777 /quota
'Step 6:-Define the Quota Limit Based on Inode or Block'
Create 2 Users
# useradd tom
# useradd jack
'### Defining Quotas Based on User Level ###'
(A)Implemmenting quotas based on inode for User:tom
# edquota -u tom
Filesystem block soft hard inode soft hard
/dev/sda8 0 0 0 0 5 10
:wq(save & quit the file)
# su - tom (login as a user to check the result)
# cd /quota (access mount point)
# touch tom{1..10} (create 10 files)
# ls (to check)
# touch tom11 (try to create 11th file)
# exit (logout)
(B)Implemmenting quotas based on block for User:jack
# blockdev --getbsz /dev/sda8 (to check block size)
# edquota -u jack
Filesystem block soft hard inode soft hard
/dev/sda8 0 12 20 0 0 0
:wq(save & quit the file)
# su - jack (login as a user to check the result)
# cd /quota (access mount point)
# mkdir jack{1..5} (create 5 dir's)
# ls (to check)
# mkdir jack6 (try to create 6th dir)
# exit (logout)
NOTE:-If the block size of the partition is 4096 bytes
then the size of each empty dir will be 4kb
(1 block=1kb)
'Defining the Quotas Based on Group Level'
Create 3 Users (for example:a1 to a3)
# groupadd zoom (create one group)
# usermod -g zoom a1 (to add user as a primary)
# usermod -g zoom a2
# usermod -g zoom a3
(A)Implemmenting quotas based on inode for group:zoom
# edquota -g zoom
Filesystem block soft hard inode soft hard
/dev/sda8 0 0 0 0 10 15
:wq(save & quit the file)
# su - a1
# cd /quota
# touch file{1..5} (create 5 files as user:a1)
# exit (logout)
Then Create 5 files each as a user:a2 & a3
# touch file16 (try to create 16th file as user:a3)
# exit (logout)
(10)BACKUP PRACTICAL STEPS
##### BACKUP & RECOVERY #####
'TO TAKE A BACKUP FROM TAR PROGRAM - FOR DIRECTORIES'
# mkdir zoom (create one dir /root)
# touch zoom/liux{1..10} (add some data)
# ls zoom (to check)
TO TAKE BACKUP:-
# tar -cvf <destination/backupfile> <source>
# tar -cvf /opt/zoom.tar zoom
# cd /opt
# ls (to check)
TO READ BACKUP FILE:-
# tar -tvf zoom.tar
# cd (go to original & remove data)
# rm -rf zoom
# ls (to check)
TO RESTORE:-
# tar -xvf /opt/zoom.tar
# ls (to check)
'TO TAKE A BACKUP FROM CPIO PROGRAM - FOR FILES'
# touch linux unix redhat (create some files in /root)
# ls (to check)
TO TAKE BACKUP:-
# ls linux unix redhat | cpio -ov > /opt/file.cpio
# cd /opt
# ls (to check)
TO READ BACKUP FILE:-
# cpio -tv < file.cpio
# cd (go to original location & remove files)
# rm -rf linux unix redhat
# ls (to check)
TO RESTORE:-
# cpio -iv < /opt/files.cpio
# ls (to check)
'TO TAKE THE BACKUP FROM DUMP - FOR PARTITION'
# mount (to check the partition mount points)
(For Example:- /dev/sda7 mounted on /home)
TO TAKE THE BACKUP:-
# dump -0uf <destination/backupfile> <partition_no>
# dump -0uf /opt/fullbackup /dev/sda7
# cd /opt
# ls (to check)
TO READ BACKUP FILE:-
# restore -tf fullbackup
# cd /home (go to the partition mount point)
# rm -rf * (remove all contents)
# ls (to check)
TO RESTORE:-
# restore -rf /opt/fullbackup
# ls (to check)
'TO TAKE THE BACKUP FROM SCP PROGRAM - FROM REMOTE PC'
# ifconfig (to check the ip addess)
# scp -rv <source> <remote_pc_ip:location>
# scp -rv zoom 192.168.0.10:/media (for example)
To check the data-Go to the Remote Pc & check in /media
# rm -rf zoom (remove data from source pc)
TO RESTORE:-
# scp -rv <remote_pc_ip:location> <source>
# scp -rv 192.168.0.10:/media/zoom /root
# ls (to check)
(11)COMPRESSING TOOLS PRACTICAL STEPS
###### COMPRESSING TOOLS ######
(1)Create one Directory with Data in /root
(2)Convert the Directory into .tar extension file
# tar -cvf /opt/zoom.tar zoom (for example)
# cd /opt
# ls (to check)
TO COMPRESS WITH GZIP:-
# ll zoom.tar (check the size)
# gzip zoom.tar
# ll zoom.tar.gz (check the size)
TO UNCOMPRESS WITH GZIP:-
# gunzip zoom.tar.gz
# ls (to check)
TO COMPRESS WITH BZIP2:-
# bzip2 zoom.tar
# ll zoom.tar.bz2 (check the size)
TO UNCOMPRESS WITH BZIP2:-
# bunzip2 zoom.tar.bz2
# ls (to check)

Contenu connexe

Tendances

Unix Commands
Unix CommandsUnix Commands
Unix Commands
Dr.Ravi
 
Unix Shell Scripting Basics
Unix Shell Scripting BasicsUnix Shell Scripting Basics
Unix Shell Scripting Basics
Dr.Ravi
 
Unix Basics
Unix BasicsUnix Basics
Unix Basics
Dr.Ravi
 

Tendances (20)

Shell & Shell Script
Shell & Shell Script Shell & Shell Script
Shell & Shell Script
 
Shell scripting
Shell scriptingShell scripting
Shell scripting
 
Unix Commands
Unix CommandsUnix Commands
Unix Commands
 
Quick start bash script
Quick start   bash scriptQuick start   bash script
Quick start bash script
 
Unix Shell Scripting Basics
Unix Shell Scripting BasicsUnix Shell Scripting Basics
Unix Shell Scripting Basics
 
Linux command for beginners
Linux command for beginnersLinux command for beginners
Linux command for beginners
 
Linux class 9 15 oct 2021-5
Linux class 9   15 oct 2021-5Linux class 9   15 oct 2021-5
Linux class 9 15 oct 2021-5
 
Shell scripting
Shell scriptingShell scripting
Shell scripting
 
Unix - Shell Scripts
Unix - Shell ScriptsUnix - Shell Scripts
Unix - Shell Scripts
 
Common linux ubuntu commands overview
Common linux  ubuntu commands overviewCommon linux  ubuntu commands overview
Common linux ubuntu commands overview
 
Unix Command Line Productivity Tips
Unix Command Line Productivity TipsUnix Command Line Productivity Tips
Unix Command Line Productivity Tips
 
Chap06
Chap06Chap06
Chap06
 
Easiest way to start with Shell scripting
Easiest way to start with Shell scriptingEasiest way to start with Shell scripting
Easiest way to start with Shell scripting
 
Unix Basics
Unix BasicsUnix Basics
Unix Basics
 
Linux shell scripting
Linux shell scriptingLinux shell scripting
Linux shell scripting
 
Linux midterm quiz
Linux midterm quizLinux midterm quiz
Linux midterm quiz
 
OpenGurukul : Language : Shell Scripting
OpenGurukul : Language : Shell ScriptingOpenGurukul : Language : Shell Scripting
OpenGurukul : Language : Shell Scripting
 
Introduction to Bash Scripting, Zyxware Technologies, CSI Students Convention...
Introduction to Bash Scripting, Zyxware Technologies, CSI Students Convention...Introduction to Bash Scripting, Zyxware Technologies, CSI Students Convention...
Introduction to Bash Scripting, Zyxware Technologies, CSI Students Convention...
 
Basic shell programs assignment 1_solution_manual
Basic shell programs assignment 1_solution_manualBasic shell programs assignment 1_solution_manual
Basic shell programs assignment 1_solution_manual
 
NYPHP March 2009 Presentation
NYPHP March 2009 PresentationNYPHP March 2009 Presentation
NYPHP March 2009 Presentation
 

En vedette

Linux by zoom tech
Linux by zoom techLinux by zoom tech
Linux by zoom tech
Satya Johnny
 
Linux lab manual by zoom
Linux lab manual by zoomLinux lab manual by zoom
Linux lab manual by zoom
Satya Johnny
 
Mcse notes
Mcse notesMcse notes
Mcse notes
vrammn
 
virtualization and hypervisors
virtualization and hypervisorsvirtualization and hypervisors
virtualization and hypervisors
Gaurav Suri
 

En vedette (20)

Mcse 2012
Mcse 2012Mcse 2012
Mcse 2012
 
Linux lecture6
Linux lecture6Linux lecture6
Linux lecture6
 
Frame Relay
Frame RelayFrame Relay
Frame Relay
 
Formation LPIC-1_SysArch
Formation LPIC-1_SysArchFormation LPIC-1_SysArch
Formation LPIC-1_SysArch
 
Getting Started With Linux Administration
Getting Started With Linux AdministrationGetting Started With Linux Administration
Getting Started With Linux Administration
 
fundamentals of linux
fundamentals of linuxfundamentals of linux
fundamentals of linux
 
Linux by zoom tech
Linux by zoom techLinux by zoom tech
Linux by zoom tech
 
Linux course details
Linux course detailsLinux course details
Linux course details
 
Server training
Server trainingServer training
Server training
 
Ibm web sphere application server interview questions
Ibm web sphere application server interview questionsIbm web sphere application server interview questions
Ibm web sphere application server interview questions
 
Servers
ServersServers
Servers
 
Linux practicals T.Y.B.ScIT
Linux practicals T.Y.B.ScITLinux practicals T.Y.B.ScIT
Linux practicals T.Y.B.ScIT
 
Linux lab manual by zoom
Linux lab manual by zoomLinux lab manual by zoom
Linux lab manual by zoom
 
What is a Server
What is a ServerWhat is a Server
What is a Server
 
Web servers
Web serversWeb servers
Web servers
 
Mcse notes
Mcse notesMcse notes
Mcse notes
 
virtualization and hypervisors
virtualization and hypervisorsvirtualization and hypervisors
virtualization and hypervisors
 
Presentation about servers
Presentation about serversPresentation about servers
Presentation about servers
 
Hypervisors and Virtualization - VMware, Hyper-V, XenServer, and KVM
Hypervisors and Virtualization - VMware, Hyper-V, XenServer, and KVMHypervisors and Virtualization - VMware, Hyper-V, XenServer, and KVM
Hypervisors and Virtualization - VMware, Hyper-V, XenServer, and KVM
 
Computer networking
Computer networkingComputer networking
Computer networking
 

Similaire à Linux system admin

Basic linux commands
Basic linux commandsBasic linux commands
Basic linux commands
Jauhar Amir
 
Getfilestruct zbksh(1)
Getfilestruct zbksh(1)Getfilestruct zbksh(1)
Getfilestruct zbksh(1)
Ben Pope
 
Getfilestruct zbksh
Getfilestruct zbkshGetfilestruct zbksh
Getfilestruct zbksh
Ben Pope
 
Intrusion Detection System using Snort
Intrusion Detection System using Snort Intrusion Detection System using Snort
Intrusion Detection System using Snort
webhostingguy
 
Intrusion Detection System using Snort
Intrusion Detection System using Snort Intrusion Detection System using Snort
Intrusion Detection System using Snort
webhostingguy
 
Shell Scripts
Shell ScriptsShell Scripts
Shell Scripts
Dr.Ravi
 

Similaire à Linux system admin (20)

Rhel 6.2 complete ebook
Rhel 6.2  complete ebookRhel 6.2  complete ebook
Rhel 6.2 complete ebook
 
Rhel 6.2 complete ebook
Rhel 6.2 complete ebookRhel 6.2 complete ebook
Rhel 6.2 complete ebook
 
Really useful linux commands
Really useful linux commandsReally useful linux commands
Really useful linux commands
 
Basic commands
Basic commandsBasic commands
Basic commands
 
Basic linux commands
Basic linux commandsBasic linux commands
Basic linux commands
 
Phishing for Root (How I Got Access to Root on Your Computer With 8 Seconds o...
Phishing for Root (How I Got Access to Root on Your Computer With 8 Seconds o...Phishing for Root (How I Got Access to Root on Your Computer With 8 Seconds o...
Phishing for Root (How I Got Access to Root on Your Computer With 8 Seconds o...
 
Bash Scripting Workshop
Bash Scripting WorkshopBash Scripting Workshop
Bash Scripting Workshop
 
Linux basics part 1
Linux basics part 1Linux basics part 1
Linux basics part 1
 
exercises-log-management-rsyslog.pdf
exercises-log-management-rsyslog.pdfexercises-log-management-rsyslog.pdf
exercises-log-management-rsyslog.pdf
 
Installing odoo v8 from github
Installing odoo v8 from githubInstalling odoo v8 from github
Installing odoo v8 from github
 
Getfilestruct zbksh(1)
Getfilestruct zbksh(1)Getfilestruct zbksh(1)
Getfilestruct zbksh(1)
 
Getfilestruct zbksh
Getfilestruct zbkshGetfilestruct zbksh
Getfilestruct zbksh
 
Linux And perl
Linux And perlLinux And perl
Linux And perl
 
Process monitoring in UNIX shell scripting
Process monitoring in UNIX shell scriptingProcess monitoring in UNIX shell scripting
Process monitoring in UNIX shell scripting
 
linux_Commads
linux_Commadslinux_Commads
linux_Commads
 
Linux basic commands
Linux basic commandsLinux basic commands
Linux basic commands
 
Intrusion Detection System using Snort
Intrusion Detection System using Snort Intrusion Detection System using Snort
Intrusion Detection System using Snort
 
Intrusion Detection System using Snort
Intrusion Detection System using Snort Intrusion Detection System using Snort
Intrusion Detection System using Snort
 
Container Security
Container SecurityContainer Security
Container Security
 
Shell Scripts
Shell ScriptsShell Scripts
Shell Scripts
 

Dernier

TECUNIQUE: Success Stories: IT Service provider
TECUNIQUE: Success Stories: IT Service providerTECUNIQUE: Success Stories: IT Service provider
TECUNIQUE: Success Stories: IT Service provider
mohitmore19
 
+971565801893>>SAFE AND ORIGINAL ABORTION PILLS FOR SALE IN DUBAI AND ABUDHAB...
+971565801893>>SAFE AND ORIGINAL ABORTION PILLS FOR SALE IN DUBAI AND ABUDHAB...+971565801893>>SAFE AND ORIGINAL ABORTION PILLS FOR SALE IN DUBAI AND ABUDHAB...
+971565801893>>SAFE AND ORIGINAL ABORTION PILLS FOR SALE IN DUBAI AND ABUDHAB...
Health
 
AI Mastery 201: Elevating Your Workflow with Advanced LLM Techniques
AI Mastery 201: Elevating Your Workflow with Advanced LLM TechniquesAI Mastery 201: Elevating Your Workflow with Advanced LLM Techniques
AI Mastery 201: Elevating Your Workflow with Advanced LLM Techniques
VictorSzoltysek
 

Dernier (20)

call girls in Vaishali (Ghaziabad) 🔝 >༒8448380779 🔝 genuine Escort Service 🔝✔️✔️
call girls in Vaishali (Ghaziabad) 🔝 >༒8448380779 🔝 genuine Escort Service 🔝✔️✔️call girls in Vaishali (Ghaziabad) 🔝 >༒8448380779 🔝 genuine Escort Service 🔝✔️✔️
call girls in Vaishali (Ghaziabad) 🔝 >༒8448380779 🔝 genuine Escort Service 🔝✔️✔️
 
Define the academic and professional writing..pdf
Define the academic and professional writing..pdfDefine the academic and professional writing..pdf
Define the academic and professional writing..pdf
 
Reassessing the Bedrock of Clinical Function Models: An Examination of Large ...
Reassessing the Bedrock of Clinical Function Models: An Examination of Large ...Reassessing the Bedrock of Clinical Function Models: An Examination of Large ...
Reassessing the Bedrock of Clinical Function Models: An Examination of Large ...
 
HR Software Buyers Guide in 2024 - HRSoftware.com
HR Software Buyers Guide in 2024 - HRSoftware.comHR Software Buyers Guide in 2024 - HRSoftware.com
HR Software Buyers Guide in 2024 - HRSoftware.com
 
Software Quality Assurance Interview Questions
Software Quality Assurance Interview QuestionsSoftware Quality Assurance Interview Questions
Software Quality Assurance Interview Questions
 
10 Trends Likely to Shape Enterprise Technology in 2024
10 Trends Likely to Shape Enterprise Technology in 202410 Trends Likely to Shape Enterprise Technology in 2024
10 Trends Likely to Shape Enterprise Technology in 2024
 
The Guide to Integrating Generative AI into Unified Continuous Testing Platfo...
The Guide to Integrating Generative AI into Unified Continuous Testing Platfo...The Guide to Integrating Generative AI into Unified Continuous Testing Platfo...
The Guide to Integrating Generative AI into Unified Continuous Testing Platfo...
 
A Secure and Reliable Document Management System is Essential.docx
A Secure and Reliable Document Management System is Essential.docxA Secure and Reliable Document Management System is Essential.docx
A Secure and Reliable Document Management System is Essential.docx
 
TECUNIQUE: Success Stories: IT Service provider
TECUNIQUE: Success Stories: IT Service providerTECUNIQUE: Success Stories: IT Service provider
TECUNIQUE: Success Stories: IT Service provider
 
call girls in Vaishali (Ghaziabad) 🔝 >༒8448380779 🔝 genuine Escort Service 🔝✔️✔️
call girls in Vaishali (Ghaziabad) 🔝 >༒8448380779 🔝 genuine Escort Service 🔝✔️✔️call girls in Vaishali (Ghaziabad) 🔝 >༒8448380779 🔝 genuine Escort Service 🔝✔️✔️
call girls in Vaishali (Ghaziabad) 🔝 >༒8448380779 🔝 genuine Escort Service 🔝✔️✔️
 
Shapes for Sharing between Graph Data Spaces - and Epistemic Querying of RDF-...
Shapes for Sharing between Graph Data Spaces - and Epistemic Querying of RDF-...Shapes for Sharing between Graph Data Spaces - and Epistemic Querying of RDF-...
Shapes for Sharing between Graph Data Spaces - and Epistemic Querying of RDF-...
 
5 Signs You Need a Fashion PLM Software.pdf
5 Signs You Need a Fashion PLM Software.pdf5 Signs You Need a Fashion PLM Software.pdf
5 Signs You Need a Fashion PLM Software.pdf
 
Unlocking the Future of AI Agents with Large Language Models
Unlocking the Future of AI Agents with Large Language ModelsUnlocking the Future of AI Agents with Large Language Models
Unlocking the Future of AI Agents with Large Language Models
 
Right Money Management App For Your Financial Goals
Right Money Management App For Your Financial GoalsRight Money Management App For Your Financial Goals
Right Money Management App For Your Financial Goals
 
+971565801893>>SAFE AND ORIGINAL ABORTION PILLS FOR SALE IN DUBAI AND ABUDHAB...
+971565801893>>SAFE AND ORIGINAL ABORTION PILLS FOR SALE IN DUBAI AND ABUDHAB...+971565801893>>SAFE AND ORIGINAL ABORTION PILLS FOR SALE IN DUBAI AND ABUDHAB...
+971565801893>>SAFE AND ORIGINAL ABORTION PILLS FOR SALE IN DUBAI AND ABUDHAB...
 
Direct Style Effect Systems - The Print[A] Example - A Comprehension Aid
Direct Style Effect Systems -The Print[A] Example- A Comprehension AidDirect Style Effect Systems -The Print[A] Example- A Comprehension Aid
Direct Style Effect Systems - The Print[A] Example - A Comprehension Aid
 
Tech Tuesday-Harness the Power of Effective Resource Planning with OnePlan’s ...
Tech Tuesday-Harness the Power of Effective Resource Planning with OnePlan’s ...Tech Tuesday-Harness the Power of Effective Resource Planning with OnePlan’s ...
Tech Tuesday-Harness the Power of Effective Resource Planning with OnePlan’s ...
 
Azure_Native_Qumulo_High_Performance_Compute_Benchmarks.pdf
Azure_Native_Qumulo_High_Performance_Compute_Benchmarks.pdfAzure_Native_Qumulo_High_Performance_Compute_Benchmarks.pdf
Azure_Native_Qumulo_High_Performance_Compute_Benchmarks.pdf
 
Microsoft AI Transformation Partner Playbook.pdf
Microsoft AI Transformation Partner Playbook.pdfMicrosoft AI Transformation Partner Playbook.pdf
Microsoft AI Transformation Partner Playbook.pdf
 
AI Mastery 201: Elevating Your Workflow with Advanced LLM Techniques
AI Mastery 201: Elevating Your Workflow with Advanced LLM TechniquesAI Mastery 201: Elevating Your Workflow with Advanced LLM Techniques
AI Mastery 201: Elevating Your Workflow with Advanced LLM Techniques
 

Linux system admin

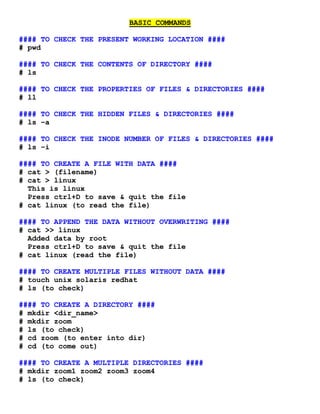
  • 1. BASIC COMMANDS #### TO CHECK THE PRESENT WORKING LOCATION #### # pwd #### TO CHECK THE CONTENTS OF DIRECTORY #### # ls #### TO CHECK THE PROPERTIES OF FILES & DIRECTORIES #### # ll #### TO CHECK THE HIDDEN FILES & DIRECTORIES #### # ls –a #### TO CHECK THE INODE NUMBER OF FILES & DIRECTORIES #### # ls –i #### TO CREATE A FILE WITH DATA #### # cat > (filename) # cat > linux This is linux Press ctrl+D to save & quit the file # cat linux (to read the file) #### TO APPEND THE DATA WITHOUT OVERWRITING #### # cat >> linux Added data by root Press ctrl+D to save & quit the file # cat linux (read the file) #### TO CREATE MULTIPLE FILES WITHOUT DATA #### # touch unix solaris redhat # ls (to check) #### TO CREATE A DIRECTORY #### # mkdir <dir_name> # mkdir zoom # ls (to check) # cd zoom (to enter into dir) # cd (to come out) #### TO CREATE A MULTIPLE DIRECTORIES #### # mkdir zoom1 zoom2 zoom3 zoom4 # ls (to check)
  • 2. #### TO CREATE A PARENT DIRECTORY #### # mkdir –p world/asia/india/ap/hyd/dsnr/zoom # ls –R world (to check) #### NAVIGATION OF DIRECTORIES #### # cd world/asia/india/ap/hyd/dsnr/zoom # pwd (to check) # cd .. (to come 1 step back) # cd ../.. (to come 2 step back) # cd ../../.. (to come 3 step back) # cd – (to go at last working directory) # cd (to go at user home directory) # pwd (to check) #### TO CHECK AND CHANGE THE DATE & TIME #### # date (to check) # date –s “wed Mar 19 12:00:00 IST 2014” #### TO CHECK THE CALENDER #### # cal (for current month & year) # cal 2014 (for year) # cal 5 2014 (for particular month & year) #### TO OPEN THE CALCULATOR #### # bc 1+2+3 7 Type „q‟ to come out #### TO GET THE HELP RELATED TO ANY COMMAND #### # man <command name> # man cat (for example) Type „q‟ to come out #### TO SHUTDOWN THE SYSTEM #### # init 0 #### TO RESTART THE SYSTEM #### # init 6 #### TO SEARCH FILES OR DIRECTORIES #### # find / -iname <filename or dirname>
  • 3. #### TO ACCESS ANY LOCATION IN GUI #### # nautilus <Path> # nautilus /etc (for example) #### TO COPY A EXISTING FILE WITH NEW NAME #### # cp <source_file> <new_name> # cp linux unix # ls (to check) # cat unix (to read) #### TO COPY FILE INTO DIFFERENT LOCATION #### # cp (filename) (destination) # cp linux /opt # ls /opt (to check) #### TO COPY MULTIPLE FILES #### # cp unix redhat solaris /opt # ls /opt (to check) #### TO COPY DATA FROM SOURCE FILE TO DESTINATION WITHOUT OVERWRITING #### # cat (source_file) >> (destination_file) # cat linux >> redhat # cat redhat (to check) #### TO COPY A DIRECTORY #### # cp –rv (source_dir) (destination) # cp –rv zoom /opt # ls /opt (to check) #### TO COPY MULTIPLE DIRECTORIES #### # cp –rv zoom1 zoom2 zoom3 /opt # ls /opt (to check) #### TO COPY COMPLETE DATA FROM PRESENT WORKING LOCATION #### # cp –rv * /media # ls /media (to check) #### TO CUT & PASTE FILE OR DIRECTORIES #### # mv (source_dir or file) (destination) # mv zoom /mnt # ls (to check) # ls /mnt (to check)
  • 4. #### TO RENAME A FILE OR DIRECTORY #### # mv (existing_name) (new_name) # mv zoom1 zoomgroup # ls (to check) #### TO REMOVE A FILE OR DIRECTORY #### # rm (filename) # rm –rf (directory_name) #### TO OPEN THE TASK MANAGER #### # ps –aux #### TO KILL THE PROCESS OF RUNNING APPLICATION #### # kill -9 (process_id) # kill -9 2354 (for example) #### TO CHECK THE CONFIGURATION OF CPU #### # cat /proc/cpuinfo #### TO CHECK THE RUNNING PROCESS OF CPU #### # top #### TO CHECK THE OS VERSION #### # cat /etc/redhat-release #### TO CHECK THE LAST LOGIN TIME #### # last
  • 5. (1)USER ADMINISTRATION PRACTICAL STEPS '#### TO CREATE A USER ####' # useradd <username> # useradd tom '#### TO CHECK THE USER DETAILS ####' # cat /etc/passwd (for complete details) # tail /etc/passwd (for last 10 users details) # tail -3 /etc/passwd (for last 3 users details) # head /etc/passwd (for top 10 users details) # head -3 /etc/passwd (for top 3 users details) # grep tom /etc/passwd (for particular user details) '#### ASSIGNING A PASSWORD TO USER ####' # passwd <username> # passwd tom Password: 1 Re-Password: 1 '#### TO CHECK THE USER PASSWORD DETAILS ####' # cat /etc/shadow # tail /etc/shadow '#### TO CHECK THE PASSWORD ENCRYPTION TOOL ####' # passwd -S <username> # passwd -S tom '#### TO CHANGE THE PASSWORD ENCRYPTION TOOL ####' # authconfig-tui By pressing spacebar key uncheck the option USE MD5 Click on NEXT # useradd jack (create a user) # passwd jack (assign the password) # passwd -S jack (check the password tool) '#### TO LOGIN WITH A USER ####' # su - tom (In root Console) # exit (to logout) # gdmflexiserver (to open extra graphical console) Select the user and enter the password Create Some Data Go to root console by pressing ctrl+alt+F1 And check the user data
  • 6. # ls /home/tom/Desktop # who (to get the details of active users) '#### TO LOCK A USER ####' # usermod -L <username> # usermod -L tom # grep tom /etc/shadow (to check) '!' sign indicates that a user is lock # gdmflexiserver Try to login with user tom '#### TO UNLOCK A USER ####' # usermod -U <username> # usermod -U tom # grep tom /etc/shadow (to check) # gdmflexiserver Try to login with user tom '#### TO CHECK THE MAIL ACCOUNT OF USERS ####' # cd /var/spool/mail # ls (to check) '#### TO CHECK THE GROUP OF THE USER ####' # tail /etc/group '#### TO CHECK THE AVAILABLE SHELLS ####' # cat /etc/shells
  • 7. (2)USER MODIFCATION PRACTICAL STEPS '### TO ASSIGN THE COMMENT ###' # useradd tom (create one user) # tail /etc/passwd (to check) # usermod -c <comment> <username> # usermod -c "Sales Dept" tom # grep tom /etc/passwd (to check) '### TO CHANGE THE UID ###' # useradd jack (create one more user) # tail -2 /etc/passwd (to check) To Provide User:jack Previlages to User:tom # usermod -u <ID> -o <username> # usermod -u 501 -o tom # tail -2 /etc/passwd (to check) Login with both the user's to check the result '### TO CHANGE THE GID ###' # groupmod -g <ID> <username> # groupmod -g 600 tom # grep tom /etc/passwd (to check) Changing the GID means,taking the Group Previlages '### TO CHANGE THE SHELL ###' # cat /etc/shells (to check availabel shells) # usermod -s <shell> <username> # usermod -s /sbin/nologin tom (to block account) # grep tom /etc/passwd (to check) # su - tom (try to access tom account) '### TO LOCK THE USER ACCOUNT ###' # usermod -L <username> # usermod -L jack (to lock) # grep jack /etc/shadow (to check) '!'sign indicates that the user account is lock # gdmflexiserver (open one gui console) Select the User:jack & try to login # usermod -U tom (to unlock) # grep jack /etc/shadow (to check) # gdmflexiserver (open one gui console) Select the User:jack & try to login
  • 8. '### TO CHANGE THE USER HOME DIRECTORY ###' # vi /etc/default/useradd (open this file) Do the Modification in the HOME line,as below HOME=/media :wq(save & quit the file) # useradd jerry (create one user) # tail /etc/passwd (to check) '### TO CHANGE THE USERNAME ###' # usermod -l <newname> <oldname> # usermod -l tom123 tom # tail /etc/passwd (to check) '### TO REMOVE A USER ###' # userdel jack (to remove a user without its home directory & mail account) # tail /etc/passwd (to check) # ls /home (to check home dir) # ls /var/spool/mail (to check mail accout) # userdel -r tom123 (to remove a user with its home directory & mail account) # tail /etc/passwd (to check) # ls /home (to check) # ls /var/spool/mail (to check)
  • 9. (3)GROUP ADMINISTRATION PRACTICAL STEPS Create 5 Users '#### TO CREATE A GROUP ####' # groupadd <group_name> # groupadd zoom # tail /etc/group (to check) '### TO ADD A SINGLE USER INTO GROUP ###' # gpasswd -a <username> <groupname> # gpasswd -a a1 zoom # grep zoom /etc/group (to check) '### TO ADD MULTIPLE USERS INTO GROUP ###' # gpasswd -M a2,a3,a4 zoom # grep zoom /etc/group (to check) Note:-Adding Multiple Users Into the Group may get overwrite on the existing users.So Without Overwriting to add a user then use the above option(gpasswd -a) '### TO REMOVE A USER FROM GROUP ###' # gpasswd -d <username> <groupame> # gpasswd -d a4 zoom # grep zoom /etc/group (to check) '### TO MAKE A USER AS GROUP ADMIN ###' # gpasswd -A <username> <groupname> # gpasswd -A a2 zoom # grep zoom /etc/gshadow (to check) # su - a2 (to check,login as a user) # gpasswd -d a3 zoom (try to remove) # gpasswd -a a5 zoom (try to add) # grep zoom /etc/group (to check) # exit (logout) # gpasswd -A "" zoom (to remove the previlages) # grep zoom /etc/gshadow (to check) '### TO RENAME A GROUP ###' # groupmod -n <newname> <oldname> # groupmod -n zoomgroup zoom # tail /etc/group (to check) '### TO REMOVE A GROUP ###' # groupdel zoomgroup # tail /etc/group (to check)
  • 10. (4)PERMISSIONS PRACTICAL STEPS #### BASIC PERMISSION #### '### APPLYING A BASIC PERMISSION ON DIRECTORY ###' # useradd tom (create one user) # su - tom (login as a user) # cd /root (try to access root dir) # exit (logout) # ls -ld /root (check the permission) (1)To Apply Execute Permission on Directory # chmod 751 /root # ls -ld /root (to check) # su - tom # cd /root (try to access) # ls (to read - ERROR) # exit (logout) (2)To Apply Read & Execute Permission on Dir # chmod 755 /root OR # chmod u=rwx,g=rx,o=rx /root # ls -ld /root (to check) # su - tom # cd /root # ls (to read) # touch tom (to write - ERROR) # exit (logout) (3)To Apply Read,Write & Execute Permission on Dir # chmod 777 /root OR # chmod u=rwx,g=rwx,o=rwx /root OR # chmod a=rwx /root # ls -ld /root (to check) # su - tom # cd /root # ls (to read) # touch tom (to write) # exit (logout)
  • 11. '#### BASIC PERMISSION ON FILE ####' # cat > linux (create one file in /root dir) # su - tom # cd /root # cat linux (to read) # cat >> linux (to write - ERROR) # exit # ll linux (check the permission) To Apply Read & Write Permission file # chmod 666 linux # ll linux (to check) # su - tom # cd /root # cat linux (to read) # cat >> linux (to write) # exit '#### TO CHANGE THE OWNER OF THE FILE ###' Create 3 more users (for ex:a1,a2,a3) # cat > unix (create one more file in /root) # ll unix (check the permission) For the User:a1-rw permission on unix file # chown <username> <filename> # chown a1 unix # ll linux (to check) # su - a1 (to check-login as a user) # cd /root # cat unix (to read) # cat >> unix (to write) # exit (logout) '#### TO CHANGE THE GROUP OWNER OF THE FILE ####' For the User:a2,a3-zero permission on unix file # groupadd zoom (create one group) # gpasswd -M a2,a3 zoom (add two users in group) # chgrp <groupname> <filename> # chgrp zoom unix (to change group owner) # chmod 604 unix (provide zero permision in group) # ll unix (to check) To Check the Result Login As a User:a2,a3 and access the unix file in /root directory
  • 12. ###### ADVANCE PERMISSION ###### TO APPLY ADVANCE PERMISSION ON DIRECTORY # chmod 1777 /root '1'for applying advance (sticky bit) permission only on directories to avoid data deleting # ls -ld /root 't'sign is the indication of Advance Permission # su - tom (login as a normal user) # cd /root (access root directory) # rm -rf * (try to remove the data) # exit (logout) ###### ACL PERMISSION ###### Create 6 Users (for ex:a1 to a6) # cat > linux (create one file in /root) # ll linux (to check the permission) 'For the User:a1 - Read & Write Permission' # setfacl -m u:a1:rw linux (to assign acl) # ll linux (to check) '+'sign is the indication of acl permission # su - a1 (to check-login as a user) # cd /root # cat linux (to read) # cat >> linux (to write) # exit (logout) 'For the User:a2 - Read & Execute Permission' # setfacl -m u:a2:rx linux # getfacl linux (to check acl permission in detail) Login as a User:a2 & Check the Result 'For the User:a3 - Read,Write & Execute Permision' # setfacl -m u:a3:rwx linux # getfacl linux (to check) Login as a User:a3 & Check the Result 'For the User:a4 - Write Permission' # setfacl -m u:a4:w linux # getfacl linux (to check) Login as a User:a4 & Check the Result
  • 13. 'For the User:a5,a6 - Zero Permission' # groupadd zoom (create one group) # gpasswd -M a5,a6 zoom # setfacl -m g:zoom:0 linux (to assign on group) # getfacl linux (to check) Login as a user:a5,a6 & check the result 'To Remove the ACL Permission from single user' # setfacl -x u:a4 linux (to remove) # getfacl linux (to check) 'To Remove the ACL Permission Completely from file' # setfacl --remove-all linux # getfacl linux (to check) # ll linux (to check)
  • 14. (5)PARTITIONS PRACTICAL STEPS 'Step 1:-Check the Existing Partitions' # fdisk -l (to check) 'Step 2:-To create a New Partition' # fdisk /dev/sda Press 'm' for help Press 'p' to check the exisiting partitions Press 'n' to create a new partition Enter the Size: +1G (for example) Press 'p' to check Press 'w' to save & quit 'Step 3:-Activate the New Changes to Kernel' # partx -a /dev/sda (run this 2 times) 'Step 4:-Format the Partition' # mkfs.ext4 <partition_no> # mkfs.ext4 /dev/sda8 (for example) 'Step 5:-To Use the Partition-Create Mount Point' # mount <partition_no> <mount_point> # mount /dev/sda8 /mnt # mount (to check) # cd /mnt (to access the partition) # ls (to check) 'lost+found' dir is the indication of partition # mkdir zoom{1..100} (create some data) # ls (to check) '#### TO CHECK THE FILESYSTEM OF PARTITIONS ####' # blkid '#### TO CHECK THE FREE SPACE OF THE PARTITION ###' # df -h '#### TO CHECK THE USED SPACE OF THE PARTITION ####' # du –sh '#### TO CHECK THE FREE SPACE OF THE HARDISK ####' # parted Type: print free Type: quit (to come out)
  • 15. '#### TO REMOVE THE MOUNT POINT(LINK) ####' # umount <partition_no> # umount /dev/sda8 (for example) # mount (to check) '#### TO DO THE PERMANENT MOUNTING ####' # vim /etc/fstab (open this file) Come at last & do the changes as given below /dev/sda11 /mnt ext4 defaults 0 0 'partition_no' 'mount_pt' 'filesystem' :wq(save & quit the file) # init 6 (reboot the pc) # mount (to check the permanent mount point)
  • 16. (6)LVM PRACTICAL STEPS ##### TO IMPLEMMENT LVM ON PARTITIONS ##### 'Step 1:-Create 3 Raw Partitions' # fdisk -l (to check) # fdisk /dev/sda (to create-see partition notes) # partx -a /dev/sda (to update kernel) 'Step 2:-Create Physcial Volume' # pvcreate <partition_no's> # pvcreate /dev/sda{12..14} (for example) # pvdisplay (to check) 'Step 3:-Create Volume Group' # vgcreate <vg_name> <partition_no's> # vgcreate zoom /dev/sda{12..14} # vgdisplay (to check) 'Step 4:-Create Logical Volume' # lvcreate -L <size> <vg_name> -n <lv_name> # lvcreate -L +500M zoom -n linux # lvdisplay (to check) 'Step 5:-Format LV & Mount to Use' # mkfs.ext4 /dev/zoom/linux # mkdir /lvm (create new dir for mount point) # mount /dev/zoom/linux /lvm (to mount) # mount (to check) # cd /lvm (access mount point to use LV) # mkdir zoom{1..100} (create some data) # ls (to check) # df -h (to check the free space of partition) 'Step 6:-To Resize the Partition' # cp -rv /usr/* /lvm (to make partition size full) # df -h (check the size) # lvresize -L +500M /dev/zoom/linux (to resize) # resize2fs /dev/zoom/linux (to resize filesystem) # df -h (check the extended size)
  • 17. 'Step 7:-To Extend the Volume Group Size' # vgdisplay (to check vg size) # fdisk /dev/sda (create one partition) # partx -a /dev/sda (to update) # pvcreate /dev/sda15 (add in pv) # vgextend zoom /dev/sda15 (to extend vg size) # vgdisplay (to check extended vg size) 'Step 8:-To Remove LVM Concept from Partition' # umount /lvm (un mount the lv) # lvremove /dev/zoom/linux (1st remove lv) # lvdisplay (to check) # vgremove /dev/zoom (2nd remove vg) # vgdisplay (to check) # pvremove /dev/sda{12..15} (3rd remove pv's) # pvdisplay (to check) (7)SWAP PARTITION PRACTICAL STEPS ##### TO CREATE A SWAP PARTITION ##### 'Step 1:-Check the RAM size' # free -m (to check the RAM size in MB) 'Step 2:-Create One Partition' # fdisk /dev/sda (to create) Press 'n' to create new partition Enter the size: +4G (for example 4GB) Press 't' to change the ID of Partition Enter Partition No:16 (for example) Press 'L' to get the list of availabel ID's Enter 82 for swap Press 'p' to check Press 'w' to save & quit 'Step 3:-Update & Format the Partition' # partx -a /dev/sda (to update) # mkswap /dev/sda16 (to create swap filesystem) # blkid /dev/sda16 (to check) 'Step 4:-Enable the Swap Service' # swapon /dev/sda16 (to enable) # free -m (to check RAM size) # swapon -s (to check the status of swap partition) 'Step 5:-To Disable the Swap Service' # swapoff /dev/sda16 (to disable) # free -m (to check the RAM size) # swapon -s (to check the status)
  • 18. (8)RAID PRACTICAL STEPS #### TO IMPLEMMENT RAID 5 ON PARTITIONS #### 'Step 1:-Create 3 Raw Partitions for Raid 5' # fdisk /dev/sda (to create) # partx -a /dev/sda (to update kernel) 'Step 2:-Create a Metadisk' # mdadm -C <metadisk_name> -n3 <partition_no's> -l5 # mdadm -C /dev/md0 -n3 /dev/sda{15..17} -l5 # mdadm -D /dev/md0 (to check) 'Step 3:-Format & Mount the Metadisk to Use' # mkfs.ext4 /dev/md0 (to format) # mkdir /raid (create new mount point) # mount /dev/md0 /raid (to mount) # mount (to check) # cd /raid (to access the metadisk) # mkdir zoom{1..100} (create some data) # ls (to check) # cd (come out) 'Step 4:-To check Raid-5 is Working or Not-Then in this case make one partition faulty & remove' # mdadm -D /dev/md0 (to check the status) # mdadm -f /dev/md0 /dev/sda15 (to make faulty) # mdadm -D /dev/md0 (to check) # mdadm -r /dev/md0 /dev/sda15 (to remove) # mdadm -D /dev/md0 (to check) # ls /raid (to check the data in metadisk) 'Step 5:-To work with Raid-5,add one Partition' # fdisk /dev/sda (to create) # partx -a /dev/sda (to updat kernel) # mkfs.ext4 /dev/sda18 (for example-to format) # mdadm -a /dev/md0 /dev/sda18 (to add in metadisk) # mdadm -D /dev/md0 (to check) # ls /raid (check the data) 'Step 6:-To Stop the Raid Level 5' # umount /raid (un mount the metadisk) # mdadm -S /dev/md0 (to stop) # mdadm -D /dev/md0 (to check) # ls /raid (to check data in mount point)
  • 19. 'Step 7:-To Start the Raid Level 5' # mdadm -A /dev/md0 /dev/sda{16..18} (to start) # mdadm -D /dev/md0 (to check) # mount /dev/md0 /raid (to access metadisk) # ls /raid (to check the data in metadisk) (9)DISK QUOTAS PRACTICAL STEPS #### TO IMPLEMMENT THE DISK QUOTAS ON PARTITION #### 'Step 1:-Create One Partition & Format' # fdisk /dev/sda (to create) # partx -a /dev/sda (to update) # mkfs.ext4 /dev/sda8 (for example-to format) # mkdir /quota (create a new mount point) 'Step 2:-Apply Quotas Permission on the Partition' # mount -o usrquota,grpquota /dev/sda8 /quota # mount (to check) 'Step 3:-Create Quota Database in the Partition' # quotacheck -cugv /quota 'Step 4:-Enable the Quota Service' # quotaon /quota (to enable) # quotaon -p /quota (to check) 'Step 5:-Apply Full Permission on Mount Point' # chmod 777 /quota 'Step 6:-Define the Quota Limit Based on Inode or Block' Create 2 Users # useradd tom # useradd jack '### Defining Quotas Based on User Level ###' (A)Implemmenting quotas based on inode for User:tom # edquota -u tom Filesystem block soft hard inode soft hard /dev/sda8 0 0 0 0 5 10 :wq(save & quit the file) # su - tom (login as a user to check the result) # cd /quota (access mount point) # touch tom{1..10} (create 10 files) # ls (to check) # touch tom11 (try to create 11th file) # exit (logout)
  • 20. (B)Implemmenting quotas based on block for User:jack # blockdev --getbsz /dev/sda8 (to check block size) # edquota -u jack Filesystem block soft hard inode soft hard /dev/sda8 0 12 20 0 0 0 :wq(save & quit the file) # su - jack (login as a user to check the result) # cd /quota (access mount point) # mkdir jack{1..5} (create 5 dir's) # ls (to check) # mkdir jack6 (try to create 6th dir) # exit (logout) NOTE:-If the block size of the partition is 4096 bytes then the size of each empty dir will be 4kb (1 block=1kb) 'Defining the Quotas Based on Group Level' Create 3 Users (for example:a1 to a3) # groupadd zoom (create one group) # usermod -g zoom a1 (to add user as a primary) # usermod -g zoom a2 # usermod -g zoom a3 (A)Implemmenting quotas based on inode for group:zoom # edquota -g zoom Filesystem block soft hard inode soft hard /dev/sda8 0 0 0 0 10 15 :wq(save & quit the file) # su - a1 # cd /quota # touch file{1..5} (create 5 files as user:a1) # exit (logout) Then Create 5 files each as a user:a2 & a3 # touch file16 (try to create 16th file as user:a3) # exit (logout) (10)BACKUP PRACTICAL STEPS ##### BACKUP & RECOVERY ##### 'TO TAKE A BACKUP FROM TAR PROGRAM - FOR DIRECTORIES' # mkdir zoom (create one dir /root) # touch zoom/liux{1..10} (add some data) # ls zoom (to check) TO TAKE BACKUP:- # tar -cvf <destination/backupfile> <source> # tar -cvf /opt/zoom.tar zoom
  • 21. # cd /opt # ls (to check) TO READ BACKUP FILE:- # tar -tvf zoom.tar # cd (go to original & remove data) # rm -rf zoom # ls (to check) TO RESTORE:- # tar -xvf /opt/zoom.tar # ls (to check) 'TO TAKE A BACKUP FROM CPIO PROGRAM - FOR FILES' # touch linux unix redhat (create some files in /root) # ls (to check) TO TAKE BACKUP:- # ls linux unix redhat | cpio -ov > /opt/file.cpio # cd /opt # ls (to check) TO READ BACKUP FILE:- # cpio -tv < file.cpio # cd (go to original location & remove files) # rm -rf linux unix redhat # ls (to check) TO RESTORE:- # cpio -iv < /opt/files.cpio # ls (to check) 'TO TAKE THE BACKUP FROM DUMP - FOR PARTITION' # mount (to check the partition mount points) (For Example:- /dev/sda7 mounted on /home) TO TAKE THE BACKUP:- # dump -0uf <destination/backupfile> <partition_no> # dump -0uf /opt/fullbackup /dev/sda7 # cd /opt # ls (to check) TO READ BACKUP FILE:- # restore -tf fullbackup # cd /home (go to the partition mount point) # rm -rf * (remove all contents) # ls (to check) TO RESTORE:- # restore -rf /opt/fullbackup # ls (to check)
  • 22. 'TO TAKE THE BACKUP FROM SCP PROGRAM - FROM REMOTE PC' # ifconfig (to check the ip addess) # scp -rv <source> <remote_pc_ip:location> # scp -rv zoom 192.168.0.10:/media (for example) To check the data-Go to the Remote Pc & check in /media # rm -rf zoom (remove data from source pc) TO RESTORE:- # scp -rv <remote_pc_ip:location> <source> # scp -rv 192.168.0.10:/media/zoom /root # ls (to check) (11)COMPRESSING TOOLS PRACTICAL STEPS ###### COMPRESSING TOOLS ###### (1)Create one Directory with Data in /root (2)Convert the Directory into .tar extension file # tar -cvf /opt/zoom.tar zoom (for example) # cd /opt # ls (to check) TO COMPRESS WITH GZIP:- # ll zoom.tar (check the size) # gzip zoom.tar # ll zoom.tar.gz (check the size) TO UNCOMPRESS WITH GZIP:- # gunzip zoom.tar.gz # ls (to check) TO COMPRESS WITH BZIP2:- # bzip2 zoom.tar # ll zoom.tar.bz2 (check the size) TO UNCOMPRESS WITH BZIP2:- # bunzip2 zoom.tar.bz2 # ls (to check)