
Recommandé
Recommandé
Contenu connexe
Tendances
Tendances (20)
En vedette
En vedette (17)
Similaire à 9 creating cent_os 7_mages_for_dpdk_training
Similaire à 9 creating cent_os 7_mages_for_dpdk_training (20)
Plus de videos
Plus de videos (14)
Dernier
Dernier (20)
9 creating cent_os 7_mages_for_dpdk_training
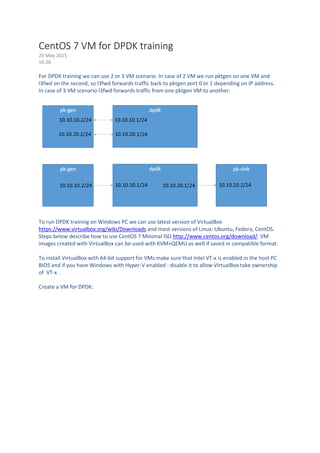
- 1. CentOS 7 VM for DPDK training 20 May 2015 16:26 For DPDK training we can use 2 or 3 VM scenario. In case of 2 VM we run pktgen on one VM and l3fwd on the second, so l3fwd forwards traffic back to pktgen port 0 or 1 depending on IP address. In case of 3 VM scenario l3fwd forwards traffic from one pktgen VM to another: To run DPDK training on Windows PC we can use latest version of VirtualBox https://www.virtualbox.org/wiki/Downloads and most versions of Linux: Ubuntu, Fedora, CentOS. Steps below describe how to use CentOS 7 Minimal ISO http://www.centos.org/download/. VM images created with VirtualBox can be used with KVM+QEMU as well if saved in compatible format. To install VirtualBox with 64-bit support for VMs make sure that Intel VT-x is enabled in the host PC BIOS and if you have Windows with Hyper-V enabled - disable it to allow VirtualBox take ownership of VT-x . Create a VM for DPDK:
- 4. Configure VM by clicking on Settings. Select 2 CPUs:
- 5. Select CentOS-7-x86_64-Minimal ISO Configure 4 network adapters: first attached to "NAT" (for yum), next two attached to "Internal" and last one attached to "Host-only" (for ssh to the VM)
- 7. You can disable Audio, Serial Ports and USB as they will not be needed.
- 8. Now we can start VM and install CentOS 7
- 11. Set host name and turn on network interfaces
- 12. Start installation and create root and dpdk user:
- 14. Reboot.
- 15. To make life easier add NOPASSWD for sudo: $sudo visudo ## Same thing without a password # %wheel ALL=(ALL) NOPASSWD: ALL Use nmtui to setup static IP addresses for interfaces attached to "internal" network:
- 16. We will need these addresses for MAC address discovery. You can use "nmcli d" command to check networks: [dpdk@dpdk ~]$ nmcli d DEVICE TYPE STATE CONNECTION enp0s10 ethernet connected Host-only (enp0s10) enp0s3 ethernet connected NAT (enp0s3) enp0s8 ethernet connected DPDK port 0 (enp0s8)
- 17. enp0s9 ethernet connected DPDK port 1 (enp0s9) lo loopback unmanaged -- If your network uses proxy export http_proxy for yum and wget $ export http_proxy=http://your_proxy:proxy_port Use sudo -E yum install to add following components which are missing in minimal installation gcc wget git patch vim psmisc (killall) net-tools (arp, netstat) pciutils (lspci) socat libpcap-devel (for pktgen) kernel-devel Make sure that /lib/modules/$kernel/build links to proper /usr/src/kernels/$kernel directory Ready to download and install dpdk. $mkdir dpdk.org $wget -P dpdk.org/ http://dpdk.org/browse/dpdk/snapshot/dpdk-2.0.0.tar.gz $tar xzvf dpdk.org/dpdk-2.0.0.tar.gz Create dpdk link, so if needs be we can easily re-link it to a different DPDK version : $ln –s dpdk-2.0.0 dpdk If you want to cross-compile DPDK for different CPU platform not listed in dpdk/config/* files you can edit existing config files or create new configuration (proper way) and change CONFIG_RTE_MACHINE. For example, to compile for Sandy Bridge on Haswell platform copy defconfig_x86_64-native-linuxapp-gcc to defconfig_x86_64-snb-linuxapp-gcc and set CONFIG_RTE_MACHINE=snb All platforms are listed in dpdk/config/common_linuxconfig: ## machine can define specific variables or action for a specific board ## RTE_MACHINE can be: ## default nothing specific ## native current machine ## atm Intel® Atom microarchitecture ## nhm Intel® microarchitecture code name Nehalem ## wsm Intel® microarchitecture code name Westmere ## snb Intel® microarchitecture code name Sandy Bridge ## ivb Intel® microarchitecture code name Ivy Bridge ## ## Note: if your compiler does not support the relevant -march options, ## it will be compiled with whatever latest processor the compiler supports! $dpdk/tools/setup.sh -> option 9: x86_64-native-linuxapp-gcc -> option 12: Insert IGB UIO module -> option 15: allocate 128 huge pages To make life easier add RTE_SDK and RTE_TARGET to .bash_profile: ~/.bash_profile export RTE_SDK=/home/dpdk/dpdk
- 18. export RTE_TARGET=x86_64-native-linuxapp-gcc You also can add export http_proxy here if you need Internet access Add to ~/.bashrc # User specific aliases and functions if [ -f ~/.bash_aliases ]; then . ~/.bash_aliases fi And create ~/.bash_aliases file with the following lines: alias dpstat='~/dpdk/tools/dpdk_nic_bind.py --status' alias dpbind='sudo -E ~/dpdk/tools/dpdk_nic_bind.py --force -- bind=igb_uio' alias dpunbind='sudo -E ~/dpdk/tools/dpdk_nic_bind.py -u' Re-login. Now we can list/bind/unbind interfaces to DPDK by dpstat/dpbind/dpunbind commands: [dpdk@dpdk ~]$ dpstat Network devices using DPDK-compatible driver ============================================ <none> Network devices using kernel driver =================================== 0000:00:03.0 '82540EM Gigabit Ethernet Controller' if=enp0s3 drv=e1000 unused=igb_uio *Active* 0000:00:08.0 '82540EM Gigabit Ethernet Controller' if=enp0s8 drv=e1000 unused=igb_uio *Active* 0000:00:09.0 '82540EM Gigabit Ethernet Controller' if=enp0s9 drv=e1000 unused=igb_uio *Active* 0000:00:0a.0 '82540EM Gigabit Ethernet Controller' if=enp0s10 drv=e1000 unused=igb_uio *Active* Other network devices ===================== <none> Compile l3fwd. For DPDK 2.0 we need to patch it, so download patches first from DPDK Patchwork http://dpdk.org/dev/patchwork/project/dpdk/list/ Patch 4752 [dpdk-dev] examples: add ip version check for l3fwd app $wget http://dpdk.org/dev/patchwork/patch/4752/raw/ -O dpdk.org/4752.patch Patch 4774 [dpdk-dev,v2] l3fwd: make destination mac address configurable $wget http://dpdk.org/dev/patchwork/patch/4774/raw/ -O dpdk.org/4774.patch Apply downloaded patches: [dpdk@dpdk ~]$ cd dpdk [dpdk@dpdk dpdk]$ patch -p 1 -i ../dpdk.org/4752.patch patching file examples/l3fwd/main.c [dpdk@dpdk dpdk]$ patch -p 1 -i ../dpdk.org/4774.patch patching file examples/l3fwd/main.c
- 19. Edit examples/l3fwd/main.c and set to 1: #define DO_IP_VERSION_CHECK 1 To enable SW classification of IP packets for emulated devices. Make l3fwd: $cd examples/l3fwd $make Now we need a VM with pktgen to generate some traffic… Instead of re-doing all steps above clone VM image we just created and after boot use nmtui to change static IP addresses and host name to pk-gen. Download pktgen from dpdk.org: $wget -P dpdk.org http://dpdk.org/browse/apps/pktgen- dpdk/snapshot/pktgen-2.9.0.tar.gz $tar xzvf pktgen-2.9.0.tar.gz $ln –s pktgen-2.9.0 pktgen $cd pktgen $make Starting pktgen and l3fwd manually First we need to bind our interfaces to igb_uio. (We already mounted hugepages and inserted igb_uio above using dpdk/tools/setup.sh) $sudo -E ~/dpdk/tools/dpdk_nic_bind.py --force --bind=igb_uio 00:08.0 00:09.0 Or, using dpdk/tools/setup.sh select option [18] Bind Ethernet device to IGB UIO module Or, with dpbind alias: $dpbind 00:08.0 00:09.0 $ sudo ./app/app/$RTE_TARGET/pktgen -c 3 -n 2 -m 128 -- -T -p 0x03 - m "[1:1].0, [1:1].1"
- 20. After you start pktgen hit Enter for command prompt. We can source MAC addresses of pktgen Src MAC Address : 08:00:27:9d:fd:7e 08:00:27:af:58:f6 as destinations for l3fwd: $sudo dpdk/examples/l3fwd/build/l3fwd -c 2 -n 2 -- -p 0x03 --config "(0,0,1),(1,0,1)" --eth-dest 0,08:00:27:9d:fd:7e --eth-dest 1,08:00:27:af:58:f6 For l3fwd running with emulated e1000 we can use only one core (-c 2) as emulated e1000 NIC doesn't support multiple tx queues at all (see http://dpdk.org/browse/dpdk/tree/lib/librte_pmd_e1000/em_ethdev.c#n884) and virtio NIC doesn't support multiple tx queues by default. At startup l3fwd prints MAC addresses of its ports: Initializing port 0 ... Creating queues: nb_rxq=1 nb_txq=1... Address:08:00:27:9F:7F:C3, and we can use port 0 MAC address to configure pktgen: Pktgen> set mac 0 08:00:27:9F:7F:C3 Pktgen> set ip dst 0 2.1.1.24 And start port 0: Pktgen> start 0
- 21. Changing destination IP to 1.1.1.x we can direct traffic back to port 0: