H5P Start up workshop session 02
•
1 j'aime•432 vues

This document provides step-by-step instructions for creating an H5P course presentation that includes mixed media elements like text, images, video, and a Twitter feed. It describes how to add slides, insert different content types, and format text. Specific instructions are given for creating a title slide, embedding a YouTube video, adding cloze and drag text interactive activities, and including a Twitter user feed. The presentation is then saved and its auto-generated summary slide noted before logging out.

Recommandé
Contenu connexe
Tendances
Tendances (20)
Similaire à H5P Start up workshop session 02
Similaire à H5P Start up workshop session 02 (20)
Plus de John Allan
Plus de John Allan (20)
Dernier
Dernier (20)
H5P Start up workshop session 02
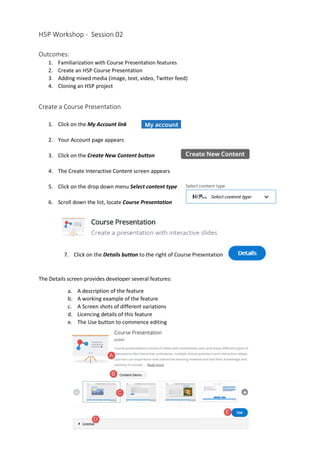
- 1. H5P Workshop - Session 02 Outcomes: 1. Familiarization with Course Presentation features 2. Create an H5P Course Presentation 3. Adding mixed media (image, text, video, Twitter feed) 4. Cloning an H5P project Create a Course Presentation 1. Click on the My Account link 2. Your Account page appears 3. Click on the Create New Content button 4. The Create Interactive Content screen appears 5. Click on the drop down menu Select content type 6. Scroll down the list, locate Course Presentation 7. Click on the Details button to the right of Course Presentation The Details screen provides developer several features: a. A description of the feature b. A working example of the feature c. A Screen shots of different variations d. Licencing details of this feature e. The Use button to commence editing
- 2. 8. Click on the Use button 9. Input the Title Swimming Advanced Techniques 10. Note that under the Select content type box is a Tutorial and an Example link. These are further supports for content developers This screen provides developer several features: a. Slide keyword menu options (show/ hide, opacity) b. Standard features c. Additional features button, reveals more elements (vertical menu) d. Additional features e. Workspace f. Show/ Hide Slide keyword menu g. Slide counter h. Slide editing icons i. Behavioural menu j. Text localization/translations menu Create a Title Slide 1. On the horizontal tool menu, click on the Text button 2. The Create Interactive Content screen appears 3. In the Edit text box, input, At the end of this module you should be able to feel comfortable identifying advanced swimming techniques. 4. Select this text, then change the text size from 100% to 125%. 5. Click on the Done button
- 3. 6. The text appears centred on the screen, with an attributes modifier 7. Use the bounding box nodes to resize the textbox 8. Click and drag within the text box to reposition the text on the slide 9. Other attributes modifiers include: 10. Click on an empty space in the work area 11. Click on the Image icon 12. Click on the Add button 13. (I selected an image from the open image site https://www.pexels.com/search/swimming/) 14. Locate and find an image on your hard drive. 15. Select the image 16. Click on the Open button 17. In the textbox Alternative text, input person swimming 18. Click on the Done button 19. Drag the image to a suitable position on the work area
- 4. Insert Online Video 1. Click on Add a new slide icon to continue 2. A new slide appears, click on the video icon 3. The Edit video page appears 4. Click on the Add file icon 5. In the YouTube source text area, paste https://youtu.be/fXgh56kisTg 6. Click on the Insert button 7. Click on the Done button 8. Centre the video on the work area 9. On the horizontal tool menu, click on the Text button 10. In the Edit text box, input, Watch this video, take notes then go to the next slide. 11. Select this text, then change the text size from 100% to 125% 12. Click on the Done button 13. Drag the textbox to a suitable position on the work area 14. Click on Add a new slide icon to continue Create a Cloze activity 1. On the horizontal tool menu, click on the Fill in the Blanks button 2. Select the text Fill in the missing words 3. Click on the text format (Normal) drop down link 4. Select the Heading 2 option
- 5. 5. Scroll down to the Text blocks textbox 6. Click in the textbox (has the text Oslo is the capital of *Norway*.) 7. Input the text, A good title for this video is “Learn to *swim* freestyle or front crawl in 3 Steps a Tutorial for Beginners”. 8. Click on the Done button 9. Drag the textbox to a suitable position on the work area 10. Resize the textbox if necessary Create a Drag Text activity 1. Click on Add a new slide icon 2. On the horizontal tool menu, click on the Drag text button 3. Scroll down to the Text textbox 4. Click in the textbox (has the text *Oslo* is the capital of Norway,*Stockholm*…) 5. Input the text, (note the asterisks) Try a front *crawl* (also known as a freestyle). Floating on your stomach, do a flutter kick with your legs and use your arms to "crawl" forward. Bring one *arm* out of the water so that it's "reaching" forward, then bring it back down and use your cupped hand to "push" the water behind you. Alternate arms. To breathe, turn your head to one *side* under the arm that's currently crawling, lifting enough for you to take a breath. Take a *breath* under the same arm each time, so that you're breathing once every two strokes. 6. Click on the Done button 7. Drag the textbox to a suitable position on the work area 8. Resize the textbox if necessary 9. Click on Add a new slide icon Add a Twitter Feed 1. On the horizontal tool menu, click on the More elements button
- 6. 2. A drop down menu appears, click on the Twitter User Feed button 3. In the Username on Twitter textbox input ClaireFuller2 4. Drag the textbox to a suitable position on the work area 5. Resize the textbox if necessary 6. Click on the Save button 7. Try your activity 8. Note that an activity Summary slide has been generated to report feedback. Click on the Log out button