
Recommandé
Contenu connexe
Tendances
Tendances (20)
Similaire à Egg candling
Similaire à Egg candling (20)
Dernier
Dernier (20)
Egg candling
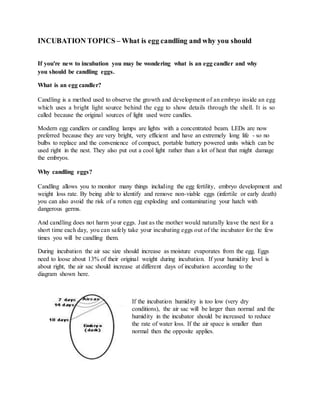
- 1. INCUBATION TOPICS – What is egg candling and why you should If you're new to incubation you may be wondering what is an egg candler and why you should be candling eggs. What is an egg candler? Candling is a method used to observe the growth and development of an embryo inside an egg which uses a bright light source behind the egg to show details through the shell. It is so called because the original sources of light used were candles. Modern egg candlers or candling lamps are lights with a concentrated beam. LEDs are now preferred because they are very bright, very efficient and have an extremely long life - so no bulbs to replace and the convenience of compact, portable battery powered units which can be used right in the nest. They also put out a cool light rather than a lot of heat that might damage the embryos. Why candling eggs? Candling allows you to monitor many things including the egg fertility, embryo development and weight loss rate. By being able to identify and remove non-viable eggs (infertile or early death) you can also avoid the risk of a rotten egg exploding and contaminating your hatch with dangerous germs. And candling does not harm your eggs. Just as the mother would naturally leave the nest for a short time each day, you can safely take your incubating eggs out of the incubator for the few times you will be candling them. During incubation the air sac size should increase as moisture evaporates from the egg. Eggs need to loose about 13% of their original weight during incubation. If your humidity level is about right, the air sac should increase at different days of incubation according to the diagram shown here. If the incubation humidity is too low (very dry conditions), the air sac will be larger than normal and the humidity in the incubator should be increased to reduce the rate of water loss. If the air space is smaller than normal then the opposite applies.
- 2. How to candle eggs and what to expect Eggs may be candled after 5 days of incubation and every few days thereafter. For best results you should candle eggs in a darkened room or in dimly lit conditions. The candler should be held right against the shell at the larger end of the egg where the air sac is located. The egg can be rotated to observe blood vessel growth and embryo development. In fertile eggs you will initially see a small spot (the embryo) with a web of blood vessels radiating from it. Day 5 - developing embryo with Day 10 - growing embryo and healthy healthy blood vessels spreading vein growth - larger air sac Day 14 – growing embryo with fully spread vein system - larger air cell Day 19 – almost fully developed embryo – dark mass with larger yet air cell By day 18 the embryo will take up most of the egg (apart from the air sac) and it will be hard to make out detail even with a good quality candler but you should be able to see movement.
- 3. Conversely, infertile eggs will remain clear and eggs which have died will show a dark ring. Later on in incubation, eggs which have died will show a dark mass with ill defined detail and no healthy blood vessels radiating. It will take a little practice to become a confident candler. Do not discard any eggs if you are not sure. Have another look at them later comparing them to your good eggs to help you decide. For more information on candling and other incubation procedures download our free incubation handbook. Read More: http://www.pippup.com/how-to-candle-eggs