Creating simple component
•
4 j'aime•2,935 vues

This document describes how to create and consume a simple component using C# for arithmetic calculations. It involves creating a class library project called "Calculator" with methods for addition, subtraction, multiplication and division. Then a Windows Forms application is created to reference the Calculator component and call its methods to perform calculations on user-entered values and display the results.

Recommandé
Contenu connexe
Tendances
Tendances (20)
Similaire à Creating simple component
Similaire à Creating simple component (20)
Plus de priya Nithya
Plus de priya Nithya (19)
Dernier
Dernier (20)
Creating simple component
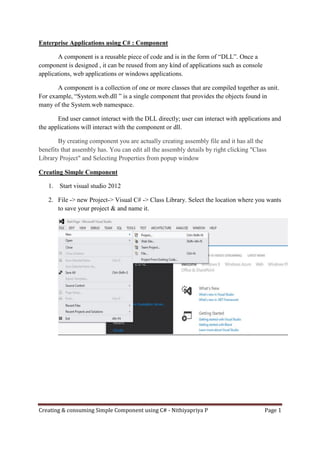
- 1. Creating & consuming Simple Component using C# - Nithiyapriya P Page 1 Enterprise Applications using C# : Component A component is a reusable piece of code and is in the form of “DLL”. Once a component is designed , it can be reused from any kind of applications such as console applications, web applications or windows applications. A component is a collection of one or more classes that are compiled together as unit. For example, “System.web.dll ” is a single component that provides the objects found in many of the System.web namespace. End user cannot interact with the DLL directly; user can interact with applications and the applications will interact with the component or dll. By creating component you are actually creating assembly file and it has all the benefits that assembly has. You can edit all the assembly details by right clicking "Class Library Project" and Selecting Properties from popup window Creating Simple Component 1. Start visual studio 2012 2. File -> new Project-> Visual C# -> Class Library. Select the location where you wants to save your project & and name it.
- 2. Creating & consuming Simple Component using C# - Nithiyapriya P Page 2 3. Rename the class1.cs as Calculate.cs and add coding for add, sub, mul, div methods as given below. Calculator.cs using System; using System.Collections.Generic; using System.Linq; using System.Text; using System.Threading.Tasks; namespace Calculator { public class Calculate { public int Add(int a, int b) { return a + b; } public int Sub(int a, int b) {
- 3. Creating & consuming Simple Component using C# - Nithiyapriya P Page 3 return a - b; } public int Mul(int a, int b) { return a * b; } public int Div(int a, int b) { return a / b; } } } 4. Save & build Calculator 5. Now we have created calculator.dll. (you can verify it in your bindebug directory of your class library project) 6. Goto solution explorer, Right click ; Add - > new Project-> visual c#->windows form Application: Give a name and click ok. 7. Design your form for arithmetic calculation as given in form design. 8. Goto solution explorer. Right click on Windows form application- >Add Reference - > browse for the calculate.dll file; check it and add to your project.
- 4. Creating & consuming Simple Component using C# - Nithiyapriya P Page 4 9. Now you can see “Calculator” under the references folder. 10. Add “using calculator” namespace on form1.cs and add the following code as given below. Form1.cs using System; using System.Collections.Generic; using System.ComponentModel; using System.Data; using System.Drawing; using System.Linq; using System.Text; using System.Threading.Tasks; using System.Windows.Forms; using Calculator; namespace Minicalculator { public partial class Form1 : Form { public Form1() { InitializeComponent(); } Calculate cal = new Calculate(); private void Form1_Load(object sender, EventArgs e) { } private void Add_Click(object sender, EventArgs e) { int i = cal.Add(int.Parse(Txt1stNo.Text), int.Parse(Txt2ndNo.Text)); TxtResult.Text = i.ToString();
- 5. Creating & consuming Simple Component using C# - Nithiyapriya P Page 5 } private void Sub_Click(object sender, EventArgs e) { int i = cal.Sub(int.Parse(Txt1stNo.Text), int.Parse(Txt2ndNo.Text)); TxtResult.Text = i.ToString(); } private void Mul_Click(object sender, EventArgs e) { int i = cal.Mul (int.Parse(Txt1stNo.Text), int.Parse(Txt2ndNo.Text)); TxtResult.Text = i.ToString(); } private void Div_Click(object sender, EventArgs e) { int i = cal.Div (int.Parse(Txt1stNo.Text), int.Parse(Txt2ndNo.Text)); TxtResult.Text = i.ToString(); } private void button1_Click_1(object sender, EventArgs e) { this.Close(); } } } 11. Save the project 12. Right click on the current project and select “set as startup project” and run the project.