A note about the References tool in Word
On a PC/Windows system (based on Office 2010)
When you need to create a citation (giving credit for work that you are referencing), you
click on References, then on Insert Citation. The next step is to add a new source.
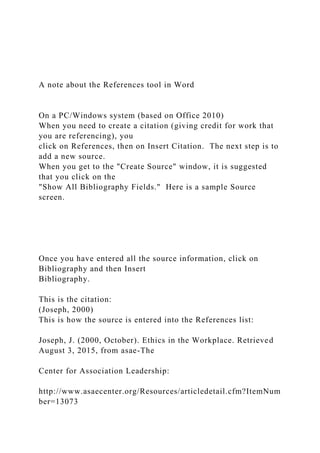
When you get to the "Create Source" window, it is suggested that you click on the
"Show All Bibliography Fields." Here is a sample Source screen.
Once you have entered all the source information, click on Bibliography and then Insert
Bibliography.
This is the citation:
(Joseph, 2000)
This is how the source is entered into the References list:
Joseph, J. (2000, October). Ethics in the Workplace. Retrieved August 3, 2015, from asae-The
Center for Association Leadership:
http://www.asaecenter.org/Resources/articledetail.cfm?ItemNumber=13073
Other fields on the source page would be used for a journal article or an article from a
periodical.
On a Mac/OS system (based on Office 2013)
From the MAC Help files:
To add a citation, a works cited list, or a bibliography to your document, you first
add a list of the sources that you used.
Add a source by using the Source Manager
The Source Manager lists every source ever entered on your computer so that
you can reuse them in any other document. This is useful, for example, if you
write research papers that use many of the same sources. If you open a
document that includes citations, the sources for those citations appear under
Current list. All the sources that you have cited, either in previous documents or
in the current document, appear under Master list.
1. Open up your Word document.
2. On the Document Elements tab , under References ,
click Manage.
3. At the bottom of the Citations tool, click , and then click
Citation Source Manager .
1 2
3
4
1 2
3
4
4. Click New.
5. On the Type of Source pop-up menu, select a source type.
6. Complete as many of the fields as you want. The required fields are
marked with an asterisk (*). These fields provide the minimum information
that you must have for a citation.
7.
Note You can insert citations even when you do not have all the publishing details.
If publishing details are omitted, citations are inserted as numbered placeholders.
Then you can edit the sources later. You must enter all the required information for a
source before you can create a bibliography.
8. When you are finished, click OK.The source information that you entered
appears in the Current list and Master list of the Source Manager.
9. To add additional sources, repeat steps 3 through 6.
10. Click Close.The source information that you entered appears in the
Citations List in the Citations tool.
Edit a source in the Citations tool
You can edit a source directly in the document or in the Citations tool. When you
change the source, the changes apply to all instances of that citation throughout
the docu.
IGNOU MSCCFT and PGDCFT Exam Question Pattern: MCFT003 Counselling and Family...
A note about the References tool in Word On a PCWindo.docx
1. A note about the References tool in Word
On a PC/Windows system (based on Office 2010)
When you need to create a citation (giving credit for work that
you are referencing), you
click on References, then on Insert Citation. The next step is to
add a new source.
When you get to the "Create Source" window, it is suggested
that you click on the
"Show All Bibliography Fields." Here is a sample Source
screen.
Once you have entered all the source information, click on
Bibliography and then Insert
Bibliography.
This is the citation:
(Joseph, 2000)
This is how the source is entered into the References list:
Joseph, J. (2000, October). Ethics in the Workplace. Retrieved
August 3, 2015, from asae-The
Center for Association Leadership:
http://www.asaecenter.org/Resources/articledetail.cfm?ItemNum
ber=13073
2. Other fields on the source page would be used for a journal
article or an article from a
periodical.
On a Mac/OS system (based on Office 2013)
From the MAC Help files:
To add a citation, a works cited list, or a bibliography to your
document, you first
add a list of the sources that you used.
Add a source by using the Source Manager
The Source Manager lists every source ever entered on your
computer so that
you can reuse them in any other document. This is useful, for
example, if you
write research papers that use many of the same sources. If you
open a
document that includes citations, the sources for those citations
appear under
Current list. All the sources that you have cited, either in
previous documents or
in the current document, appear under Master list.
1. Open up your Word document.
2. On the Document Elements tab , under References ,
click Manage.
3. 3. At the bottom of the Citations tool, click , and then click
Citation Source Manager .
1 2
3
4
1 2
3
4
4. Click New.
5. On the Type of Source pop-up menu, select a source type.
6. Complete as many of the fields as you want. The required
fields are
marked with an asterisk (*). These fields provide the minimum
information
that you must have for a citation.
7.
Note You can insert citations even when you do not have all
4. the publishing details.
If publishing details are omitted, citations are inserted as
numbered placeholders.
Then you can edit the sources later. You must enter all the
required information for a
source before you can create a bibliography.
8. When you are finished, click OK.The source information that
you entered
appears in the Current list and Master list of the Source
Manager.
9. To add additional sources, repeat steps 3 through 6.
10. Click Close.The source information that you entered appears
in the
Citations List in the Citations tool.
Edit a source in the Citations tool
You can edit a source directly in the document or in the
Citations tool. When you
change the source, the changes apply to all instances of that
citation throughout
the document. However, if you make a manual change to a
particular citation
within the document, those changes apply only to that particular
citation. Also,
that particular citation is not updated or overridden when you
update the citations
and bibliography.
1. On the Document Elements tab, under References, click
Manage.
5. 2. In the Citations List, select the citation that you want to edit.
3. At the bottom of the Citations tool, click , and then click Edit
Source.
4. Make the changes that you want, and then click OK. If you
see a message
that asks whether you want to save changes in both the Master
list and the
Current list, click No to change only the current document, or
click Yes to
apply changes to the source of the citation and use it in other
documents.
Remove a source from the Citations List
Before you can remove a source from the Citations List, you
must delete all
related citations.
1. In the document, delete all the citations associated with the
source that
you want to remove.
2. Tip You can use the search field to locate citations. In the
search field , enter part of the citation.
3. On the Document Elements tab, under References, click
Manage.
4. At the bottom of the Citations tool, click , and then click
Citation Source
6. Manager.
5. In the Current list, select the source that you want to remove,
and then
click Delete. The source now appears only in the Master list.
6.
Note If the Delete button is unavailable, or if you see a check
mark next to the source in the list, there is still at least one
related citation in the document. Delete all remaining related
citations in the document, and then try deleting
the source again.
7. Click Close. The source that you removed no longer
appears in the Citations
List.
Step 2. Insert, edit, or delete a citation (optional)
Insert a citation
1. In your document, click where you want to insert the citation.
2. On the Document Elements tab, under References, click
Manage.
3. In the Citations List, double-click the source that you want to
cite. The
citation appears in the document.
Add page numbers or suppress author, year, or title for a
specific citation
7. Use this option to make custom changes to a citation and keep
the ability to
update the citation automatically.
Note The changes that you make by using this method apply
only to this citation.
1. Click anywhere between the parentheses of the citation. A
frame appears
around the citation.
2. Click the arrow on the frame, and then click Edit this
Citation.
3. Add page numbers, or select the Author, Year, or Title check
box to keep that
information from showing in the citation.
Make manual changes to a specific citation
If you want to change a specific citation manually, you can
make the citation text
static and edit the citation in any way that you want. After you
make the text
static, the citation will no longer update automatically. If you
want to make
changes later, you must make the changes manually.
1. Click anywhere between the parentheses of the citation. A
frame appears
8. around the citation.
2. Click the arrow on the frame, and then click Convert Citation
to Static Text.
3. In the document, make the changes to the citation.
Delete a single citation from the document
1. In the document, find the citation that you want to delete.
2.
Tip You can use the search field to locate citations. In the
search field , enter part of the citation.
3. Select the whole citation, including the parentheses, and then
press DELETE.
Step 3. Insert or edit a works cited list or a bibliography
A works cited list is a list of all works you referred to (or
"cited") in your
document, and is typically used when you cite sources using the
MLA style. A
works cited list differs from a bibliography, which is a list of
all works that you
consulted when your researched and wrote your document.
Insert a works cited list or a bibliography
1. In your document, click where you want the works cited list
or bibliography to
9. appear (usually at the very end of the document, following a
page break).
2. On the Document Elements tab, under References, click
Bibliography, and
then click Bibliography or Works Cited.
Change a works cited list or a bibliography style
You can change the style of all the citations contained in a
document's works
cited list or bibliography without manually editing the style of
the citations
themselves. For example, you can change the citations from the
APA style to the
MLA style.
1. On the View menu, click Draft or Print Layout.
2. On the Document Elements tab, under References, click the
Bibliography
Style pop-up menu, and then click the style that you want to
change the
bibliography's references to. All
references in your document's bibliography change to the new
style.
Update a works cited list or a bibliography
If you add new sources to the document after you inserted the
works cited list or
bibliography, you can update the works cited list or
bibliography to include the
new sources.
10. 1. Click the works cited list or bibliography. A frame appears
around it.
2. Click the arrow on the frame, and then click Update Citations
and
Bibliography.
HCS339 Representation of Constitutions and Tissues States
Images
Image #1: Jane Doe
Image #2: Mona Lisse
Image #3: Roberta Flynn
Image #4: Kyle Friar
11. Image #5: Tome Arissa
Image #6: Robyn, Tony, Christine Locke
Image #7: Condole Arriz
Image #8: Harris Mann
Image #9: Tilden Long
Image #10: Marlee Jung
12. Image #11: Aristo Lechat
Image #12: Teloss Kozonis
Research Paper Using Word
This assignment has two goals: 1) have students increase their
understanding of the concept of Protecting Personal Information
(PPI) and other ethical issues related to the use of information
technology through research, and 2) learn to correctly
incorporate citations and references in APA format. Students
may use the tools and techniques within Word to format the
research paper, including use of the References and citation
tools. These skills will be valuable throughout a student’s
academic career. The paper will require a title page, NO
abstract, three to four full pages of content with incorporation
of a minimum of 3 external resources from credible sources and
a Works Cited/References page. Wikipedia and similar general
information sites, blogs or discussion groups are not considered
creditable sources for a research project. No more than 10% of
the paper may be in the form of a direct citation from an
external source.
A list of topics from which students can choose is provided
below.
Topics for Research Paper
1.
1. Social Engineering – what it is, how it is used, and potential
positive and negative impacts on individuals and on society
1. Employee Monitoring – why and how it is used, the legal
13. issues surrounding its use, and impacts on employer and
employee
1. Biometrics – various implementations and the ethical and
privacy issues related to the use of biometrics
1. Use of Cookies – what they are, how they are used, and
potential positive and negative impacts
1. What are the privacy laws related to Information Technology
use and how do they impact you personally?
1. Intellectual Property Rights; issues related to copyright, fair
use, copyright infringement, and the potential personal and
financial impacts
1. The Edward Snowden case - the dilemma between the
"Official Secrets Act" versus a perceived duty to share versus
the damage it may do to national security.
1. The Apple vs. FBI controversy over unlocking the iPhone
If there is another topic that addresses ethical issues as related
to information technology that is of special interest to you but
one that is not in the list above, request permission from your
instructor before selecting this alternate topic.
Writing Quality for the Research Paper
* All Grammar, Verb Tenses, Pronouns, Spelling, Punctuation,
and Writing Competency should be without error.
* Be particularly careful about mis-matching a noun and
pronoun. For example, if you say "A person does this…" then
do not use "their" or "they" when referring to that person.
"Person" is singular; "their" or "they" is plural.
* Remember: there is not their, your is not you're, its is not it's,
too is not to or two, site is not cite, and who should be used
after an individual, not that. For example, "the person WHO
made the speech" not "the person THAT made the speech."
* In a professional paper one does not use contractions
14. (doesn't, don't, etc.) and one does not use the personal I,you or
your. Use the impersonal as in the previous sentence. It is more
business-like to say "In a professional paper one should not use
contractions," rather than saying, "In a professional paper you
don't use contractions."
*Remember: spell-check, then proofread. Better yet, have a
friend or colleague read it before submitting it. Read it out loud
to yourself. Read it as if you are submitting it to your boss.
You can find instructions on how to use the References tool in
Word on a PC or on a Mac in the separate file attached here.
Complete rubrics for this paper are found in the table on the
next page.
Element #
Requirement
Points Allocated
Comments
01
Paper should be
- double-spaced,
- margins are set to 1” (left, right, top bottom),
- 12 point Arial type is used for all text
- headings, if used, are bold but in 12 point Arial type
0.5
This is the font in normal paragraphs. Heading and title fonts
may be in bold, but should remain in 12 point font.
02
Body of the paper is at least three full pages and does not
exceed five typed, double-spaced pages. The 3- 5 pages does not
include the title and reference pages and these are not included
in the page count of the body of the paper.
0.5
Charts and other graphical information are not included in the
page count.
03
15. Title Page which shows title of the paper and the author's
(student's) name. The title and author’s name should be centered
horizontally and vertically on the title page. The title and
author's name should appear in the center of the page.
0.5
Title must be appropriate for content
04
At least three (3) APA formatted in-text citations.
If you are not familiar with APA format, it is recommended that
you use the References feature in Word for your citations and
Reference List or refer to the "Citing and Writing" option under
the Resources/Library/Get Help area in the LEO classroom.
It is important to review the final format for APA-style
correctness even if generated by Word.
2
These can be anywhere in the document, but the citations must
be relevant to what is being referenced and the APA format is
used correctly.
05
At least two (2) informational footnotes.
(Note: APA Style does not use footnotes for citations; however,
APA style does allow for the incorporation of informational
footnotes)
Footnotes are not used to list a reference! Footnotes contain
information about the topic to which the footnote has been
attached.
1.0
These can be anywhere in the document, but the informational
footnotes must be relevant to the associated text. The purpose
of this requirement is to effectively incorporate the information
and demonstrate that you can use the MS Word footnoting
functionality.
16. 06
References Page using APA format for references. The
References must be on a separate page from the body of the
paper.
If you are not familiar with APA format, it is recommended that
you use the References feature in Word for your citations and
Reference List or refer to the "Citing and Writing" option under
the Resources/Library/Get Help area in the LEO classroom.
It is important to review the final format for APA-style
correctness even if generated by Word.
1.0
All works listed must be incorporated within the writing of your
paper as specified in APA style
07
Describe the topic and ethical issue as it relates to the use of
Information Technology
2
08
Discuss the trends and ways individuals and/or organizations
are impacted by the issue or are working to prevent the impact.
2
09
Paper must be well-organized, clearly written in a style
appropriate for college level work.
1
10
Paper should be grammatically correct and contain no spelling
errors.
1.5
Although you should use the Spell Check and Grammar Check
17. function in Word, this will not catch all errors – you are
ultimately responsible for proofreading. Direct citations should
not exceed 10% of total words (use Word’s ‘word count’
function)
TOTAL:
12
Case Study Part 3 – MS Powerpoint Executive Presentation
Use the project description HERE to complete this activity. For
a review of the complete rubric used in grading this exercise,
click on the Assignments tab, then on the title Case Study Part 3
- Exec Presentation (Powerpoint)– click on Show Rubrics if the
rubric is not already displayed.
To the maximum extent possible, utilize the rule of 7’s - no
more than seven bullets per slide, and no more than seven words
per bullet.
Note: there are several tutorials on Power Point functions in the
topic labeled "Optional Tutorials – Power Point project" in the
Readings list for Week 8.
The details of the hardware and software solution need to be in
the slides.
The purpose of this presentation is to present the hardware and
software solution for a decision. For example, make and model
of hardware and short description should be in the slide but be
brief and in bullet format. The speaker notes are for
amplification. Slides with Speaker notes should contain at least
four complete sentences (in the notes section) each. Think of
the speaker notes as what you would actually say during the
presentation. Also, if someone wants to review the presentation
later, the speaker notes will provide sufficient information for
the reader to understand what you presented.
Points will be deducted for any spelling or grammatical errors
either on the slide or in the speaker notes.
18. The summary MUST link the proposed solution to the
requirements.
Create a presentation to outline your proposal to meet the case
study requirements. Identify the purpose and audience (the
Director) for your presentation.
Element
#
Requirement
Points Allocated
Comments
01
Open a new, blank Power Point presentation file.
Save the Presentation using the following name:
“Student’s First Initial Last Name Presentation”
Example: JSmith Presentation
0.1
02
Select a design/theme template to define the format and
background for your presentation slides. Do NOT use the
default theme (Office). Also ensure that the theme you select or
any other formatting changes you make do not make the
presentation difficult to view on a computer.
0.1
From this point forward, let the design template automatically
set font and style formats. This is the beauty of using a standard
template over one that you designed yourself.
03
Slide 1: This is your Title Slide.
Select an appropriate title and subtitle layout that clearly
conveys the purpose of your presentation.
0.1
No speaker notes required
04
Slide 2: Title this slide "Agenda for Today's Meeting"
19. Add the following bullet points for the agenda:
· Introduction/Overview
· Hardware Devices
· System Unit Components
· Productivity Software
· Summary of Recommendations
0.3
This is an outline of your presentation.
Your speaker notes will include your own introduction. Talk
very briefly about the agenda.
05
Slide 3: Title this slide "Purpose of Presentation and Overview"
Identify audience and the reason for the presentation and
provide a bulleted overview of what's to come. Include here the
name and type of computers you are recommending (e.g., Dell
Inspiron 1500 or Apple Mac desktop)
Use bullet points, not complete sentences.
0.6
Use the speaker notes feature to help you discuss the bullet
points (four complete sentences minimum).
06
Slide 4: Title this slide "Hardware Devices."
Write and add a minimum of 3 – 5 bullets that best illustrate
how the Hardware devices satisfy the requirements. You will
summarize the hardware devices here, pointing out major
components or differences in major components if more than
one type of computer is being recommended. The devices
include input, output, communication, storage, and "other."
0.6
Use the speaker notes feature to help you discuss the bullet
points (four complete sentences minimum). The speaker notes
should address the requirement met.
07
20. Slide 5: Title this slide "System Unit Components and System
Software"
Write and add a minimum of 3 – 5 bullets that best illustrate
how the System Unit Features satisfy the requirements. . You
will summarize the system unit components here, pointing out
major components or differences in major components if more
than one type of computer is being recommended. Include
information on the system software also (OS, utilities, etc.)
0.6
Use the speaker notes feature to help you discuss the bullet
points (four complete sentences minimum). The speaker notes
should address the requirement met.
08
Slide 6: Title this slide "Productivity Software."
Write and add a minimum of 3 – 5 bullets that identify the
recommended application software and illustrate how the
Application Software satisfies the requirements. You will
summarize the software components here, pointing out major
components or differences in major components if more than
one type of computer is being recommended.
0.6
Use the speaker notes feature to help you discuss the bullet
points (four complete sentences minimum). The speaker notes
should address the requirement met.
09
Add a relevant graphic that enhances text on the Productivity
Software slide (slide 6). If a photo is used, be sure to cite the
source.
0.3
10
Slide 7: Title of this slide is "Internet Connectivity and Web
Services."
Write and add a minimum of 3 – 5 bullets that best illustrate
how the Internet Connectivity satisfies the requirements. You
will identify the ISP and summarize the web services here,
21. pointing out major components or differences in major
components if more than one type of computer is being
recommended.
0.6
Use the speaker notes feature to help you discuss the bullet
points (four complete sentences minimum). The speaker notes
should address the requirement met.
11
Slide 8: Title this slide "Summary of Recommendations"
Write and add 3 – 5 bullets that best illustrate why this is the
best solution or supports the purpose you’ve defined for your
presentation.
0.6
Use the speaker notes feature to help you discuss the bullet
points (four complete sentences minimum).
12
Slide 9:
Add a Title Only slide. Type "Questions & Next Steps" in the
title section. Move the title box so that is it centered on the
slide (horizontally & vertically).
0.3
No speaker notes required
13
Create a footer using "Courtesy of Your Name" so that is shows
on all slides including the Title Slide. This will require a
separate step from the next item.
0.3
Replace the words "Your Name" with your actual name.
14
In that same footer, insert automated Slide Numbers that appear
on all slides except the Title Slide. Slide #2 should show 2 as
the page number – it is your 2nd slide
Ensure that your name does appear on every slide, but the page
numbers start on slide #2. This will involve slightly different
steps to accomplish both.
0.4
22. Depending upon the theme you have chosen, the page number or
your name may not appear in the lower portion of the slide.
That is ok.
15
Apply a transition scheme to all slides.
0.2
One transition scheme may be used OR different schemes for
different slides
16
Apply an animation on at least one slide. The animation may be
applied to text or a graphic
0.3
TOTAL
6
Page 5 of 5