Beyond the EU: DORA and NIS 2 Directive's Global Impact
Insert a shape
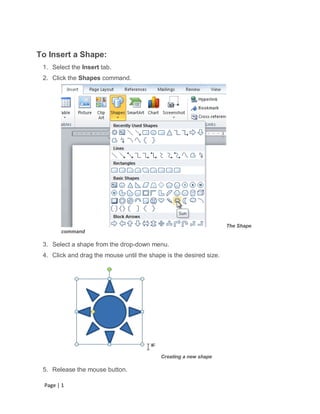
1. To Insert a Shape:
1. Select the Insert tab.
2. Click the Shapes command.
The Shape
command
3. Select a shape from the drop-down menu.
4. Click and drag the mouse until the shape is the desired size.
Creating a new shape
5. Release the mouse button.
Page | 1
2. To Resize a Shape:
1. Click on the shape to select it.
2. Click and drag one of the sizing handles on the corners and sides of the text
box until it is the desired size.
Resizing the shape
3. To rotate the shape, drag the green handle.
Rotating the shape
4. Some shapes also have one or more yellow handles that can be used to
modify the shape. For example, with star shapes, you can adjust the length of
the points.
Modifying the shape
If you drag the sizing handles on any of the four corners, you will be able to change
the height and width at the same time. The sizing handles on the top or bottom of
Page | 2
3. the shape will only allow you to resize vertically, while the handles on the left and
right sides will resize the shape horizontally.
To Change the Order of Shapes:
If one shape overlaps another, you may need to change the ordering so that the
correct shape appears in front. You can bring a shape to the front or send it to the
back. If you have multiple images, you can use Bring Forward or Send Backward
to fine-tune the ordering. You can also move a shape in front of or behind text.
1. Right-click the shape you wish to move.
Right-clicking the shape
2. In the menu that appears, hover over Bring to Front or Send to Back. Several
ordering options will appear.
Page | 3
4. Selecting an ordering
option
3. Select the desired ordering option. The shapes will reorder themselves.
The reordered shapes
In some cases, the ordering option you select will not affect the ordering of the
shapes. If that happens, select the same option again or try a different option.
Page | 4
5. Changing a Shape's Appearance
To Change to a Different Shape:
1. Select the shape. A new Format tab appears with Drawing Tools.
The Format tab
2. Click on the Format tab.
3. Click the Edit Shape command.
The Edit Shape command
4. Click Change Shape to display a drop-down list.
Page | 5
6. Choosing a new shape
5. Select the desired shape from the list.
The new shape
To Change Shape Style:
1. Select the shape. The Format tab appears.
The Format tab
Page | 6
7. 2. Click the More drop-down arrow in the Shape Styles group to display more style
options.
The More
drop-down arrow
3. Move your cursor over the styles to see a live preview of the style in your
document.
Previewing shape styles
4. Select the desired style.
To Change the Shape Fill Color:
1. Select the shape. The Format tab appears.
Page | 7
8. 2. Select the Format tab.
3. Click the Shape Fill command to display a drop-down list.
Choosing a fill color
4. Select the desired color from the list, choose No Fill, or choose More Fill
Colors to choose a custom color.
To Change the Shape Outline:
1. Select the shape. The Format tab appears.
2. Click the Format tab.
3. Click the Shape Outline command to display a drop-down menu.
Page | 8
9. Choosing an outline color
4. From the drop-down menu, you can change the outline color, weight
(thickness), and whether or not it is a dashed line.
A thicker outline
To Change Shadow Effects:
1. Select the Format tab.
2. Click the Shape Effects command. A drop-down menu will appear.
3. Hover the mouse over Shadow. You will see a list of shadow presets.
4. Move your mouse over the menu options to see a live preview of the shadow
effect in your document.
Page | 9
10. Choosing a shadow type
5. Click the desired shadow effect to add it to your shape.
You can select Shadow Options from the drop-down menu and click the Color
button to select a different shadow color for your shape.
3-D Effects
There are two kinds of effects that you can apply to your shapes to give them a 3-D
appearance: 3-D Rotation and Bevel. 3-D Rotation gives the appearance that you
are viewing the object from a different angle, and it can be applied to any shape.
Bevel adds thickness and a rounded edge to shapes, but it doesn't work with every
type of shape.
To Use 3-D Rotation:
1. Select the shape.
2. Click on the Format tab.
Page | 10
11. 3. Click Shape Effects from the Shape Styles group.
4. Hover the mouse over 3-D Rotation. A drop-down menu will appear.
5. Select the desired rotation preset from the drop-down menu. You can also click
3-D Rotation Options if you would prefer to type in custom values.
Choosing a 3-D rotation preset
To Use Bevel:
1. Select the shape.
2. Click on the Format tab.
3. Click Shape Effects from the Shape Styles group.
4. Hover the mouse over Bevel. A drop-down menu will appear.
Page | 11
12. Choosing a bevel preset
5. Select the desired bevel preset from the drop-down menu. You can also click 3-
D Options if you would prefer to type in custom values.
If you click on 3-D Options, you'll also be able to change the shape's material to give
it a metal, plastic, or translucent appearance, and you can choose the lighting type to
change how the shape is illuminated.
Page | 12