On National Teacher Day, meet the 2024-25 Kenan Fellows
Excel Printing Tips2007
1. For useful Documents like this and Lots of more Educational and Technological Stuff...
Visit... www.thecodexpert.com
EXCEL-2007 PRINTING TIPS
1. Start Excel.
2. Open the Excel Printing Tips file.
Print Preview
Begin by viewing the print out before any changes are made to the print settings. To view the
document as it will appear when printed:
1. From the Office Button menu on the menu toolbar, choose Print Preview.
OR
Click on the Print Preview button on the Quick Access toolbar.
Now notice the dashed lines (for example, between columns G and H and between
rows 46 and 47). These lines indicate the edges of pages.
2. To close the print preview window, click the Close button near the top of the screen.
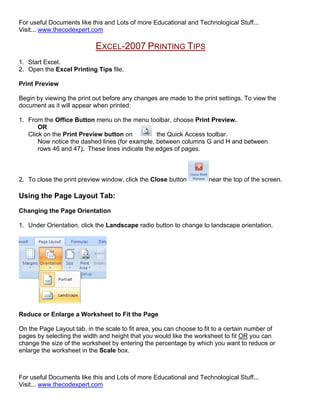
Using the Page Layout Tab:
Changing the Page Orientation
1. Under Orientation, click the Landscape radio button to change to landscape orientation.
Reduce or Enlarge a Worksheet to Fit the Page
On the Page Layout tab, in the scale to fit area, you can choose to fit to a certain number of
pages by selecting the width and height that you would like the worksheet to fit OR you can
change the size of the worksheet by entering the percentage by which you want to reduce or
enlarge the worksheet in the Scale box.
For useful Documents like this and Lots of more Educational and Technological Stuff...
Visit... www.thecodexpert.com
2. For useful Documents like this and Lots of more Educational and Technological Stuff...
Visit... www.thecodexpert.com
1. Change the Width area to 1 page.
Adjusting Margins
By decreasing the margins, the printable area of the page increases. This allows more text to
fit on a page.
1. Change the Margins to Narrow
Center Worksheet Data on the Printed Page
1. To center worksheet data horizontally on the page between the left and right margins,
select the Custom Margins… then check the Horizontally Box.
2. To center worksheet data vertically on the page between the top
and bottom margins, select the Vertically check box under
Center on page.
3. Click the Print Preview button on the right side of the Page Setup dialog box
to see the changes we have made so far. Notice how all of the columns are
included on each page. If you look at the last page, notice how the data is vertically
centered on the page.
4. When you are finished previewing, click Close Print Preview to return to the document.
For useful Documents like this and Lots of more Educational and Technological Stuff...
Visit... www.thecodexpert.com
3. For useful Documents like this and Lots of more Educational and Technological Stuff...
Visit... www.thecodexpert.com
Insert a Header/Footer: Headers and Footers are covered in the Excel Intro Part 1 class.
There is an optional review exercise on the last page of this handout.
Sheet Tab
1. Click on the Print Titles button.
Print Row and Column Titles on Every
Page
For our document, it would be useful to
have the column titles appear on each
page. Then, when looking at each page,
you will be able to identify the data in the
column without having to refer back to page
one.
For useful Documents like this and Lots of more Educational and Technological Stuff...
Visit... www.thecodexpert.com
4. For useful Documents like this and Lots of more Educational and Technological Stuff...
Visit... www.thecodexpert.com
2. In the Print titles section of the Sheet tab, click on the collapse dialog button next to the
Rows to repeat at top box.
The Page Setup window will minimize allowing you to select the rows to be repeated.
3. Click on the row 1 label found at the left of the window. This is the row that
contains our column titles.
4. Now click on the collapse dialog button to return to the Page Setup menu.
(Note: If you have row labels you want to repeat on each page, you would follow the same procedure
using the Columns to repeat at left box.)
5. Click Print Preview to see how the row you have selected now appears on each page. Use
the Next button to see other pages.
6. Click Close Print Preview when finished viewing.
7. Click on the Print Titles button.
Additional Information Regarding Other Options on the Sheet Tab
(Please ask the instructor, or refer to the on-line help if you would like more information on these settings.)
This option allows to you to print part of a
sheet. It is useful when you only want a few
rows and columns of the sheet to be printed. For example, you may wish to print only
Columns A, B and C and Rows 1 through 26.
This option allows you to print all gridlines. Gridlines are the lines around the
cell boundaries.
Prints in black and white.
Draft Quality reduces printing time. When this option is selected, Excel will
not print gridlines and most graphics.
Prints the row and column headings on each page. Row and column
headings describe the location of information on the worksheet. Row
For useful Documents like this and Lots of more Educational and Technological Stuff...
Visit... www.thecodexpert.com
5. For useful Documents like this and Lots of more Educational and Technological Stuff...
Visit... www.thecodexpert.com
headings are the actual row numbers to the left of the worksheet (1, 2, 3…) and column
headings are the letters that appear at the top of the columns on a worksheet (A, B, C…).
8. Click OK to close the Page Setup window.
Print Options
1. Click the Office Button, click Print.
2. Under Print what, select the option you want.
To use the Selection option, cells must be highlighted before accessing the Print window. This
option will only print the selected cells.
The Entire workbook option prints all of the sheets in the document.
The default option is Active sheet.
This option only prints the active
sheet, not all of the sheets in the
workbook.
From the Print window, you can
also select the number of copies
and specify which pages to print.
3. You do not need to Print in
class. Click the Cancel button.
Continue on to the optional
exercise covering headers and
footers OR close Excel. You do
not need to save your changes.
For useful Documents like this and Lots of more Educational and Technological Stuff...
Visit... www.thecodexpert.com
6. For useful Documents like this and Lots of more Educational and Technological Stuff...
Visit... www.thecodexpert.com
Header/Footer Tab - Optional Exercise:
Create Custom Headers and Footers
Excel Headers and Footers are covered in the Excel-Intro Part 1 class. This page contains an optional
review exercise.
1. Click Header & footer button from the Insert Tab.
2. Type Human Resources Employee Report here.
3. Highlight the text you just typed and click on the Home tab to format the text.
4. Change the font to Arial, and the size to 12 from the drop down lists.
Select a Built-in Header or Footer
There are many built-in headers and footers. To view these, use the drop down boxes under
Header and Footer on the left side of the Design tab.
To use a built-in footer:
1. From the drop down Footer box,
located on the left side of the
screen in the Design tab, choose
Page 1 of ?.
2. Use the Print Preview button to see the results.
3. Close the document. You do not need to save your changes.
For useful Documents like this and Lots of more Educational and Technological Stuff...
Visit... www.thecodexpert.com
7. For useful Documents like this and Lots of more Educational and Technological Stuff...
Visit... www.thecodexpert.com
For useful Documents
like this and
Lots of more
Educational and
Technological Stuff...
Visit...
www.thecodexpert.com
For useful Documents like this and Lots of more Educational and Technological Stuff...
Visit... www.thecodexpert.com