Konfigurasi pc server dan pc route6r pada lks nasional xiii jakarta tahun 2010(bagus)12ok
•Télécharger en tant que DOC, PDF•
0 j'aime•703 vues

Jaringan TKJ

Recommandé
Recommandé
Contenu connexe
Tendances
Tendances (20)
Similaire à Konfigurasi pc server dan pc route6r pada lks nasional xiii jakarta tahun 2010(bagus)12ok
Similaire à Konfigurasi pc server dan pc route6r pada lks nasional xiii jakarta tahun 2010(bagus)12ok (20)
Plus de slempase
Plus de slempase (13)
Dernier
Dernier (20)
Konfigurasi pc server dan pc route6r pada lks nasional xiii jakarta tahun 2010(bagus)12ok
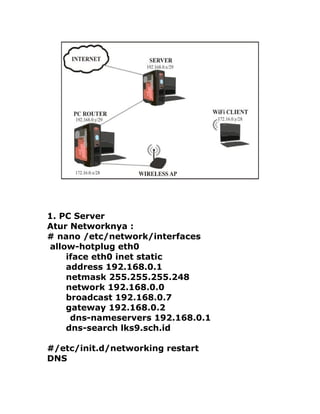
- 1. 1. PC Server Atur Networknya : # nano /etc/network/interfaces allow-hotplug eth0 iface eth0 inet static address 192.168.0.1 netmask 255.255.255.248 network 192.168.0.0 broadcast 192.168.0.7 gateway 192.168.0.2 dns-nameservers 192.168.0.1 dns-search lks9.sch.id #/etc/init.d/networking restart DNS
- 2. #apt-get install bind9 #nano /etc/bind/named.conf, tambahkan zona sebagai berikut : zone "lks9.sch.id" { type master; file "/etc/bind/db.alamat"; }; zone "0.168.192.in-addr.arpa" { type master; file "/etc/bind/db.ip"; }; #cp /etc/bind/db.local /etc/bind/db.alamat #cp /etc/bind/db.127 /etc/bind/db.ip Lalu edit file db.alamat, dan atur sebagai berikut : #nano /etc/bind/db.alamat ; ; BIND data file for local loopback interface ; $TTL 604800 @ IN SOA ns.lks9.sch.id. root.lks9.sch.id. ( 1 ; Serial 604800 ; Refresh 86400 ; Retry 2419200 ; Expire 604800 ) ; Negative Cache TTL; @ IN NS ns.lks9.sch.id. @ IN MX 10 mail.lks9.sch.id. @ IN A 192.168.0.1
- 3. ns IN A 192.168.0.1 www IN CNAME ns mail IN CNAME ns webmail IN CNAME ns proxy IN CNAME ns imap IN CNAME ns pop IN CNAME ns ftp IN CNAME ns lalu editlah db.ip menjadi sebagai berikut : #nano /etc/bind/db.ip ; ; BIND reverse data file for local loopback interface ; $TTL 604800 @ IN SOA ns.lks9.sch.id. root.lks9.sch.id. ( 1 ; Serial 604800 ; Refresh 86400 ; Retry 2419200 ; Expire 604800 ) ; Negative Cache TTL; @ IN NS ns.lks9.sch.id. 1 IN PTRns.lks9.sch.id. #/etc/init.d/bind9 restart Dan coba di lihat konfigurasi dns dengan mengetikkan #nslookup www.lks7.sch.id Mail Server
- 4. #apt-get install postfix courier-imap courier-pop php4-imap #apt-get install apache2 php4 Pada saat install ini mungkin diminta beberapa cd..masukan cd yang diminta dan enter... Internet site---enter---courier-base---no---mail name :lks9.sch.id---enter----libc-client----no--- Dan ikuti proses selanjutnya..jika diminta cd--- masukan dan enter #apt-get install squirrelmail Masukan cd yang diminta dan enter #nano /etc/postfix/main.cf myhostname = mail.lks9.sch.id mydomain = lks9.sch.id alias_maps = hash:/etc/aliases alias_database = hash:/etc/aliases myorigin = /etc/mailname mydestination = lks9.sch.id, server.lks9.sch.id, localhost.lks9.sch.id, localhost relayhost = mynetworks = 127.0.0.0/8 192.168.9.0/29 #mailbox_command = procmail -a "$EXTENSION" home_mailbox = Maildir/ mailbox_size_limit = 0 recipient_delimiter = + inet_interfaces = all
- 5. lalu : #etc/init.d/postfix restart #nano etc/apache2/apache2.conf Tambahkan : Include /etc/squirrelmail/apache.conf #nano /etc/squirrelmail/apache.conf Pada : Alias /squirrelmail /usr/share/squirrelmail Ganti menjadi : Alias /webmail /usr/share/squirrelmail Selanjutnya : #squirrelmail-configure enter...pilih D---tulis server mail courier—enter---pilih S---enter--- #cd /etc/skel #ls #maildirmake Maildir #adduser admin Isikan informasi password dan yang lainnya untuk account admin #/etc/init.d/apache2 restart #/etc/init.d/postfix restart Silakan buat user lain untuk melihat proses pengiriman surat:
- 6. Untuk dapat menjalankan browser secara text : #apt-get install lynx Untuk menjalankan webmail : #lynx www.lks9.sch.id/webmail Isikan username dan password ... Dan cobalah browsing juga dari pc router....:)
- 7. Proxy #apt-get install squid Masukan cd(5) yang diminta dan enter #nano /etc/squid/squid.conf Maka tambahkan kode/ataupun hilangkan tanda # pada : http_port 3128 transparent yang ini bias juga untuk ditambahkan cari dan tambahkan : ( hilangkan tanda # ) cache_mem 16 mb cache_dir ufs /var/spool/squid 500 16 256 cache_mgr admin@pephy.com visible_hostname proxy.tkj.com -> nama visible hostname kamu auth_param basic children 5 auth_param basic realm Squid proxy-caching web server auth_param basic credentialsttl 2 hours auth_param basic casesensitive off acl blok dstdomain “/etc/squid/situs_larang” http_access deny blok
- 8. http_access allow all buat file situs_larang #nano /etc/squid/situs_larang www.google.com www.yahoo.com karena disini kita tes di pc dalam jaringan lokal maka buat domain google...agar nantinya waktu dites proxy kita bisa lihat jalan atau tidak #cp /etc/bind/db.alamat /etc/bind/db.goole #nano /etc/bind/named.conf...buatlah zona tambahan untuk google spt dibawah ini : zone "google.com" { type master; file "/etc/bind/db.google"; #/etc/init.d/bind9 restart Agar dapat dibrowsing di client , maka harus di forward juga.. #echo 1 > /proc/sys/net/ipv4/ip_forward lalu : #squid –z #iptables –t nat –A PREROUTING –o eth0 –p tcp – dport 80 –j REDIRECT –-to-port 3128(jangan) #iptables –A PREROUTING –t nat –p tcp --dport 80 –j REDIRECT -to-port 3128 (jangan )
- 9. #iptables –t nat –A PREROUTING –i eth0 –p tcp –- dport 80 –j REDIRECT –-to-port 3128 #/etc/init.d/squid restart Membuat pesan kesalahan jika diakses situs yang dilarang #nano /usr/share/squid/errors/English/ERR_ACCESS_DEN IED Atau bisa isi : <html> <head> <title>Blok Proxy</title> </head> <body> <script language=”JavaScript”> <!-- Alert(‘Dilarang Membuka Situs Tersebut’); //--> </script> </body> </html> Isikan/ubah dengan pesan kesalahan yang anda inginkan, simpan dan restart squid #/etc/init.d/squid restart
- 10. Dan silakan lihat dengan browsing di client...dengan membrowsing situs yang diblok File Sharing #apt-get install proftpd Lalu client dpat melakukan browsing ftp dengan mengetikkan : ftp://lks9.sch.id atau melalui dos : dengan mengetikkan : ftp ip_server contoh : ftp 192.168.9.1 note : bila ingin mengisi file/folder ke server , maka tempatkan file di user tempat anda masuk ke windows misal : C:Documents and Settingsuser Perintah ftp : Mengambil file : get nama_file Mengupload file : put nama_file Mengakhiri ftp :bye
- 11. NTP Server 1.apt-get install ntp ntpdate a./etc/init.d/ntp stop b.buka file /etc/ntp.conf dan masukan ip dibawah ini: server 127.127.1.1 fudge 127.127.1.1 #stratum 14 refid NIST restrict 192.168.7.0 mask 255.255.255.240 nomodify notrap restrict 172.16.7.0 mask 255.255.255.240 nomodify notrap c.buka nano /etc/default/ntpdate Make these three changes in the file: NTPDATE_USE_NTP_CONF=no NTPSERVERS="192.168.7.1" NTPOPTIONS="-u" d.ntpdate –u 192.168.7.1 (ip_server) e.buka nano /etc/cron.d/synctime isi dengan : * */4 * * * root /etc/network/if-up.d/ntpdate
- 12. Start the NTP server: sudo /etc/init.d/ntp start Watch the NTP server: watch 'sh -c "ntpq -p -c as && echo && ntptrace"' When you see the parts in bold, your NTP server is ready: remote refid st t when poll reach delay offset jitter ================================================== ============================ *LOCAL(1) .NIST. 14 l 30 64 17 0.000 0.000 0.001 ind assID status conf reach auth condition last_event cnt ================================================== ========= 1 47409 9614 yes yes none sys.peer reachable 1 localhost: stratum 15, offset 0.000000, synch distance 0.948602 STEP 2: CONFIGURE YOUR LOCAL COMPUTERS. You’re now ready to set your computers up to use your NTP server. However, keep in mind that commercial operating systems like Mac OS X and Windows use SNTP not NTP. The difference is that NTP tries to keep the client’s time as accurate as possible by taking into account various factors such as how fast or slow that hardware clock is and the lag is from the internet connection. SNTP just jumps to whatever time it gets.
- 13. Linux, however, gives you a choice. And honestly, NTP is way too much for most home users. Also keep in mind that if we did use NTP in this case, we would be synchronizing one “inaccurate” clock against another. The best deal is to go with SNTP, but the obvious answer of searching for an SNTP package is wrong. All you have to do is configure the client machines to run NTPDATE like you did with NTP server. Configure NTPDATE on the client machines: sudo nano /etc/default/ntpdate Make these three changes in the file: NTPDATE_USE_NTP_CONF=no NTPSERVERS="your.ntp.server" NTPOPTIONS="-u" Get your original synchronization: ntpdate -u your.ntp.server Make a crontab so we can keep our client machines in line with time: sudo nano /etc/cron.d/synctime Put the following line in the file and save: (This calls a script that shuts ntp down, calls ntpdate, and then starts ntp again. It’s meant to be used when bringing network interfaces up, but there’s nothing wrong with calling on it here.) * */4 * * * root /etc/network/if-up.d/ntpdate Perhaps, one day, GNOME’s GUI for time synchronization with allow you to choose full NTP or SNTP with NTPDATE, and do all of this messing around with crontabs for you. But for now, the power is yours whether you want it or not. Date tgl_bulan_tahun
- 14. 2. PC ROUTER Atur network nya sbb: #nano /etc/network/interfaces allow-hotplug eth0 iface eth0 inet static address 192.168.0.2 netmask 255.255.255.248 network 192.168.0.0 broadcast 192.168.0.248 gateway 192.168.0.1 dns-nameservers 192.168.0.1 dns-search lks9.sch.id auto eth1 iface eth1 inet static address 172.16.0.1 netmask 255.255.255.240 network 172.16.0.0 broadcast 172.16.0.15 Restart jaringan #/etc/init.d/networking restart #iptables –t nat –A POSTROUTING –o eth0 –j MASQUERADE #iptables –t nat –A POSTROUTING –o eth1 –j MASQUERADE Atur Forward Ip: #nano /etc/sysctl.conf kemudian buka tanda pagar pada kata :
- 15. # net.ipv4.ip_forward=1 #net.ipv4.conf.default.forwarding=1 #net.ipv4.conf.default.rp_filter=1 menjadi net.ipv4.ip_forward=1 net.ipv4.conf.default.forwarding=1 net.ipv4.conf.default.rp_filter=1 dan : #nano /proc/sys/net/ipv4/ip-forward Isikan nilai 1 Atau bisa juga spt: # echo > 1 /proc/sys/net/ipv4/ip_forward Atur resolvf.conf nya sebagai berikut : #nano /etc/resolv.conf Menjadi sperti ini : Nameservers 192.168.0.1 Search www.lks9.sch.id Domain ns.lks9.sch.id Atur dhcpnya : #apt-get install dhcp3-server #nano /etc/dhcp3/dhcpd.conf # A slightly different configuration for an internal subnet. subnet 172.16.0.0 netmask 255.255.255.240 { range 172.16.0.3 172.16.0.14;
- 16. option domain-name-servers ns.lks9.sch.id; option domain-name "lks9.sch.id"; option routers 172.16.0.1; option broadcast-address 172.16.0.15; default-lease-time 600; max-lease-time 7200; #nano /etc/default/dhcp3-server Isikan pada INTERFACES=”eth1” #/etc/init.d/dhcp3-server restart #iptables –t nat –A POSTROUTING –s 172.16.9.0/28 –d 0/0 –j MASQUERADE #iptables –t nat –A POSTROUTING –o eth1 –j MASQUERADE ( disesuaikan dengan eth yang diberikan ke arah client ) Atau bisa sperti kata pak tuani: asumsi server eth0 dengan ip 192.168.10.254 eth1 ip 10.252.10.254 dan sudah konek ke client(xp) dengan nomor 192.168.10.1 sekarang kita mau routing supaya 192.168.10.1 bisa konek ke 10.252.10.254 1. #vim /etc/sysctl cari ipv4/ip_forward =1 (enable-kan) atau #echo 1 > /proc/sys/net/ipv4/ip_forward 2. iptable-F
- 17. iptables -t nat -A POSTROUTING -o eth0(sesuaikan eth ke arah client) -j MASQUERADE 3. c>ping 10.252.10.254 kalau sudah jalan ... ya sudah beres.... Control+ W pada nano untuk mencari... Control + K untuk mencopy Contro + U untuk paste Kesalahan jika pas di restart apache2 nya Ada pesan cannot determinan qualified domain... Itu penyebabnya nama pc diubah dan tidak diubah keseluruhan ..jadi harus diubah seluruhnya atau jangan ubah Proxy pada debian lenny : Konfigurasi Transparent Proxy Debian Lenny Bay | Site Selasa, 31 Agustus 2010 Linux Debian 1.Install Squid #apt-get install squid 2.Stop service squid #/etc/init.d/squid stop
- 18. 3.Konfigurasi squid #vim /etc/squid/squid.conf Cari kata http_port 3128 kemudian kita tambahkan kata transparent sehingga menjadi: #http_port 3128 transparent Cari kata acl CONNECT kemudian dibawahnya kita tambahkan acl url dstdomain "/etc/squid/url" acl key url_regex -i "/etc/squid/key" no_cache deny url no_cache deny key http_access deny url http_access deny key Cari kata INSERT YOUR kemudian dibawahnya kita tambahkan acl jaringan src ip network/netmask ( kalau ada 2 jaringan masukkan dan pisahkan dengan spasi ) http_acces allow jarigan Cari kata http_access deny all (ada 2)kemudian semuanya di tambah tanda # di depannya Cari cache_mem 8 M ubah 8 M menjadi 1/4 dari ram PC kemudian hiangkan tanda # Cari cache_dir ufs /var/spool/squid 10000 16 256 Cari cache_swap_low hilangkan tanda # pada hight dan low
- 19. Cari cache_log /var/log/squid/cache.log hilangkan tanda # Cari cache_store /var/log/squid/store.log hilangkan tanda # Cari ipcache_size hilangkan tanda # pada size, low ,dan high *Jika ingin ganti nama administrator yang blok access: TAG: cache_mgr (nama pengeblok) Simpan konfigurasi 4.Membuat daftar situs yang di blokir #vim /etc/squid/url misalkan yang akan diblokir adalah facebook maka ketikkan www.facebook.com setelah selesai membuat daftar situs-situs yang di blokir sipanlah file. 5.Membuat daftar kata kunci yang di blokir #vim /etc/squid/key misalkan kata yang di blokir adalah sex maka ketikkan sex pada daftar an simpan file 6.Membuat directori swap #squid -z
- 20. 7.Menjalankan quid #/etc/init.d/squid. start 8.membuat ip tables #iptables –t nat –A PREROUTING –i eth0 –p tcp –- dport 80 –j REDIRECT –-to-port 3128 9.Supaya settingan tersebut tidak hilang saat komputer restart maka simpan konfigurasi pada rc.local #vim /etc/rc.local diatas exit 0 kita tambahkan #iptables –t nat –A PREROUTING –i eth0 –p tcp –- dport 80 –j REDIRECT –-to-port 3128 10. 11.Restart squid #/etc/init.d/squid restart 12.reconfigure squid #squid -k reconfigure 13.Restart networking
- 21. #/etc.init.d/networking restart Jika ingin melihat aktifitas User/client, gunakan Squidview. # apt-get install squidview