Télécharger en tant que PDF, PPTX


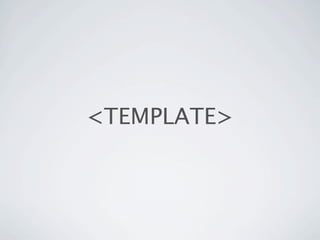
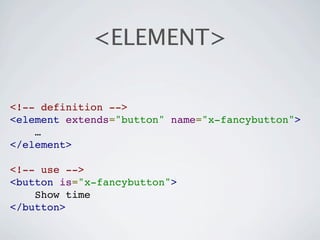
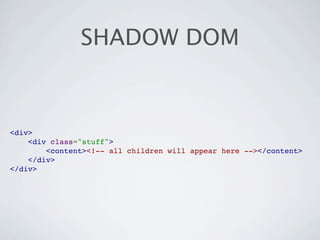
![<TEMPLATE>
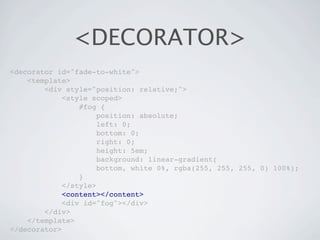
<template id="commentTemplate">
<div>
<img src="">
<div class="comment"></div>
…
</div>
</template>
var t = document.querySelector("#commentTemplate");
// Populate content and img[src] values in the
template.
someElement.appendChild(t.content.cloneNode());](https://image.slidesharecdn.com/web-components-parisjs-120320093145-phpapp02/85/Web-Components-Shadow-DOM-11-320.jpg)
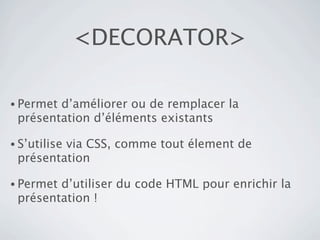


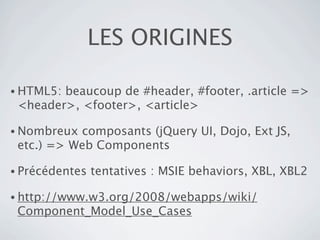
La présentation traite des Web Components, un ensemble de normes HTML5 permettant de créer des éléments réutilisables sur le web via des templates, des décorateurs et le shadow DOM. Des exemples d'utilisation de bibliothèques comme YUI et Dojo illustrent la séparation efficace du code et l'intégration de composants. Enfin, la présentation souligne l'évolution rapide des spécifications et les différences de prise en charge entre les navigateurs.


![[FR] Capture vidéo avec HTML5](https://cdn.slidesharecdn.com/ss_thumbnails/parisjs-110601103107-phpapp01-thumbnail.jpg?width=640&height=640&fit=bounds)


![[FR] Présentation de PhoneGap](https://cdn.slidesharecdn.com/ss_thumbnails/prsentationdephonegap-120110043120-phpapp02-thumbnail.jpg?width=640&height=640&fit=bounds)
![[FR] Ancienne présentation de PhoneGap](https://cdn.slidesharecdn.com/ss_thumbnails/phonegap-110728024409-phpapp02-thumbnail.jpg?width=640&height=640&fit=bounds)
![[FR] ParisJS en 2 minutes](https://cdn.slidesharecdn.com/ss_thumbnails/parisjs9-110728024222-phpapp02-thumbnail.jpg?width=640&height=640&fit=bounds)