SlideShare une entreprise Scribd logo
1  sur  13
Télécharger pour lire hors ligne
–1–
WOODWORKS: ADVANCED PROJECT
ARTS & CRAFTS TABLE LAMP
With its simple lines, this lamp is reminiscent of early 20th-century Prairie-style design, but beneath its seemingly straightforward lines lies a
challenging project for advanced woodworkers that demands precision in cutting angles and making exposed joints, especially for the shade.
As you’ll see, however, using jigs and special tablesaw setups will help to simplify even the trickiest steps. When you’ve done all the woodworking,
you’ll probably find the wiring a breeze, even if you haven’t done much before. You’ll also learn more about applying and using stains and finishes
to protect the wood and keep it looking beautiful through the course of building this project.
CONTINUED - WOODWORKS: ADVANCED PROJECT 2006-2007 ARTS & CRAFTS TABLE LAMP
–2–
TOOLS REQUIRED
Power Tools
– Tablesaw with rip/crosscut blade and
dado blade
– Router with 1/4" router guide bushing
and 1/4" straight cutting bit
– Jigsaw
Miscellaneous
– Pencil
– Tape measure
– Felt-tipped marker
– Safety glasses
– Carpenter’s glue
– 120, 150 and 220-grit sandpaper
– Clean, lint-free cloths
– Respirator
– Double-sided tape
– Gloves for finishing
– Mineral spirits (for oil-based stains
and finishes)
– Water-filled metal container with tight-
fitting lid (for oil-based stains and
finishes waste materials)
– Minwax® Wood Finish™ Stain Brush
or other good quality, natural-bristle
brush (for oil-based stains and finishes)
SHOPPING LIST
WOOD FINISHING PRODUCTS
CUTTING LIST
Recommended Finish
Prep: Minwax® Pre-Stain Wood Conditioner (if using soft
or porous wood)
Stain: Minwax® Gel Stain Cherry (or your choice of any of
the 8 Minwax® Gel Stain colors)
Finish: Minwax® Fast-Drying Polyurethane Semi-Gloss
Alternate Finish
Prep: Minwax® Pre-Stain Wood Conditioner (if using soft
or porous wood)
Stain: Minwax® Wood Finish™ Golden Oak Stain (or your
choice of any of the 22 Minwax® Wood Finish™ Stain
colors)
Finish: Minwax® Fast-Drying Polyurethane Satin (Also available
in aerosol)
Item Quantity
8/4 cherry 3 bd. ft.
4/4 cherry 3 bd. ft.
Electrical parts, see below
Stained glass, see below
Overall Dimensions: 22-1/2"H x 41-1/2"W x 17"D
Key Part Pcs. Dimensions
A Base sides 4 1-1/8" x 1-1/2" x 9-1/4"
B Base lip 4 5/16" x 1-3/8" x 6-5/16"
C Arm (vertical) 1 1-1/2" x 1-1/2" x 22-1/2"
D Arm (horizontal) 1 1-1/2" x 1-1/2" x 10-3/4"
E Arm (end) 1 1-1/2" x 1-1/2" x 3"
F Vertical cover plate 1 7/16" x 1-1/8" x 21"
G Upper cover plate 1 7/16" x 1-1/8" x 9"
H End cover plate 1 7/16" x 1-1/8" x 2"
J Shade hangers 2 3/8" x 2-1/2" x 2-1/2"
K Shade sides 8 3/4" x 1" x 10-1/2"
L Shade tops 4 3/4" x 1" x 12"
M Shade bottoms 4 3/4" x 1" x 15-1/2"
N Splines 8 1/8" x 2" x 3-1/2"
Recommended Wood: Cherry
Alternate Wood: Mahogany
MATERIAL LIST
Key Part Pcs. Dimensions
Q Lamp cord and plug 1 18 g. 8 ft. long
R Rotary line switch 1
S Bushing 1 1/8" ips, female bushing
T Steel pipes 2 1/8" ips, 10" long
U Couplings 3 1/8" ips, female
V Steel pipe 1 1/8" ips, 9" long
W Armbacks (elbows) 2 90 degree, 1/2' ball, 1/8 ips
X Nipple 1 1/8" ips, 5" long
Y Star lock washers 2 1/8" ips
Z Nuts 3 1/8" hex nut
AA Keyless sockets 2
BB Cluster body 1 1-1/16" x 1-1/16"
CC Brass arms 2 3-1/2", 1/8" ips
DD Wire nuts 2 9/16" x 5/16"
Key Part Pcs. Dimensions
P Stained glass 4 1/8" x 12-1/4" x 6-1/8"
Glass
Electrical
BEFORE YOU BEGIN
Good craftsmanship begins and ends with good work habits, so make
the following steps part of your routine workshop practice. If you have
any doubts or questions about how to proceed with a project, always
discuss them with your instructor.
• Carefully and fully review plans and instructions before putting
a tool to the project lumber.
• Work sensibly and safely. Wear safety goggles and the appropriate
respirator whenever making sawdust or working with thinners
or other solvents.
• At the end of every work session, clean up your shop area and
put away all portable tools.
CUTTING AND ASSEMBLY
PROCEDURE
Build the Shade Frame
The shade is made of four identical frames. Use a stop block for all the
cuts to ensure repeat accuracy.
1. Mill the 4/4 cherry board to the design thickness and rip the boards
into 1" widths. Rough-cut three 12" pieces and one 18" piece for each
of the four frames (K, L, M, Fig. 1). Cut enough parts to build an extra
frame as a precaution and for setup purposes.
2. Attach a long auxiliary fence to your tablesaw’s miter gauge.
Consider adding an acrylic guard just as a reminder of where
not to put your fingers.
3. Make a setup block for setting your miter gauge angles by cutting a
38-degree angle on one end and a 26-degree angle on the other. Use
an accurate miter saw to cut the block.
4. Set the miter gauge to cut at 38 degrees. Miter both ends of the
frame sides (K) and frame bottoms (M) to final dimensions. Miter just
the left edge of the frame top (L). All these cuts can be made using one
miter fence setting.
5. Cut the half-lap joint on the mitered end of each piece (Figs. 2 & 3).
Use scrap wood to set the blade height and a stop block for each cut.
You will need to rotate the miter gauge 38 degrees right and left of
center to accomplish all the angles.
6. Dry-fit all the pieces together and mark the position of the half-lap
on the right side of the frame top (Fig. 4) to determine the exact posi-
tion of the top’s second dado. Then cut the rest of the top half-laps.
W
Wo
oo
od
dw
wo
or
rk
ke
er
r’
’s
s T
Ti
ip
p:
: This piece is actually quite short in the
finished shade, but it’s much easier to make and hold on the saw
if you start with a long piece of wood. Trim the excess length after
the frame has been glued up.
7. Glue each frame assembly together with small C-clamps. When the
glue has set, cut off the waste on the top.
Rabbet for the Glass
8. Make a template out of 1/4" plywood to cut rabbets in each frame.
Simply place a shade frame on the plywood, trace the interior and
mark lines 1/4" to the outside of the tracing lines. Cut to this line with
a jigsaw. Keep the template 3" wide to support the router.
9. Rout the rabbet with a 1/4" straight bit and guide bushing (Figs. 3 & 5).
Take several passes of to get the rabbet to full depth. Clean up the
corners of the rabbet using a chisel.
W
Wo
oo
od
dw
wo
or
rk
ke
er
r’
’s
s T
Ti
ip
p:
: Use double-sided tape to secure the frame
to the bench and template. Tuck frame scraps under the template
for support.
Cut the Compound Miters
10. Use the setup block to set the tablesaw miter fence to cut at
38 degrees and angle the blade to 26 degrees.
11. Place a frame, face side up, with the bottom against the fence. Cut
the compound miter (Fig. 6), leaving a 5/8"-wide side (Fig. 3).
W
Wo
oo
od
dw
wo
or
rk
ke
er
r’
’s
s T
Ti
ip
p:
: To ensure a clean joint, make two passes.
The first cut is just shy of the line. For the second cut, add a shim,
such as a playing card, to the stop block. This will take just a
whisker off for a super-clean edge.
12. Next, place the freshly cut side against the miter fence and adjust the
angle so the uncut side is parallel to the blade. This should be approxi-
mately 76 degrees on the miter gauge. Then miter the second side.
13. With a beveled side against the fence, adjust the miter fence so the
frame bottom is parallel to the blade. Reset the blade to 90 degrees; rip
each bottom to 3/4"-wide (Fig. 7A). Reset the blade to 45 degrees
and bevel the underside of the frame’s bottom just up to the routed
rabbets (Fig. 7B).
14. Remove the miter fence, flip the frame over onto its face and use
the tablesaw fence to bevel the top (Fig. 7A). Leave a 3/8"-wide flat
reveal at the top. The shade hanger (J) sits inside this reveal. Place
the frame bottom against the tablesaw fence and rip each frame top
at 90 degrees so each frame is identical.
15. Glue the four frames together using spring clamps. When dry, clean
up the glue and sand.
Cut the Glass and Shade Hangers
16. Make a cardboard template 1/32" smaller than the frame opening.
Mark this pattern on the glass using a felt-tipped marker.
17. Make a single scoring cut just inside one of the lines. Place the scored
edge over the end of the bench and, with a gentle downward motion, snap
the glass at the scored mark. Repeat until all the glass is cut. Be sure to
wear gloves for this step. Freshly cut glass can be razor sharp.
W
Wo
oo
od
dw
wo
or
rk
ke
er
r’
’s
s T
Ti
ip
p:
: Minor adjustments to the glass shape can
be made using an 800-grit waterstone. Do not use a grinder or
power sander.
18. Cut the two shade hangers (J, Fig. 8). Make a simple crosscut jig
(Fig. 9) to safely cut the 45-degree chamfers on the tablesaw. Trim
the top hanger until it just fits inside the mitered top of the shade and
–3–
CONTINUED - WOODWORKS: ADVANCED PROJECT 2006-2007 ARTS & CRAFTS TABLE LAMP
flush with the top reveal. Drill a hole in the center of each hanger for
the nipple (X).
Make the Base and Arm
19. Mill 8/4 cherry to 1-1/2". Rip stock for the four base sides (A) to
1-1/8". Miter to the final dimension.
20. Glue up the base with a band clamp. After the glue dries, cut slots
for the splines (N) on the tablesaw (Fig. 10) using a shop-made spline
slot sled (Fig. 11). Glue in the splines and trim them flush when dry.
Cut the reveal around the bottom of the base (Fig. 1).
21. Cut a notch in the back of the base (Fig. 1) with a dado blade.
22. Mill 4/4 cherry to 5/16"-thick stock and rip to 1-3/8" wide for
base lip (B). Miter to fit inside the base, and glue.
23. Cut a 45" length of 1-1/2" x 1-1/2" cherry for arm assembly parts
(C, D and E).
24. Cut a deep groove for the conduit in the center of one edge (Fig. 1).
25. Miter the arm assembly parts. To make clamping the miter easier,
leave part E long until after the glue-up.
26. Cut the notch in the bottom of Part C (Fig. 1). Dry-fit the base and
the vertical arm.
27. Drill two holes (Fig. 1, Detail. 2) for the screws that attach the base
and arm. Drill a third hole for the lamp wire.
28. Glue the arm assembly one joint at a time. Leave the end piece
extra-long for now, so there’s room to attach the stepped block. Cut this
piece to length after it’s glued.
29. Cut the spline slots in the assembled upright, as in Step 20, and
glue in the splines. Cut the spines and sand them flush.
30. Cut arm end (E) to final length.
31. Make cover plate F, G and H (Fig. 1, Detail 1) from a 40"-long strip
of wood. Cut the rabbets so the cover plates fit snugly into the groove
with hand pressure.
32. Miter the completed cover plates to fit the upright.
33. Sand the shade, base, upright and hangers to 220-grit and apply
the finish. Refer to the STAINING & FINISHING section.
34. Install the stained glass in the shade. To hold the glass in place, rip
3/16" x 3/16" cherry stops on the tablesaw. Miter the stops to fit behind
the glass and attach them with No. 19 x 1/2" brads (Fig. 7B).
NOTE: Install the glass after you stain and finish the shade.
Assemble the Wiring Conduit
We’ve wired this lamp the safest way possible using metal conduit to
protect the wires. The lamp cord has a polarized plug for safety and an
add-on power switch for simplicity.
35. Cut two 10" pieces from the end of lamp cord (Q) and set aside
for wiring the sockets later.
36. Feed the lamp cord through the hole in the upright. Assembling
the conduit is just a matter of screwing Parts S through X together
and feeding the wire as you go (Fig. 12). Don’t overly tighten the two
armbacks (W) as they can cut through the cord insulation. Make sure
several inches of cord feed past the end of the nipple (X).
W
Wo
oo
od
dw
wo
or
rk
ke
er
r’
’s
s T
Ti
ip
p:
: Reverse twist the cord before screwing on the
last armback so the wire is not wound in the conduit.
37. Lay the conduit into the upright base/arm assembly.
Complete the Wiring
38. Screw the two arms (CC, Fig. 13) into the cluster (BB).
IMPORTANT: Make sure the wire nuts are rated to join three
18-gauge wires.
39. Feed 10" of lamp cord from the cluster through each arm.
40. Wire the sockets (AA, Fig. 14). Strip 5/8" of insulation from
each wire end and wrap the bare wire three-quarters of the way
around the screw.
41. It’s standard practice in lamp wiring that the neutral wire is
marked. Our wire was marked with ribbing on the insulation. Other
manufacturers may use different colored insulation or a colored strand
in the wire itself. No matter how it’s marked, you can always tell the
neutral wire; it’s the one that comes off the wide blade on the plug.
42. Attach the rotary switch (R) to the cord (Fig. 15). Cut the hot
wire, lay both wires through the switch, snap on the cover and screw
it down. Small metal prongs penetrate the insulation and complete
the switch circuit.
43. Attach the shade to the upright (Fig. 16).
44. Twist wire nuts on the three neutral wires and the three hot wires
(DD, Fig. 13). Take care that all the copper wire strands are in the
wire nuts. Push the wires into the cluster and screw on the cap.
FINAL ASSEMBLY
Attach the Base
45. Screw the base onto the uprights. Check with a square to make
sure the arm seats 90 degrees to the tabletop. If needed, pare the base
slot with a chisel to adjust the fit. Plug the screw holes with 3/8" cherry
plugs and sand them flush. After you stain and finish add self-adhesive
felt pads to the bottom and you’re done!
Attach the Shade
46. See Fig. 16. Screw the hex nut onto the nipple until it’s just below
the surface of the arm. Install the cover plates.
47. Screw the upper shade hanger to the arm. To determine where to
place the screw holes, fit the upper shade hanger upside down over the
conduit. Draw the outline of the arm end onto the hanger. Remove the
–4–
CONTINUED - WOODWORKS: ADVANCED PROJECT 2006-2007 ARTS & CRAFTS TABLE LAMP
hanger, and countersink and drill three holes for the screws. Drill pilot
holes into the arm end to prevent splitting.
48. Set the shade on the upper shade hanger and place the lower
hanger over the nipple. Tighten nut A and its washer onto the threaded
conduit. Install nut B and washer about halfway down the nipple.
Thread the lamp socket cluster onto the nipple. Stop when the nipple
reaches just inside the cluster. Back off nut B to lock the socket cluster
in place.
STAINING AND FINISHING
W
Wo
oo
od
dw
wo
or
rk
ke
er
r’
’s
s T
Ti
ip
p:
: Though you may be tempted to cut short
your sanding, preparation and application time, don’t do it. These
tasks are very important steps in obtaining a high-quality finish.
Remember, it is the finish, just as much as the fit and smoothness
of the parts that will have great bearing on how people judge your
craftsmanship. To ensure an excellent result, follow the steps
listed in this section and also the instructions the finish manu-
facturer puts on its products.
FINISHING TIPS
• Test the stains and finishes you are planning to use on scraps of
wood. On the back of the scrap, mark the stain/finish combination
and the type of wood. Allow all samples to dry thoroughly before
making your final finish selection. Save your samples for quick
reference on future projects.
• All stains and finishes must be allowed to dry thoroughly between
coats. Remember that drying times can vary due to humidity and
other climatic conditions.
• If you have some leftover stain or finish, wipe the can rim so that
stain or finish in the rim won’t dry out and prevent the lid from
forming a tight seal.
• Brushes used for water-based products, such as Minwax® Water-
Based Wood Stains or Minwax® Polycrylic® Protective Finish, must
be cleaned with soap and water; oil-based finishes must be cleaned
with mineral spirits.
49. Sand all pieces with 120-grit paper, then move up to 220-grit to
complete the pre-finish smoothing. Use an orbital sander to remove any
marks or scratches, then lightly sand by hand using with-the-grain
sanding strokes. Dust off the piece and wipe it carefully with a clean,
lint-free cloth lightly dampened with mineral spirits.
Recommended Finish
50. Prior to final assembly of the lamp, apply the Minwax® Gel Stain
you’ve chosen to the surfaces using a clean, lint-free cloth or natural-
bristle brush. Allow the Gel Stain to set for about 3 minutes, then wipe
off any excess. Repeat for the exterior surfaces. To achieve a deeper
color, you may apply a second coat after 8 to 10 hours, repeating
the application directions for the first coat. Allow the stain to dry
for 24 hours before applying the finish.
W
Wo
oo
od
dw
wo
or
rk
ke
er
r’
’s
s T
Ti
ip
p:
: When wiping off stain, make certain that
your last wipe with the cloth goes with the grain of the wood. This
way, any stain you might miss during wipe-off will be visually
minimized by the wood grain.
51. Apply Minwax® Fast-Drying Polyurethane following the directions
on the can. Use a good quality, natural-bristle brush. Allow the first coat
to dry overnight.
52. The next day, sand all surfaces lightly with 220-grit or finer sandpa-
per using with-the-grain strokes. Dust off and wipe all surfaces with a
cloth lightly dampened with mineral spirits. Apply a second coat of
polyurethane and set the piece aside to cure overnight.
53. The following day, sand all surfaces lightly with 220-grit paper. Dust
off and wipe the piece with a cloth lightly dampened with mineral spirits
and apply the third and final coat of polyurethane.
Alternate Finish
54. Apply the Minwax® Wood Finish™ you’ve chosen to the surfaces
using a natural-bristle brush and a clean, lint-free cloth following the
directions on the can. The brush will help you get the stain into the
many inside corners and other tight spots. Allow the Wood Finish™ to
set for about 5 to 15 minutes, then wipe off any excess. To achieve a
deeper color, you may apply a second coat after 4-6 hours, repeating
the application directions for the first coat. Allow the stain to dry for
24 hours before applying the protective clear finish.
55. Apply Minwax® Fast-Drying Polyurethane following the directions
on the can. Use a good quality, natural-bristle brush. Allow the first coat
to dry overnight.
56. The next day, sand all surfaces lightly with 220-grit or finer sandpa-
per using with-the-grain strokes. Dust off and wipe all surfaces with a
cloth lightly dampened with mineral spirits. Apply a second coat of
polyurethane and set the piece aside to cure overnight.
57. The following day, sand all surfaces lightly with 220-grit paper.
Dust off and wipe the piece with a cloth lightly dampened with min-
eral spirits and apply the third and final coat of polyurethane.
PRODUCT SAFETY
For your safety and the safety of those you work with, always read the
safety warnings, which manufacturers print on their labels, and follow
them to the letter.
WARNING! Removal of old paint by sanding, scraping or other means
may generate dust or fumes that contain lead. Exposure to lead dust
or fumes may cause brain damage or other adverse health effects,
especially in children or pregnant women. Controlling exposure to
lead or other hazardous substances requires the use of proper
protective equipment, such as properly fitted respirator (NIOSH
approved) and proper containment and cleanup. For more information,
call the National Lead Information Center at 1-800-424-LEAD (in US)
or contact your local health authority.
DANGER: Rags, steel wool, other waste soaked with oil-based stains
and clear finishes, and sanding residue may spontaneously catch
fire if improperly discarded. Immediately place rags, steel wool,
other waste soaked with these products, and sanding residue in a
sealed, water-filled metal container. Dispose of in accordance with
local fire regulations.
–5–
CONTINUED - WOODWORKS: ADVANCED PROJECT 2006-2007 ARTS & CRAFTS TABLE LAMP
When using oil-based wood finishing products:
CAUTIONS: CONTAINS ALIPHATIC HYDROCARBONS.
Contents are COMBUSTIBLE. Keep away from heat and open flame.
VAPOR HARMFUL. Use only with adequate ventilation. To avoid over-
exposure, open windows and doors or use other means to ensure fresh
air entry during application and drying. If you experience eye watering,
headaches, or dizziness, increase fresh air, or wear respiratory protection
(NIOSH approved), or leave the area. Avoid contact with eyes and skin.
Wash hands after using. Keep container closed when not in use. Do not
transfer contents to other containers for storage.
FIRST AID: In case of eye contact, flush thoroughly with large amounts
of water for 15 minutes and get medical attention. For skin contact,
wash thoroughly with soap and water. In case of respiratory difficulty,
provide fresh air and call physician. If swallowed, call Poison Control
Center, hospital emergency room, or physician immediately.
DELAYED EFFECTS FROM LONG-TERM OVEREXPOSURE.
Contains solvents which can cause permanent brain and nervous
system damage. Intentional misuse by deliberately concentrating and
inhaling contents may be harmful or fatal.
WARNING: This product contains chemicals known to the State of
California to cause cancer and birth defects or other reproductive harm.
DO NOT TAKE INTERNALLY. KEEP OUT OF REACH OF CHILDREN.
CONFORMS TO ASTM D-4326. Contact a physician for more health
information.
When using water-based wood finishing products:
CAUTIONS: Use Only With Adequate Ventilation. To avoid overexposure,
open windows and doors or use other means to ensure fresh air entry
during application and drying. If you experience eye watering,
headaches, or dizziness, increase fresh air, or wear respiratory protection
(NIOSH approved), or leave the area. Avoid contact with eyes and skin.
Wash hands after using. Keep container closed when not in use. Do not
transfer contents to other containers for storage.
FIRST AID: In case of eye contact, flush thoroughly with large amounts
of water. Get medical attention if irritation persists. If swallowed, get
medical attention immediately.
WARNING: This product contains chemicals known to the State of
California to cause cancer and birth defects or other reproductive harm.
DO NOT TAKE INTERNALLY. KEEP OUT OF REACH OF CHILDREN.
CONFORMS TO ASTM D-4326. Contact a physician for more health
information.
SOURCES
Grand Brass Lamp Parts
(212) 226-2567
www.grandbrass.com
One 10-ft. 18/2 SPT-1 cord with molded plug, #WIC10FTBL, $1.50
One black rotary line switch for SPT-1 cord, #SW423BL, $0.80
One 1/8 ips female black bushing, #BG201B, $0.10
Two 10" x 1/8 ips steel pipe, #PIST10, $0.75 ea.
One 9" x 1/8 ips steel pipe, #PIST09, $0.75
Three straight coupling brass 1/8F thru, #NE449, $0.20 ea.
Two 1/8m bottom x 1/8f side,
1/2 ball 90-degree armback, #AB335NP $0.75 ea.
One 5" x 1/8 ips nipple steel, #NI5-0X1/8, $0.60
Two 1/8 ips.slip star lock washer, #WA1/8STAR, $0.02 ea.
Three 1/8 hex nut, brass, #NU424, $0.08 ea.
Two 3-1/2" plain (J) arm brass 1/8m ips, #ARJL, $2.25 ea.
One small turned cluster body,
2-piece, #BOS2XB, $2.50
Two MD wire nut, #WINUTG, $0.10
Two cast-brass uno-threaded keyless socket with 1/8 ips bushing and
setscrew, #SO9347CB, $10 ea.
Processing fee for order under $50: $10.
Total cost: Lamp electrical parts, $50 plus shipping.
Southern Front Stained Glass
(281) 890-5860
www.southernfront.com
Wissmach Glass, W0101, Dark Green and Opal Wispy
Five 10-1/2" x 16" panels, $27
Fletcher-Terry steel glass cutter, $4.50.
Woodworkers Supply
(800) 645-9292
www.woodworker.com
Felt discs, #933-671, $2.99 strip of 60
1/4" straight bit, #03-140, $13.99
1/4" router guide bushing, #938-048, $7.99
–6–
CONTINUED - WOODWORKS: ADVANCED PROJECT 2006-2007 ARTS & CRAFTS TABLE LAMP
FIG 1. LAMP DETAILS
–7–
CONTINUED - WOODWORKS: ADVANCED PROJECT 2006-2007 ARTS & CRAFTS TABLE LAMP
F
N
D
E
G
H
J
J
#6 x 1" Screw
F
C
M
K
L
#8 x 1-
3
/4"
Screw
Plug
1/4" x 1
1
/8"
Notch
7
/8" x 1
1
/2"
Notch
B
A
N
9
/16" W x 7
/8" D
3
/16"
7
/16" Dia.
1
/8" x 1
/8" Reveal
1
/4"
3
/4"
C
1
/4" Wire Hole
3
/8"
3
/8" Dia.
Counterbore
3
/8"
1
/2"
9
/16"
3
/16"
1
/4"
DETAIL 2
Back of Lamp Arm Bottom
DETAIL 1
Cover Plate
1
/8"
1-
FIG 2. CUT THE ANGLED HALF-LAP JOINTS
–8–
CONTINUED - WOODWORKS: ADVANCED PROJECT 2006-2007 ARTS & CRAFTS TABLE LAMP
Stop Block
Guard
FIG 3. HALF-LAP JOINTS
Top
Second Dado
Cut Flush After Glued
FIG 4. ASSEMBLE THE FRAME
1
/4"
Straight
Bit
Rabbet
Template
Scrap
Double-Sided Tape
1
/4"
Guide
Bushing
10
1
/2"
151
/2"
3
/8"
3
/8"
L
K
M
FIG 5. RABBET EACH FRAME FIG 6. RIP THE COMPOUND ANGLES
5
/8"
Stop Block
38°
26°
Guard
–9–
CONTINUED - WOODWORKS: ADVANCED PROJECT 2006-2007 ARTS & CRAFTS TABLE LAMP
FIG 7A. BEVELED ENDS
5
/8"
45° Top Bevel
45° Bottom Bevel
3
/4"
L
M
K
3
/4"
FIG 7B. INSIDE OF SHADE FRAME
3
/16" x
3
/16"
Stop
1
/4" x
1
/2" Rabbet
#19 x
1
/2" Brads
45° Bevel
L
M
K
FIG 8. CUT THE SHADE HANGERS
Stop Block
Crosscut Sled
Shade Hangers
45°
FIG 10. CUT SLOTS FOR SPLINES
90° Sled
Rip Blade
Lamp Base
Spline Slot
FIG 9. CROSSCUT SLED
12"
10"
1" x
3
/4"
Fit to
Miter Slot
Toggle
Clamp
FIG 11. SPLINE SLOT SLED
12"
8"
9"
45°
6"
3
/4" Plywood
FIG 12. CONDUIT ASSEMBLY
–10–
CONTINUED - WOODWORKS: ADVANCED PROJECT 2006-2007 ARTS & CRAFTS TABLE LAMP
Y
Z
Z
Y
X
Z
U
W
V U
W
T
U
T
S
R
Q
FIG 14. SOCKET ASSEMBLY
Neutral Wire
(Ribbed)
CC
AA
Brass Screw
Silver Screw
Hot Wire
AA
FIG 13. CLUSTER WIRING
Neutral Wires
(Ribbed)
CC CC
X
BB
DD
Hot Wires
Combine the three
ribbed wires and
the three hot wires
with small wire
nuts. IMPORTANT:
Make sure the
wire nuts are
rated to join three
18-gauge wires.
CAUTION: Only remove 5/8" of insulation from each wire end. Be sure
to attach the neutral (ribbed) wire that runs from the wide blade on the
plug to the silver screw and the hot wire to the brass-colored screw.
–11–
CONTINUED - WOODWORKS: ADVANCED PROJECT 2006-2007 ARTS & CRAFTS TABLE LAMP
FIG 16. ATTACH THE SHADE
Lamp Socket Cluster
Nut B
Nut A
Lower Shade Hanger
Upper Shade Hanger
Nipple
Hex Nut
Cover Plate
Note: The glass is
removed for clarity.
FIG 15. ROTARY SWITCH
Neutral Wire
(Ribbed)
R
Prong
Holes
Hot
Wire
Cut the hot wire, lay both wires through
the switch, snap on the cover and screw
it down. Small metal prongs penetrate
the insulation and complete the switch.
2022-Arts_and_Crafts_Table_Lamp

Contenu connexe

Tendances

Vintage model airplane
Vintage model airplaneVintage model airplane
Vintage model airplanetgv1978
 
Carpentry updated ppt
Carpentry updated pptCarpentry updated ppt
Carpentry updated pptmishini anil
 
11. How to paint a shed
11. How to paint a shed11. How to paint a shed
11. How to paint a shedicreatablesseo
 
apeluri ieftine internationale
apeluri ieftine internationaleapeluri ieftine internationale
apeluri ieftine internationalezobcornel
 
4. How to build shed roof rafters
4. How to build shed roof rafters4. How to build shed roof rafters
4. How to build shed roof raftersicreatablesseo
 
Graphics lecture#4 section view
Graphics lecture#4 section viewGraphics lecture#4 section view
Graphics lecture#4 section viewJavid Salimi
 

Tendances (7)

Measuring and marking
Measuring and markingMeasuring and marking
Measuring and marking
 
Vintage model airplane
Vintage model airplaneVintage model airplane
Vintage model airplane
 
Carpentry updated ppt
Carpentry updated pptCarpentry updated ppt
Carpentry updated ppt
 
11. How to paint a shed
11. How to paint a shed11. How to paint a shed
11. How to paint a shed
 
apeluri ieftine internationale
apeluri ieftine internationaleapeluri ieftine internationale
apeluri ieftine internationale
 
4. How to build shed roof rafters
4. How to build shed roof rafters4. How to build shed roof rafters
4. How to build shed roof rafters
 
Graphics lecture#4 section view
Graphics lecture#4 section viewGraphics lecture#4 section view
Graphics lecture#4 section view
 

Similaire à 2022-Arts_and_Crafts_Table_Lamp

Deck-Lounger-Plan
Deck-Lounger-PlanDeck-Lounger-Plan
Deck-Lounger-PlanDan Cary
 
Advanced project-adirondack-chair
Advanced project-adirondack-chairAdvanced project-adirondack-chair
Advanced project-adirondack-chairAyun Restu
 
Building a cornhole set
Building a cornhole setBuilding a cornhole set
Building a cornhole setklinch12
 
Building a cornhole set
Building a cornhole setBuilding a cornhole set
Building a cornhole setklinch12
 
Parts for Adirondack Chair
Parts for Adirondack ChairParts for Adirondack Chair
Parts for Adirondack ChairChristian Keir
 
Woods Presentation
Woods PresentationWoods Presentation
Woods Presentationjsartoris
 
Installing the deck railing
Installing the deck railingInstalling the deck railing
Installing the deck railingZulaiha Amaria
 
소형베틀도면
소형베틀도면소형베틀도면
소형베틀도면Seongwon Kim
 
9. How to install asphalt roofing on a shed
9. How to install asphalt roofing on a shed9. How to install asphalt roofing on a shed
9. How to install asphalt roofing on a shedicreatablesseo
 
Mega Collection of Southwest Inspired Metal Work Jewelry Tutorials
Mega Collection of Southwest Inspired Metal Work Jewelry TutorialsMega Collection of Southwest Inspired Metal Work Jewelry Tutorials
Mega Collection of Southwest Inspired Metal Work Jewelry TutorialsThe Beading Gem's Journal
 
접이식 자가제작 베틀제작 도면
접이식 자가제작 베틀제작 도면접이식 자가제작 베틀제작 도면
접이식 자가제작 베틀제작 도면Seongwon Kim
 

Similaire à 2022-Arts_and_Crafts_Table_Lamp (20)

Deck-Lounger-Plan
Deck-Lounger-PlanDeck-Lounger-Plan
Deck-Lounger-Plan
 
Advanced project-adirondack-chair
Advanced project-adirondack-chairAdvanced project-adirondack-chair
Advanced project-adirondack-chair
 
Construção de Violões
Construção de ViolõesConstrução de Violões
Construção de Violões
 
Adirondack_Chair.pdf
Adirondack_Chair.pdfAdirondack_Chair.pdf
Adirondack_Chair.pdf
 
Measuring device
Measuring deviceMeasuring device
Measuring device
 
Timber decking
Timber deckingTimber decking
Timber decking
 
Lean-toToolShed.pdf
Lean-toToolShed.pdfLean-toToolShed.pdf
Lean-toToolShed.pdf
 
Building a cornhole set
Building a cornhole setBuilding a cornhole set
Building a cornhole set
 
Building a cornhole set
Building a cornhole setBuilding a cornhole set
Building a cornhole set
 
gaveteiro
gaveteirogaveteiro
gaveteiro
 
Adega modular
Adega modularAdega modular
Adega modular
 
Break down bow
Break down bowBreak down bow
Break down bow
 
Parts for Adirondack Chair
Parts for Adirondack ChairParts for Adirondack Chair
Parts for Adirondack Chair
 
TRU-FIT
TRU-FITTRU-FIT
TRU-FIT
 
Woods Presentation
Woods PresentationWoods Presentation
Woods Presentation
 
Installing the deck railing
Installing the deck railingInstalling the deck railing
Installing the deck railing
 
소형베틀도면
소형베틀도면소형베틀도면
소형베틀도면
 
9. How to install asphalt roofing on a shed
9. How to install asphalt roofing on a shed9. How to install asphalt roofing on a shed
9. How to install asphalt roofing on a shed
 
Mega Collection of Southwest Inspired Metal Work Jewelry Tutorials
Mega Collection of Southwest Inspired Metal Work Jewelry TutorialsMega Collection of Southwest Inspired Metal Work Jewelry Tutorials
Mega Collection of Southwest Inspired Metal Work Jewelry Tutorials
 
접이식 자가제작 베틀제작 도면
접이식 자가제작 베틀제작 도면접이식 자가제작 베틀제작 도면
접이식 자가제작 베틀제작 도면
 

Dernier

Insurers' journeys to build a mastery in the IoT usage
Insurers' journeys to build a mastery in the IoT usageInsurers' journeys to build a mastery in the IoT usage
Insurers' journeys to build a mastery in the IoT usageMatteo Carbone
 
Boost the utilization of your HCL environment by reevaluating use cases and f...
Boost the utilization of your HCL environment by reevaluating use cases and f...Boost the utilization of your HCL environment by reevaluating use cases and f...
Boost the utilization of your HCL environment by reevaluating use cases and f...Roland Driesen
 
Understanding the Pakistan Budgeting Process: Basics and Key Insights
Understanding the Pakistan Budgeting Process: Basics and Key InsightsUnderstanding the Pakistan Budgeting Process: Basics and Key Insights
Understanding the Pakistan Budgeting Process: Basics and Key Insightsseribangash
 
BEST ✨ Call Girls In Indirapuram Ghaziabad ✔️ 9871031762 ✔️ Escorts Service...
BEST ✨ Call Girls In  Indirapuram Ghaziabad  ✔️ 9871031762 ✔️ Escorts Service...BEST ✨ Call Girls In  Indirapuram Ghaziabad  ✔️ 9871031762 ✔️ Escorts Service...
BEST ✨ Call Girls In Indirapuram Ghaziabad ✔️ 9871031762 ✔️ Escorts Service...noida100girls
 
It will be International Nurses' Day on 12 May
It will be International Nurses' Day on 12 MayIt will be International Nurses' Day on 12 May
It will be International Nurses' Day on 12 MayNZSG
 
VIP Call Girls In Saharaganj ( Lucknow ) 🔝 8923113531 🔝 Cash Payment (COD) 👒
VIP Call Girls In Saharaganj ( Lucknow  ) 🔝 8923113531 🔝  Cash Payment (COD) 👒VIP Call Girls In Saharaganj ( Lucknow  ) 🔝 8923113531 🔝  Cash Payment (COD) 👒
VIP Call Girls In Saharaganj ( Lucknow ) 🔝 8923113531 🔝 Cash Payment (COD) 👒anilsa9823
 
Ensure the security of your HCL environment by applying the Zero Trust princi...
Ensure the security of your HCL environment by applying the Zero Trust princi...Ensure the security of your HCL environment by applying the Zero Trust princi...
Ensure the security of your HCL environment by applying the Zero Trust princi...Roland Driesen
 
Monthly Social Media Update April 2024 pptx.pptx
Monthly Social Media Update April 2024 pptx.pptxMonthly Social Media Update April 2024 pptx.pptx
Monthly Social Media Update April 2024 pptx.pptxAndy Lambert
 
Call Girls Navi Mumbai Just Call 9907093804 Top Class Call Girl Service Avail...
Call Girls Navi Mumbai Just Call 9907093804 Top Class Call Girl Service Avail...Call Girls Navi Mumbai Just Call 9907093804 Top Class Call Girl Service Avail...
Call Girls Navi Mumbai Just Call 9907093804 Top Class Call Girl Service Avail...Dipal Arora
 
Tech Startup Growth Hacking 101 - Basics on Growth Marketing
Tech Startup Growth Hacking 101  - Basics on Growth MarketingTech Startup Growth Hacking 101  - Basics on Growth Marketing
Tech Startup Growth Hacking 101 - Basics on Growth MarketingShawn Pang
 
Mondelez State of Snacking and Future Trends 2023
Mondelez State of Snacking and Future Trends 2023Mondelez State of Snacking and Future Trends 2023
Mondelez State of Snacking and Future Trends 2023Neil Kimberley
 
Regression analysis: Simple Linear Regression Multiple Linear Regression
Regression analysis:  Simple Linear Regression Multiple Linear RegressionRegression analysis:  Simple Linear Regression Multiple Linear Regression
Regression analysis: Simple Linear Regression Multiple Linear RegressionRavindra Nath Shukla
 
7.pdf This presentation captures many uses and the significance of the number...
7.pdf This presentation captures many uses and the significance of the number...7.pdf This presentation captures many uses and the significance of the number...
7.pdf This presentation captures many uses and the significance of the number...Paul Menig
 
Unlocking the Secrets of Affiliate Marketing.pdf
Unlocking the Secrets of Affiliate Marketing.pdfUnlocking the Secrets of Affiliate Marketing.pdf
Unlocking the Secrets of Affiliate Marketing.pdfOnline Income Engine
 
9599632723 Top Call Girls in Delhi at your Door Step Available 24x7 Delhi
9599632723 Top Call Girls in Delhi at your Door Step Available 24x7 Delhi9599632723 Top Call Girls in Delhi at your Door Step Available 24x7 Delhi
9599632723 Top Call Girls in Delhi at your Door Step Available 24x7 DelhiCall Girls in Delhi
 
Best Basmati Rice Manufacturers in India
Best Basmati Rice Manufacturers in IndiaBest Basmati Rice Manufacturers in India
Best Basmati Rice Manufacturers in IndiaShree Krishna Exports
 
0183760ssssssssssssssssssssssssssss00101011 (27).pdf
0183760ssssssssssssssssssssssssssss00101011 (27).pdf0183760ssssssssssssssssssssssssssss00101011 (27).pdf
0183760ssssssssssssssssssssssssssss00101011 (27).pdfRenandantas16
 
HONOR Veterans Event Keynote by Michael Hawkins
HONOR Veterans Event Keynote by Michael HawkinsHONOR Veterans Event Keynote by Michael Hawkins
HONOR Veterans Event Keynote by Michael HawkinsMichael W. Hawkins
 
GD Birla and his contribution in management
GD Birla and his contribution in managementGD Birla and his contribution in management
GD Birla and his contribution in managementchhavia330
 

Dernier (20)

Insurers' journeys to build a mastery in the IoT usage
Insurers' journeys to build a mastery in the IoT usageInsurers' journeys to build a mastery in the IoT usage
Insurers' journeys to build a mastery in the IoT usage
 
Boost the utilization of your HCL environment by reevaluating use cases and f...
Boost the utilization of your HCL environment by reevaluating use cases and f...Boost the utilization of your HCL environment by reevaluating use cases and f...
Boost the utilization of your HCL environment by reevaluating use cases and f...
 
Understanding the Pakistan Budgeting Process: Basics and Key Insights
Understanding the Pakistan Budgeting Process: Basics and Key InsightsUnderstanding the Pakistan Budgeting Process: Basics and Key Insights
Understanding the Pakistan Budgeting Process: Basics and Key Insights
 
BEST ✨ Call Girls In Indirapuram Ghaziabad ✔️ 9871031762 ✔️ Escorts Service...
BEST ✨ Call Girls In  Indirapuram Ghaziabad  ✔️ 9871031762 ✔️ Escorts Service...BEST ✨ Call Girls In  Indirapuram Ghaziabad  ✔️ 9871031762 ✔️ Escorts Service...
BEST ✨ Call Girls In Indirapuram Ghaziabad ✔️ 9871031762 ✔️ Escorts Service...
 
It will be International Nurses' Day on 12 May
It will be International Nurses' Day on 12 MayIt will be International Nurses' Day on 12 May
It will be International Nurses' Day on 12 May
 
VIP Call Girls In Saharaganj ( Lucknow ) 🔝 8923113531 🔝 Cash Payment (COD) 👒
VIP Call Girls In Saharaganj ( Lucknow  ) 🔝 8923113531 🔝  Cash Payment (COD) 👒VIP Call Girls In Saharaganj ( Lucknow  ) 🔝 8923113531 🔝  Cash Payment (COD) 👒
VIP Call Girls In Saharaganj ( Lucknow ) 🔝 8923113531 🔝 Cash Payment (COD) 👒
 
Ensure the security of your HCL environment by applying the Zero Trust princi...
Ensure the security of your HCL environment by applying the Zero Trust princi...Ensure the security of your HCL environment by applying the Zero Trust princi...
Ensure the security of your HCL environment by applying the Zero Trust princi...
 
Monthly Social Media Update April 2024 pptx.pptx
Monthly Social Media Update April 2024 pptx.pptxMonthly Social Media Update April 2024 pptx.pptx
Monthly Social Media Update April 2024 pptx.pptx
 
Call Girls Navi Mumbai Just Call 9907093804 Top Class Call Girl Service Avail...
Call Girls Navi Mumbai Just Call 9907093804 Top Class Call Girl Service Avail...Call Girls Navi Mumbai Just Call 9907093804 Top Class Call Girl Service Avail...
Call Girls Navi Mumbai Just Call 9907093804 Top Class Call Girl Service Avail...
 
Tech Startup Growth Hacking 101 - Basics on Growth Marketing
Tech Startup Growth Hacking 101  - Basics on Growth MarketingTech Startup Growth Hacking 101  - Basics on Growth Marketing
Tech Startup Growth Hacking 101 - Basics on Growth Marketing
 
Mondelez State of Snacking and Future Trends 2023
Mondelez State of Snacking and Future Trends 2023Mondelez State of Snacking and Future Trends 2023
Mondelez State of Snacking and Future Trends 2023
 
Regression analysis: Simple Linear Regression Multiple Linear Regression
Regression analysis:  Simple Linear Regression Multiple Linear RegressionRegression analysis:  Simple Linear Regression Multiple Linear Regression
Regression analysis: Simple Linear Regression Multiple Linear Regression
 
Forklift Operations: Safety through Cartoons
Forklift Operations: Safety through CartoonsForklift Operations: Safety through Cartoons
Forklift Operations: Safety through Cartoons
 
7.pdf This presentation captures many uses and the significance of the number...
7.pdf This presentation captures many uses and the significance of the number...7.pdf This presentation captures many uses and the significance of the number...
7.pdf This presentation captures many uses and the significance of the number...
 
Unlocking the Secrets of Affiliate Marketing.pdf
Unlocking the Secrets of Affiliate Marketing.pdfUnlocking the Secrets of Affiliate Marketing.pdf
Unlocking the Secrets of Affiliate Marketing.pdf
 
9599632723 Top Call Girls in Delhi at your Door Step Available 24x7 Delhi
9599632723 Top Call Girls in Delhi at your Door Step Available 24x7 Delhi9599632723 Top Call Girls in Delhi at your Door Step Available 24x7 Delhi
9599632723 Top Call Girls in Delhi at your Door Step Available 24x7 Delhi
 
Best Basmati Rice Manufacturers in India
Best Basmati Rice Manufacturers in IndiaBest Basmati Rice Manufacturers in India
Best Basmati Rice Manufacturers in India
 
0183760ssssssssssssssssssssssssssss00101011 (27).pdf
0183760ssssssssssssssssssssssssssss00101011 (27).pdf0183760ssssssssssssssssssssssssssss00101011 (27).pdf
0183760ssssssssssssssssssssssssssss00101011 (27).pdf
 
HONOR Veterans Event Keynote by Michael Hawkins
HONOR Veterans Event Keynote by Michael HawkinsHONOR Veterans Event Keynote by Michael Hawkins
HONOR Veterans Event Keynote by Michael Hawkins
 
GD Birla and his contribution in management
GD Birla and his contribution in managementGD Birla and his contribution in management
GD Birla and his contribution in management
 

2022-Arts_and_Crafts_Table_Lamp

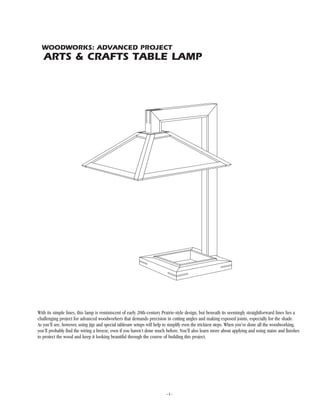
  • 1. –1– WOODWORKS: ADVANCED PROJECT ARTS & CRAFTS TABLE LAMP With its simple lines, this lamp is reminiscent of early 20th-century Prairie-style design, but beneath its seemingly straightforward lines lies a challenging project for advanced woodworkers that demands precision in cutting angles and making exposed joints, especially for the shade. As you’ll see, however, using jigs and special tablesaw setups will help to simplify even the trickiest steps. When you’ve done all the woodworking, you’ll probably find the wiring a breeze, even if you haven’t done much before. You’ll also learn more about applying and using stains and finishes to protect the wood and keep it looking beautiful through the course of building this project.
  • 2.
  • 3. CONTINUED - WOODWORKS: ADVANCED PROJECT 2006-2007 ARTS & CRAFTS TABLE LAMP –2– TOOLS REQUIRED Power Tools – Tablesaw with rip/crosscut blade and dado blade – Router with 1/4" router guide bushing and 1/4" straight cutting bit – Jigsaw Miscellaneous – Pencil – Tape measure – Felt-tipped marker – Safety glasses – Carpenter’s glue – 120, 150 and 220-grit sandpaper – Clean, lint-free cloths – Respirator – Double-sided tape – Gloves for finishing – Mineral spirits (for oil-based stains and finishes) – Water-filled metal container with tight- fitting lid (for oil-based stains and finishes waste materials) – Minwax® Wood Finish™ Stain Brush or other good quality, natural-bristle brush (for oil-based stains and finishes) SHOPPING LIST WOOD FINISHING PRODUCTS CUTTING LIST Recommended Finish Prep: Minwax® Pre-Stain Wood Conditioner (if using soft or porous wood) Stain: Minwax® Gel Stain Cherry (or your choice of any of the 8 Minwax® Gel Stain colors) Finish: Minwax® Fast-Drying Polyurethane Semi-Gloss Alternate Finish Prep: Minwax® Pre-Stain Wood Conditioner (if using soft or porous wood) Stain: Minwax® Wood Finish™ Golden Oak Stain (or your choice of any of the 22 Minwax® Wood Finish™ Stain colors) Finish: Minwax® Fast-Drying Polyurethane Satin (Also available in aerosol) Item Quantity 8/4 cherry 3 bd. ft. 4/4 cherry 3 bd. ft. Electrical parts, see below Stained glass, see below Overall Dimensions: 22-1/2"H x 41-1/2"W x 17"D Key Part Pcs. Dimensions A Base sides 4 1-1/8" x 1-1/2" x 9-1/4" B Base lip 4 5/16" x 1-3/8" x 6-5/16" C Arm (vertical) 1 1-1/2" x 1-1/2" x 22-1/2" D Arm (horizontal) 1 1-1/2" x 1-1/2" x 10-3/4" E Arm (end) 1 1-1/2" x 1-1/2" x 3" F Vertical cover plate 1 7/16" x 1-1/8" x 21" G Upper cover plate 1 7/16" x 1-1/8" x 9" H End cover plate 1 7/16" x 1-1/8" x 2" J Shade hangers 2 3/8" x 2-1/2" x 2-1/2" K Shade sides 8 3/4" x 1" x 10-1/2" L Shade tops 4 3/4" x 1" x 12" M Shade bottoms 4 3/4" x 1" x 15-1/2" N Splines 8 1/8" x 2" x 3-1/2" Recommended Wood: Cherry Alternate Wood: Mahogany MATERIAL LIST Key Part Pcs. Dimensions Q Lamp cord and plug 1 18 g. 8 ft. long R Rotary line switch 1 S Bushing 1 1/8" ips, female bushing T Steel pipes 2 1/8" ips, 10" long U Couplings 3 1/8" ips, female V Steel pipe 1 1/8" ips, 9" long W Armbacks (elbows) 2 90 degree, 1/2' ball, 1/8 ips X Nipple 1 1/8" ips, 5" long Y Star lock washers 2 1/8" ips Z Nuts 3 1/8" hex nut AA Keyless sockets 2 BB Cluster body 1 1-1/16" x 1-1/16" CC Brass arms 2 3-1/2", 1/8" ips DD Wire nuts 2 9/16" x 5/16" Key Part Pcs. Dimensions P Stained glass 4 1/8" x 12-1/4" x 6-1/8" Glass Electrical
  • 4. BEFORE YOU BEGIN Good craftsmanship begins and ends with good work habits, so make the following steps part of your routine workshop practice. If you have any doubts or questions about how to proceed with a project, always discuss them with your instructor. • Carefully and fully review plans and instructions before putting a tool to the project lumber. • Work sensibly and safely. Wear safety goggles and the appropriate respirator whenever making sawdust or working with thinners or other solvents. • At the end of every work session, clean up your shop area and put away all portable tools. CUTTING AND ASSEMBLY PROCEDURE Build the Shade Frame The shade is made of four identical frames. Use a stop block for all the cuts to ensure repeat accuracy. 1. Mill the 4/4 cherry board to the design thickness and rip the boards into 1" widths. Rough-cut three 12" pieces and one 18" piece for each of the four frames (K, L, M, Fig. 1). Cut enough parts to build an extra frame as a precaution and for setup purposes. 2. Attach a long auxiliary fence to your tablesaw’s miter gauge. Consider adding an acrylic guard just as a reminder of where not to put your fingers. 3. Make a setup block for setting your miter gauge angles by cutting a 38-degree angle on one end and a 26-degree angle on the other. Use an accurate miter saw to cut the block. 4. Set the miter gauge to cut at 38 degrees. Miter both ends of the frame sides (K) and frame bottoms (M) to final dimensions. Miter just the left edge of the frame top (L). All these cuts can be made using one miter fence setting. 5. Cut the half-lap joint on the mitered end of each piece (Figs. 2 & 3). Use scrap wood to set the blade height and a stop block for each cut. You will need to rotate the miter gauge 38 degrees right and left of center to accomplish all the angles. 6. Dry-fit all the pieces together and mark the position of the half-lap on the right side of the frame top (Fig. 4) to determine the exact posi- tion of the top’s second dado. Then cut the rest of the top half-laps. W Wo oo od dw wo or rk ke er r’ ’s s T Ti ip p: : This piece is actually quite short in the finished shade, but it’s much easier to make and hold on the saw if you start with a long piece of wood. Trim the excess length after the frame has been glued up. 7. Glue each frame assembly together with small C-clamps. When the glue has set, cut off the waste on the top. Rabbet for the Glass 8. Make a template out of 1/4" plywood to cut rabbets in each frame. Simply place a shade frame on the plywood, trace the interior and mark lines 1/4" to the outside of the tracing lines. Cut to this line with a jigsaw. Keep the template 3" wide to support the router. 9. Rout the rabbet with a 1/4" straight bit and guide bushing (Figs. 3 & 5). Take several passes of to get the rabbet to full depth. Clean up the corners of the rabbet using a chisel. W Wo oo od dw wo or rk ke er r’ ’s s T Ti ip p: : Use double-sided tape to secure the frame to the bench and template. Tuck frame scraps under the template for support. Cut the Compound Miters 10. Use the setup block to set the tablesaw miter fence to cut at 38 degrees and angle the blade to 26 degrees. 11. Place a frame, face side up, with the bottom against the fence. Cut the compound miter (Fig. 6), leaving a 5/8"-wide side (Fig. 3). W Wo oo od dw wo or rk ke er r’ ’s s T Ti ip p: : To ensure a clean joint, make two passes. The first cut is just shy of the line. For the second cut, add a shim, such as a playing card, to the stop block. This will take just a whisker off for a super-clean edge. 12. Next, place the freshly cut side against the miter fence and adjust the angle so the uncut side is parallel to the blade. This should be approxi- mately 76 degrees on the miter gauge. Then miter the second side. 13. With a beveled side against the fence, adjust the miter fence so the frame bottom is parallel to the blade. Reset the blade to 90 degrees; rip each bottom to 3/4"-wide (Fig. 7A). Reset the blade to 45 degrees and bevel the underside of the frame’s bottom just up to the routed rabbets (Fig. 7B). 14. Remove the miter fence, flip the frame over onto its face and use the tablesaw fence to bevel the top (Fig. 7A). Leave a 3/8"-wide flat reveal at the top. The shade hanger (J) sits inside this reveal. Place the frame bottom against the tablesaw fence and rip each frame top at 90 degrees so each frame is identical. 15. Glue the four frames together using spring clamps. When dry, clean up the glue and sand. Cut the Glass and Shade Hangers 16. Make a cardboard template 1/32" smaller than the frame opening. Mark this pattern on the glass using a felt-tipped marker. 17. Make a single scoring cut just inside one of the lines. Place the scored edge over the end of the bench and, with a gentle downward motion, snap the glass at the scored mark. Repeat until all the glass is cut. Be sure to wear gloves for this step. Freshly cut glass can be razor sharp. W Wo oo od dw wo or rk ke er r’ ’s s T Ti ip p: : Minor adjustments to the glass shape can be made using an 800-grit waterstone. Do not use a grinder or power sander. 18. Cut the two shade hangers (J, Fig. 8). Make a simple crosscut jig (Fig. 9) to safely cut the 45-degree chamfers on the tablesaw. Trim the top hanger until it just fits inside the mitered top of the shade and –3– CONTINUED - WOODWORKS: ADVANCED PROJECT 2006-2007 ARTS & CRAFTS TABLE LAMP
  • 5. flush with the top reveal. Drill a hole in the center of each hanger for the nipple (X). Make the Base and Arm 19. Mill 8/4 cherry to 1-1/2". Rip stock for the four base sides (A) to 1-1/8". Miter to the final dimension. 20. Glue up the base with a band clamp. After the glue dries, cut slots for the splines (N) on the tablesaw (Fig. 10) using a shop-made spline slot sled (Fig. 11). Glue in the splines and trim them flush when dry. Cut the reveal around the bottom of the base (Fig. 1). 21. Cut a notch in the back of the base (Fig. 1) with a dado blade. 22. Mill 4/4 cherry to 5/16"-thick stock and rip to 1-3/8" wide for base lip (B). Miter to fit inside the base, and glue. 23. Cut a 45" length of 1-1/2" x 1-1/2" cherry for arm assembly parts (C, D and E). 24. Cut a deep groove for the conduit in the center of one edge (Fig. 1). 25. Miter the arm assembly parts. To make clamping the miter easier, leave part E long until after the glue-up. 26. Cut the notch in the bottom of Part C (Fig. 1). Dry-fit the base and the vertical arm. 27. Drill two holes (Fig. 1, Detail. 2) for the screws that attach the base and arm. Drill a third hole for the lamp wire. 28. Glue the arm assembly one joint at a time. Leave the end piece extra-long for now, so there’s room to attach the stepped block. Cut this piece to length after it’s glued. 29. Cut the spline slots in the assembled upright, as in Step 20, and glue in the splines. Cut the spines and sand them flush. 30. Cut arm end (E) to final length. 31. Make cover plate F, G and H (Fig. 1, Detail 1) from a 40"-long strip of wood. Cut the rabbets so the cover plates fit snugly into the groove with hand pressure. 32. Miter the completed cover plates to fit the upright. 33. Sand the shade, base, upright and hangers to 220-grit and apply the finish. Refer to the STAINING & FINISHING section. 34. Install the stained glass in the shade. To hold the glass in place, rip 3/16" x 3/16" cherry stops on the tablesaw. Miter the stops to fit behind the glass and attach them with No. 19 x 1/2" brads (Fig. 7B). NOTE: Install the glass after you stain and finish the shade. Assemble the Wiring Conduit We’ve wired this lamp the safest way possible using metal conduit to protect the wires. The lamp cord has a polarized plug for safety and an add-on power switch for simplicity. 35. Cut two 10" pieces from the end of lamp cord (Q) and set aside for wiring the sockets later. 36. Feed the lamp cord through the hole in the upright. Assembling the conduit is just a matter of screwing Parts S through X together and feeding the wire as you go (Fig. 12). Don’t overly tighten the two armbacks (W) as they can cut through the cord insulation. Make sure several inches of cord feed past the end of the nipple (X). W Wo oo od dw wo or rk ke er r’ ’s s T Ti ip p: : Reverse twist the cord before screwing on the last armback so the wire is not wound in the conduit. 37. Lay the conduit into the upright base/arm assembly. Complete the Wiring 38. Screw the two arms (CC, Fig. 13) into the cluster (BB). IMPORTANT: Make sure the wire nuts are rated to join three 18-gauge wires. 39. Feed 10" of lamp cord from the cluster through each arm. 40. Wire the sockets (AA, Fig. 14). Strip 5/8" of insulation from each wire end and wrap the bare wire three-quarters of the way around the screw. 41. It’s standard practice in lamp wiring that the neutral wire is marked. Our wire was marked with ribbing on the insulation. Other manufacturers may use different colored insulation or a colored strand in the wire itself. No matter how it’s marked, you can always tell the neutral wire; it’s the one that comes off the wide blade on the plug. 42. Attach the rotary switch (R) to the cord (Fig. 15). Cut the hot wire, lay both wires through the switch, snap on the cover and screw it down. Small metal prongs penetrate the insulation and complete the switch circuit. 43. Attach the shade to the upright (Fig. 16). 44. Twist wire nuts on the three neutral wires and the three hot wires (DD, Fig. 13). Take care that all the copper wire strands are in the wire nuts. Push the wires into the cluster and screw on the cap. FINAL ASSEMBLY Attach the Base 45. Screw the base onto the uprights. Check with a square to make sure the arm seats 90 degrees to the tabletop. If needed, pare the base slot with a chisel to adjust the fit. Plug the screw holes with 3/8" cherry plugs and sand them flush. After you stain and finish add self-adhesive felt pads to the bottom and you’re done! Attach the Shade 46. See Fig. 16. Screw the hex nut onto the nipple until it’s just below the surface of the arm. Install the cover plates. 47. Screw the upper shade hanger to the arm. To determine where to place the screw holes, fit the upper shade hanger upside down over the conduit. Draw the outline of the arm end onto the hanger. Remove the –4– CONTINUED - WOODWORKS: ADVANCED PROJECT 2006-2007 ARTS & CRAFTS TABLE LAMP
  • 6. hanger, and countersink and drill three holes for the screws. Drill pilot holes into the arm end to prevent splitting. 48. Set the shade on the upper shade hanger and place the lower hanger over the nipple. Tighten nut A and its washer onto the threaded conduit. Install nut B and washer about halfway down the nipple. Thread the lamp socket cluster onto the nipple. Stop when the nipple reaches just inside the cluster. Back off nut B to lock the socket cluster in place. STAINING AND FINISHING W Wo oo od dw wo or rk ke er r’ ’s s T Ti ip p: : Though you may be tempted to cut short your sanding, preparation and application time, don’t do it. These tasks are very important steps in obtaining a high-quality finish. Remember, it is the finish, just as much as the fit and smoothness of the parts that will have great bearing on how people judge your craftsmanship. To ensure an excellent result, follow the steps listed in this section and also the instructions the finish manu- facturer puts on its products. FINISHING TIPS • Test the stains and finishes you are planning to use on scraps of wood. On the back of the scrap, mark the stain/finish combination and the type of wood. Allow all samples to dry thoroughly before making your final finish selection. Save your samples for quick reference on future projects. • All stains and finishes must be allowed to dry thoroughly between coats. Remember that drying times can vary due to humidity and other climatic conditions. • If you have some leftover stain or finish, wipe the can rim so that stain or finish in the rim won’t dry out and prevent the lid from forming a tight seal. • Brushes used for water-based products, such as Minwax® Water- Based Wood Stains or Minwax® Polycrylic® Protective Finish, must be cleaned with soap and water; oil-based finishes must be cleaned with mineral spirits. 49. Sand all pieces with 120-grit paper, then move up to 220-grit to complete the pre-finish smoothing. Use an orbital sander to remove any marks or scratches, then lightly sand by hand using with-the-grain sanding strokes. Dust off the piece and wipe it carefully with a clean, lint-free cloth lightly dampened with mineral spirits. Recommended Finish 50. Prior to final assembly of the lamp, apply the Minwax® Gel Stain you’ve chosen to the surfaces using a clean, lint-free cloth or natural- bristle brush. Allow the Gel Stain to set for about 3 minutes, then wipe off any excess. Repeat for the exterior surfaces. To achieve a deeper color, you may apply a second coat after 8 to 10 hours, repeating the application directions for the first coat. Allow the stain to dry for 24 hours before applying the finish. W Wo oo od dw wo or rk ke er r’ ’s s T Ti ip p: : When wiping off stain, make certain that your last wipe with the cloth goes with the grain of the wood. This way, any stain you might miss during wipe-off will be visually minimized by the wood grain. 51. Apply Minwax® Fast-Drying Polyurethane following the directions on the can. Use a good quality, natural-bristle brush. Allow the first coat to dry overnight. 52. The next day, sand all surfaces lightly with 220-grit or finer sandpa- per using with-the-grain strokes. Dust off and wipe all surfaces with a cloth lightly dampened with mineral spirits. Apply a second coat of polyurethane and set the piece aside to cure overnight. 53. The following day, sand all surfaces lightly with 220-grit paper. Dust off and wipe the piece with a cloth lightly dampened with mineral spirits and apply the third and final coat of polyurethane. Alternate Finish 54. Apply the Minwax® Wood Finish™ you’ve chosen to the surfaces using a natural-bristle brush and a clean, lint-free cloth following the directions on the can. The brush will help you get the stain into the many inside corners and other tight spots. Allow the Wood Finish™ to set for about 5 to 15 minutes, then wipe off any excess. To achieve a deeper color, you may apply a second coat after 4-6 hours, repeating the application directions for the first coat. Allow the stain to dry for 24 hours before applying the protective clear finish. 55. Apply Minwax® Fast-Drying Polyurethane following the directions on the can. Use a good quality, natural-bristle brush. Allow the first coat to dry overnight. 56. The next day, sand all surfaces lightly with 220-grit or finer sandpa- per using with-the-grain strokes. Dust off and wipe all surfaces with a cloth lightly dampened with mineral spirits. Apply a second coat of polyurethane and set the piece aside to cure overnight. 57. The following day, sand all surfaces lightly with 220-grit paper. Dust off and wipe the piece with a cloth lightly dampened with min- eral spirits and apply the third and final coat of polyurethane. PRODUCT SAFETY For your safety and the safety of those you work with, always read the safety warnings, which manufacturers print on their labels, and follow them to the letter. WARNING! Removal of old paint by sanding, scraping or other means may generate dust or fumes that contain lead. Exposure to lead dust or fumes may cause brain damage or other adverse health effects, especially in children or pregnant women. Controlling exposure to lead or other hazardous substances requires the use of proper protective equipment, such as properly fitted respirator (NIOSH approved) and proper containment and cleanup. For more information, call the National Lead Information Center at 1-800-424-LEAD (in US) or contact your local health authority. DANGER: Rags, steel wool, other waste soaked with oil-based stains and clear finishes, and sanding residue may spontaneously catch fire if improperly discarded. Immediately place rags, steel wool, other waste soaked with these products, and sanding residue in a sealed, water-filled metal container. Dispose of in accordance with local fire regulations. –5– CONTINUED - WOODWORKS: ADVANCED PROJECT 2006-2007 ARTS & CRAFTS TABLE LAMP
  • 7. When using oil-based wood finishing products: CAUTIONS: CONTAINS ALIPHATIC HYDROCARBONS. Contents are COMBUSTIBLE. Keep away from heat and open flame. VAPOR HARMFUL. Use only with adequate ventilation. To avoid over- exposure, open windows and doors or use other means to ensure fresh air entry during application and drying. If you experience eye watering, headaches, or dizziness, increase fresh air, or wear respiratory protection (NIOSH approved), or leave the area. Avoid contact with eyes and skin. Wash hands after using. Keep container closed when not in use. Do not transfer contents to other containers for storage. FIRST AID: In case of eye contact, flush thoroughly with large amounts of water for 15 minutes and get medical attention. For skin contact, wash thoroughly with soap and water. In case of respiratory difficulty, provide fresh air and call physician. If swallowed, call Poison Control Center, hospital emergency room, or physician immediately. DELAYED EFFECTS FROM LONG-TERM OVEREXPOSURE. Contains solvents which can cause permanent brain and nervous system damage. Intentional misuse by deliberately concentrating and inhaling contents may be harmful or fatal. WARNING: This product contains chemicals known to the State of California to cause cancer and birth defects or other reproductive harm. DO NOT TAKE INTERNALLY. KEEP OUT OF REACH OF CHILDREN. CONFORMS TO ASTM D-4326. Contact a physician for more health information. When using water-based wood finishing products: CAUTIONS: Use Only With Adequate Ventilation. To avoid overexposure, open windows and doors or use other means to ensure fresh air entry during application and drying. If you experience eye watering, headaches, or dizziness, increase fresh air, or wear respiratory protection (NIOSH approved), or leave the area. Avoid contact with eyes and skin. Wash hands after using. Keep container closed when not in use. Do not transfer contents to other containers for storage. FIRST AID: In case of eye contact, flush thoroughly with large amounts of water. Get medical attention if irritation persists. If swallowed, get medical attention immediately. WARNING: This product contains chemicals known to the State of California to cause cancer and birth defects or other reproductive harm. DO NOT TAKE INTERNALLY. KEEP OUT OF REACH OF CHILDREN. CONFORMS TO ASTM D-4326. Contact a physician for more health information. SOURCES Grand Brass Lamp Parts (212) 226-2567 www.grandbrass.com One 10-ft. 18/2 SPT-1 cord with molded plug, #WIC10FTBL, $1.50 One black rotary line switch for SPT-1 cord, #SW423BL, $0.80 One 1/8 ips female black bushing, #BG201B, $0.10 Two 10" x 1/8 ips steel pipe, #PIST10, $0.75 ea. One 9" x 1/8 ips steel pipe, #PIST09, $0.75 Three straight coupling brass 1/8F thru, #NE449, $0.20 ea. Two 1/8m bottom x 1/8f side, 1/2 ball 90-degree armback, #AB335NP $0.75 ea. One 5" x 1/8 ips nipple steel, #NI5-0X1/8, $0.60 Two 1/8 ips.slip star lock washer, #WA1/8STAR, $0.02 ea. Three 1/8 hex nut, brass, #NU424, $0.08 ea. Two 3-1/2" plain (J) arm brass 1/8m ips, #ARJL, $2.25 ea. One small turned cluster body, 2-piece, #BOS2XB, $2.50 Two MD wire nut, #WINUTG, $0.10 Two cast-brass uno-threaded keyless socket with 1/8 ips bushing and setscrew, #SO9347CB, $10 ea. Processing fee for order under $50: $10. Total cost: Lamp electrical parts, $50 plus shipping. Southern Front Stained Glass (281) 890-5860 www.southernfront.com Wissmach Glass, W0101, Dark Green and Opal Wispy Five 10-1/2" x 16" panels, $27 Fletcher-Terry steel glass cutter, $4.50. Woodworkers Supply (800) 645-9292 www.woodworker.com Felt discs, #933-671, $2.99 strip of 60 1/4" straight bit, #03-140, $13.99 1/4" router guide bushing, #938-048, $7.99 –6– CONTINUED - WOODWORKS: ADVANCED PROJECT 2006-2007 ARTS & CRAFTS TABLE LAMP
  • 8. FIG 1. LAMP DETAILS –7– CONTINUED - WOODWORKS: ADVANCED PROJECT 2006-2007 ARTS & CRAFTS TABLE LAMP F N D E G H J J #6 x 1" Screw F C M K L #8 x 1- 3 /4" Screw Plug 1/4" x 1 1 /8" Notch 7 /8" x 1 1 /2" Notch B A N 9 /16" W x 7 /8" D 3 /16" 7 /16" Dia. 1 /8" x 1 /8" Reveal 1 /4" 3 /4" C 1 /4" Wire Hole 3 /8" 3 /8" Dia. Counterbore 3 /8" 1 /2" 9 /16" 3 /16" 1 /4" DETAIL 2 Back of Lamp Arm Bottom DETAIL 1 Cover Plate 1 /8" 1-
  • 9. FIG 2. CUT THE ANGLED HALF-LAP JOINTS –8– CONTINUED - WOODWORKS: ADVANCED PROJECT 2006-2007 ARTS & CRAFTS TABLE LAMP Stop Block Guard FIG 3. HALF-LAP JOINTS Top Second Dado Cut Flush After Glued FIG 4. ASSEMBLE THE FRAME 1 /4" Straight Bit Rabbet Template Scrap Double-Sided Tape 1 /4" Guide Bushing 10 1 /2" 151 /2" 3 /8" 3 /8" L K M FIG 5. RABBET EACH FRAME FIG 6. RIP THE COMPOUND ANGLES 5 /8" Stop Block 38° 26° Guard
  • 10. –9– CONTINUED - WOODWORKS: ADVANCED PROJECT 2006-2007 ARTS & CRAFTS TABLE LAMP FIG 7A. BEVELED ENDS 5 /8" 45° Top Bevel 45° Bottom Bevel 3 /4" L M K 3 /4" FIG 7B. INSIDE OF SHADE FRAME 3 /16" x 3 /16" Stop 1 /4" x 1 /2" Rabbet #19 x 1 /2" Brads 45° Bevel L M K FIG 8. CUT THE SHADE HANGERS Stop Block Crosscut Sled Shade Hangers 45° FIG 10. CUT SLOTS FOR SPLINES 90° Sled Rip Blade Lamp Base Spline Slot FIG 9. CROSSCUT SLED 12" 10" 1" x 3 /4" Fit to Miter Slot Toggle Clamp FIG 11. SPLINE SLOT SLED 12" 8" 9" 45° 6" 3 /4" Plywood
  • 11. FIG 12. CONDUIT ASSEMBLY –10– CONTINUED - WOODWORKS: ADVANCED PROJECT 2006-2007 ARTS & CRAFTS TABLE LAMP Y Z Z Y X Z U W V U W T U T S R Q FIG 14. SOCKET ASSEMBLY Neutral Wire (Ribbed) CC AA Brass Screw Silver Screw Hot Wire AA FIG 13. CLUSTER WIRING Neutral Wires (Ribbed) CC CC X BB DD Hot Wires Combine the three ribbed wires and the three hot wires with small wire nuts. IMPORTANT: Make sure the wire nuts are rated to join three 18-gauge wires. CAUTION: Only remove 5/8" of insulation from each wire end. Be sure to attach the neutral (ribbed) wire that runs from the wide blade on the plug to the silver screw and the hot wire to the brass-colored screw.
  • 12. –11– CONTINUED - WOODWORKS: ADVANCED PROJECT 2006-2007 ARTS & CRAFTS TABLE LAMP FIG 16. ATTACH THE SHADE Lamp Socket Cluster Nut B Nut A Lower Shade Hanger Upper Shade Hanger Nipple Hex Nut Cover Plate Note: The glass is removed for clarity. FIG 15. ROTARY SWITCH Neutral Wire (Ribbed) R Prong Holes Hot Wire Cut the hot wire, lay both wires through the switch, snap on the cover and screw it down. Small metal prongs penetrate the insulation and complete the switch.