Kuwait City MTP kit ((+919101817206)) Buy Abortion Pills Kuwait
Plc trilogi5 purdue
1. 1
1
TRILOGI
5.3
PLC Ladder Diagram Programmer
and Simulator
A tutorial prepared for IE 575 by
Dr. T.C. Chang
2
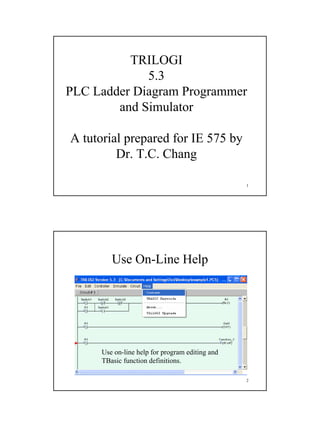
Use On-Line Help
Use on-line help for program editing and
TBasic function definitions.
5. 5
9
Start Server
Need server to connect
to a PLC.
Set the correct COM
port. In networked
PLCs use “Change
PLCID” to set PLC ID
number. The PLC ID
will be saved in the
EEPROM of the PLC.
10
Configure Users
Click Configure
Users. You must be
an administrator to
enter a new user.
This is not for IE
575 students.
9. 9
17
On-Line Monitoring Window
You may not
click on the
input to change
it. Only input at
the PLC will be
shown.
18
Disconnect from Server
In order to link
your TRiLOGI
window to a
different PLC,
you must
disconnect it from
the current PLC.
10. 10
19
Connect to Server
In the previous
example, the
server was
running on the
local PC. You
may connect to a
server running on
a remote PC
(anywhere), as
long as you have
the username and
password for the
PLC and the IP
address of the PC.
20
New Server
Change the
server IP
address.
11. 11
21
User New Server
• After the new server has been connected,
treat it the same as the local server. No extra
example will be given here.
22
Input New Program
12. 12
23
Enter I/O Table
You must define
I/O table before
you may insert
new circuit (rung).
24
I/O Table
Click the label name for Input # 1
to enter “Switch1”. Press “enter”
to enter the name.
Click the > button to advance to
“Output”, “Relay”, “Timer”, etc.
14. 14
27
“OR” and Contact
Insertion point is
shown in a green
box. After the “OR”
contact is selected,
choose a relay from
the I/O table. Use the
“>” or the pull down
menu to select Relay.
28
Choose a Relay Contact
Click on Switch1 to move the
insertion point to the right hand
side of Switch1. Then click the
right arrow to move the
insertion point after both
contacts.
15. 15
29
New Insertion Point
If the insertion point is not moved here
the logic will be (Switch1 *
Switch2’)+R1. When the insertion point
is moved outside (solid yellow box) the
logic becomes (Switch1+R1)*Switch2’
30
Insert a Normally Closed Contact
Right click contact and
select the input.
16. 16
31
Add an Output
Click on the output and select the
correct one.
32
Delete the Output and Change to
Relay
While Out is highlighted, click DEL twice
quickly.
17. 17
33
Replace with Relay
Click the output and choose relay from
the I/O table. Press “Enter” to go to next
rung.
34
Add New Rung
Use the procedure discussed before to enter a
new circuit (rung).
18. 18
35
Insert a Contact
Click on Switch2 to choose the
insertion point. Right click contact to
insert Switch3.
36
Competed Ladder Diagram
19. 19
37
Add OR Condition
Add new element OR (Switch2’*Switch3’). Click on
Switch2, then, click element 5. Element 5 change to
close on the right hand side. Select the close point.
Following example is used to show how to edit the ladder
diagram. The resultant program may not be correct.
38
Close the OR Logic
Click the contact to close, then, click
element 5.
20. 20
39
New Element Complete
An AND condition is added.
40
Insert Custom Function
Double click here to add a new rung.
21. 21
41
Add a Special Bit 0.1s Pulse
Every 0.1 second, the contact
will close then open.
42
Select Custom Function
The output of the rung
is a custom function.
22. 22
43
Select Delta Custom Function 1
Edit custom function using the edit
menu or right click Function_1.
44
Edit Custom Function
Type the Tbasic program.
May edit other custom
function. When editing is
done, close the editor.
23. 23
45
Simulate the Program
This program will run two stepper motors continuously. Since
the function is called every 0.1 second.
46
Replace the Clock with R1
Right click on Clk:0.1s and enter R1
in the “Edit Label Name” box.