
Recommandé
Contenu connexe
Tendances
Tendances (20)
Similaire à Photoshop Silhouettes: A Step-by-Step Guide
Similaire à Photoshop Silhouettes: A Step-by-Step Guide (20)
Photoshop Silhouettes: A Step-by-Step Guide
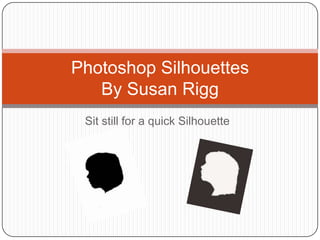
- 1. Photoshop Silhouettes By Susan Rigg Sit still for a quick Silhouette
- 2. Open Photoshop Elements 11 and choose Photo Editor
- 3. Your opening work space will look like this. You need to open the picture you want to make your creation from. You can choose open and find your picture in a You also can file drop the picture directly on the page from the file if you have it open.
- 4. Now you are ready to remove background color.
- 5. Removing background ! Using the magic wand select the background area. It will have ants Now push the delete running around it. If it button and remove the selects your subject try background area. again. If all of it is not If you have any selected you can background area left, reselect the other areas follow the same steps
- 6. Once you have removed all color you may need to clean it up with the eraser. Choose select all and ants will run around the border of the picture. Shortcut crtl A Now choose the eraser and erase any stray background color you see. If you want to change the size of the block eraser you can slide the size button.
- 7. How to fill in the silhouette with black. Use your magic wand again and Now choose select again. Choose select the white background. The inverse, and the ants will run around ants should run around the outside of you image only. the picture and around your silhouette!
- 8. Filling your silhouette with black! Choose the Now go to the picture paint bucket to and click and it will fill the picture fill black! with black. If you see any white Choose the spots, you can try top square clicking on them with and a color the bucket or selector will painting them with appear. You the brush. then choose black for you color.
- 9. Removing the shoulders Choose the eraser block and remove the You now have a finished shoulders or areas silhouette! You can below the head. print!
- 10. Reverse the image if you want to write on the inside. Use you magic wand and select the image. Choose select at the top and choose inverse. Fill the image white using the paint bucket. Select and inverse at the top again. Now using the paint bucket fill the outside with black. Print and write poetry or anything inside the silhouette!