The document provides details on the steps taken to create the initial layout and navigation for a website using Adobe Animate. Key points include:
- Rectangles were used to create the background layout and navigation bar. Buttons were created for the navigation links and rollover effects were added.
- Assets like images and logos were imported from a library file. Images of Australia and a map were added to pages.
- A scroll panel was added to hostel page text to make it readable.
- A slideshow of images was created on the hostels page using layers and tweens.
- Text, input boxes and submit buttons were added to pages like 'About Oz' and '
1. Tre Wallace
Website diary
I have created a bit of the website early and here is what I have done.
What I have done is just the back ground which was done through the shape tool on rectangles. The
rectangle tool is the third one down in the image posted just underneath.
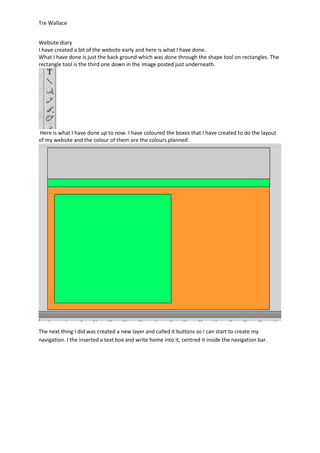
Here is what I have done up to now. I have coloured the boxes that I have created to do the layout
of my website and the colour of them are the colours planned.
The next thing I did was created a new layer and called it buttons so I can start to create my
navigation. I the inserted a text box and write home into it, centred it inside the navigation bar.
2. Tre Wallace
I then clicked over the home button and clicked modify. In the modify navigation table it says
‘convert to symbol’ I clicked on that and it came up with the box below.
3. Tre Wallace
I then changed the name to btn_home to show it is a button and I then changed the type to button
to actually make the actual text a button and I then clicked ok.
After creating the button, I then clicked over the button and it came up with the frames for the
button. I then inserted a new key frame next to the original one and changed the text to orange so it
will work as a rollover button.
4. Tre Wallace
I did this technique for more buttons so I have 5 in total. These buttons are the navigation to all the
pages I will have on the website.
After I created the navigation I went to file and went over import which then came up with import
from library which I clicked. I then imported a file I had saved called assets which I had created to
keep the assets for my website all together. When the assets were imported it came up with a list in
the library of images and so on which I can now put onto my website.
5. Tre Wallace
I then imported two images that I had found to use on my website. The images are the Australian
flag and a map to show the different places in Australia to visit.
6. Tre Wallace
I then imported the logo and fit it into the corner of the page so it has the logo apart of the
background.
After finishing the background of the website pages I decided to then insert the buttons into a
different timeline so I can use them as the buttons as they are.
I did this by creating a new timeline and cling on all the buttons created and pulled them over to the
other timeline locking the other timeline so nothing is changed. But as nothing changed I deleted the
buttons of the background so it isn’t doubled over or needed.
A labels and content timeline was then created so when I’m on labels I know the pages by name and
content I know what pages need what content.
On my first page home I inserted a pic I had on the background so it is only on the page I need it. The
text next to it I inserted that with the text tool in the tool bar. The text is an introduction so people
feel welcome to the website and know what we are for.
7. Tre Wallace
The next page I was on was the hostels page. On the hostels page I have put a lot of text to explain
about the hostels and it is also a list of the hostels that we have with the explanation with it. The text
was way to long for the page so I decided to turn it into a scroll bar.
8. Tre Wallace
To get the scroll panel on your text you will have to make your text box smaller with the text set to
scrollable which is in the properties bar. When the text is scrollable you then click on ‘window’
‘motion presets’ ‘components when the box comes up and then you can look through till you see
‘scrollpane’ when you click on this you just add it to the side of your text and you then have a
working stroller when you go onto the actual use of the page.
9. Tre Wallace
On the hostels page I wanted a slide show of images so to make that I had to create slides of images
with the time line.
I inserted an image into the new key frame I put I the time line outside of the space I was going to
put it. I then held the ‘shift’ key and dragged the image into place and inserted a classic tween from
right clicking over the frame. I then added another key frame 35 frames down so it stays on the page
for a second or so. Then I inserted other key frame 5 frames along so the image has a tween to leave
the page.
10. Tre Wallace
Having this first image set up to slide of the page I need a new image to slide on so I then added a
new layer and inserted a key frame over the last five of the last frame which is the tween of it sliding
off the page.
11. Tre Wallace
I then did this until all the images I have for this slide show re gone. At the end I had to insert the
image I started with to slide on so the images do not end going on in the rhythm.
12. Tre Wallace
I then had to make a new layer called mask. I created the mask layer so I could mask the images that
are sl;iding on. As the images slide on they take up the room of the rest of the page so I inserted a
box of where I only want the images to show and right clicked over the layer and clicked mask.
13. Tre Wallace
After the first 2 pages being finished I then started on the about Oz page as it would be the easiest
to finish. I inserted my text information into the green box as all then other pages and then I added
an input box from the components section so people could leave any comments or questions about
the site.
Then using the same list of components I then clicked on thew3 button component and inserted
underneath the input box so the input can be submitted to the website owners.
I then inserted the last bit of text so people know what the input box is for. This is so the people feel
welcome and free to ask or comment.
14. Tre Wallace
For my membership page I added lots of text boxes with the text that’s going to be needed to have
you sign up to the website
I then lined them all into position to be answered to sign up for the site and have a membership
15. Tre Wallace
I then added a text input box next to each question so you can add in your information to sign up for
us. The postal address is bigger as it will need more information as you may have a long road
address.
16. Tre Wallace
To change the sizes of the boxes you get a position and size table to help you adjust the size so they
are all equal. I also used the positioning to line all them together so none of them look out of
proportion.
I then added a submit button using the same components box as the text input to make the
information get submitted to the website.
Booking page I have added my information that I am going to need to include for people to know the
dates, prices and information on the website.
17. Tre Wallace
I then added buttons so you actually book those holidays on the spot while you are actually on it so
it saves you time and make sure you get a place.
18. Tre Wallace
I then added a combo box from the components under the input box so I can add a list of months.
When you change the months the dates will change.