Manual de Recarga Xerox N24 N32 N40 113R173
•
1 j'aime•1,171 vues

Manual utilizado nos modelos Xerox 113R173 para Impressoras N24 N32 N40.

Recommandé
Recommandé
Contenu connexe
Tendances
Tendances (19)
Similaire à Manual de Recarga Xerox N24 N32 N40 113R173
Similaire à Manual de Recarga Xerox N24 N32 N40 113R173 (17)
Plus de Valejet
Plus de Valejet (12)
Dernier
Dernier (20)
Manual de Recarga Xerox N24 N32 N40 113R173
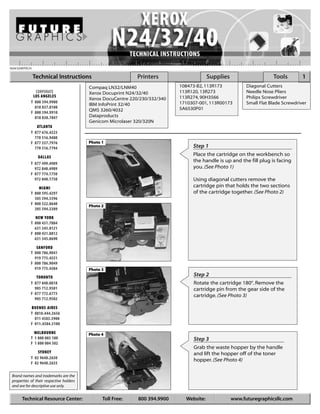
- 1. N24/3240TECH Technical Instructions Printers Supplies Tools 1 Compaq LN32/LNM40 108473-B2, 113R173 Diagonal Cutters CORPORATE Xerox Docuprint N24/32/40 113R120, 13R273 Needle Nose Pliers LOS ANGELES 113R274, 90H3566 Philips Screwdriver Xerox DocuCentre 220/230/332/340 T 800 394.9900 1710307-001, 113R00173 Small Flat Blade Screwdriver IBM InfoPrint 32/40 818 837.8100 5A6530P01 F 800 394.9910 QMS 3260/4032 818 838.7047 Dataproducts Genicom Microlaser 320/320N ATLANTA T 877 676.4223 770 516.9488 F 877 337.7976 Photo 1 770 516.7794 Step 1 DALLAS Place the cartridge on the workbench so the handle is up and the fill plug is facing T 877 499.4989 972 840.4989 you. (See Photo 1) F 877 774.1750 972 840.1750 Using diagonal cutters remove the MIAMI cartridge pin that holds the two sections T 800 595.4297 of the cartridge together. (See Photo 2) 305 594.3396 F 800 522.8640 Photo 2 305 594.3309 NEW YORK T 800 431.7884 631 345.0121 F 800 431.8812 631 345.0690 SANFORD T 800 786.9041 919 775.4551 F 800 786.9049 919 775.4584 Photo 3 TORONTO Step 2 T 877 848.0818 Rotate the cartridge 180°. Remove the 905 712.9501 cartridge pin from the gear side of the F 877 772.6773 cartridge. (See Photo 3) 905 712.9502 BUENOS AIRES T 0810.444.2656 011 4583.5900 F 011.4584.3100 MELBOURNE Photo 4 T 1 800 003 100 Step 3 F 1 800 004 302 Grab the waste hopper by the handle SYDNEY and lift the hopper off of the toner T 02 9648.2630 hopper. (See Photo 4) F 02 9648.2635 Brand names and trademarks are the properties of their respective holders and are for descriptive use only. Technical Resource Center: Toll Free: 800 394.9900 Website: www.futuregraphicsllc.com
- 2. 2 Xerox N24/32/40 Technical Instructions Step 4 Photo 5 Photo 6 Using a Philips screwdriver remove the two screws holding the drum axle hub on the contact side of the waste hopper. (See Photo 5). Remove the drum axle hub. (See Photo 6) Photo 7 Photo 8 Step 5 Rotate the waste hopper 180°. Remove the two screws holding the drum axle hub. (See Photos 7). Remove the hub. (See Photos 8) Photo 9 Photo 10 Step 6 Lift out the drum. (See Photos 9) Step 7 Remove the PCR from the cradles. (See Photos 10) NOTE: Clean the PCR using a mild soap and water. Photo 11 Photo 12 Step 8 Carefully lift the waste hopper so it is up on its end and the handle of the cartridge is facing you. (See Photo 11) NOTE: Do not flip the waste hopper so the wiper blade is down, toner will spill out of the hopper. Remove the screw located just below the handle. (See Photo 12) Photo 13 Photo 14 Step 9 Take the waste hopper to the dump station. Release the two clips located on each end of the waste hopper cover. (See Photo 13) Lift off the waste hopper cover. (See Photo 14)
- 3. Xerox N24/32/40 Technical Instructions 3 Photo 15 Step 10 Step 10: Dump out the waste toner from the hopper. Using dry com- pressed air or a vacuum clean out the Step 15 waste hopper. Using a cotton swab and alcohol clean the PCR contact cradle. (See Photo 20) Reinstall the Step 11 cleaned PCR in the waste hopper. Remove the two screws holding the wiper blade. (See Photo 15) Photo 20 Photo 16 NOTE: Do not lose the two spacers that fit on the two screws. (See Photo 16) Photo 17 Step 16 Step 12 Apply padding powder to the Remove the wiper blade from the OPC drum and install the drum. waste hopper. (See Photo 17) (See Photo 21) Photo 21 Photo 18 Step 13 Apply padding powder to the new blade. Install the new wiper blade in the waste hopper making sure the spacers are on the wiper blade screws. (See Photo 18) Photo 19 Step 14 Reinstall the waste hopper cover to the top of the waste hopper. Install the screw that holds the cover on the waste hopper. (See Photo 18) Need help with a particular remanu- facturing problem? Call the Technical Resource Center from 8am - 5pm PST: 800 394.9900
- 4. 4 Xerox N24/32/40 Technical Instructions Photo 24 Step 19 Remove the screw that holds the mag roller end cap on the gear end of the Step 17 mag roller. (See Photo 24) Remove the Install the drum axle hubs on end cap. each side of the waste hopper and install the screws that hold the axle hubs. (See Photos 22 & 23) Photo 25 Step 20 Remove the mag roller drive gear and the stabilizing bushing from the end of the mag roller. (See Photo 25) Photo 22 Photo 26 Step 21 Lift the gear end of the mag roller up and remove the roller from the contact end of the hopper. (See Photo 26) Photo 23 Step 22 Remove the mag roller bearing and the bushing from the gear end of the mag roller. (See Photo 27) Photo 27 NOTE: A locking washer keeps the mag roller bearing and bushing on the contact end of the mag roller in place, it is not necessary to remove them. Clean the bearings with a lint free cloth and alcohol. Step 18 Step 23 Rotate the drum 4-5 revolutions Using dry compressed air or a vacuum, to ensure that the wiper blade clean the toner off the mag roller. is cleaning the drum correctly. NOTE: Clean the mag roller using a mag Using a lint free cloth wipe the Photo 28 roller cleaner and a lint free cloth. padding powder off the PCR. Set the waste hopper aside and cover. Step 24 Remove the two screws holding the doctor blade. (See Photo 28) If you plan to reuse the doctor blade clean the toner off the blade using dry compressed air or a vacuum. Using a lint free cloth and alcohol wipe off the doctor blade.
- 5. Xerox N24/32/40 Technical Instructions 5 Photo 29 Step 25 Remove the four screws found along the top of the toner hopper. (See Photo 29) Step 30 Using dry compressed air or a vacuum clean out the toner hopper and the toner hopper cover. Step 31 Using a Philips screwdriver Photo 30 remove the screw that holds Step 26 the contact end cap to the Using a small flat blade screwdriver hopper. (See Photo 34) release the long clip the locks the toner hopper cover to the hopper on the gears side of the hopper. (See Photo 30) Photo 34 Photo 31 Step 27 To release the three chips located along the back of the toner hopper, press down on the toner hopper cover just above the clip. While applying pressure to the cover, use a small flat blade screwdriver to pry the clip that locks the cover in place away from the hopper. (See Photo 31) Photo 32 Step 28 Release the clip located next to the fill plug in the same way. (See Photo 32) Photo 33 Step 29 With all the clips released, lift the cover off the hopper. (See Photo 33) Need help with a particular remanu- facturing problem? Call the Technical Resource Center from 8am - 5pm PST: 800 394.9900
- 6. 6 Xerox N24/32/40 Technical Instructions Photo 38 Step 34 Using needle nose pliers grab the metal toner agitator bar and pull it from the Step 32 agitator gear. (See Photo 38) Release the four clips (two on the top and two on the bottom) that hold the contact end cap to the hopper. (See Photos 35 & 36) Photo 35 Photo 39 Step 35 Remove the agitator drive gear from the side of the hopper. (See Photo 39) Photo 36 Photo 40 Step 36 Using a cotton swab and alcohol clean the seal area. (See Photo 40) Photo 41 Step 33 Step 37 Using a small flat blade screw- Remove the backing of the seal and driver release the clip that apply the seal to the hopper. holds the seal exit port plug to (See Photo 41) the hopper. (See Photo 37) Remove the plug. Photo 37 Photo 42 Step 38 Reinstall the agitator drive gear and the agitator bar in the hopper. (See Photo 42) NOTE: Make sure the agitator bar snaps into position in the agitator drive gear.
- 7. Xerox N24/32/40 Technical Instructions 7 Photo 43 Step 39 With the seal pull tab through the seal exit port, use needle nose pliers to hold the agitator bar in the correct position Step 44 while reinstalling the seal exit port plug. Place the mag roller bushing (See Photo 43) Pull the seal pull-tab tight and the bearing onto the mag so the agitator bar does not hit the roller. Reinstall the roller back pull-tab. into the hopper. Slide the stabi- lizing bushing, the drive gear and the end cap back onto the end of the mag roller. Reinstall Photo 44 the screw that holds the end Step 40 cap onto the hopper. Reinstall the contact end cap on the (See Photo 48) toner hopper. Using a Philips screwdriver install the screw that hold the end cap. (See Photo 44) Photo 48 Photo 45 Step 41 Push the fill plug out of the toner hopper. (See Photo 45) Step 45 Fill the toner hopper with the correct fill load of toner. (See Photo 49) Reinstall the fill plug. Photo 46 Step 42 Place the cover of the toner hopper onto Photo 49 the hopper. Push down on the cover making sure all five clips a securely fastened. Install the four screws to the top of the cover. (See Photo 46) Photo 47 Step 43 Reinstall the doctor blade and the two screws that hold the blade in place. (See Photo 47) Need help with a particular remanu- facturing problem? Call the Technical Resource Center from 8am - 5pm PST: 800 394.9900
- 8. 8 Xerox N24/32/40 Technical Instructions Photo 50 Step 46 Step 48 Replace or reset the cartridge Grab the waste hopper by the handle chip, check with your supplier and lower the waste hopper onto the for your best option. toner hopper. Once the two sections (See Photo 52) are aligned correctly install the two cartridge pins that hold the two sections of the cartridge together. (See Photo 50) Step 48 Reinstall the chip. Test the cartridge. Photo 51 Photo 52 Step 47 Using a Philips screwdriver remove the two screws hold the cartridge chip. (See Photo 51) Need help with a particular remanu- facturing problem? Call the Technical Resource Center from 8am - 5pm PST: 800 394.9900 Technical Resource Center: Toll Free: 800 394.9900 Website: www.futuregraphicsllc.com
- 9. In April 1997, Xerox released a series of new printers and information stored in the cartridges chip prevents the toner digital copiers using a new Fuji-Xerox print engine, the Xerox cartridges from being used in machines other than the one DocuPrint N24, N32, N40 and the Xerox DocuCentre 220, 230. specified. Not long after Xerox released their new series of printers, companies like IBM, QMS, Dataproducts, Epson, and others The variations in the cartridges include, gear differences, started releasing machines under their names using the same mag roller and doctor blade designs and differences in the Fuji-Xerox engine. The now popular Fuji-Xerox engine is cartridge mold, which prevent the cartridges from being capable of printing anywhere from 24 to 40 pagers per minute interchangeable. The cartridge chips, found on the waste and up to 1200x1200 dots per inch depending on which hopper are programmed with part numbers so the machine machine is purchased. can determine if the correct consumable is installed. If the wrong chip is detected in the machine the display will show The toner cartridges yield 20,000 pages for the digital copier “Print Cartridge OEM ID Mismatch.” By modifying the models and 23,000 pages for the network printer version. cartridges and changing the chip, toner cartridges can me Even thought these toner cartridges look similar they are not converted to work in the desired model. interchangeable. Variations in the cartridges and specific PROBLEMS AND SOLUTIONS Problem #1: A close look at the design of the cartridge will reveal prevent any problems with a leaking cartridge. Remove the problems in the sealing of the toner hopper. Unlike most cartridge from the box. Carefully shake the cartridge from side cartridges that have magnets or felts to seal the ends of the to side. Install the cartridge into the printer. Pull the seal from mag roller, the Xerox cartridges do not. If the cartridge is tilted the cartridge. on its end after the seal is pulled toner will leak out from the ends of the mag roller. Problem #2: “Print Cartridge OEM ID Mismatch” error Solution #1: Because the cartridge leaks so badly, sealing the cartridges is Solution #2: recommended, even for hand delivery. The following steps The incorrect chip has been installed on the cartridge. should be given to the customer for installing the cartridge to Install the correct chip. For Technical Assistance Contact: USA: 800 394.9900 INT’L: +1 818 837.8100 Website: www.futuregraphicsllc.com
- 10. Xerox N24/32/40 Engine fact Sheet Xerox N24/32/40 | OEM Cartridge Number: 90H3566 (IBM), 1710307-001 (QMS), 113R173 (Xerox) IBM Infoprint 24/32/40, QMS 3260/4032, Xerox Docuprint N24/32/40 # Product Description Item # Pack Qty. 01 Chip - MultEPROM Reset Epson LP-9600/N4000 Reprogrammed Exchange EPSONXCCHIPX 1 02 Chip - MultEPROM Fujitsu LB303/LB306A Compatible Replacement FUJITXCCHIPC 1 03 Chip - MultEPROM Reset Fujitsu LB303/LB306A Reprogrammed Exchange FUJITXCCHIPX 1 04 Chip - MultEPROM IBM Infoprint 32 Compatible Replacement IBM32CHIPC 1 05 Chip - MultEPROM Reset IBM Infoprint 32 Reprogrammed Exchange IBM32CHIPX 1 06 Chip - MultEPROM Mannesmann Tally Compatible Replacement MTXCCHIPC 1 07 Chip - MultEPROM Reset Mannesmann Tally Reprogrammed Exchange MTXCCHIPX 1 08 Chip - MultEPROM NEC 3854 Compatible Replacement NECXCCHIPC 1 09 Chip - MultEPROM Reset NEC 3854 Reprogrammed Exchange NECXCCHIPX 1 10 Chip - MultEPROM QMS 3260 Compatible Replacement QMS3260CHIPC 1 11 Chip - MultEPROM Reset QMS 3260 Reprogrammed Exchange QMS3260CHIPX 1 12 Chip - MultEPROM Xerox DC220/330 (CAN) Compatible Replacement XE13R313CHIPC 1 Compatible with: OEM Part 113R313 13 Chip - MultEPROM Reset Xerox DC220/330 (CAN) Compatible Replacement XE13R313CHIPX 1 Compatible with: OEM Part 113R313 14 Chip - MultEPROM Xerox DC220/330 (USA) Compatible Replacement XE13R273CHIPC 1 Compatible with: OEM Part 113R273 15 Chip - MultEPROM Reset Xerox DC220/330 (USA)Compatible Replacement XE13R273CHIPX 1 Compatible with: OEM Part 113R273 16 Chip - MultEPROM Xerox N24/32/40 Compatible Replacement XEN32CHIPC 1 Compatible with: OEM Part 113R173 17 Chip - MultEPROM Reset Xerox N24/32/40 Reprogrammed Exchange XEN32CHIPX 1 Compatible with: OEM Part 113R173 18 Chip - MultEPROM Xerox N24/3240 (EUR) Compatible Replacement XEN32CHIPC 1 Compatible with: OEM Part 113R184 19 Chip - MultEPROM Reset Xerox N24/3240 (EUR) Reprogrammed Exchange XEN32CHIPX 1 Compatible with: OEM Part 113R184 20 Chip Reset Device Resets For Xerox XC-Series XC1RESET 20 21 Doctor Blade Kuroki N32DRBLADEK 10/200 Compatible with: Xerox N24/32/40 22 Drum For DC 220/230 Copier, AEG DC220COPIERAEG 5/60 Compatible with: Xerox N24/32/40 23 Drum For Printer, AEG N32PRINTERAEG Compatible with: Xerox N24/32/40 24 Drum For Printer, Sinonar N32PRINTERSNR Compatible with: Xerox N24/32/40 25 Mag Roller Bearing Compatible with: Xerox N24/32/40 26 Mag Roller Bearing Lock Bearing Lock Ring 50 Compatible with: Xerox N24/32/40 27 Mag Roller Bushing N32BUSHING Compatible with: Xerox N24/32/40 28 Mag Roller Sleeve New, Black Surface, Onyx N32MAGONYX 10 Compatible with: Xerox N24/32/40 29 PCR New, Onyx N32PCRONYX 10 Compatible with: Xerox N24/32/40 30 Seal Adhesive Goldseal N32GOLDSEAL 50 Compatible with: Xerox N24/32/40 31 Toner 1070 gm Bottle N32TNR1070 10 Compatible with: Xerox N24/32/40 32 Toner Bulk Bag, 22 lb Per-Fil - Box of 1, Sold per Box N3210KG 1 Compatible with: Xerox N24/32/40 33 Toner, MICR 1050 gm Bottle N32MICR1050 10 Compatible with: Xerox N24/32/40 34 Wiper Blade Kuroki N32WBLADEK 10/100 Compatible with: Xerox N24/32/40