
Recommandé
Contenu connexe
Tendances
Tendances (19)
En vedette
Similaire à Wordpress handout
Similaire à Wordpress handout (20)
Plus de weigansm
Plus de weigansm (20)
Dernier
Dernier (20)
Wordpress handout
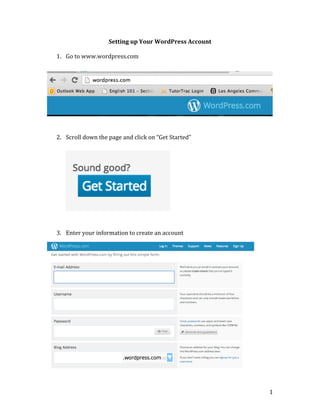
- 1. Setting up Your WordPress Account 1. Go to www.wordpress.com 2. Scroll down the page and click on “Get Started” 3. Enter your information to create an account 1
- 2. 4. Click on “Create Blog” under the Free option. 5. Check your email to complete the registration. 6. Click on Activate blog 2
- 3. 7. Edit information to “Set Up Your Blog” and click on “Next Step.” 8. Choose a theme. Be careful….some of them cost money; choose a free one instead. 3
- 4. 9. Don’t worry about customizing your theme now. You can do it later. Click on “Next Step.” 10. Click on “Text to Create Your First Post.” 4
- 5. 11. Add the title to your post and then add some detail in the body of the post. Click on “publish post” when you are finished. 12. Click on “done.” 5
- 6. 13. Click on “My Blogs” 14. Click on “Blog Admin.” 15. The Dashboard gives you the ability to add new posts and pages, to edit existing content, and to control settings such 6
- 7. 16. To add a new blogpost, click Post on the lefthand side of the screen and click Add New. 17. You will end up on this page. This is where you write your blogpost and its title. 7
- 8. 18. Go to youtube, find a video you like, and copy/paste the URL of the youtube video directly into the body of the post. 19. Click on Preview 8
- 9. 20. You’ll see a preview of what your post will look like. 21. Click back to the last screen, and decide if you want to save a draft or publish the blog post. 9
- 10. 22. If you want to add pictures or PDF to go along with the text on your post, click Add Media. You will see a page that looks like this and all you have to do is drag your pictures or PDFs in the middle of the page. 23. After your picture or document is uploaded, click on “Insert into Post” 10
- 11. 24. Your picture will now show up on your page. To create a hyper link, type in your text, and then click on the “chain link” in tool bar. 25. Type in the URL of the website you want it to link to, click on “Open link in new window,” and click on “add link.” 11
- 12. 26. You’ll now see the text has turned blue, which means when you preview or publish your page, it will lin to the designated page. 27. The left menu is what allows you to either add “Posts” or “Pages”. The “Post” are the entries that occur on the front page of your website, and they are organized by date. “Pages” (depending on your template) are links on the top or the side of your site, and these are “static” pages, not indented to be update d everyda 12