
Recommandé
Contenu connexe
Tendances
Tendances (20)
Similaire à Taking pictures
Similaire à Taking pictures (20)
Plus de emilyilett
Plus de emilyilett (15)
Dernier
Dernier (20)
Taking pictures
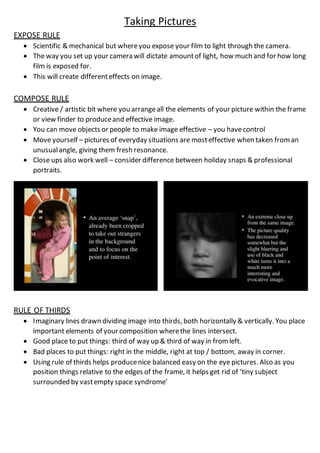
- 1. Taking Pictures EXPOSE RULE Scientific & mechanical but whereyou expose your film to light through the camera. The way you set up your camera will dictate amountof light, how much and for how long film is exposed for. This will create differenteffects on image. COMPOSE RULE Creative / artistic bit where you arrangeall the elements of your picture within the frame or view finder to produceand effective image. You can move objects or people to make image effective – you havecontrol Move yourself – pictures of everyday situations are mosteffective when taken froman unusualangle, giving them fresh resonance. Close ups also work well – consider difference between holiday snaps & professional portraits. RULE OF THIRDS Imaginary lines drawn dividing image into thirds, both horizontally & vertically. You place important elements of your composition wherethe lines intersect. Good place to put things: third of way up & third of way in fromleft. Bad places to put things: right in the middle, right at top / bottom, away in corner. Using rule of thirds helps producenice balanced easy on the eye pictures. Also as you position things relative to the edges of the frame, it helps get rid of ‘tiny subject surrounded by vastempty space syndrome’
- 2. FOCUS Autofocus (AF) – either haveit turned it on or off. Can be quick, convenient & reliable but not essential. o Area whereyou find most automation is in the control of exposure(control of aperture and shutter). These different types of automation are called MODES. Manual focus (MF) – user has to adjustthe focus by hand. MODES Manual (M) – You set the shutter and aperture yourself Aperture Priority (AP) – You set the apertureand the camera will automatically set the shutter speed. Shutter Priority (SP) – You set the shutter speed and the camera will automatically set the corresponding aperture. Program(P) – You point the camera & it will select a suitable aperture& shutter combination. With programmode, there is a pile of other modes: o Action mode o Landscapemode o Portraitmode o Close-up mode o Fill-in flash mode o Night mode LIGHT METER Most cameras these days come with a built in light metering system. Once activated usually by turning on the camera or by light pressureon the shutter release, the light meter measures the light reflected back through the camera lens from the scenein frontof it – this is known as a Reflected Light Through the Lens Meter (TTL Meter.) Using a TTL meter which is a fairly straightforward operation. With the meter switched on simply composethe picture as normal and the meter will take a reading from the scene. You will then be given information on about the necessary apertureor shutter settings that may be required. These readings are based on the amount of light reflected back fromthe scene and on the sensitivity of the film you’reusing. MANUAL MODE What you see will vary according to the make and model of the camera you’reusing. Itwill probably be along the lines of: o 1. An illuminated + sign over exposure, - sign under exposure or a zero (OK) symbol to the side of the focusing screen. o 2. An illuminated scale from plus to minus, similar to the previous one. o 3. A range of shutter speeds with a symbolindicating the currently set shutter speed & a moving needle indicating the recommended shutter speed.
- 3. o 4. As abovebut using LEDS (little red lights) instead of a needle. Steady LED for set speed & flashing LED for recommended speed. In manual mode, you havecontrol of both shutter and aperture speed and you can adjusteither or both to reach the correctexposure. You are aiming to ‘zero’ on a plus minus systemor match the 2 indicators (match-needle system.) APERTURE PRIORITY Meter will indicate its chosen shutter speed based on apertureyou’veset – this may be shown on a scale or simply as an illuminated number in view finder. If you change the aperture, the shutter speed will change to compensate. SHUTTER PRIORITY Meter will indicate which F- number it will select, based on the shutter speed you’veset – this will be shown as a number in view finder. If you change the shutter speed, the aperturewill change to compensate. PROGRAM Meter will indicate its choice of shutter speed and aperture. EXPOSURE Aperture is justa hole whosesizecan be varied to allow more or less light to pass through it. Size of the aperture is expressed in f-numbers ( calculated by dividing lens focal length by the diameter of aperture) Range of f-numbers follows a standard sequencewith each f number being half as bright, passing half as much light as previous one. E.g. / F 2 / F 4 / F 5.6 / F 8 / F 16 / F 32 There are smaller & bigger F numbers but actual numbers arealways the same & will maintain a constantvalue over different focal lenses. The small the F number = larger the apertureis = more light it will pass. Lenses with large maximum apertures (small F number) are described as being fast. Generally aperture will be held open at its maximum irrespective of what you may set it to and it will not close down until the moment of exposure – this is so that it produces the brightestimage possibleon closing screen. SHUTTER AND SHUTTER SPEEDS Shutter prevents light from reaching film until moment of exposurewhen it opens for a predetermined time allowing light passing through lens aperture to reach the film. Unlike the aperture (which is always in an open position) the shutter is always closed. Like aperture, shutter speeds follow a standard sequencewith each one being half the next, allowing half as much light to pass through.
- 4. Shutter speeds are expressed in seconds or fractions of a second. Slow shutter speeds are seconds butshortshutter speeds are fractions of a second. Changing the shutter speed, changes the exposureby one ‘stop’ in the same way as changing the aperture. You can have loads of combinations of aperture& shutter speed that will give the same exposure. You could reduce apertureby one-stop = film is receiving half as much light as it requires underexposure– to compensate for this you select a slower shutter speed so that it stays open for twice as long as before & lets in twice as much light as before. You could increaseaperture by one-stop = film is receiving twice as much light as it requires (over exposure) – to compensatefor this you increaseyour shutter speed so that it stays open for half as long and lets in half as much light as before. FILM SPEED In order for light meter to come up with suitable combination of aperturesize & shutter speed it needs to know how sensitiveto light a particular film is. A film sensitivity is known as its speed & is expressed as an ASA/ISO number. The higher the number, the more sensitive it is so the less light it needs to forman image The lower the number, less sensitiveit is so more light is needed to forman image. Sensitive films are said to be fast& films with low sensitivity are said to be slow. Film speeds go up in steps like shutter / aperture speed – so each one is twice as sensitiveas the next. OVER AND UNDER EXPOSURE Giving your film more exposurethan necessary will= over exposure – the pictures will be pale or light with poor washed out colours. Giving your film less exposurethan necessary will= under exposure – the pictures will be dark will poor detail in shadows and dark areas. EXPOSURE RECAP 1. Film speed. Onceset, don’t alter on the sameroll of film. 2. Aperture. Which you can increase or decrease. 3. Shutter speed. Which you can increase or decrease. They in turn shareanother common factor, which crops up a lot in photography – the ‘stop.’ Changing either of them by one full setting will always half or double the exposurethe film receives. Increasing oneand decreasing the other by the same number of ‘stops’ gets you the same exposure.