
Recommandé
Contenu connexe
Tendances
Tendances (20)
Similaire à suctioning-procedure-ppt full.pptx
Similaire à suctioning-procedure-ppt full.pptx (20)
Plus de AkshataBansode1
Plus de AkshataBansode1 (14)
Dernier
Dernier (20)
suctioning-procedure-ppt full.pptx
- 2. INTRODUCT ION • Suction can be used to remove secretions from intubated patients and from infants and children who are unable to cough and expectorate.
- 3. GENERAL PRINCIPLES • The technique should be as quick, clean and gentle as possible. • Suction is very traumatic to delicate mucosal tissue and it is very easy to introduce infection, especially in intubated patients. • Suction should only be carried out as and when necessary, rather than on a routine basis.
- 4. SUCTION TROLLEY: • All the equipment needed for airway suction should be set out on a trolley for ease of access: 1. Sterile plastic gloves - disposable. 2. Suction catheters - appropriate sizes for the patient. 3. Lubricating jelly water-based only, not oil-based, for use in nasopharyngeal suction. 4. Sterile gauze swabs - to transfer jelly to tip of catheter. 5. sterile water - to flush the secretions through the catheter and tubing. Sodium bicarbonate acts as a solvent of the secretions. 6. Forceps (if used). 7. Plastic bag for the collection of disposables
- 5. INDICAT ION 1. Whenever secretions can be heard in an intubated patient. 2. For retained secretions in the spontaneously breathing patient who is unable to cough and expectorate efficiently. 3. Before and during the release of the cuff on a tracheostomy tube. 4. If the inflation pressure of the ventilator suddenly' rises. This may indicate the presence of a large plug of mucus in one of the larger bronchi or even within the endotracheal or tracheostomy tube. 5. If the minute volume (MV) drops, this may indicate retained secretions
- 6. RISKS AND COMPLICATIONS OF 1. Trauma: • Mucosal haemorrhage and erosion frequently occur in the patient who has been suctioned, leading eventually to the formation of granulation tissue. • The amount of trauma depends upon the frequency of suction, the amount of negative pressure applied, the size and type of catheter used and the vigour of insertion.
- 7. 2. Hypoxi a. • This can occur following suction. • To avoid this the suctioning time should be kept to a minimum, particularly in tl](ose patients who are dependent on a ventilator, and the inspired oxygen and/or ventilation may be increased prior to suction providing there are no contra- indications.
- 8. • Cardiovascular effects. • Cardiac arrhythmias and hypotension can occur during suction due to hypoxia and/or vagal stimulation from direct pharyngeal and tracheal irritation. • Particular care should be taken with neonates as bradycardia and apnoea can follow nasopharyngeal suction in these patients
- 9. •Atelectasis. • Too large a suction catheter in too small an airway will prevent room air from entering around the catheter during suctioning and atelectasis, in varying degrees, may occur. • Too high a negative suction pressure may also cause atelectasis and airway collapse.
- 10. •Pneumothorax. • This can occur primarily in premature infants with severe underlying lung disease due to perforation of segmental bronchi by a suction catheter
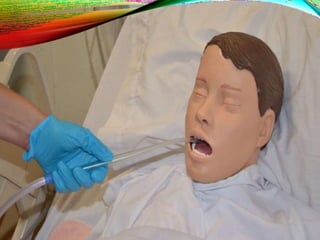
- 11. TYPES Depending on site of Suctioning A. Nasotracheal suctioning (NT) B. Oropharyngeal suctioning C. Tracheostomy suctioning (TT) D. Endotracheal suctioning
- 12. PROCEDURE:- SUCTION FOR INTUBATED PATIENTS 1. Wash hands. prepare saline or mucolytic solution - prepare gloves/forceps. 2. Prepare equipment: - turn on vacuum, check pressure - attach suction catheter - 3. Prepare patient - if conscious the patient should be swaddled in a blanket being aware of infusions, drains, tubes, etc; or he should be held firmly by an assistant. The procedure should be explained to the child and constant reassurance given while suctioning is taking place 4. Physiotherapy may be carried out at this point if indicated.
- 13. 5. Place glove on the hand that is to hold suction catheter. 6. Withdraw catheter from its sterile pack with the gloved hand. 7. Disconnect ventilated patient from ventilator. 8. Insert catherter into tube without applying suction. 9. Push catheter gently and quickly down tube until a slight resistance is met. 10. Withdraw catheter 0.5cm. 11. Apply suction. 12. Withdraw catheter quickly, rotating gently between thumb and first finger and interrupting the suction pressure every few seconds.
- 14. 13. Reconnect patient to ventilator. 14. The same catheter can then be used to clear secretions from the mouth and nose. 15. Discard both the glove and the catheter. 16. Repeat until secretions are cleared.
- 15. SUCTION FOR NON-INTUBATED PATIENTS • Children and infants should always be suctioned in side lying to prevent aspiration of vomit. 1. Wash hands. 2.Prepare equipment: - turn on vacuum, check pressure - attach suction catheter - prepare saline or mucolytic solution - prepare gloves/forceps. 3. Prepare patient - if conscious the patient should be swaddled in a blanket being aware of infusions, drains, tubes, etc; or he should be held firmly by an assistant. The procedure should be explained to the child and constant reassurance given while suctioning is taking place. 4. Physiotherapy may be carried out at this point if indicated. 5. Place glove on the hand that is to hold suction catheter. 6. Withdraw catheter from its sterile pack with the gloved hand
- 16. 7. Gently insert catheter into the nose using an upward motion until the nasal septum is passed, then using a downward motion. If a slight resistance is met, withdraw catheter slighdy and try again. 8. Insert catheter to the back of the throat until a cough has been stimulated. It is possible to pass a catheter into the trachea by inserting the catheter during inspiration, but an effective cough can be elicited merely by stimulating the pharynx. 9. Apply suction. 10. Withdraw catheter, rotating slightly between thumb and first finger and interrupting the suction every few seconds. 11. Repeat procedure via other nostril. 12. Discard both the glove and the catheter. 13. Repeat until secretions are cleared.
- 17. ORAL SUCTION Ensure that the catheter is not curling up in the mouth. 9.Apply suction. 10.Withdraw catheter. 11.Repeat until secretions are clear. 12.Discard both the glove and the cathete 8. Pass suction catheter to the back of the throat until a cough has been stimulated.
- 18. CLOSED-CIRCUIT SUCTION • Closed-circuit suction systems are available and consist of a catheter in a protective closed sheath which remains attached to the endotracheal or tracheostomy tube for 24 hours. • The indications for use are: immuno- suppressed patients, actively infectious patients (e.g. open TB) and patients with severe refractory hypoxaemia on high levels of PEEP.
- 20. PRECAUTIONS 1. 100 — i20mmHg is ideal for most patients although pressure up to —200mmHg may be needed for thick secretions. 2. Nasopharyngeal suction: I. When introducing a suction catheter via the nose it is helpful if the patient’s neck is extended so that the head is tilted backwards resting on a pillow. If the patient can co- operate the tongue should be protruded, as this helps when attempting to pass the catheter between the vocal cords and into the trachea II. It must be remembered that nasopharyngeal suction is a very unpleasant experience for the conscious patient and should only be used when absolutely necessary. III. Nasopharyngeal suction should not be used for patients with head injuries where there is a leak of CSF into the nasal passages.
- 21. 3. Oropharyngeal suction. I. A lubricated plastic airway is usually tie eded to prevent the patient biting the catheter and it is difficult to direct the catheter accurately into the pharynx and beyond. 4. Suction via tube I. Whatever the mode of entry, the physiotherapist must ensure that no suction pressure is applied while the catheter is being introduced. II. If, during nasopharyngeal suction, the patient becomes cyanosed I and the catheter was difficult to insert, it is acceptable to disconnect the suction, leaving the catheter in situ, while administering oxygen J until the patient recovers and suction can be resumed. III. No longer than 15 seconds should elapse between the disconnec - I tion and reconnection of the patient to the ventilator, more than adequate time for effective removal of secretions by the experienced I operator. j Where possible, the patient should be suctioned in side lying or 1 with the head rotated to one side to avoid aspiration of gastric contents should vomiting occur.
- 22. STEPS including RR or adventitious sounds, nasal secretions, drooling, gastric secretions, or vomitus in mouth • Rationale • Physical signs and symptoms result from pooling of secretions in upper and lower airways. 1. Assign signs and symptoms of upper and lower airway obstruction nasotracheal or orotracheal requiring suctioning,
- 23. Assess signs and symptoms associated with hypoxia and hypercapnia. • Rationale • Physical signs and symptoms resulting from decreased oxygen to tissues indicate need for suctioning. Step 2
- 24. Step 3 • Determine factors that normally influence upper or lower airway functioning • Fluid Status • Lack of Humidity • Infection • Anatomy • Rationale • Fluid overload may increase amount of secretions. Dehydration promotes thicker secretions • The environment influences secretion formation and gas exchange, necessitation airway suctioning when cannot clear secretions effectively. • Clients with respiratory infections are prone to increased secretions that are thicker and sometimes more difficult to expectorate • Abnormal anatomy can impair normal drainage or secretions.
- 25. Step 4 • Assess client’s understanding of procedure (when applicable) • Rationale: • Reveals need for client instruction and also encourages cooperation. Step 5 • Obtain physicians order if indicated by agency policy. ● Rationale ● Some institutions require a physicians order for tracheal suctioning
- 26. Step 6 • Help client assume position comfortable for nurse and client (usually semi-Fowler’s or sitting upright with head hyperextended, unless contraindicated). • Rationale • Reduces stimulation of gag reflex, promotes client comfort and secretion drainage, and prevents aspiration. • Lessens strain on nurses’ back. • Hyperextension fascilitates insertion of catheter into trachea.
- 27. Step 7 • Place pulse oximeter on client’s finger. Take reading and leave pulse oximeter in place. • Rationale • Provides baseline SpO2 to determine client’s response to suctioning. Step 8 • Place tower across client’s chest. ● Rationale ● Reduces transmission of microorganisms by protecting gown from secretions.
- 28. Step 9 • Perform hand hygiene. • Rationale • Reduces transmission of microorganisms.
- 29. Step 10 Preparation for all types of suctioning • Open suction kit or catheter with use of aseptic technique. Do not allow the suction catheter to touch any unsterile surfaces. • Unwrap or open sterile basin and place on bedside table. Fill basin with approx 100ml of sterile normal saline solution or water. Rationale • Prepares catheter and prevents transmission of microorganisms.
- 30. Step 10 continued… Preparation for all types of suctioning • Connect one end of connecting tubing to suction machine. Place other end in convenient location near client. Check that equipment is functioning properly by suctioning a small amount of water from basin. Rationale • Equipment must be in proper working order to prevent delay in the procedure.
- 31. Step 10 continued… Preparation for all types of suctioning • Turn on suction device. Set regulator to appropriate negative pressure: wall suction, 80 – 120mmHg; portable suction, 7 – 15 mmHg for adults. Rationale • Elevated pressure settings increase risk of trauma to mucosa and can induce greater hypoxia.
- 32. Step 11 – Oropharyngeal Suctioning Consider applying mask or face shield. Attach suction catheter to connecting tube. Remove oxygen mask if present. Insert catheter into client’s mouth.With suction applied, move catheter around mouth, including pharynx and gum line, until • • Apply clean disposable • glove to dominant hand. Suction of oral cavity does not require sterile glove use. • Suction may cause splashing of body fluids. • If catheter does not have a suction ctrl, apply intermittent suction, take care not to allow suction tip to invaginate oral mucosal surfaces with continuous suction.
- 33. Step 11 – Oropharyngeal Suctioning cont’d… • • Encourage client to cough, and repeat suctioning if needed. Replace oxygen mask if used Suction water from basin through catheter until clear from secretions • Place catheter in a clean dry area for reuse with suction turned off or within client’s reach, with suction on, if client is capable of suctioning self. • Coughing moves secretions from lower to upper airways into the mouth. • Clearing secretions before they dry reduces probability of transmission of microorganisms and enhances delivery of preset suction pressures. • Facilitates prompt removal of secretions when needed in the future.
- 34. Nasopharyngeal Suctioning • If indicated, increase supplemental oxygen therapy to 100% or as ordered by physician. Encourage client’s deep breathing. • Preoxygenation and deep breathing assist in reducing suction-induced hypoxemia. Preoxygenation should be used with caution in oxygen sensitive clients such as those with chronic heart and lung conditions and those with pneumonia.
- 35. Nasopharyngeal Suctioning… • Open lubricant. Squeeze small amount onto open sterile catheter package without touching package. • Apply sterile glove to each hand • Prepares lubricant while maintaining sterility. Water soluble lubricant is used to avoid lipoid aspiration pneumonia. Excessive lubricant can occlude catheter. • Reduces transmission of microorganisms and allows nurse to maintain sterility of suction catheter.
- 36. Nasopharyngeal Suctioning… • Pickup suction catheter with dominant hand without touching nonsterile surfaces. Pick up connecting tubing with nondominant hand. Secure catheter to tubing. • Lightly coat distal 6 to 8 cm (2-3in) of catheter with water-soluble lubricant. • Maintains catheter sterility. Connects catheter to suction. • Lubricates catheter for easier insertion.
- 37. Nasopharyngeal Suctioning… • Measure the distance from the tip of the nose to the tip of the earlobe 13 cm (5in) • Follow natural course of naris; slightly slant catheter downward and advance to back of pharynx. • When pulling back the catheter, slightly roll the tube between the thumb and index finger. • Proper placement ensures removal of pharyngeal secretions. • Rolling the tube back and forth ensures suctioning in all areas.
- 38. Nasopharyngeal Suctioning… • • Encourage client to cough. • Allow for rest periods and repeat this procedure until airway is cleared. Limit suction time to 3-5 mins. Reapply oxygen as needed. • Coughing facilitates removal of secretions • Rest periods allow for rest and reoxygenation • Repeated passes with the suction catheter assist in clearing the airway of excessive secretions and promotes oxygenation.
- 39. Nasopharyngeal Suctioning… • Rinse catheter and connecting tubing with normal saline or water until cleared. • Reassess client’s respiratory status. • Clearing secretions before they dry reduces probability of transmission of microorganisms and enhances delivery of preset suction pressures.
- 40. VIDEO
- 41. THANK YOU