
Recommandé
Contenu connexe
Tendances
Tendances (20)
Similaire à PDLC Film bus bar Manufacturing
Similaire à PDLC Film bus bar Manufacturing (20)
Dernier
Dernier (20)
PDLC Film bus bar Manufacturing
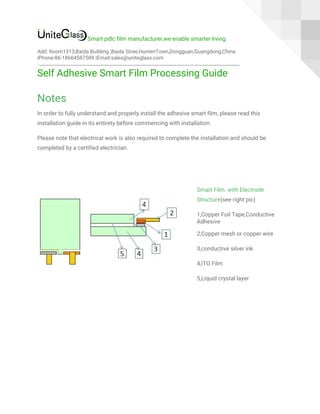
- 1. Smart pdlc film manufacturer,we enable smarter living. Add: Room1313,Baida Building ,Baida Stree,HumenTown,Dongguan,Guangdong,China |Phone:86-18664587589 |Email:sales@uniteglass.com Self Adhesive Smart Film Processing Guide Notes In order to fully understand and properly install the adhesive smart film, please read this installation guide in its entirety before commencing with installation. Please note that electrical work is also required to complete the installation and should be completed by a certified electrician. Smart Film with Electrode Structure(see right pic) 1,Copper Foil Tape,Conductive Adhesive 2,Copper mesh or copper wire 3,conductive silver ink 4,ITO Film 5,Liquid crystal layer
- 2. 2 Smart pdlc film manufacturer,we enable smarter living. 1.0 Smart FilM Movement and Operation 1.1.1 Preparation 1) Cut the smart film size as needed; 2) Confirm the quality of the smart film,no pinhole, delamination, drip marks, off state, surface taint; 3) Clean the countertops without dirt, impurities and raised objects. 1.1.2 Movement and Overturn Operation 1) Movement Instruction: a, The smart film is hard enough,but we need to handle it lightly,no bending. At the beginning of rolling it to cylindric,hold the smart film edge and pushing the film forward and rolling it up. b. When rolling, one hand hold the edge of the film without loose and the other one hold the film roll 1/2-2/3 position; c.when unfolding the film,control the speed, open it slowly,following the roll open without barrier ahead. 2)Overturn Instruction: a,Long Length film overturn: stretch out the arms,palm inward,hold 2 sides of the film above 40-50 cm above the countertops.No bending and overturn it slowly to flat b,Short Length film overturn:hold one end and shift slowly to the other end flat,no bending 1.1.3 Operation notice 1)Large film handle it slowly without bending,using 2 hands instead of one 2)The film layer must rolled up when overturn or moving from countertop 3)Using dust-free cloth wiping the film surface only avoid scratches.
- 3. 3 Smart pdlc film manufacturer,we enable smarter living. 4)Slightly shake the film before overturn and the film is totally separated from the glass countertop. Check there’s no pinholes,delamination,dripmarks,off sate,dirt of film. 2.1 Cutting Operation 2.1.1 Cutting Preparation 1)The countertop and cutting knife is clean. 2)The film is good quality without any pinhole,delamination,drip mark,off-sate. 3)Cutting knife on the countertop. 4) Based on the maximum utilization of the film, then confirm the cutting way. 5)Tape measure, oil pen, square ruler, ruler, scissors,alcohol are ready. 6)Using the trimming film to confirm the cutting effect.
- 4. 4 Smart pdlc film manufacturer,we enable smarter living. 2.1.2 Cutting Operation 1)Drawing Lines a)Using a Square ruler to get a right angle at one side of the film b)Get the length of the film by a tape measure,then reach it by a ruler 2)Size measurement:Check the working sheet, confirm the cutting size, the size error ±2mm. 3)The film is under the cutting knife,press the cutting plate to avoid the film sliding. 4)Notes f cutting different size a)trimming:no cutting the size below 3mm to avoid knife moves b) Center Cutting:for larger size film, move the cutting knife to the 500mm position of countertop, the film is parallel to the cutting knife. 5)Finish cutting, draw out the film under the cutting plate,lay it on the countertop to measure the actual size. 6)The film cutting size requirement:size error± 2mm,diagonal error ± 3mm, if exceed these size,it’s failed one. 2.1.3 Cutting Finish Operation 1)Wipe the knife edge with a dust-free acholo cloth 2)Place the cutting plate, slide the cutter to the end left 3)Place the film neatly for next processing.the film are in cylindrical roll,maximum 5pcs during movement.
- 5. 5 Smart pdlc film manufacturer,we enable smarter living. 2.1.4 Operation Precautions 1)Large size film handle lightly by 2 hands only,following the force of the film,no bending occurred. 2)One pcs one time when cutting. 3)No hands on cutting plating when cutting 4)QC control the cutting quality: dimensional length deviation, diagonal deviation, edge delamination, etc 3.0 Electrode Operation 3.1.1 Preparation 1)Tool preparation: electrode knife, oil pen, dust-free paper, alcohol; 2) Check the sharpness of the electrode cutting edge; 3) Confirm electrode positioin,size as required. Length error ± 2mm, width fluctuation ± 0.5mm; 3.1.2 Eletrode Operation 1)According to the required electrode size, use the ruler to confirm the size and position, then draw lines; 2)Insert the inner edge of the electrode knife between the two
- 6. 6 Smart pdlc film manufacturer,we enable smarter living. films of liquid crystal layer for cutting. 3)Using one hold and press the film avoid sliding when do electrode cutting. 4) Electrode knife cutting slide straight along the edge of the film to the angle of 45 degree and draw out knife. 5) Turn over the film and do it exactly as above the fourth step 6) Wipe the cutted electrode area by a dust-free paper with alcohol gently,wipe off the white glue layer. Wipe it from right to left directly, without back and forth. 3.1.3 Operation Precautions 1) Do not bend the film and handle it gently to prevent edge delamination. 2) Keep the blade level during electrode cutting to prevent cutting the conductive layer. 3) When cutting, be careful the blade cuts your hand. 4) Check the blade in the middle of the two layers when opening the electrode. Do not cut off the double film. 5) If the electrode is abnormal, stop the operation immediately and notify the QC to confirm. 6) QC check electrode quality: electrode position, size specifications, scratches, delamination.
- 7. 7 Smart pdlc film manufacturer,we enable smarter living. 4.1 Screen Electrode Operation 4.1.1 Preparation before silk screen printing 1) Clean the glass countertops without dust or impurities. 2) Confirm screen printing silver paste size, the length direction error is ±3mm. 4) Silver ink should be taken out of the refrigerator for at least 2 hours before use.Stir the silver ink evenly with a squeegee for at least 30 minutes. 5) The silver paste used in the workshop should be stirred evenly before use for at least 10 minutes. 4.1.2 Silk Screen printing Electrode Operation 1) Select a screen with a 3mm wide line and use tape to stick to the back area of the screen to control the length.
- 8. 8 Smart pdlc film manufacturer,we enable smarter living. 2) Align the alignment piece and paste the film to the right position. 3) The screen is close to the double-sided foam, check the alignment effect and adjust. 4) The film and the screen are matched position, then squeegee silver ink and paste 5) Ink Reclaiming:Use a spatula to evenly cover it. (The squeegee angle is 30 degrees horizontally, the silver ink covered the cutting area). 6) Squeegee: Use a squeegee the silver ink to the cutting electrode area at angle of 60 degree horizontally. 7) Finish one side with curing and print the other side 8)Immediately wipe the bottom of the screen with a clean cloth of silver paste diffusion. 5.1Electrode Processing 5.1.1 Preparation: 1) Tools: Electric ferrochrome. 2) Material: solder, electrode wire,welding torch, 8mm, 4mm copper foil 5.1.2 Stick Copper Foil, Welded Copper Mesh 1) Stick and cover the copper foil on the silver ink a little bit tight . 2) After sticking, cut it and press the copper foil with a smooth cap. 3)Welding:the soldering iron on one point less than 2s, the welding surface is smooth 4) Keep welding heads parallel to the copper foil when pressing and not rub the conductive surface.
- 9. 9 Smart pdlc film manufacturer,we enable smarter living. 5)The copper mesh and copper foil is fully connected to avoid virtual soldering 6)Solder the electrode wire on the surface of the copper foil the copper foil is attached, cut it and press the copper foil with a smooth cap or the like. 3) Weld the copper mesh according to the process card drawing, and the soldering iron should not exceed 2s clock at the same point during the welding process.The welding surface should be smooth and free of protrusions. 4) Keep the tip parallel when using the pen to press the copper foil. Do not rub the conductive surface. 5) When soldering the copper mesh, the solder should be melted and the copper mesh and the copper foil should be connected well, and no soldering phenomenon should occur. 6) Solder the electrode wire on the surface of the copper foil. 6.1 PDLC film protection / inspection / packaging
- 10. 10 Smart pdlc film manufacturer,we enable smarter living. 6.1.1 Protection work: 1) Use a 10 mm wide transparent tape (neutral) onto the electrode to protect it. 2) Seal the four corners of the film with 3cm paper to prevent delamination. 3) Keep the tape as flat as possible and avoid large wrinkles and air bubbles. 6.1.2 Power-on detection: 1) Test with a 60V power supply to check whether there are quality problems such as sparking, folding, delamination, and white spots. 10 Smart pdlc film manufacturer,we enable smarter living. For more information,pls contact us freely. You’re warmly welcomed to visit our factory! Website:www.uniteglass.com Add: Room1313,Baida Building ,Baida Stree,HumenTown,Dongguan,Guangdong,China |Phone:86-18664587589 |Email:sales@uniteglass.com