2. A
C
T
I V
I T
Y
A
C
T
I V
I T
Y
A
C
T
I V
I T
Y
A
C
T
I V
I T
Y
A
C
T
I V
I T
Y
Measuring Time on the Floral Clock
IntroductionIntroductionIntroductionIntroductionIntroduction
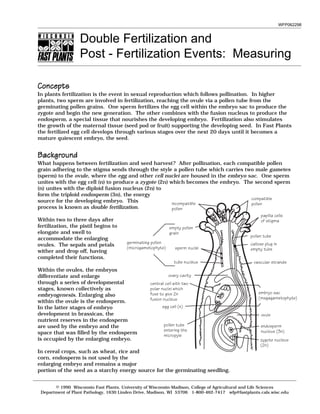
Embryogenesis is a highly coordinated sequence of developmental events within the
ovule and supporting maternal tissues that ultimately leads to the development of a viable
seed.
Successful embryo and endosperm development is accompanied by rapid elongation and enlargement
of the pistil which serves as supportive nourishing maternal tissue. There is a strong interdependency
between the developing embryos, endosperm, ovule and maternal tissues of the pod: it is believed that
hormones produced by the developing embryos and endosperm regulate the growth and expansion of
maternal tissue (Stage G in the life cycle, see WFPID The Life Cycle). When either embryo or
endosperm fails in its development, ovule development also ceases and pod enlargement may be
slowed. Vigorous pod development supported by a healthy plant is also necessary for the developing
embryo and endosperm in the ovule. Seed failure can result if the maternal plant comes under
excessive environmental stress, as from excessive heat, water stress or nutrient deprivation.
Fertilization in sexually reproducing organisms represents the onset of the next generation. Following
double fertilization in plants, the most visible event is the rapid wasting of all those flower parts which
are no longer needed by the plant. Sepals, petals and stamens wither and fall. Nectaries dry up. At
the same time, within a few hours of fertilization, the pistil with its complement of fertilized ovules
begins rapid development.
This activity provides students with an opportunity to follow the results of student pollination by
measuring the increasing length of the pistil at regular intervals until mature seeds are formed and
harvested. Upon harvest, viability of the seeds will also be tested. In the WFPID Embryogensis,
students dissect pods at various stages of development and investigate in great detail the stages in
embryogenesis.
Question:Question:Question:Question:Question: What are the indicators of normal fertilization and post-fertilization development that follow
successful pollination?
Sample Hypothesis:Sample Hypothesis:Sample Hypothesis:Sample Hypothesis:Sample Hypothesis: Flower parts other than the pistil wither. The pistil enlarges to become a pod
containing developing seed. At maturity the pod and seeds dry. Viable seeds germinate.
DesignDesignDesignDesignDesign
• At specified intervals following pollination, measure the length of the pistil, observe developing
embryos and endosperm and estimate the number of developing embryos. At maturity, harvest
seed and verify viability with germination test. As a control follow the development of pistils of the
unpollinated control plants.
• Students will record observations and measurements on the Floral Clock Student Data Sheet.
Time FrameTime FrameTime FrameTime FrameTime Frame
A period of 36 days from the sowing of seed is required for the growth of the Fast Plants and the
completion of this activity. The time required each class period will vary according to the observations
or measurements being made. Time will be required on seven separate days through the course of
this activity, specified in the procedure.
Through the development of the seed, the plant has solved the problem of packaging its new
generation to survive until favorable conditions for growth return. As the seed matures, the walls
of each ovule develop into a protective seed coat and the entire ovary becomes a fruit (seed pod)
known as silques. In Fast Plants, embryos mature into seeds in 20 days after successful
pollination and fertilization.
3. stigma
receptacle
pistilpistilpistilpistilpistil
lengthlengthlengthlengthlength
2. Repeat Step 1 at 6 dap and 9 dap.
3. Students will notice that the pods at 9 dap, in addition to elongating, have swollen around what
appears to be developing seeds or ovules (Stage H, Life Cycle).
- Carefully hold the plants up to the light. Can you see the outlines of the developing ovules
within the pods?
- Estimate the number of developing seeds in each pod. Record the information on your Floral
Clock Student Data Sheet. At harvesting you will be able to verify your estimations by counting
the seed.
4. If students are not doing the activity on embryo dissection, each pair may sacrifice one pod from
one of their plants in order to observe the developing embryos within the ovules at 9 dap.
Learning ObjectivesLearning ObjectivesLearning ObjectivesLearning ObjectivesLearning Objectives
In participating in this activity students will:
• learn to make observations and accurate measurements of pistil enlargement;
• understand the role of pollination and compatible pollen germination as a precursor to double
fertilization (Stage F, Life Cycle);
• understand that following double fertilization a complex sequence of interdependent developmental
events occurs over a period of 20 days that results in the production of viable seed for a new
generation in the spiral of life (Stages F, G, H and I, Life Cycle);
• understand the unique nature of double fertilization in higher plants in which embryo and
endosperm are interdependent specialized tissues within the ovule that function in normal seed
development (Stage G, Life Cycle);
• understand the interdependent relationship of developing maternal tissue and developing fertilized
ovules (Stage G, Life Cycle);
• understand that the development of a viable seed requires a healthy (environmentally non-
stressed) plant during the period of growth in which the fertilized ovules are developing into seed.
MaterialsMaterialsMaterialsMaterialsMaterials
• flowering Fast Plants, post-pollination
• dissection strips (see WFPID Dissection Strips)
• fine scissors
• fine-tipped forceps and fine dissecting needles (e.g., tuberculin syringes with #23 or #25 needles)
• clear double stick tape
• 2 cm wide clear adhesive tape
• seed envelope
• glass microscope slide
• water and dropper
• sharp cutting blade
ProcedureProcedureProcedureProcedureProcedure
1. At 3 dap (days after pollination) students will notice that the flower
parts that were important in pollination have withered and fallen from
the plant.
- Using a dissection strip without tape as a ruler, carefully measure the
length of each expanding pistil, recording its length to the nearest
millimeter in the appropriate column of the Floral Clock Student Data
Sheet according to its position number. Remember the highest
number (4) is the most apical (top) flower.
4. - With two needles, hold and squeeze the first ovule, cutting into it with one needle. A tiny green
object should squirt out along with some cloudy material (the endosperm).
- With a hand lens or microscope, observe and draw the object to scale. Does it look like any of
the illustrated stages in the WFPID Embryogensis?
- If you didn't succeed with the first one, try another ovule.
5. At 12 dap, repeat Step 1 and record the data on the Floral Clock Student Data Sheet.
- By this time, the plant's lower leaves may be starting to turn yellow or even wither and dry. This
is the normal succession in the life cycle of the plant, particularly if it is supporting a number of
pods with developing seeds.
- If a plant fails to develop any seeds, it will frequently remain green and continue to produce
flowers from side shoots developing in the axils of leaves. This should be the case in the
unpollinated control plants, if a plant has been severely stressed so that embryogeny has failed
or if it is genetically or phenotypically sterile (incapable of producing offspring).
6. At 21 dap, plants are now approaching maturity. Normally Fast Plants embryos have fully
developed by 18 to 20 dap, at which time stem and pods of the aging parent plant begin to turn
yellow along with the leaves and the seed coat begin to turn brown (Stage I, Life Cycle). This is the
time that water can be withheld from the plants to encourage seed ripening.
- At 21 dap, students should take a final pistil length measurement.
- Empty the water from the reservoir and remove the capillary mats. Keep the plants under the
lightbank and let them dry.
- With a dropper place a very small drop of water over the ovules on the dissection strip.
- Proceed by choosing a pod in which several ovules are visible. Carefully snip it
off with a fine scissors.
- Cut the pod in half with a sharp blade and give one half to each student. Place
each half on the sticky tape of another dissection strip.
- Holding one end of the half-pod, use a
sharp needle to pry it open along its length
to expose the ovules which look like tiny
green grapes. With the needle or forceps,
detach two or three ovules from the pod
and place them in a cluster on the sticky
tape of the dissection strip. Put the pod
aside on wet paper toweling to stay fresh.
dissection needledissection needles
water dropovule
cut
pod
ovules
dissection needle
ovules
dissection needle
starchy e
greengreen embryo
water drop
starchy endosperm
ovule wall
5. 7. In about a week, or when the pods are dry, harvest the seeds from
each of your pods onto separate loops of sticky tape. Record the
plant and pod number on the tape.
- Count and record the number of seeds for each pod on the Floral
Clock Student Data Sheet.
- Did the number of seeds in each pod agree with the estimates
you made at 9 dap?
- As you harvest, notice any unusual seed. If these are of interest
with you, tape them to a card where they can be examined or
germinated later.
8. Take a sample of two seeds from each pod and test their viability in a bottle cap seed germinator
according to the instructions in WFPID Germination.
- Two days later, record the seed viability on the Floral Clock Student
Data Sheet. On the data sheet, "+" indicates a viable seed and "-" indicates a
nonviable seed.
- Combine all the other seed in a bulk and store it in a seed or coin
envelope within a sealed container with indicator silica gel, drying compound.
Seed stored dry and cool in a refrigerator or freezer will stay viable for many
years.
Concluding Activities and QuestionsConcluding Activities and QuestionsConcluding Activities and QuestionsConcluding Activities and QuestionsConcluding Activities and Questions
After setting the floral clock with the pollination activity, students have followed the course of
reproductive development by observing and measuring pistil enlargement and seed production and
completing the Floral Clock Student Data Sheet. Combine the student data into group data, and then
into a class data summary using the Floral Clock Class Data Sheet.
If available, use data analysis software to create graphical and statistical summaries of class data.
Notice how the various statistical notations (range, mean and standard deviation) change over time
from pollination. Have students consider the following:
- From a class frequency histogram and statistical summary, does the measured plant character of
pod length on a particular day exhibit a normal distribution within the class population?
- Do individual pod lengths for each day fall within one or two standard deviations of the class
mean? Do students consider their post-fertilization events to be normal? Why or why not?
- Are there any "abnormal" seeds? They may be tested for viability.
- From a graph of the average rate of increase in pod length over time, is there a period in post-
fertilization development in which the increase in pod length is fastest?
- Is there a relationship between the number of developing seed and pod length?
- How do graphs of pod length increase over time compare between the pollinated and unpollinated
sets of plants?
ExtensionExtensionExtensionExtensionExtension
For an activity investigating the role of plant hormones in the regulation of pod enlargement, see
WFPID Hormone-Induced Parthenocarpy in Rapid-Cycling Brassica rapa.