Manage iGuides & Galleries in One Place
•Télécharger en tant que PPTX, PDF•
0 j'aime•13,472 vues

This document provides instructions for using an iGuide portal tool that allows users to create and manage iGuides. The tool includes features to create an iGuide, upload data and images, edit display settings like general settings and visual settings, organize image galleries, and lock sold properties to create private views. Instructions are provided on property addresses, iGuide URLs, sponsors, subscribers, and other display customization options.

Recommandé
Contenu connexe
Similaire à Manage iGuides & Galleries in One Place
Similaire à Manage iGuides & Galleries in One Place (17)
Dernier
Dernier (20)
Manage iGuides & Galleries in One Place
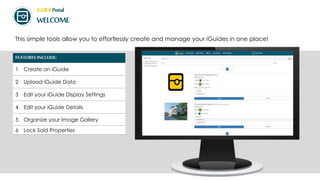
- 1. iGUIDEPortal WELCOME This simple tools allow you to effortlessly create and manage your iGuides in one place! FEATURES INCLUDE: 1 Create an iGuide 2 Upload iGuide Data 3 Edit your iGuide Display Settings 4 Edit your iGuide Details 5 Organize your Image Gallery 6 Lock Sold Properties
- 2. Property Address iGUIDEPortal CREATE AN iGUIDE PROPERTYADDRESS: 1 Select “Create iGuide” tab 2 Property address Click edit Enter a property address and select the location from the drop down menu Postal code/ zip code is required GPS Coordinates are required for new development areas or locations not recognized by Google Maps Press Select to continue
- 3. iGuide URL iGUIDEPortal CREATE AN iGUIDE iGUIDE URL: 1 The URL is automatically created 2 To customize the URL, manually overwrite the URL link Example: planitar_kitchener_on Press save to continue
- 4. Sponsors (Listing Agents) iGUIDEPortal CREATE AN iGUIDE SPONSORS: 1 To access the Planitar database of existing clients: type“Banner Planitar” Select “Banner Planitar” from the drop down menu Click on the black box to search for an agents banner 2 To access your database of clients: click “Assign Yourself as a Sponsor” Click the black box to search for an agents banner 3 To create a new banner: Click “Assign Yourself as a Sponsor” Click “Create New Banner” and fill in all required fields Press save to continue
- 5. Subscribers iGUIDEPortal CREATE AN iGUIDE SUBSCRIBERS: 1 Enter the email address of any additional people who wish to receive the iGuide report Note: managers, editors and emails which appear on banners are automatically added to the subscribers list 2 Save your work and click: “Create iGuide” Press save to continue
- 6. iGuide Raw Data iGUIDEPortal UPLOADINGRAW DATA: 1 Select “iGuide Raw Data” 2 Drag & drop the zipped folder or click “Upload” iGUIDEPortal UPLOAD iGUIDE DATA
- 7. Hi-Resolution Images iGUIDEPortal UPLOADINGHI-RESOLUTION IMAGES: 1 Select “Hi-Res Images” 2 Drag & drop the zipped folder or click “Upload” iGUIDEPortal UPLOAD iGUIDE DATA
- 8. iGuide Gallery iGUIDEPortal UPLOADINGTHE iGUIDE GALLERY: 1 Read the disclaimer and select the box to continue 2 A new screen will appear instructing you to drag and drop the zipped folder or upload iGUIDEPortal UPLOAD iGUIDE DATA
- 9. iGUIDEPortal EDIT YOURiGUIDE DISPLAY SETTINGS We have provided a number of options to customize your iGuide MODIFYGENERAL SETTINGS: 1 Select Edit Default View > General Settings > Edit 1 Change the title for your iGuide 2 Insert external video links 3 Select your iGuide start position 4 Customize your button options 5 Expire sold or closed listings ALWAYSSAVE YOURWORK
- 10. iGUIDEPortal We have provided a number of options to customize your iGuide Settings MODIFYVISUAL SETTINGS: 1 Change your floor labels 2 Change your room labels 3 Resize your room label fonts (Double click title to change) ALWAYSSAVE YOURWORK iGUIDEPortal EDIT YOURiGUIDE DISPLAY SETTINGS
- 11. iGUIDEPortal We have provided a number of options to customize your iGuide Settings DISABLEPANORAMICVIEWS: Double click to turn off a panoramic view (Panoramic views will turn red when off) DEACTIVATEWHOLE FLOORS: 1 Double click to turn floor view off (Labels will turn red when off) ALWAYSSAVE YOURWORK iGUIDEPortal EDIT YOURiGUIDE DISPLAY SETTINGS
- 12. People MANAGE WHO HASACCESS TO YOURiGUIDE: 1 Select Show iGuide Details>People>Edit 2 Assign sponsors Assign editors (photographers & agents) Assign subscribers Assign a manager iGUIDEPortal EDIT YOURiGUIDE DETAILS ALWAYSSAVE YOURWORK
- 13. Property Address EDIT THE PROPERTYADDRESS: 1 Select Show iGuide Details>Property Address>Edit 2 Change the property address Add or remove the unit, apartment or house number iGUIDEPortal EDIT YOURiGUIDE DETAILS ALWAYSSAVE YOURWORK
- 14. iGuide URL iGUIDEPortal EDIT YOURiGUIDE DETAILS EDIT THE iGUIDE URL: 1 Select Show iGuide Details>Edit iGuide URL 2 Change the address in the iGuide URL ALWAYSSAVE YOURWORK
- 15. iGUIDEPortal ORGANIZEYOURIMAGEGALLERY We have provided a number of options to customize your iGuide Settings OPTIONSFOR IMAGE GALLERY: 1 Select Edit Default View>Gallery>Edit 1 Change the order of images 2 Exclude images from the gallery 3 Exclude images appear in the excluded images box
- 16. iGUIDEPortal LOCKINGYOURiGUIDE When a property is sold or you want to delist, you can provide users with private access. LOCKA PROPERTYANDCREATE PRIVATE VIEWS: 1 Select “iGuide User Views” 1 Create a new view 2 Lock the original (Linked) view 3 View and copy the new view link 4 Share the new private link with users