SlideShare une entreprise Scribd logo
1  sur  72
Télécharger pour lire hors ligne
Microsoft Word Tutorials
Q. What is MS Word and what are its uses?
Microsoft Word is one of the most popular word processing programs supported by both Mac
and PC platforms. Microsoft Word can be used to create documents, brochures, leaflets, outlines,
resumes, lists, and simple web pages.
By default, documents saved in Word 2010 are saved with the .docx extension. Microsoft Word
can be used for the following purposes:
 To create business documents having various graphics including pictures, charts, and
diagrams.
 To store and reuse ready-made content and formatted elements such as cover pages and
sidebars.
 To create letters and letterheads for personal and business purpose.
 To design different documents such as resumes or invitation cards etc.
 To create a range of correspondence from a simple office memo to legal copies and
reference documents.
Q. How to open MS-Word?
Step (1): Click Start button.
Step (2): Click All Programs option from
the menu.
(1)Start Button
(2) All Programs
Step (3): Search for Microsoft Office from
the sub menu and click it.
Step (4): Search for Microsoft Word
2010 from the submenu and click it.
This will launch Microsoft Word 2010 application and you will see the following word window.
Q. Exploration of Window
(3) Microsoft
Office
(4) Microsoft
Word 2010
FileTab:
The File tab replaces the Office button from Word 2007. You can click it to
check Backstage view, which is the place to come when you need to open or save files, create
new documents, print a document, and do other file-related operations.
QuickAccessToolbar:
This you will find just above the File tab and its purpose is to provide a convenient
resting place for the Word most frequently used commands. You can customize this toolbar
based on your comfort.
Ribbon:
Ribbon contains commands organized in three components:
 Tabs: They appear across the top of the Ribbon and contain groups of related
commands. Home, Insert, Page Layout are example of ribbon tabs.
 Groups: They organize related commands; each group name appears below the group on
the Ribbon. For example group of commands related to fonts or group of commands
related to alignment etc.
 Commands: Commands appear within each group as mentioned above.
Titlebar:
This lies in the middle and at the top or the window. Title bar shows the program and
document titles.
Rulers:
Word has two rulers - a horizontal ruler and a vertical ruler. The horizontal ruler appears
just beneath the Ribbon and is used to set margins and tab stops. The vertical ruler appears on
the left edge of the Word window and is used to gauge the vertical position of elements on the
page.
Help:
The Help Icon can be used to get word related help anytime you like. This provides nice
tutorial on various subjects related to word.
ZoomControl:
Zoom control lets you zoom in for a closer look at your text. The zoom control consists
of a slider that you can slide left or right to zoom in or out, . and + buttons you can click to
increase or decrease the zoom factor.
ViewButtons:
The group of five buttons located to the left of the Zoom control, near the bottom of the
screen, lets you switch among Word's various document views.
 Print Layout view: This displays pages exactly as they will appear when printed.
 Full Screen Reading view: This gives a full screen look of the document.
 Web Layout view: This shows how a document appears when viewed by a Web
browser, such as Internet Explorer.
 Outline view: This lets you work with outlines established using Word.
 Draft view: This formats text as it appears on the printed page with a few exceptions.
For example, headers and footers aren't shown. Most people prefer this mode.
DocumentArea:
The area, where you type. The flashing vertical bar is called the insertion point and it
represents the location where text will appear when you type.
StatusBar:
This displays document information as well as the insertion point location. From left to
right, this bar contains the total number of pages and words in the document, language etc.
You can configure the status bar by right-clicking anywhere on it and by selecting or
deselecting options from the provided list.
DialogBoxLauncher:
This appears as very small arrow in the lower-right corner of many groups on the
Ribbon. Clicking this button opens a dialog box or task pane that provides more options about
the group.
Q. What is backstage view?
Click the File tab, located in the upper-left corner of the Word Ribbon.
Backstage view shows three columns when you select most of the available options in the first
column.
File Tab
First column of the backstage view will have following options:
Option Description
Save If an existing document is opened, it would be saved as is, otherwise it will
display a dialogue box asking for document name.
Save As A dialogue box will be displayed asking for document name and document
type, by default it will save in word 2010 format with extension .docx
Open This option will be used to open an existing word document.
Close This option will be used to close an opened document.
Info This option will display information about the opened document.
Recent This option will list down all the recently opened documents
New This option will be used to open a new document.
Print This option will be used to print an opened document.
Save &
Send
This option will save an opened document and will display options to send
the document using email etc.
Help You can use this option to get required help about word 2010.
Options Use this option to set various option related to word 2010.
Exit Use this option to close the document and exit.
ExitBackstageView:
It is simple to exit from Backstage View. Either click on File tab or press Esc button on
the keyboard to go back in word working mode.
Q. How to enter the text?
Document area is the area where you type your text. The flashing vertical bar is called the
insertion point and it represents the location where text will appear when you type.
Q. How to move in document using mouse, keyboard, scroll bars and
commands?
You can easily move the insertion point by clicking in your text anywhere on the screen.
Sometime if document is big then you cannot see a place where you want to move. In such
situation you would have to use the scroll bars, as shown in the following screen shot:
You can scroll your document by rolling your mouse wheel, which is equivalent to clicking the
up-arrow or down-arrow buttons in the scroll bar.
MovingwithScrollBars:
As shown in the above screen capture, there are two scroll bars: one for moving vertically
within the document, and one for moving horizontally. Using the vertical scroll bar, you may:
 Move upward by one line by clicking the upward-pointing scroll arrow.
 Move downward by one line by clicking the downward-pointing scroll arrow.
 Move one next page, using next page button (footnote).
 Move one previous page, using previous page button (footnote).
 Use Browse Object button to move through the document, going from one chosen
object to the next.
MovingwithKeyboard:
The following keyboard commands, used for moving around your document, also move the
insertion point:
Keystroke Where the Insertion Point Moves
Forward one character
Back one character
Up one line
Down one line
PageUp To the previous screen
PageDown To the next screen
Home To the beginning of the current line
End To the end of the current line
You can move word by word or paragraph by paragraph. You would have to hold down the Ctrl
key while pressing an arrow key, which moves the insertion point as described here:
Key Combination Where the Insertion Point Moves
Ctrl + To the next word
Ctrl + To the previous word
Ctrl +
To the start of the previous paragraph
Ctrl +
To the start of the next paragraph
Ctrl + PageUp To the previous browse object
Ctrl + PageDown To the next browse object
Ctrl + Home To the beginning of the document
Ctrl + End To the end of the document
Shift + F5 To the last place you changed in your document.
MovingwithGoToCommand:
Press F5 key to use Go To command, which will display a dialogue box where you will have
various options to reach to a particular page.
Normally we use page number or line number or section number to go directly on a particular
page and finally press Go To button.
Q. How to save a document?
Step (1): Click the File tab and select Save
As option.
Step (2): Select a folder where you would like to save the document, Enter file name which you
want to give to your document and Select a Save as type, by default it is .docx format.
Step (3): Finally, click on Save button and your document will be saved with the entered name
in the selected folder.
SavingNewChanges:
If you want to save this document with the same name then you can use either of the following
simple options:
 Just press Ctrl + S keys to save the changes.
 Or click on the floppy icon available at the top left corner and just above the File tab.
This option will also save the changes.
 Or you can also use third method to save the changes, which is Save option available just
above the Save As option as shown in the above screen capture.
Q. How to open a new or blank document?
Step (1): Click the File tab and select New
option.
Step (2): When you select New option from the first column, it will display a list of templates in second
column. Just double click on Blank document, which is very first option in the template list. We will
discuss about rest of the templates available in the list in coming chapters.
Now you should have your blank document as shown below ready to start typing your text.
Short Cut key: Ctrl+N
Q. How to open an existing document?
Step (1): Click the File tab and select Open option.
Step (2): This will display following file Open dialog box, which lets you navigate through different file
folders and also lets you select a file which you want to open.
Step (3): Finally locate and select a file which you want to open and click on Open button to open the file.
(You will have different options to open the file, but simply use Open option.)
Q. How to close the document?
Step (1): Click the File tab and select Close option.
Step (2): When you select Close option and if document is not saved before closing, it will display
following Warning box asking whether the document should be saved or not.
Step (3): Click Save, otherwise click Don't Save button. To go back to the document click Cancel button.
This will close the document and you see a blank Word window as shown below:
Q. How to select text in document?
The most common method of selecting a text is to click and drag the mouse over the text you want to select.
Following table lists down few other simple methods which will help you in selecting text in different
scenarios:
SN Component & Selection Method
1 Selecting text between two points
Click at the start of the block of text, hold down Shift, and click at the end of the
block.
2 Selecting a single word
Simply double click anywhere on the word you want to select.
3 Selecting a paragraph
Simply triple click anywhere on the paragraph you want to select.
4 Selecting a sentence
Hold down Ctrl key and click anywhere in the sentence you want to select.
5 Selecting a column of text
Hold down Alt, click and hold the mouse button, and drag over the column you
want to select.
Note that only one part of the document can be in selected state. If you have one portion of the document in
selected state and as soon as you try to select any other part of the document, previous part will
automatically be de-selected.
UsingtheSelectionBar:
The black shaded area in the following screen shot is called selection bar. When you bring your cursor in
this area, it turns into a rightward-pointing arrow.
You can use selection bar to select various components of a document as described in the following table:
SN Component & Selection Method
1 Selecting a line
Bring your mouse in selection bar area and click in front of the line you want to
select.
2 Selecting a paragraph
Bring your mouse in selection bar area and double click in front of the paragraph
you want to select.
3 Selecting the document
Bring your mouse in selection bar area and triple click.
Usingthekeyboard:
Keyboard provides very good support when you want to select various components of the document as
described in the following table:
SN Key & Selection Method Selecting Text
1 Ctrl + A
Press Ctrl + A keys to select the entire document.
2 Shift
Keep pressing Sift key and use any of the arrow keys to select the text.
3 F8
Press F8 and then use any of the arrows keys to select the text.
4 Ctrl + Shift + F8
Press Ctrl + Shift + F8 and then use any of the arrows keys to select column of the
text.
Q. How to delete text from the document?
UsingBackspace&DeleteKeys:
The most basic deletion technique is to delete characters one at a time by pressing either backspace or delete
keys. Following table describes how you can delete single character or whole word by using either of these
two keys:
SN Keys & Deletion Methods
1 Backspace
Keep the insertion point just after the character you want to delete and
press backspace key. Word deletes the character immediately to the left of the
insertion point.
2 Ctrl + Backspace
Keep the insertion point just after the word you want to delete and
press Ctrl + Backspace key. Word deletes the whole word immediately to the left
of the insertion point.
3 Delete
Keep the insertion point just before the character you want to delete and
press delete key. Word deletes the character immediately to the right of the insertion
point.
4 Ctrl + Delete
Keep the insertion point just before the word you want to delete and
press Ctrl + Delete key. Word deletes the word immediately to the right of the
insertion point.
UsingSelectionMethod:
You have learnt how to select various parts of a word document. You can make use of that learning to delete
those selected parts as described in the following table:
SN Component Selection & Delete Methods
1 Deleting text between two points
Click at the start of the block of text, hold down Shift, and click at the end of the
block to select the text and finally press either backspace or delete key.
2 Deleting a single word
Simply double click anywhere on the word you want to delete and finally press
either backspace or delete key.
3 Deleting a paragraph
Simply triple click anywhere on the paragraph you want to delete and finally press
either backspace or delete key.
4 Deleting a sentence
Hold down Ctrl key and click anywhere in the sentence you want to delete and
finally press either backspace or delete key.
5 Deleting a column of text
Hold down Alt, click and hold the mouse button, and drag over the column you
want to delete and finally press either backspace or delete key.
6 Deleting a line
Bring your mouse in selection bar area and click in front of the line you want to
delete and finally press either backspace or delete key.
7 Deleting entire document content
Press Ctrl + A keys to delete the entire document and finally press
either backspace or delete key.
Q.Howtomovetextwith-insameanddifferentdocument?
Movewith-insamedocument:
Step (1): Select a portion of the text using any of the text selection methods.
Step (2): Now take your mouse pointer over the selected text and hold mouse left button and keep holding it
while moving around the document.
Step (3): Take your mouse pointer at the place where you want to move selected text and release the mouse
button. You will see that selected text is moved to the desired location.
Movewith-indifferentdocuments:
Step (1): Keep both the documents opened and to ensure that both documents are visible, click the Arrange
All button on the View tab on the Ribbon.
This will display both the documents as shown below:
Step (2): Now, select a portion of the text using any of the text selection methods.
Step (3): Take your mouse pointer over the selected text and hold mouse left button and keep holding it
while moving around the document.
Step (4): Take your mouse pointer at the place in second document where you want to move selected text
and release the mouse button. You will see that selected text is moved to the desired location in second
document.
Note: In case you have more than two documents, you can use Alt + Tab keys to switch through the
different documents and select the desired destination document.
Q. How to Copy and Paste the text in document?
Step (1): Select a portion of the text using any of the text selection methods.
Step (2): At second step, you have various options available to copy the selected text in clipboard. Just use
any one of them which you like most:
 Using Mouse Right Click: If right click on the selected text, it will display copy option, just click
this option to copy the selected content in clipboard.
 Using Ribbon Copy Button: After selecting a text, you can use copy button available at the ribbon
to copy the selected content in clipboard.
 Using Ctrl+C Keys: After selecting a text, just press Ctrl+C keys to copy the selected content in
clipboard.
Step (3): Finally click at the place where you want to copy selected text and use either of these two simple
options:
 Using Ribbon Paste Button: Just click paste button available at the ribbon to paste the copied
content at the desired location.
 Using Ctrl + v Keys: This is simplest way of pasting the content. Just press Ctrl + v keys to paste
the content at the new location.
Q. How to move text in document?
Cut&PasteOperation:
Step (1): Select a portion of the text using any of the text selection methods.
Step (2): At second step, you have various options available to cut the selected text and put it in clipboard.
Just use any one of them which you like most:
 Using Mouse Right Click: If right click on the selected text, it will display cut option, just click this
option to cut the selected content and keep it in clipboard.
 Using Ribbon Cut Button: After selecting a text, you can use cut button available at the ribbon to
cut the selected content and keep it in clipboard.
 Using Ctrl + x Keys: After selecting a text, just press Ctrl + x keys to cut the selected content and
keep it in clipboard.
Step (3): Finally click at the place where you want to move the selected text and use either of these two
simple options:
 Using Ribbon Paste Button: Just click paste button available at the ribbon to paste the content at the
new location.
 Using Ctrl + v Keys: This is simplest way of pasting the content. Just press Ctrl + v keys to paste
the content at the new location.
Q. How to Find the text in document?
Step (1): Let us have a sample text available in our word document. Just type =rand() and press enter to
have the following screen:
Step (2): Click the Find option in the Editing group on the Home tab or press Ctrl + F to launch the
Navigation pane shown in step (2):
Step (3): Enter a word which you want to search in the search box, as soon as you finish typing, Word
searches for the text you entered and displays the results in the navigation pane and highlight the word in the
document as well as follows:
Step (4): You can click clear button (X) to clear the search and results and perform another search.
Step (5): You can use further options while searching for a word. Click option button to display options
menu and then click Options option which will display a list of options. You can select options like match
case to perform case sensitive search.
Step (6): Finally if you are done with searching operation, you can click close button (X) to close the
Navigation Pane.
Q. How to Replace the text in document?
Step (1): Click the Replace option in the Editing group on the Home tab or press Ctrl + H to launch
the Find and Replace dialog box shown in step (2):
Step (2): Type a word which you want to search and a word which would like to replace with in the Find
and Replace dialog box as follows:
Step (3): Click Replace button available on Find and Replace dialog box and you will see first occurrence
of the searched word would be replaced with the replace with word. Clicking again on Replace button
would replace next occurrence of the searched word. If you will click Replace All button then it would
replace all the found words in one go. You can also use Find Next button just to search the next occurrence
and later you can use Replace button to replace the found word.
Step (4): You can use More >> button available on the dialog box to use more options and to make your
search more specific like case sensitive search or searching for whole word only etc.
Step (5): Finally if you are done with finding and replacing operation, you can click Close
(X) or Cancel button of the dialog box to close the box.
Q. How to check Spelling and Grammar in document?
Step (1): Click the Review tab and then click Spelling & Grammar button.
Step (2): A Spelling and Grammar dialog box will appear and will display wrong spellings or grammar and
correct suggestions as shown below:
Now you have following options to fix the spelling mistake:
 Ignore: If you are willing to ignore a word then click this button and word ignores the word
throughout the document.
 Ignore All: Like Ignore, but ignores all occurrences of the same misspelling, not just this one.
 Add to Dictionary: Choose Add to Dictionary to add the word to the Word spelling dictionary.
 Change: This will change the wrong word using the suggested correct word.
 Change All: Like Change, but change all occurrences of the same misspelling, not just this one.
 AutoCorrect: If you select a suggestion, Word creates an AutoCorrect entry that automatically
corrects this spelling error from now on.
Following are the different options in case you have grammatical mistake:
 Next Sentence: You can click Next Sentence to direct the grammar checker to skip ahead to the next
sentence.
 Explain: The grammar checker displays a description of the rule that caused the sentence to be
flagged as a possible error.
 Options: This will open the Word Options dialog box to allow you to change the behaviour of the
grammar checker or spelling options.
 Undo: This will undo the last grammar changed.
Step (3): Select one of the given suggestions you want to use and click Change option to fix the spelling or
grammar mistake and repeat the step to fix all the spelling or grammar mistake.
Step (4): Word displays a dialog box when it finishes checking for spelling and grammar mistakes, finally
Click OK.
Check Spelling and Grammar using Right
Click:
If you will click a right mouse button over a
misspelled word then it would show you correct
suggestions and above mentioned options to fix
the spelling or grammar mistake. Try it yourself.
Q. How to zoom-in and zoom-out?
Step (1): Click the view tab and then click Zoom button which is shown below.
Step (2): When you click Zoom button, a Zoom dialog box will appear as shown below and will display
zoom options box to select a value to reduce or increase the size of the document on-screen. By default it
will be 100%, you can select 200% to increase the size of the font or 75% to reduce the size of the font. You
can set view at custom percent as well by entering a value in the given box.
You can click the Many pages down arrow and select to display multiple pages.
Step (3): Once you are done with selecting an option, click OK to apply the changes on the document.
Step (4): Try different options available, for example Page Width and Text Width.
Zoom-in & Zoom-out using (+) and (-) Buttons:
Following screen capture shows two buttons Zoom-out which is (-) button and Zoom-in which
is (+) button.
Step (1): Click Zoom-out button, you will find that your document size will decrease by 10% each time
you click the button. Similar way if you click on Zoom-in button your document size will increase by 10%
each time you click the button.
Q. How to use Undo & Repeat operations?
Step (1): Let us type some text in a blank document as I have typed above. Now click Repeat (Redo) button
and you will see that word would repeat the same operation for you.
Step (2): Now to examine undo operation, let us delete last word operation character by character so that
you have following text remaining in the line.
Step (3): Let us try to click Undo button one by one. You will see that work would recover all the deleted
characters one by one after performing few undo operations.
Shortcuts to use Undo & Repeat operations:
Undo: Ctrl+Z; Redo: Ctrl+Y
Formatting of text:
Q. How to change font type and size?
Clear Formatting Options:
Step (1): Select the text that you want to reset.
Step (2): Click Clear Formatting button in the Home tab Font group, or simply use Ctrl + SPACEBAR.
Q. How to do Bold the text in document?
Step (1): Select the text you want to bold.
Step (2): Click Font Bold [ B ] button in the Home tab Font group, or simply use Ctrl + B keys to make
selected text bold.
Q. How to do Italic the text in document?
Step (1): Select the text you want in italic.
Step (2): Click Font Italic [ I ] button in the Home tab Font group, or simply use Ctrl + I keys to convert
text in italic font.
Q. How to do underline the text in document?
Step (1): Select the text that you want to underline.
Step (2): Click Font Underline [ U ] button in the Home tab Font group, or simply use Ctrl + U keys to put
an underline under the text.
Q. How to do strikethrough the text in document?
Step (1): Select the text that you want to Strikethrough.
Step (2): Click Font Strikethrough [ abc ] button in the Home tab Font group to put a line in the middle of
the text which is called strikethrough the text.
Q. How to change the font color of the text in document?
Step (1): Select the text that you want to change.
Step (2): Click the Font Color button triangle to display a list of colors. Try to move your mouse pointer
over different colors and you will see text color will change automatically. You can select any of the colors
available by simply clicking over it.
If you click at the left portion of the Font Color button, then already selected color will be applied to the
text, so you would have to click over small triangle to display a list of colors.
If you do not find a color of your choice, you can use More Colors option to display color pallet box which
allows you to select a color from range of millions of colors.
Q. How to highlight the text with colors in document?
Step (1): Select the text that you want to apply the change.
Step (2): Click the Text Highlight Color button triangle to display a list of colors. You can select any of the
colors available by simply clicking over it.
If you click at the left portion of the Text Highlight Color button, then already selected color will be applied
to the text.
Q. How to apply text effect in document?
Step (1): Select the text that you want to change.
Step (2): Click the Text Effect button to display a list of effects including shadow, outline, glow, reflection
etc. You can select any of the text effect available by simply clicking over it.
Q. How to left align the text in document?
Step (1): Click anywhere on the paragraph you want to align and click Align Text Left button available
on Home tab or simply press Ctrl + L keys.
Q. How to center align the text in document?
Step (1): Click anywhere on the paragraph you want to align and click Center button available on Home
tab or simply press Ctrl + E keys.
Q. How to right align the text in the document?
Step (1): Click anywhere on the paragraph you want to align and click Align Text Right button available
on Home tab or simply press Ctrl + R keys.
Q. How to justify aligned the text in the document?
Step (1): Click anywhere on the paragraph you want to align and click Justify button available on Home
tab or simply press Ctrl + J keys.
Q. How to do left indent in document?
Step (1): Click anywhere on the paragraph you want to indent left and click Increase Indent button
available on Home tab or simply press Ctrl + M keys. You can click multiple times to create deeper
indentation.
Step (2): You can remove left indentation by clicking Decrease Indent button available on Home tab or
simply press Ctrl + Shift+ M keys.
Q. How to do right indent in document?
Step (1): Click anywhere on the paragraph you want to indent right and click Increase Right Indent spinner
available on Page Layout tab. You can click multiple the spinner times to create deeper indentation. You
can use Left Indent spinners as well to set left indentation from the same place.
Step (2): You can remove right indentation by clicking the Decrease Right Indent spinner in opposite
direction.
Q. How to do first line indentation in document?
Step (1): Click anywhere on the paragraph you want to indent right and click the Paragraph Dialog
Box Launcher available on Home tab.
Step (2): Click Before Text spinner to set left indentation and select First Line Option to move the left side
of the first line of a paragraph inward toward the center. You can control the movement by
setting Indentation Unit. A preview box will give idea no the indentation status.
Q. How to do hanging indentation in document?
Step (1): Click anywhere on the paragraph you want to indent right and click the Paragraph Dialog
Box Launcher available on Home tab.
Step (2): Click Before Text spinner to set left indentation and select Hanging Option to move the left side
of the first line of a paragraph leftward, away from the center. You can control the movement by
setting Indentation Unit. A preview box will give idea no the indentation status.
Q. How to create a list from existing text?
Step (1): Select a list of text to which you want to assign bullets or numbers.
Step (2): Click the Bullet Button triangle to display a list of bullets you want to assign to the list. You can
select any of the bullet style available by simply clicking over it.
Step (3): If you are willing to create a list with numbers then click the Numbering Button triangle instead of
bullet button to display a list of numbers you want to assign to the list. You can select any of the numbering
style available by simply clicking over it.
Q. How to create a list as typing?
Step (1): Type *, and then either press the SPACEBAR or press TAB key, and then type the rest of what
you want in the first item of the bulleted list.
Step (2): When you are done with typing, press Enter to add the item in the list automatically and go to add
next item in the list.
Step (3): Repeat Step 2 for each list item.
You can create a numbered list as you type. Word will automatically format it according to your text.
Following are the simple steps to create numbered list as you type.
Step (1): Type 1, and then either press the SPACEBAR or press TAB key, and then type the rest of what
you want in the first item of the numbered list.
Step (2): When you are done with typing, press Enter to add the item in the list automatically and go to add
next item in the list.
Step (3): Repeat Step 2 for each list item.
Q. How to set line spacing between lines?
Step (1): Select the paragraph or paragraphs for which you want to define spacing.
Step (2): Click the Line and Paragraph Spacing Button triangle to display a list of options to adjust space
between the lines. You can select any of the option available by simply clicking over it.
Spacing between Paragraphs:
You can also set distance between two paragraphs. Following are the simple steps to set this distance.
Step (1): Select the paragraph or paragraphs for which you want to define spacing and click the Paragraph
Dialog Box Launcher available on Home tab.
Step (2): Click Before spinner to increase or decrease the space before the selected paragraph. Similar way
click After spinner to increase or decrease the space after the selected paragraph. Finally click OK button to
apply the changes.
Q. How to add border to the text?
Step (1): Select the text or paragraph to which you want to add border.
Step (2): Click the Border Button to display a list of options to put a border around the selected text or
paragraph. You can select any of the option available by simply clicking over it.
Step (3): Try to add different borders like left, right top or bottom by selecting different options from the
border options.
Step (4): To delete the existing border, simply select No Border option from the border options.
Q. How to add border to the page?
Step (1): Click the Border Button >> Border and Shading option available at the bottom of list of the
options as shown in above screen capture. This will display a Border and Shading dialog box. This dialog
box can be used to set borders and shading around a selected text or page borders.
Step (2): Click Page Border tab which will display a list of border settings, styles and options whether this
border should be applied to the whole document or just one page or first page.
Step (3): You can use Preview section to disable or enable left, right, top or bottom borders of the page.
Follow the given instruction in preview section itself.
Step (4): You can customize your border by setting its color, width by using different art available under
style section.
You can have similar or even better borders as given below.
Q. How to add shades to the text?
Step (1): Click the Border Button >> Border and Shading option available at the bottom of list of the
options as shown in above screen capture. This will display a Border and Shading dialog box. This dialog
box can be used to set borders and shading around a selected text or page borders.
Step (2): Click Shading tab which will display options to select fill, color and style and whether this border
should be applied to Paragraph or Text.
Step (3): You can use Preview section to have an idea about the expected result. Once you are done,
click OK button to apply the result.
Q. How to apply formatting multiple times?
Step (1): If you are intended to apply formatting at multiple places, then you would have to double
click Format Painter button while copying text format. Later on you just keep selecting text where you
want to apply the text formatting.
Step (2): When you are done with applying formatting at all the places, again click once at Format
Painter to come out of format applying operation.
Q. How to adjust margin?
Step (1): Open the document whose margins you want to set. If you want the margins to apply only to a
selected part of a document, select that part now.
Step (2): Click the Page Layout tab, and click Margins button in the Page Setup group. This will display a
list of options to be selected but you have to click Custom Margins option available at the bottom.
Step (3): You will have to display a Page Dialog Box as shown below where you can set top, left, right and
bottom margins under the Margins tab. Select Apply to: option to apply the margin on selected text or
complete document.
Step (4): Click OK button to apply the margins.
Q. How to add header and footer in the document?
Step (1): Click the Insert tab, and click either Header button or Footer button whatever you want to add
first. Assume you are going to add Header, so when you click Header button it will display a list of built-in
Headers from where you can choose any of the headers by simply clicking on it.
Step (2): Once you select any of the headers, it will be applied to the document in editable mode and the text
in your document will appear dimmed, Header and Footer buttons appear on the Ribbon and a Close
Header and Footer button will also appear at the top-right corner.
Step (3): Finally you can type your information whatever you want to have in your document header and
once you are done, click Close Header and Footer to come out of header insertion mode. You will see final
result as follows.
You can follow a similar procedure to add footer in your document.
Q. How to edit header and footer of the document?
Step (1): Click the Insert tab, and click either Header button or Footer button whatever you want to edit.
Assume you are going to edit Header, so when you click Header button it will display a list of options
including Edit Header option.
Step (2): Just click on it and word will display editable header for you as shown below.
Step (3): Now you can edit your document header and once you are done, click Close Header and Footer to
come out of header edit mode.
You can follow a similar procedure to edit footer in your document.
Q. How to add page number to the document?
Step (1): Click the Insert tab, and click Page Number button available in header and footer section. This
will display a list of options to display page number at the top, bottom, current position etc.
Step (2): When you move your mouse pointer over the available options, it displays further styles of page
numbers to be displayed. For example when I take mouse pointer at Bottom of Page option it displays
following list of styles.
Step (3): Finally select of the page number styles which you like most. I selected Accent Bar 1 style by
clicking over it. After this step you will enter in Page Footer modification mode, so you would have to
click Close Header and Footer button to come out of footer edit mode.
Q. How to remove page number to the document?
Step (1): Click the Insert tab, and click Page Number button available in header and footer section. This
will display a list of options to display page number at the top, bottom, current position etc and at the bottom
you will have Remove Page Numbers option. Just click this option and it will delete your all the page
numbers set in your document.
Q. How to add cover page of the document?
Step (1): Click the Insert tab, and click Cover
Page button available in the Pages group. This
will display a list of Built-in Cover Pages as
shown below.
Step (2): Just click the cover page from the gallery that you want to add to your document. Selected cover
page will be added as the first page of your document which can you modify as per your need. If you want to
place cover page elsewhere except first page, right-click the cover page in the gallery and select the location
you want from the menu that appears.
Q. How to delete the cover page of the document?
Step (1): Click the Insert tab, and click Cover Page button available in the Pages group. This will display a
list of Built-in Cover Pages as shown below. There you will find an Remove Current Cover Page option
available at the bottom of cover page gallery.
Step (2): Just click Remove Current Cover Page option and your cover page will be deleted from your
document.
Q. How to change page orientation?
Step (1): Open a word document for which you want to change the orientation. By default, orientation will
be Portrait Orientation as shown below.
Step (2): Click the Page Layout tab, and click Orientation button available in the Page Setup group. This
will display an Option Menu having both the options (Portrait & Landscape) to be selected.
Step (3): Click any of the options you want to set to orientation. Because my page is already in portrait
orientation, so I will click Landscape option to change my orientation to landscape orientation.
Q. How to change text to sentence case?
Step (1): Select the text that you want to change.
Step (2): Click the Change Case button and then select Sentence Case option to capitalize the first character
of every selected sentence.
Q. How to change text to lower case?
Step (1): Select the text that you want to change.
Step (2): Click the Change Case button and then select Lowercase option to display all selected words in
lowercase.
Q. How to change text to upper case?
Step (1): Select the text that you want to change.
Step (2): Click the Change Case button and then select UPPERCASE option to display all selected words
in all caps. All characters of every selected word will be capitalized.
Q. How to change text to capitalize?
Step (1): Select the text that you want to change.
Step (2): Click the Change Case button and then select Capitalize Each Word option to put a leading cap
on each selected word.
Q. How to change text to toggle case?
Step (1): Select the text that you want to change.
Step (2): Click the Change Case button and then select tOGGLE cASE option to change all lowercase
words into uppercase and uppercase words into lowercase.

Contenu connexe

Tendances (20)

MS Word Basics
MS Word BasicsMS Word Basics
MS Word Basics
 
Microsoft word
Microsoft wordMicrosoft word
Microsoft word
 
MS Word for Beginners
MS Word for BeginnersMS Word for Beginners
MS Word for Beginners
 
Basics of Microsoft Word
Basics of Microsoft WordBasics of Microsoft Word
Basics of Microsoft Word
 
Standard and formatting toolbar
Standard and formatting toolbarStandard and formatting toolbar
Standard and formatting toolbar
 
Introduction to MS WORD
Introduction to MS WORDIntroduction to MS WORD
Introduction to MS WORD
 
Microsoft word
Microsoft wordMicrosoft word
Microsoft word
 
Microsoft word-getting-started-basics
Microsoft word-getting-started-basicsMicrosoft word-getting-started-basics
Microsoft word-getting-started-basics
 
Word pad
Word padWord pad
Word pad
 
MS Word's main menu
MS Word's main menuMS Word's main menu
MS Word's main menu
 
Word lecture 3
Word lecture 3Word lecture 3
Word lecture 3
 
Word Lecture 2
Word Lecture 2Word Lecture 2
Word Lecture 2
 
MS Word Window Elements
MS Word Window ElementsMS Word Window Elements
MS Word Window Elements
 
Microsoft office support and and outlook slide show
Microsoft office support and and outlook slide showMicrosoft office support and and outlook slide show
Microsoft office support and and outlook slide show
 
An introduction to microsoft_word
An introduction to microsoft_wordAn introduction to microsoft_word
An introduction to microsoft_word
 
Notepad
NotepadNotepad
Notepad
 
Ribbon components
Ribbon componentsRibbon components
Ribbon components
 
Microsoft Word
Microsoft WordMicrosoft Word
Microsoft Word
 
MS Word 2007
MS Word 2007MS Word 2007
MS Word 2007
 
Ms word
Ms wordMs word
Ms word
 

Similaire à Microsoft word tutorials COMPLETE by Gulshan K Maheshwari(QAU)

opc Info sheet 3 updated word.ppt (2).pptx
opc Info sheet 3 updated word.ppt (2).pptxopc Info sheet 3 updated word.ppt (2).pptx
opc Info sheet 3 updated word.ppt (2).pptxAsterNegash3
 
MS Word Intermediate Training
MS Word Intermediate TrainingMS Word Intermediate Training
MS Word Intermediate TrainingMichael Sheyahshe
 
Microsoft word 2007 part 1
Microsoft word 2007 part 1Microsoft word 2007 part 1
Microsoft word 2007 part 1kenjaneredz
 
chapter1computers2-160923133049.pdf
chapter1computers2-160923133049.pdfchapter1computers2-160923133049.pdf
chapter1computers2-160923133049.pdfjhoncarlvaldez
 
Microsoft Word 2010
Microsoft Word 2010Microsoft Word 2010
Microsoft Word 2010home
 
Introduction to-word-2016
Introduction to-word-2016Introduction to-word-2016
Introduction to-word-2016Damilola Mosaku
 
Lecture4 1
Lecture4 1Lecture4 1
Lecture4 1sajib333
 
Lesson 1
Lesson 1Lesson 1
Lesson 1grechie
 
INFORMATION TECHNOLOGY (ICT Skills ).pptx
INFORMATION TECHNOLOGY (ICT Skills ).pptxINFORMATION TECHNOLOGY (ICT Skills ).pptx
INFORMATION TECHNOLOGY (ICT Skills ).pptxArshveerSinghDhillon
 
Microsoft Office Specialization.pptx
Microsoft Office Specialization.pptxMicrosoft Office Specialization.pptx
Microsoft Office Specialization.pptxDarylCornelos
 
Microsoft word features
Microsoft word featuresMicrosoft word features
Microsoft word featuresSaira Randhawa
 
Microsoft office word 2003
Microsoft office word 2003Microsoft office word 2003
Microsoft office word 2003sasika fernando
 
Word 2007 intro
Word 2007 introWord 2007 intro
Word 2007 introedshee
 

Similaire à Microsoft word tutorials COMPLETE by Gulshan K Maheshwari(QAU) (20)

opc Info sheet 3 updated word.ppt (2).pptx
opc Info sheet 3 updated word.ppt (2).pptxopc Info sheet 3 updated word.ppt (2).pptx
opc Info sheet 3 updated word.ppt (2).pptx
 
MS Word Intermediate Training
MS Word Intermediate TrainingMS Word Intermediate Training
MS Word Intermediate Training
 
Word 2016
Word 2016Word 2016
Word 2016
 
Microsoft word 2007 part 1
Microsoft word 2007 part 1Microsoft word 2007 part 1
Microsoft word 2007 part 1
 
chapter1computers2-160923133049.pdf
chapter1computers2-160923133049.pdfchapter1computers2-160923133049.pdf
chapter1computers2-160923133049.pdf
 
Microsoft Word 2010
Microsoft Word 2010Microsoft Word 2010
Microsoft Word 2010
 
Introduction to-word-2016
Introduction to-word-2016Introduction to-word-2016
Introduction to-word-2016
 
Lecture4 1
Lecture4 1Lecture4 1
Lecture4 1
 
WORD LESSON (1).pptx
WORD LESSON (1).pptxWORD LESSON (1).pptx
WORD LESSON (1).pptx
 
Lesson 1
Lesson 1Lesson 1
Lesson 1
 
Ms word
Ms wordMs word
Ms word
 
INFORMATION TECHNOLOGY (ICT Skills ).pptx
INFORMATION TECHNOLOGY (ICT Skills ).pptxINFORMATION TECHNOLOGY (ICT Skills ).pptx
INFORMATION TECHNOLOGY (ICT Skills ).pptx
 
Microsoft Office Specialization.pptx
Microsoft Office Specialization.pptxMicrosoft Office Specialization.pptx
Microsoft Office Specialization.pptx
 
Microsoft word features
Microsoft word featuresMicrosoft word features
Microsoft word features
 
Unit4
Unit4Unit4
Unit4
 
Word Processor
Word ProcessorWord Processor
Word Processor
 
Microsoft Word PPT.pdf
Microsoft Word PPT.pdfMicrosoft Word PPT.pdf
Microsoft Word PPT.pdf
 
Ms word module 1
Ms word module 1Ms word module 1
Ms word module 1
 
Microsoft office word 2003
Microsoft office word 2003Microsoft office word 2003
Microsoft office word 2003
 
Word 2007 intro
Word 2007 introWord 2007 intro
Word 2007 intro
 

Plus de GulshanKumar368

Search engines by Gulshan K Maheshwari(QAU)
Search engines by Gulshan  K Maheshwari(QAU)Search engines by Gulshan  K Maheshwari(QAU)
Search engines by Gulshan K Maheshwari(QAU)GulshanKumar368
 
Power point by Gulshan K Maheshwari(QAU)
Power point by Gulshan  K Maheshwari(QAU)Power point by Gulshan  K Maheshwari(QAU)
Power point by Gulshan K Maheshwari(QAU)GulshanKumar368
 
Osi week10(1) [autosaved] by Gulshan K Maheshwari(QAU)
Osi week10(1) [autosaved] by Gulshan  K Maheshwari(QAU)Osi week10(1) [autosaved] by Gulshan  K Maheshwari(QAU)
Osi week10(1) [autosaved] by Gulshan K Maheshwari(QAU)GulshanKumar368
 
Ms excel shortcut keys complete by Gulshan K Maheshwari(QAU)
Ms excel shortcut keys complete by Gulshan  K Maheshwari(QAU)Ms excel shortcut keys complete by Gulshan  K Maheshwari(QAU)
Ms excel shortcut keys complete by Gulshan K Maheshwari(QAU)GulshanKumar368
 
Internet and web by Gulshan K Maheshwari(QAU)
Internet and web by Gulshan  K Maheshwari(QAU)Internet and web by Gulshan  K Maheshwari(QAU)
Internet and web by Gulshan K Maheshwari(QAU)GulshanKumar368
 
(computer Networks it) by gulshan k maheshwari qau
(computer Networks it) by gulshan k maheshwari qau(computer Networks it) by gulshan k maheshwari qau
(computer Networks it) by gulshan k maheshwari qauGulshanKumar368
 
"History Of Computer" By Gulshan K Maheshwari .qau
"History Of Computer" By Gulshan K Maheshwari .qau"History Of Computer" By Gulshan K Maheshwari .qau
"History Of Computer" By Gulshan K Maheshwari .qauGulshanKumar368
 

Plus de GulshanKumar368 (8)

Search engines by Gulshan K Maheshwari(QAU)
Search engines by Gulshan  K Maheshwari(QAU)Search engines by Gulshan  K Maheshwari(QAU)
Search engines by Gulshan K Maheshwari(QAU)
 
Power point by Gulshan K Maheshwari(QAU)
Power point by Gulshan  K Maheshwari(QAU)Power point by Gulshan  K Maheshwari(QAU)
Power point by Gulshan K Maheshwari(QAU)
 
Osi week10(1) [autosaved] by Gulshan K Maheshwari(QAU)
Osi week10(1) [autosaved] by Gulshan  K Maheshwari(QAU)Osi week10(1) [autosaved] by Gulshan  K Maheshwari(QAU)
Osi week10(1) [autosaved] by Gulshan K Maheshwari(QAU)
 
Ms excel shortcut keys complete by Gulshan K Maheshwari(QAU)
Ms excel shortcut keys complete by Gulshan  K Maheshwari(QAU)Ms excel shortcut keys complete by Gulshan  K Maheshwari(QAU)
Ms excel shortcut keys complete by Gulshan K Maheshwari(QAU)
 
Internet and web by Gulshan K Maheshwari(QAU)
Internet and web by Gulshan  K Maheshwari(QAU)Internet and web by Gulshan  K Maheshwari(QAU)
Internet and web by Gulshan K Maheshwari(QAU)
 
Html full
Html fullHtml full
Html full
 
(computer Networks it) by gulshan k maheshwari qau
(computer Networks it) by gulshan k maheshwari qau(computer Networks it) by gulshan k maheshwari qau
(computer Networks it) by gulshan k maheshwari qau
 
"History Of Computer" By Gulshan K Maheshwari .qau
"History Of Computer" By Gulshan K Maheshwari .qau"History Of Computer" By Gulshan K Maheshwari .qau
"History Of Computer" By Gulshan K Maheshwari .qau
 

Dernier

Explore beautiful and ugly buildings. Mathematics helps us create beautiful d...
Explore beautiful and ugly buildings. Mathematics helps us create beautiful d...Explore beautiful and ugly buildings. Mathematics helps us create beautiful d...
Explore beautiful and ugly buildings. Mathematics helps us create beautiful d...christianmathematics
 
1029-Danh muc Sach Giao Khoa khoi 6.pdf
1029-Danh muc Sach Giao Khoa khoi  6.pdf1029-Danh muc Sach Giao Khoa khoi  6.pdf
1029-Danh muc Sach Giao Khoa khoi 6.pdfQucHHunhnh
 
Nutritional Needs Presentation - HLTH 104
Nutritional Needs Presentation - HLTH 104Nutritional Needs Presentation - HLTH 104
Nutritional Needs Presentation - HLTH 104misteraugie
 
Unit-IV- Pharma. Marketing Channels.pptx
Unit-IV- Pharma. Marketing Channels.pptxUnit-IV- Pharma. Marketing Channels.pptx
Unit-IV- Pharma. Marketing Channels.pptxVishalSingh1417
 
fourth grading exam for kindergarten in writing
fourth grading exam for kindergarten in writingfourth grading exam for kindergarten in writing
fourth grading exam for kindergarten in writingTeacherCyreneCayanan
 
Russian Escort Service in Delhi 11k Hotel Foreigner Russian Call Girls in Delhi
Russian Escort Service in Delhi 11k Hotel Foreigner Russian Call Girls in DelhiRussian Escort Service in Delhi 11k Hotel Foreigner Russian Call Girls in Delhi
Russian Escort Service in Delhi 11k Hotel Foreigner Russian Call Girls in Delhikauryashika82
 
Arihant handbook biology for class 11 .pdf
Arihant handbook biology for class 11 .pdfArihant handbook biology for class 11 .pdf
Arihant handbook biology for class 11 .pdfchloefrazer622
 
APM Welcome, APM North West Network Conference, Synergies Across Sectors
APM Welcome, APM North West Network Conference, Synergies Across SectorsAPM Welcome, APM North West Network Conference, Synergies Across Sectors
APM Welcome, APM North West Network Conference, Synergies Across SectorsAssociation for Project Management
 
Student login on Anyboli platform.helpin
Student login on Anyboli platform.helpinStudent login on Anyboli platform.helpin
Student login on Anyboli platform.helpinRaunakKeshri1
 
The basics of sentences session 2pptx copy.pptx
The basics of sentences session 2pptx copy.pptxThe basics of sentences session 2pptx copy.pptx
The basics of sentences session 2pptx copy.pptxheathfieldcps1
 
Holdier Curriculum Vitae (April 2024).pdf
Holdier Curriculum Vitae (April 2024).pdfHoldier Curriculum Vitae (April 2024).pdf
Holdier Curriculum Vitae (April 2024).pdfagholdier
 
Class 11th Physics NEET formula sheet pdf
Class 11th Physics NEET formula sheet pdfClass 11th Physics NEET formula sheet pdf
Class 11th Physics NEET formula sheet pdfAyushMahapatra5
 
microwave assisted reaction. General introduction
microwave assisted reaction. General introductionmicrowave assisted reaction. General introduction
microwave assisted reaction. General introductionMaksud Ahmed
 
Sports & Fitness Value Added Course FY..
Sports & Fitness Value Added Course FY..Sports & Fitness Value Added Course FY..
Sports & Fitness Value Added Course FY..Disha Kariya
 
General AI for Medical Educators April 2024
General AI for Medical Educators April 2024General AI for Medical Educators April 2024
General AI for Medical Educators April 2024Janet Corral
 
Web & Social Media Analytics Previous Year Question Paper.pdf
Web & Social Media Analytics Previous Year Question Paper.pdfWeb & Social Media Analytics Previous Year Question Paper.pdf
Web & Social Media Analytics Previous Year Question Paper.pdfJayanti Pande
 
The Most Excellent Way | 1 Corinthians 13
The Most Excellent Way | 1 Corinthians 13The Most Excellent Way | 1 Corinthians 13
The Most Excellent Way | 1 Corinthians 13Steve Thomason
 
Paris 2024 Olympic Geographies - an activity
Paris 2024 Olympic Geographies - an activityParis 2024 Olympic Geographies - an activity
Paris 2024 Olympic Geographies - an activityGeoBlogs
 

Dernier (20)

Mattingly "AI & Prompt Design: Structured Data, Assistants, & RAG"
Mattingly "AI & Prompt Design: Structured Data, Assistants, & RAG"Mattingly "AI & Prompt Design: Structured Data, Assistants, & RAG"
Mattingly "AI & Prompt Design: Structured Data, Assistants, & RAG"
 
Explore beautiful and ugly buildings. Mathematics helps us create beautiful d...
Explore beautiful and ugly buildings. Mathematics helps us create beautiful d...Explore beautiful and ugly buildings. Mathematics helps us create beautiful d...
Explore beautiful and ugly buildings. Mathematics helps us create beautiful d...
 
1029-Danh muc Sach Giao Khoa khoi 6.pdf
1029-Danh muc Sach Giao Khoa khoi  6.pdf1029-Danh muc Sach Giao Khoa khoi  6.pdf
1029-Danh muc Sach Giao Khoa khoi 6.pdf
 
Nutritional Needs Presentation - HLTH 104
Nutritional Needs Presentation - HLTH 104Nutritional Needs Presentation - HLTH 104
Nutritional Needs Presentation - HLTH 104
 
Unit-IV- Pharma. Marketing Channels.pptx
Unit-IV- Pharma. Marketing Channels.pptxUnit-IV- Pharma. Marketing Channels.pptx
Unit-IV- Pharma. Marketing Channels.pptx
 
fourth grading exam for kindergarten in writing
fourth grading exam for kindergarten in writingfourth grading exam for kindergarten in writing
fourth grading exam for kindergarten in writing
 
Russian Escort Service in Delhi 11k Hotel Foreigner Russian Call Girls in Delhi
Russian Escort Service in Delhi 11k Hotel Foreigner Russian Call Girls in DelhiRussian Escort Service in Delhi 11k Hotel Foreigner Russian Call Girls in Delhi
Russian Escort Service in Delhi 11k Hotel Foreigner Russian Call Girls in Delhi
 
Arihant handbook biology for class 11 .pdf
Arihant handbook biology for class 11 .pdfArihant handbook biology for class 11 .pdf
Arihant handbook biology for class 11 .pdf
 
Código Creativo y Arte de Software | Unidad 1
Código Creativo y Arte de Software | Unidad 1Código Creativo y Arte de Software | Unidad 1
Código Creativo y Arte de Software | Unidad 1
 
APM Welcome, APM North West Network Conference, Synergies Across Sectors
APM Welcome, APM North West Network Conference, Synergies Across SectorsAPM Welcome, APM North West Network Conference, Synergies Across Sectors
APM Welcome, APM North West Network Conference, Synergies Across Sectors
 
Student login on Anyboli platform.helpin
Student login on Anyboli platform.helpinStudent login on Anyboli platform.helpin
Student login on Anyboli platform.helpin
 
The basics of sentences session 2pptx copy.pptx
The basics of sentences session 2pptx copy.pptxThe basics of sentences session 2pptx copy.pptx
The basics of sentences session 2pptx copy.pptx
 
Holdier Curriculum Vitae (April 2024).pdf
Holdier Curriculum Vitae (April 2024).pdfHoldier Curriculum Vitae (April 2024).pdf
Holdier Curriculum Vitae (April 2024).pdf
 
Class 11th Physics NEET formula sheet pdf
Class 11th Physics NEET formula sheet pdfClass 11th Physics NEET formula sheet pdf
Class 11th Physics NEET formula sheet pdf
 
microwave assisted reaction. General introduction
microwave assisted reaction. General introductionmicrowave assisted reaction. General introduction
microwave assisted reaction. General introduction
 
Sports & Fitness Value Added Course FY..
Sports & Fitness Value Added Course FY..Sports & Fitness Value Added Course FY..
Sports & Fitness Value Added Course FY..
 
General AI for Medical Educators April 2024
General AI for Medical Educators April 2024General AI for Medical Educators April 2024
General AI for Medical Educators April 2024
 
Web & Social Media Analytics Previous Year Question Paper.pdf
Web & Social Media Analytics Previous Year Question Paper.pdfWeb & Social Media Analytics Previous Year Question Paper.pdf
Web & Social Media Analytics Previous Year Question Paper.pdf
 
The Most Excellent Way | 1 Corinthians 13
The Most Excellent Way | 1 Corinthians 13The Most Excellent Way | 1 Corinthians 13
The Most Excellent Way | 1 Corinthians 13
 
Paris 2024 Olympic Geographies - an activity
Paris 2024 Olympic Geographies - an activityParis 2024 Olympic Geographies - an activity
Paris 2024 Olympic Geographies - an activity
 

Microsoft word tutorials COMPLETE by Gulshan K Maheshwari(QAU)

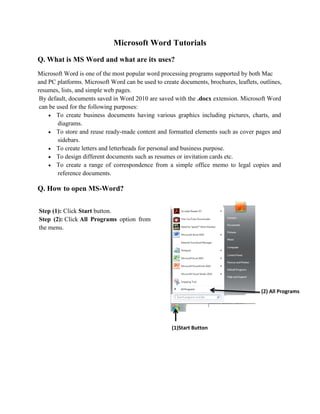
  • 1. Microsoft Word Tutorials Q. What is MS Word and what are its uses? Microsoft Word is one of the most popular word processing programs supported by both Mac and PC platforms. Microsoft Word can be used to create documents, brochures, leaflets, outlines, resumes, lists, and simple web pages. By default, documents saved in Word 2010 are saved with the .docx extension. Microsoft Word can be used for the following purposes:  To create business documents having various graphics including pictures, charts, and diagrams.  To store and reuse ready-made content and formatted elements such as cover pages and sidebars.  To create letters and letterheads for personal and business purpose.  To design different documents such as resumes or invitation cards etc.  To create a range of correspondence from a simple office memo to legal copies and reference documents. Q. How to open MS-Word? Step (1): Click Start button. Step (2): Click All Programs option from the menu. (1)Start Button (2) All Programs
  • 2. Step (3): Search for Microsoft Office from the sub menu and click it. Step (4): Search for Microsoft Word 2010 from the submenu and click it. This will launch Microsoft Word 2010 application and you will see the following word window. Q. Exploration of Window (3) Microsoft Office (4) Microsoft Word 2010
  • 3. FileTab: The File tab replaces the Office button from Word 2007. You can click it to check Backstage view, which is the place to come when you need to open or save files, create new documents, print a document, and do other file-related operations. QuickAccessToolbar: This you will find just above the File tab and its purpose is to provide a convenient resting place for the Word most frequently used commands. You can customize this toolbar based on your comfort. Ribbon:
  • 4. Ribbon contains commands organized in three components:  Tabs: They appear across the top of the Ribbon and contain groups of related commands. Home, Insert, Page Layout are example of ribbon tabs.  Groups: They organize related commands; each group name appears below the group on the Ribbon. For example group of commands related to fonts or group of commands related to alignment etc.  Commands: Commands appear within each group as mentioned above. Titlebar: This lies in the middle and at the top or the window. Title bar shows the program and document titles. Rulers: Word has two rulers - a horizontal ruler and a vertical ruler. The horizontal ruler appears just beneath the Ribbon and is used to set margins and tab stops. The vertical ruler appears on the left edge of the Word window and is used to gauge the vertical position of elements on the page. Help: The Help Icon can be used to get word related help anytime you like. This provides nice tutorial on various subjects related to word. ZoomControl: Zoom control lets you zoom in for a closer look at your text. The zoom control consists of a slider that you can slide left or right to zoom in or out, . and + buttons you can click to increase or decrease the zoom factor. ViewButtons: The group of five buttons located to the left of the Zoom control, near the bottom of the screen, lets you switch among Word's various document views.  Print Layout view: This displays pages exactly as they will appear when printed.  Full Screen Reading view: This gives a full screen look of the document.  Web Layout view: This shows how a document appears when viewed by a Web browser, such as Internet Explorer.  Outline view: This lets you work with outlines established using Word.  Draft view: This formats text as it appears on the printed page with a few exceptions. For example, headers and footers aren't shown. Most people prefer this mode. DocumentArea:
  • 5. The area, where you type. The flashing vertical bar is called the insertion point and it represents the location where text will appear when you type. StatusBar: This displays document information as well as the insertion point location. From left to right, this bar contains the total number of pages and words in the document, language etc. You can configure the status bar by right-clicking anywhere on it and by selecting or deselecting options from the provided list. DialogBoxLauncher: This appears as very small arrow in the lower-right corner of many groups on the Ribbon. Clicking this button opens a dialog box or task pane that provides more options about the group. Q. What is backstage view? Click the File tab, located in the upper-left corner of the Word Ribbon. Backstage view shows three columns when you select most of the available options in the first column. File Tab
  • 6. First column of the backstage view will have following options: Option Description Save If an existing document is opened, it would be saved as is, otherwise it will display a dialogue box asking for document name. Save As A dialogue box will be displayed asking for document name and document type, by default it will save in word 2010 format with extension .docx Open This option will be used to open an existing word document. Close This option will be used to close an opened document. Info This option will display information about the opened document. Recent This option will list down all the recently opened documents New This option will be used to open a new document. Print This option will be used to print an opened document. Save & Send This option will save an opened document and will display options to send the document using email etc. Help You can use this option to get required help about word 2010. Options Use this option to set various option related to word 2010. Exit Use this option to close the document and exit.
  • 7. ExitBackstageView: It is simple to exit from Backstage View. Either click on File tab or press Esc button on the keyboard to go back in word working mode. Q. How to enter the text? Document area is the area where you type your text. The flashing vertical bar is called the insertion point and it represents the location where text will appear when you type.
  • 8. Q. How to move in document using mouse, keyboard, scroll bars and commands? You can easily move the insertion point by clicking in your text anywhere on the screen. Sometime if document is big then you cannot see a place where you want to move. In such situation you would have to use the scroll bars, as shown in the following screen shot: You can scroll your document by rolling your mouse wheel, which is equivalent to clicking the up-arrow or down-arrow buttons in the scroll bar. MovingwithScrollBars: As shown in the above screen capture, there are two scroll bars: one for moving vertically within the document, and one for moving horizontally. Using the vertical scroll bar, you may:  Move upward by one line by clicking the upward-pointing scroll arrow.  Move downward by one line by clicking the downward-pointing scroll arrow.  Move one next page, using next page button (footnote).  Move one previous page, using previous page button (footnote).  Use Browse Object button to move through the document, going from one chosen object to the next. MovingwithKeyboard:
  • 9. The following keyboard commands, used for moving around your document, also move the insertion point: Keystroke Where the Insertion Point Moves Forward one character Back one character Up one line Down one line PageUp To the previous screen PageDown To the next screen Home To the beginning of the current line End To the end of the current line You can move word by word or paragraph by paragraph. You would have to hold down the Ctrl key while pressing an arrow key, which moves the insertion point as described here: Key Combination Where the Insertion Point Moves Ctrl + To the next word Ctrl + To the previous word Ctrl + To the start of the previous paragraph Ctrl + To the start of the next paragraph Ctrl + PageUp To the previous browse object Ctrl + PageDown To the next browse object Ctrl + Home To the beginning of the document Ctrl + End To the end of the document Shift + F5 To the last place you changed in your document.
  • 10. MovingwithGoToCommand: Press F5 key to use Go To command, which will display a dialogue box where you will have various options to reach to a particular page. Normally we use page number or line number or section number to go directly on a particular page and finally press Go To button. Q. How to save a document? Step (1): Click the File tab and select Save As option. Step (2): Select a folder where you would like to save the document, Enter file name which you want to give to your document and Select a Save as type, by default it is .docx format.
  • 11. Step (3): Finally, click on Save button and your document will be saved with the entered name in the selected folder. SavingNewChanges: If you want to save this document with the same name then you can use either of the following simple options:  Just press Ctrl + S keys to save the changes.  Or click on the floppy icon available at the top left corner and just above the File tab. This option will also save the changes.  Or you can also use third method to save the changes, which is Save option available just above the Save As option as shown in the above screen capture.
  • 12. Q. How to open a new or blank document? Step (1): Click the File tab and select New option. Step (2): When you select New option from the first column, it will display a list of templates in second column. Just double click on Blank document, which is very first option in the template list. We will discuss about rest of the templates available in the list in coming chapters. Now you should have your blank document as shown below ready to start typing your text. Short Cut key: Ctrl+N
  • 13. Q. How to open an existing document? Step (1): Click the File tab and select Open option. Step (2): This will display following file Open dialog box, which lets you navigate through different file folders and also lets you select a file which you want to open.
  • 14. Step (3): Finally locate and select a file which you want to open and click on Open button to open the file. (You will have different options to open the file, but simply use Open option.) Q. How to close the document? Step (1): Click the File tab and select Close option.
  • 15. Step (2): When you select Close option and if document is not saved before closing, it will display following Warning box asking whether the document should be saved or not. Step (3): Click Save, otherwise click Don't Save button. To go back to the document click Cancel button. This will close the document and you see a blank Word window as shown below: Q. How to select text in document? The most common method of selecting a text is to click and drag the mouse over the text you want to select. Following table lists down few other simple methods which will help you in selecting text in different scenarios:
  • 16. SN Component & Selection Method 1 Selecting text between two points Click at the start of the block of text, hold down Shift, and click at the end of the block. 2 Selecting a single word Simply double click anywhere on the word you want to select. 3 Selecting a paragraph Simply triple click anywhere on the paragraph you want to select. 4 Selecting a sentence Hold down Ctrl key and click anywhere in the sentence you want to select. 5 Selecting a column of text Hold down Alt, click and hold the mouse button, and drag over the column you want to select. Note that only one part of the document can be in selected state. If you have one portion of the document in selected state and as soon as you try to select any other part of the document, previous part will automatically be de-selected. UsingtheSelectionBar: The black shaded area in the following screen shot is called selection bar. When you bring your cursor in this area, it turns into a rightward-pointing arrow.
  • 17. You can use selection bar to select various components of a document as described in the following table: SN Component & Selection Method 1 Selecting a line Bring your mouse in selection bar area and click in front of the line you want to select. 2 Selecting a paragraph Bring your mouse in selection bar area and double click in front of the paragraph you want to select. 3 Selecting the document Bring your mouse in selection bar area and triple click. Usingthekeyboard: Keyboard provides very good support when you want to select various components of the document as described in the following table: SN Key & Selection Method Selecting Text 1 Ctrl + A Press Ctrl + A keys to select the entire document. 2 Shift Keep pressing Sift key and use any of the arrow keys to select the text. 3 F8 Press F8 and then use any of the arrows keys to select the text. 4 Ctrl + Shift + F8 Press Ctrl + Shift + F8 and then use any of the arrows keys to select column of the text. Q. How to delete text from the document? UsingBackspace&DeleteKeys: The most basic deletion technique is to delete characters one at a time by pressing either backspace or delete keys. Following table describes how you can delete single character or whole word by using either of these two keys:
  • 18. SN Keys & Deletion Methods 1 Backspace Keep the insertion point just after the character you want to delete and press backspace key. Word deletes the character immediately to the left of the insertion point. 2 Ctrl + Backspace Keep the insertion point just after the word you want to delete and press Ctrl + Backspace key. Word deletes the whole word immediately to the left of the insertion point. 3 Delete Keep the insertion point just before the character you want to delete and press delete key. Word deletes the character immediately to the right of the insertion point. 4 Ctrl + Delete Keep the insertion point just before the word you want to delete and press Ctrl + Delete key. Word deletes the word immediately to the right of the insertion point. UsingSelectionMethod: You have learnt how to select various parts of a word document. You can make use of that learning to delete those selected parts as described in the following table: SN Component Selection & Delete Methods 1 Deleting text between two points Click at the start of the block of text, hold down Shift, and click at the end of the block to select the text and finally press either backspace or delete key. 2 Deleting a single word Simply double click anywhere on the word you want to delete and finally press either backspace or delete key. 3 Deleting a paragraph Simply triple click anywhere on the paragraph you want to delete and finally press either backspace or delete key. 4 Deleting a sentence Hold down Ctrl key and click anywhere in the sentence you want to delete and
  • 19. finally press either backspace or delete key. 5 Deleting a column of text Hold down Alt, click and hold the mouse button, and drag over the column you want to delete and finally press either backspace or delete key. 6 Deleting a line Bring your mouse in selection bar area and click in front of the line you want to delete and finally press either backspace or delete key. 7 Deleting entire document content Press Ctrl + A keys to delete the entire document and finally press either backspace or delete key. Q.Howtomovetextwith-insameanddifferentdocument? Movewith-insamedocument: Step (1): Select a portion of the text using any of the text selection methods. Step (2): Now take your mouse pointer over the selected text and hold mouse left button and keep holding it while moving around the document.
  • 20. Step (3): Take your mouse pointer at the place where you want to move selected text and release the mouse button. You will see that selected text is moved to the desired location. Movewith-indifferentdocuments: Step (1): Keep both the documents opened and to ensure that both documents are visible, click the Arrange All button on the View tab on the Ribbon. This will display both the documents as shown below:
  • 21. Step (2): Now, select a portion of the text using any of the text selection methods. Step (3): Take your mouse pointer over the selected text and hold mouse left button and keep holding it while moving around the document. Step (4): Take your mouse pointer at the place in second document where you want to move selected text and release the mouse button. You will see that selected text is moved to the desired location in second document.
  • 22. Note: In case you have more than two documents, you can use Alt + Tab keys to switch through the different documents and select the desired destination document. Q. How to Copy and Paste the text in document? Step (1): Select a portion of the text using any of the text selection methods.
  • 23. Step (2): At second step, you have various options available to copy the selected text in clipboard. Just use any one of them which you like most:  Using Mouse Right Click: If right click on the selected text, it will display copy option, just click this option to copy the selected content in clipboard.  Using Ribbon Copy Button: After selecting a text, you can use copy button available at the ribbon to copy the selected content in clipboard.  Using Ctrl+C Keys: After selecting a text, just press Ctrl+C keys to copy the selected content in clipboard.
  • 24. Step (3): Finally click at the place where you want to copy selected text and use either of these two simple options:  Using Ribbon Paste Button: Just click paste button available at the ribbon to paste the copied content at the desired location.  Using Ctrl + v Keys: This is simplest way of pasting the content. Just press Ctrl + v keys to paste the content at the new location. Q. How to move text in document? Cut&PasteOperation: Step (1): Select a portion of the text using any of the text selection methods.
  • 25. Step (2): At second step, you have various options available to cut the selected text and put it in clipboard. Just use any one of them which you like most:  Using Mouse Right Click: If right click on the selected text, it will display cut option, just click this option to cut the selected content and keep it in clipboard.  Using Ribbon Cut Button: After selecting a text, you can use cut button available at the ribbon to cut the selected content and keep it in clipboard.  Using Ctrl + x Keys: After selecting a text, just press Ctrl + x keys to cut the selected content and keep it in clipboard.
  • 26. Step (3): Finally click at the place where you want to move the selected text and use either of these two simple options:  Using Ribbon Paste Button: Just click paste button available at the ribbon to paste the content at the new location.  Using Ctrl + v Keys: This is simplest way of pasting the content. Just press Ctrl + v keys to paste the content at the new location.
  • 27. Q. How to Find the text in document? Step (1): Let us have a sample text available in our word document. Just type =rand() and press enter to have the following screen:
  • 28. Step (2): Click the Find option in the Editing group on the Home tab or press Ctrl + F to launch the Navigation pane shown in step (2):
  • 29. Step (3): Enter a word which you want to search in the search box, as soon as you finish typing, Word searches for the text you entered and displays the results in the navigation pane and highlight the word in the document as well as follows: Step (4): You can click clear button (X) to clear the search and results and perform another search. Step (5): You can use further options while searching for a word. Click option button to display options menu and then click Options option which will display a list of options. You can select options like match case to perform case sensitive search.
  • 30. Step (6): Finally if you are done with searching operation, you can click close button (X) to close the Navigation Pane. Q. How to Replace the text in document? Step (1): Click the Replace option in the Editing group on the Home tab or press Ctrl + H to launch the Find and Replace dialog box shown in step (2):
  • 31. Step (2): Type a word which you want to search and a word which would like to replace with in the Find and Replace dialog box as follows: Step (3): Click Replace button available on Find and Replace dialog box and you will see first occurrence of the searched word would be replaced with the replace with word. Clicking again on Replace button would replace next occurrence of the searched word. If you will click Replace All button then it would replace all the found words in one go. You can also use Find Next button just to search the next occurrence and later you can use Replace button to replace the found word. Step (4): You can use More >> button available on the dialog box to use more options and to make your search more specific like case sensitive search or searching for whole word only etc. Step (5): Finally if you are done with finding and replacing operation, you can click Close (X) or Cancel button of the dialog box to close the box.
  • 32. Q. How to check Spelling and Grammar in document? Step (1): Click the Review tab and then click Spelling & Grammar button. Step (2): A Spelling and Grammar dialog box will appear and will display wrong spellings or grammar and correct suggestions as shown below:
  • 33. Now you have following options to fix the spelling mistake:  Ignore: If you are willing to ignore a word then click this button and word ignores the word throughout the document.  Ignore All: Like Ignore, but ignores all occurrences of the same misspelling, not just this one.  Add to Dictionary: Choose Add to Dictionary to add the word to the Word spelling dictionary.  Change: This will change the wrong word using the suggested correct word.  Change All: Like Change, but change all occurrences of the same misspelling, not just this one.  AutoCorrect: If you select a suggestion, Word creates an AutoCorrect entry that automatically corrects this spelling error from now on. Following are the different options in case you have grammatical mistake:  Next Sentence: You can click Next Sentence to direct the grammar checker to skip ahead to the next sentence.  Explain: The grammar checker displays a description of the rule that caused the sentence to be flagged as a possible error.  Options: This will open the Word Options dialog box to allow you to change the behaviour of the grammar checker or spelling options.  Undo: This will undo the last grammar changed.
  • 34. Step (3): Select one of the given suggestions you want to use and click Change option to fix the spelling or grammar mistake and repeat the step to fix all the spelling or grammar mistake. Step (4): Word displays a dialog box when it finishes checking for spelling and grammar mistakes, finally Click OK. Check Spelling and Grammar using Right Click: If you will click a right mouse button over a misspelled word then it would show you correct suggestions and above mentioned options to fix the spelling or grammar mistake. Try it yourself.
  • 35. Q. How to zoom-in and zoom-out? Step (1): Click the view tab and then click Zoom button which is shown below. Step (2): When you click Zoom button, a Zoom dialog box will appear as shown below and will display zoom options box to select a value to reduce or increase the size of the document on-screen. By default it will be 100%, you can select 200% to increase the size of the font or 75% to reduce the size of the font. You can set view at custom percent as well by entering a value in the given box. You can click the Many pages down arrow and select to display multiple pages.
  • 36. Step (3): Once you are done with selecting an option, click OK to apply the changes on the document. Step (4): Try different options available, for example Page Width and Text Width. Zoom-in & Zoom-out using (+) and (-) Buttons: Following screen capture shows two buttons Zoom-out which is (-) button and Zoom-in which is (+) button.
  • 37. Step (1): Click Zoom-out button, you will find that your document size will decrease by 10% each time you click the button. Similar way if you click on Zoom-in button your document size will increase by 10% each time you click the button. Q. How to use Undo & Repeat operations?
  • 38. Step (1): Let us type some text in a blank document as I have typed above. Now click Repeat (Redo) button and you will see that word would repeat the same operation for you.
  • 39. Step (2): Now to examine undo operation, let us delete last word operation character by character so that you have following text remaining in the line. Step (3): Let us try to click Undo button one by one. You will see that work would recover all the deleted characters one by one after performing few undo operations. Shortcuts to use Undo & Repeat operations: Undo: Ctrl+Z; Redo: Ctrl+Y
  • 40. Formatting of text: Q. How to change font type and size? Clear Formatting Options: Step (1): Select the text that you want to reset. Step (2): Click Clear Formatting button in the Home tab Font group, or simply use Ctrl + SPACEBAR.
  • 41. Q. How to do Bold the text in document? Step (1): Select the text you want to bold. Step (2): Click Font Bold [ B ] button in the Home tab Font group, or simply use Ctrl + B keys to make selected text bold. Q. How to do Italic the text in document? Step (1): Select the text you want in italic. Step (2): Click Font Italic [ I ] button in the Home tab Font group, or simply use Ctrl + I keys to convert text in italic font.
  • 42. Q. How to do underline the text in document? Step (1): Select the text that you want to underline. Step (2): Click Font Underline [ U ] button in the Home tab Font group, or simply use Ctrl + U keys to put an underline under the text. Q. How to do strikethrough the text in document? Step (1): Select the text that you want to Strikethrough. Step (2): Click Font Strikethrough [ abc ] button in the Home tab Font group to put a line in the middle of the text which is called strikethrough the text.
  • 43. Q. How to change the font color of the text in document? Step (1): Select the text that you want to change. Step (2): Click the Font Color button triangle to display a list of colors. Try to move your mouse pointer over different colors and you will see text color will change automatically. You can select any of the colors available by simply clicking over it. If you click at the left portion of the Font Color button, then already selected color will be applied to the text, so you would have to click over small triangle to display a list of colors. If you do not find a color of your choice, you can use More Colors option to display color pallet box which allows you to select a color from range of millions of colors. Q. How to highlight the text with colors in document? Step (1): Select the text that you want to apply the change. Step (2): Click the Text Highlight Color button triangle to display a list of colors. You can select any of the colors available by simply clicking over it. If you click at the left portion of the Text Highlight Color button, then already selected color will be applied to the text.
  • 44. Q. How to apply text effect in document? Step (1): Select the text that you want to change. Step (2): Click the Text Effect button to display a list of effects including shadow, outline, glow, reflection etc. You can select any of the text effect available by simply clicking over it.
  • 45. Q. How to left align the text in document? Step (1): Click anywhere on the paragraph you want to align and click Align Text Left button available on Home tab or simply press Ctrl + L keys. Q. How to center align the text in document? Step (1): Click anywhere on the paragraph you want to align and click Center button available on Home tab or simply press Ctrl + E keys. Q. How to right align the text in the document?
  • 46. Step (1): Click anywhere on the paragraph you want to align and click Align Text Right button available on Home tab or simply press Ctrl + R keys. Q. How to justify aligned the text in the document? Step (1): Click anywhere on the paragraph you want to align and click Justify button available on Home tab or simply press Ctrl + J keys. Q. How to do left indent in document? Step (1): Click anywhere on the paragraph you want to indent left and click Increase Indent button available on Home tab or simply press Ctrl + M keys. You can click multiple times to create deeper indentation.
  • 47. Step (2): You can remove left indentation by clicking Decrease Indent button available on Home tab or simply press Ctrl + Shift+ M keys. Q. How to do right indent in document? Step (1): Click anywhere on the paragraph you want to indent right and click Increase Right Indent spinner available on Page Layout tab. You can click multiple the spinner times to create deeper indentation. You can use Left Indent spinners as well to set left indentation from the same place.
  • 48. Step (2): You can remove right indentation by clicking the Decrease Right Indent spinner in opposite direction. Q. How to do first line indentation in document? Step (1): Click anywhere on the paragraph you want to indent right and click the Paragraph Dialog Box Launcher available on Home tab. Step (2): Click Before Text spinner to set left indentation and select First Line Option to move the left side of the first line of a paragraph inward toward the center. You can control the movement by setting Indentation Unit. A preview box will give idea no the indentation status. Q. How to do hanging indentation in document? Step (1): Click anywhere on the paragraph you want to indent right and click the Paragraph Dialog Box Launcher available on Home tab. Step (2): Click Before Text spinner to set left indentation and select Hanging Option to move the left side of the first line of a paragraph leftward, away from the center. You can control the movement by setting Indentation Unit. A preview box will give idea no the indentation status.
  • 49. Q. How to create a list from existing text? Step (1): Select a list of text to which you want to assign bullets or numbers. Step (2): Click the Bullet Button triangle to display a list of bullets you want to assign to the list. You can select any of the bullet style available by simply clicking over it.
  • 50. Step (3): If you are willing to create a list with numbers then click the Numbering Button triangle instead of bullet button to display a list of numbers you want to assign to the list. You can select any of the numbering style available by simply clicking over it. Q. How to create a list as typing? Step (1): Type *, and then either press the SPACEBAR or press TAB key, and then type the rest of what you want in the first item of the bulleted list. Step (2): When you are done with typing, press Enter to add the item in the list automatically and go to add next item in the list. Step (3): Repeat Step 2 for each list item.
  • 51. You can create a numbered list as you type. Word will automatically format it according to your text. Following are the simple steps to create numbered list as you type. Step (1): Type 1, and then either press the SPACEBAR or press TAB key, and then type the rest of what you want in the first item of the numbered list. Step (2): When you are done with typing, press Enter to add the item in the list automatically and go to add next item in the list. Step (3): Repeat Step 2 for each list item.
  • 52. Q. How to set line spacing between lines? Step (1): Select the paragraph or paragraphs for which you want to define spacing. Step (2): Click the Line and Paragraph Spacing Button triangle to display a list of options to adjust space between the lines. You can select any of the option available by simply clicking over it.
  • 53. Spacing between Paragraphs: You can also set distance between two paragraphs. Following are the simple steps to set this distance. Step (1): Select the paragraph or paragraphs for which you want to define spacing and click the Paragraph Dialog Box Launcher available on Home tab. Step (2): Click Before spinner to increase or decrease the space before the selected paragraph. Similar way click After spinner to increase or decrease the space after the selected paragraph. Finally click OK button to apply the changes. Q. How to add border to the text? Step (1): Select the text or paragraph to which you want to add border. Step (2): Click the Border Button to display a list of options to put a border around the selected text or paragraph. You can select any of the option available by simply clicking over it.
  • 54. Step (3): Try to add different borders like left, right top or bottom by selecting different options from the border options. Step (4): To delete the existing border, simply select No Border option from the border options.
  • 55. Q. How to add border to the page? Step (1): Click the Border Button >> Border and Shading option available at the bottom of list of the options as shown in above screen capture. This will display a Border and Shading dialog box. This dialog box can be used to set borders and shading around a selected text or page borders. Step (2): Click Page Border tab which will display a list of border settings, styles and options whether this border should be applied to the whole document or just one page or first page. Step (3): You can use Preview section to disable or enable left, right, top or bottom borders of the page. Follow the given instruction in preview section itself. Step (4): You can customize your border by setting its color, width by using different art available under style section.
  • 56. You can have similar or even better borders as given below.
  • 57. Q. How to add shades to the text? Step (1): Click the Border Button >> Border and Shading option available at the bottom of list of the options as shown in above screen capture. This will display a Border and Shading dialog box. This dialog box can be used to set borders and shading around a selected text or page borders. Step (2): Click Shading tab which will display options to select fill, color and style and whether this border should be applied to Paragraph or Text. Step (3): You can use Preview section to have an idea about the expected result. Once you are done, click OK button to apply the result.
  • 58. Q. How to apply formatting multiple times? Step (1): If you are intended to apply formatting at multiple places, then you would have to double click Format Painter button while copying text format. Later on you just keep selecting text where you want to apply the text formatting. Step (2): When you are done with applying formatting at all the places, again click once at Format Painter to come out of format applying operation.
  • 59. Q. How to adjust margin? Step (1): Open the document whose margins you want to set. If you want the margins to apply only to a selected part of a document, select that part now. Step (2): Click the Page Layout tab, and click Margins button in the Page Setup group. This will display a list of options to be selected but you have to click Custom Margins option available at the bottom.
  • 60. Step (3): You will have to display a Page Dialog Box as shown below where you can set top, left, right and bottom margins under the Margins tab. Select Apply to: option to apply the margin on selected text or complete document. Step (4): Click OK button to apply the margins. Q. How to add header and footer in the document? Step (1): Click the Insert tab, and click either Header button or Footer button whatever you want to add first. Assume you are going to add Header, so when you click Header button it will display a list of built-in Headers from where you can choose any of the headers by simply clicking on it.
  • 61. Step (2): Once you select any of the headers, it will be applied to the document in editable mode and the text in your document will appear dimmed, Header and Footer buttons appear on the Ribbon and a Close Header and Footer button will also appear at the top-right corner.
  • 62. Step (3): Finally you can type your information whatever you want to have in your document header and once you are done, click Close Header and Footer to come out of header insertion mode. You will see final result as follows. You can follow a similar procedure to add footer in your document. Q. How to edit header and footer of the document? Step (1): Click the Insert tab, and click either Header button or Footer button whatever you want to edit. Assume you are going to edit Header, so when you click Header button it will display a list of options including Edit Header option.
  • 63. Step (2): Just click on it and word will display editable header for you as shown below. Step (3): Now you can edit your document header and once you are done, click Close Header and Footer to come out of header edit mode. You can follow a similar procedure to edit footer in your document.
  • 64. Q. How to add page number to the document? Step (1): Click the Insert tab, and click Page Number button available in header and footer section. This will display a list of options to display page number at the top, bottom, current position etc. Step (2): When you move your mouse pointer over the available options, it displays further styles of page numbers to be displayed. For example when I take mouse pointer at Bottom of Page option it displays following list of styles.
  • 65. Step (3): Finally select of the page number styles which you like most. I selected Accent Bar 1 style by clicking over it. After this step you will enter in Page Footer modification mode, so you would have to click Close Header and Footer button to come out of footer edit mode. Q. How to remove page number to the document? Step (1): Click the Insert tab, and click Page Number button available in header and footer section. This will display a list of options to display page number at the top, bottom, current position etc and at the bottom you will have Remove Page Numbers option. Just click this option and it will delete your all the page numbers set in your document.
  • 66. Q. How to add cover page of the document? Step (1): Click the Insert tab, and click Cover Page button available in the Pages group. This will display a list of Built-in Cover Pages as shown below. Step (2): Just click the cover page from the gallery that you want to add to your document. Selected cover page will be added as the first page of your document which can you modify as per your need. If you want to place cover page elsewhere except first page, right-click the cover page in the gallery and select the location you want from the menu that appears.
  • 67. Q. How to delete the cover page of the document? Step (1): Click the Insert tab, and click Cover Page button available in the Pages group. This will display a list of Built-in Cover Pages as shown below. There you will find an Remove Current Cover Page option available at the bottom of cover page gallery. Step (2): Just click Remove Current Cover Page option and your cover page will be deleted from your document.
  • 68. Q. How to change page orientation? Step (1): Open a word document for which you want to change the orientation. By default, orientation will be Portrait Orientation as shown below. Step (2): Click the Page Layout tab, and click Orientation button available in the Page Setup group. This will display an Option Menu having both the options (Portrait & Landscape) to be selected.
  • 69. Step (3): Click any of the options you want to set to orientation. Because my page is already in portrait orientation, so I will click Landscape option to change my orientation to landscape orientation. Q. How to change text to sentence case? Step (1): Select the text that you want to change. Step (2): Click the Change Case button and then select Sentence Case option to capitalize the first character of every selected sentence.
  • 70. Q. How to change text to lower case? Step (1): Select the text that you want to change. Step (2): Click the Change Case button and then select Lowercase option to display all selected words in lowercase.
  • 71. Q. How to change text to upper case? Step (1): Select the text that you want to change. Step (2): Click the Change Case button and then select UPPERCASE option to display all selected words in all caps. All characters of every selected word will be capitalized. Q. How to change text to capitalize? Step (1): Select the text that you want to change. Step (2): Click the Change Case button and then select Capitalize Each Word option to put a leading cap on each selected word.
  • 72. Q. How to change text to toggle case? Step (1): Select the text that you want to change. Step (2): Click the Change Case button and then select tOGGLE cASE option to change all lowercase words into uppercase and uppercase words into lowercase.