Python Notes for mca i year students osmania university.docx
RefWorks User Guide 2021 - 6 pages.pdf
1. Welcome to RefWorks!
This guide will provide you with helpful tips needed to navigate RefWorks. For a comprehensive guide refer to the
RefWorks User Guide.
CREATING YOUR ACCOUNT
To get started with your new RefWorks account, go to https://refworks.proquest.com Enter your institutional
email address and create a password.
NOTE: RefWorks supports Shibboleth and Open Athens, which allows you to use your institutional credentials
to sign into RefWorks.
Remote users accessing RefWorks from off-site or from a non-registered IP address, must either enter the
unique URL provided by the institutional admin, log in via the organization’s proxy server, or log in using other
institutional credentials (Athens, Shibboleth).
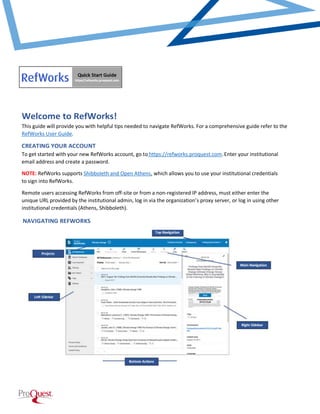
NAVIGATING REFWORKS
NAVIGATING REFWORKS
2. There are several ways to add references into Refworks.
Begin in the Main Navigation and click on +Add:
Upload a Document – these are documents from your own computer
files. Example: PDF, PPT, Word Doc. They can also be uploaded with drag
and drop anywhere on the All Documents page or Import a Reference
page.
Import a Reference – allows you to import reference files from other
reference managers, from legacy RefWorks and from other sources.
ADDING REFERENCES
Create New Reference – Search for a title or DOI, review the results and save the ones you choose, or manually
add all reference meta data. When selecting Create new reference a new pane will appear on the right.
You can search for a reference or create it yourself.
1. Enter a title, or as much of the title as you can.
2. When available, click on the lightning icon button in the Title field to have RefWorks match the title
with an item in the library. This button is also available after you enter a value in the DOI field, which
appears for most reference types.
3. RefWorks displays possible suggestions at the bottom of the pane. If you select one, RefWorks completes
the title and fills the fields with information from the library. You can later review or edit fields.
4. To keep the reference, click on Save. The reference will be added to your Last Imported Folder.
5. If no match is found, you can create the reference by typing in the metadata yourself and clicking on Save.
You can save references or articles, including full text (if available) from any website into RefWorks using the Save
to RefWorks plug-in; refer to the Tools section below.
You can also add references by searching in linked library catalogs and
publicly available databases. Search results can be imported into your
account with the click of a button.
1. Select the Search Databases tab from the left sidebar.
2. Open the dropdown and enter the name of the database you
wish to search or select it from the list of recently used
databases.
3. Enter the search term in the search box and click on the Search
icon
4. Select the relevant items and use one of the following options
to save the references:
A successful import will generate a message similar to the following:
To export references, navigate to the page or folder of the references you would like to export. Click on Share in
the Main Navigation, then Export references. Select the relevant options and click on Export.
a. Click on the Folder icon to import into a specific folder. Choose an existing folder or create a new folder.
b. Click on Import. The newly imported references are placed in the Last Imported folder and can be
assigned to folders by dragging and dropping or by using the Assign to Folder action in the Main Navigation.
3. ORGANIZING REFERENCES
RefWorks supports the full research process and provides a variety of options to
help you better organize references.
Left Sidebar:
All References – Contains all references in the project.
Search Databases – Used to search for items in external linked databases.
Last Imported – Displays references imported in the last 30 days.
Sharing – Enables you to view folders that were shared with you.
My Folders – Allows you to organize references into folders and subfolders. A
single reference can be in multiple folders.
Not inFolder – Displays references that have not yet been moved into a folder.
Tags – includes tags assigned to references that are imported and tags created
by you when adding references. A reference can have multiple tags.
Deleted – Contains all items that have been deleted.
To add a folder:
1. Click on +Add folder
2. Name your folder
3. Click on Save
To add a subfolder:
1. Click on the selected folder’s kabob icon (on the right)
2. Click on Add subfolder...
3. Follow prompts to name and save the subfolder.
You can sort folders alphabetically or drag and drop in your preferred order. You can toggle
between the two sorting options using the Sort option under My Folders. When choosing the
custom option, your latest custom sorting is restored.
References can also be organized into projects, which are separate reference
collections with unique folders, references, tags, etc. Most users will find they
can organize their references sufficiently by using folders. For some users,
especially those working on multiple research projects with different groups
of people, the ability to isolate references and folders within a Project is
needed. Your RefWorks account has a default project called Untitled Project.
You can change the name and create new projects in the Manage projects
page.
ORGANIZING REFERENCES IN FOLDERS
ORGANIZING REFERENCES IN PROJECTS
4. VIEWING REFERENECES
Sort by: Select how you want to display
references: by date, title, author or Ref ID.
RefWorks will remember your selected sorting
the next time you open RefWorks.
Number of references per page: Select how
many references you would like to appear on
the page (from 25 to 2000 references).
View type: Select which view you prefer:
Normal View (default), Table View, Full
View or Citation View. RefWorks will
remember your selected view the next time
you open RefWorks.
Using the Customize tab allows users to
display Folders and Tags checkboxes when
selected. Clearing the checkboxes hides the
folders and tags from the list of references.
This option is available in Normal View and
in Full View.
Use the Advanced Search capability to find information in specific folders or reference metadata fields.
Access the Advanced Search by clicking on the Search icon in the Main Navigation.
Click on Advanced and an options panel will open.
Advanced searches can be created by selecting a variety of fields (including custom fields), search terms and Boolean
operators.
5. SHARING & COLLABORATING
RefWorks sharing capabilities allow you to share folders and projects with others within or outside your
institution. In addition to individual sharing, users can share folders with all users at their institution.
Select the folder you choose to share in your My Folders tab.
1. Click on the icon and select Share Folder or click on the
Share icon in the Main Navigation.
2. In the Sharing Settings screen use the dropdown options
to configure:
o Settings for: Which references to share
o Public URL: Create a URL to provide access to people who do not
have a RefWorks account. They will be able to view, sort, export
references and create a bibliography.
o Shared with: Type the email addresses, designate if the recipients
can read, annotate or modify and optionally add a message.
3. Click on Done.
You can share a project with other RefWorks users.
• Doing so makes them a project owner and gives them full
permissions within the project, including adding, deleting, and
modifying folders and references.
• Any project owner can delete the project, as long as it is not the
current project of any owner.
Select “Share this Project” from the Project dropdown menu or from a
project’s “Actions” button on the My Projects page (Project Menu >
Manage Projects):
The Project Sharing Settings page appears, allowing to invite users to the
project, and displaying users with whom the project was already shared.
FOLDER SHARING
PROJECT SHARING
6. CREATING CITATIONS OR A BIBLIOGRAPHY
You can create citations and a bibliography from selected
references or folders.
4. Navigate to the page or folder of references you
want to use.
5. Click on Create bibliography in the Main
Navigation.
6. Click on Quick Cite.
You can create citations and a bibliography from selected references or folders.
1. Navigate to the page or folder of references you want to use.
2. Click on Create bibliography in the Main Navigation.
3. Click on Quick Cite.
Choose your preferences:
1. Citation Style: RefWorks will remember the last citation style you used. You can change styles by clicking
on the style name and either searching for a new style or selecting from the displayed list.
2. Insert Citations: Select the references for which you would like to create citations. As you select
references, their corresponding citations will be displayed in the text box.
3. Click on the clipboard icon, navigate to your document and paste the formatted citations. Don’t forget to
save your paper when you're done!
4. Click on Continue to bibliography to generate a bibliography which you can copy and paste into your
document. You can also click on Create bibliography in the main Navigation and then again on Create
bibliography to skip creating citations.
TOOLS
RefWorks offers add-on and plug-in tools to help with your research. To access these, click on Tools in the Main
Navigation.
Save to RefWorks
By installing the Save to RefWorks plug-in in your browser, you will be able to save a reference or article,
including full text (if available) from any website into your RefWorks account.
Plug-ins for Microsoft Word and for Google Docs
These plug-ins allow you to quickly insert citations and a bibliography to your document using references from
your RefWorks folders. Follow the details in the Tools section to identify the plug-in relevant for you and follow
the installation instructions.
RESOURCES/SUPPORT
• Ex Libris RefWorks Knowledge Center offers various resources for Admins and users.
• RefWorks YouTube Channel
• The RefWorks Technical Support team is available to assist you with any issues that come up while using RefWorks.
Please submit a case, case contact us by email: support@refworks.com