A method to mask out a subject from a background
•
0 j'aime•709 vues
This is one of many, many ways to separate the subject of a photograph from its' background.

Recommandé
Contenu connexe
Tendances
Tendances (20)
Similaire à A method to mask out a subject from a background
Similaire à A method to mask out a subject from a background (20)
Plus de Michael e. Stern Photography
Plus de Michael e. Stern Photography (20)
Dernier
Dernier (20)
A method to mask out a subject from a background
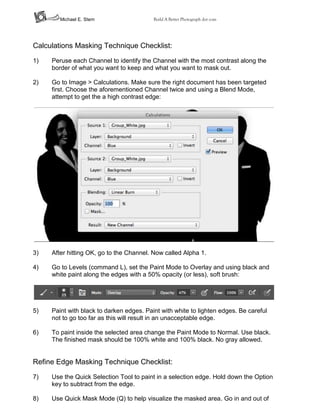
- 1. Michael E. Stern Build A Better Photograph dot com Calculations Masking Technique Checklist: 1) Peruse each Channel to identify the Channel with the most contrast along the border of what you want to keep and what you want to mask out. 2) Go to Image > Calculations. Make sure the right document has been targeted first. Choose the aforementioned Channel twice and using a Blend Mode, attempt to get the a high contrast edge: 3) After hitting OK, go to the Channel. Now called Alpha 1. 4) Go to Levels (command L), set the Paint Mode to Overlay and using black and white paint along the edges with a 50% opacity (or less), soft brush: 5) Paint with black to darken edges. Paint with white to lighten edges. Be careful not to go too far as this will result in an unacceptable edge. 6) To paint inside the selected area change the Paint Mode to Normal. Use black. The finished mask should be 100% white and 100% black. No gray allowed. Refine Edge Masking Technique Checklist: 7) Use the Quick Selection Tool to paint in a selection edge. Hold down the Option key to subtract from the edge. 8) Use Quick Mask Mode (Q) to help visualize the masked area. Go in and out of
- 2. this mode as needed. 9) In Quick Mask Mode, paint with black to add to the red mask and paint with white to erase. 10) Refine Edge Dialog Box: 11) Paint along the selection edge to help Photoshop understand calculate what to mask and what to leave alone. This is especially good for subtle things like hair and soft edges. The Option key subtracts from the edge. Sound familiar? 12) Adjust Smoothness, Feathering, Contrast and Shift Edge while looking at your selection edge. 13) Use Output at about 50% to help blend edges around the softer edges. This does depend on what you are putting the object into. notes: 818-422-0696 michael@buildabetterphotograph.com