SlideShare une entreprise Scribd logo
1  sur  6
EXPERIMENT 1: INTRODUCTION TO ELECTRONICS INSTRUMENTATIONS

1.1 OBJECTIVE:
 To introduce basics electronics instrumentations of oscilloscope and function generator.

1.2 APPARATUS:
Oscilloscope, function generator

1.3 PROCEDURE:
    - Oscilloscope and function generator are introduced and demonstrated by instructor.
    - Students demonstrated competency in using instruments when asked by instructor.

1.4 ANALYSIS

   -   Oscilloscope
ITEM                                   FUNCTION
    1   Power switch              Push in to turn instrument power on and off
2       Power lamp                Lights when power is on.
3       Inten control             Adjust the brightness of the CRT display, increase
                                  brightness .
4       Focus control             To obtain maximum trace sharp.
5       Rotation control          Allow screwdriver adjustment of trace alignment with
                                  regard to the horizontal line of graticule CRT.
6       Illum control             To adjust graticul illumination for photographing CRT
                                  display.
7       Voltage selector          Permits changing the operating voltage range.
8       Power connector           Permits removal or replacement of AC power record.
9       CH1 or X IN connector     For applying an input signal to vertical-amplifier channel
                                  1, or to x-axis (horizontal) amplifier during X-Y
                                  operation
10      CH2 or Y IN connector     For applying an input signal to vertical amplifier channel
                                  2, or to Y-axis (vertical) amplifier during X-Y operation.
11      CH1 AC/ GND /DC           To select the method of coupling the input signal to the
        switch                    CH1 vertical amplifier. AC position inserts a capacitor
                                  between the input connector and amplifier to block any
                                  DC component in the input signal. GND position
                                  connects the amplifier to ground. Instead of the input
                                  connector, so a ground reference can be established. DC
                                  position connects the amplifier directly to its input
                                  connector, thus passing all signal components on the
                                  amplifier.
12      CH2 AC / GND / DC         To select the method of coupling the input signal to the
        switch                    CH2 vertical amplifier.
13      CH1 volts/div switch      To select the calibrated deflection factor of the input
                                  signal fed to the CH1 vertical amplifier.
14      CH2 volts/div switch      To select the calibrated deflection factor of the input
                                  signal fed to the CH2 vertical amplifier
15      Variable control (on      Provide continuously variable adjustment of deflection
        variable)                 factor between steps of the volts /div switches. Volts/div
                                  calibrations are accurately only when the variable
                                  controls are click stopped in their fully clockwise
                                  position.
16      Variable control (on      (same as 15)
        variable)
17      CH1 position control      For vertically positioning the CH1 trace on the CRT
                                  screen, Clockwise rotation moves the trace up,
                                  counterclockwise rotation moves the trace down.
18      CH2 position              For vertically positioning the CH2 trace on the CRT
                                  screen. Clockwise rotation moves the trace up,
                                  counterclockwise rotation moves the trace downward.
18      Pull CH2 inv switch (on   When pulled, the polarity of the CH2 signal is inverted
        CH2 position control)
19      V mode switch             When pulled, the polarity of the CH2 signal is
                                  inverted.To select the vertical-amplifier display
mode.CH1 position displays only the channel 1
                                  Input signal on the CRT screen.CH2 position displays
                                  only the channel 2. Input signal on the CRT screen
                                  dual.
20
21   Horiz display switches      To select the sweep mode.A pushbutton sweeps the CRT
                                 at the main (A).Timebase rate when pressed.
                                 A INT pushbutton sweeps the CRT at the main (A)
                                 timebase rate when pressed, and the B timebase
                                 intensifies a section of the trace(s) The location of the
                                 intensified section is determined by the delay time pos
                                 control. B pushbutton sweeps the CRT at the rate
                                 selected. By the B time/div switch, after a delay
                                 determined by the A time/div switch and the delay time
                                 pos control. X-Y push button provides X-Y operation. B
                                 TRIG’D pushbutton sweeps the CRT at the rate selected
                                 by the B time dib switch when triggered by the first
                                 trigger pulse occurring after the delay time determined by
                                 the A time/div switch and the delay time pos control.
22   A time/div switch           To select either the calibrated sweep rate of the main (A)
                                 timebase, the delay-time range for delayed-sweep
                                 operation.
23   B time/div switch           To select the calibrated sweep rate of the delayed (B)
                                 timebase.
24   Delay time pos control      To determine the exact starting point within the A
                                 timebase delay range at which the B timebase will begin
                                 sweepin
25   A variable control          Provides continuously variable adjustment of sweep rate
                                 between steps of the A time/div switch. Time/div
                                 calibrations are accurate only when the A variable control
                                 is click-stopped fully clockwise.
26   Horizontal position control To adjust the horizontal position of the traces control
                                 displayed on the CRT. Clockwise rotation moves the
                                 traces to the right, counterclockwise rotation moves the
                                 traces to the left.
27   Trigger mode switch         To select the sweep triggering mode. Auto position
                                 selects free-running sweep where a baseline is displayed
                                 in the absense of a signal. This condition automatically
                                 reverts to triggered sweep when a trigger signal of 25 Hz
                                 or higher is received and other trigger controls and
                                 properly set. NORM position produces sweep only when
                                 a trigger signal is received and other controls are properly
                                 set.No trace is visible if any trigger requirement is
                                 missing. This mode must be used when the signal
                                 frequency is 25 Hz or lower. TV-V position is used for
                                 observing a composite video signal at the frame rate. TV-
                                 H position is used for observing a compositevideo signal
                                 at the frame rate.
28   Trigger source switch       To conveniently select the trigger source. CH1 position
                                 selects the channel 1 signal as the trigger source. CH2
position selects the channel 2 signal as the trigger source.
                                         Line position selects a trigger derived from the AC power
                                         line. This permits the scope to sta-bilize display line-
                                         related components of a signal even if they are very small
                                         compared to other components of the signal. Ext position
                                         selects the signal applied to the ext trig in connector.
29         Hold off control              Allows triggering on certain complex signals by changing
                                         the holdoff (dead) time of the main (A) sweep.This
                                         avoids triggering on intermediate trigger points within the
                                         repetition cycle of the desired display. The holdoff time
                                         increases with clockwise rotation. NORM is a position at
                                         full counterclockwise rotation that is used for ordinary
                                         signals.
30         Trigger level control         To select the trigger-signal amplitude at which triggering
                                         occurs. When rotated clockwise, the trigger point moves
                                         toward the positive peak of the trigger signal. When this
                                         control is rotated counterclockwise, the trigger point
                                         moves toward the negative peak of the trigger signal.
30         Trigger slope switch          To select the positive or negative slope of the trigger
           (on level control)            signal for initiating sweep. Pushed in, the switch selects
                                         the positive (+) slope. When pulled, this switch selects the
                                         negative (-) slope.
31         Ext trig in connector         For applying external trigger signal to the trigger circuits.
32         Ext blanking input            For applying signal to intensity modulate the CRT. Trace
           connector                     brightness is reduced with a positive signal, and increased
                                         with a negative signal.
33         Cal connector                 Provides a fast-rise square wave of precise amplitude for
                                         probe adjustment and vertical amplifier calibration.
34         Ground connector              Provides an attachment point for a separate ground lead.

     -    Function generator


         ITEM          FUNCTION
1        Power ON      When lighted, indicates a power on condition.
         light
2        Amplitude     This variable control, depending on the position of the volts out button,
         Control       determines the level of the signal at the main output connector.
3        DC offset     Pull out this control to activate. The DC offset control sets the DC level
and polarity of the signal at the main output. When the control is pressed
                  in, the signal is centered at
                  zero VDC.
4    Symmetry     This knob changes the duty cycle of a square wave signal or the rise and
     Knob         fall times of sawtooth and sine wave signals. This feature is called
                  symmetry because it affects the visual symmetry of the wave form along
                  its longitudinal axis. The knob has no effect unless the symmetry button
                  (see item 11) is pushed in. When the symmetry knob is at the center
                  position, the symmetry of the waveform is unaffected. Rotating the knob
                  clockwise has an increasing effect on the waveform; rotating the knob
                  counterclockwise has the opposite effect. (table 1 )


5    Range (Hz)   These buttons determine the frequency range of the signal at the main
     Buttons      output connector.
6    Function     The sine, square or sawtooth buttons select the type of signal provided at
     Buttons      the main output connector
7    Frequency    This variable control determines the frequency of the signal at the main
     Control      output connector within the range set by the range buttons.
8    Sweep        This control adjusts the sweep amplitude . This control adjusts the sweep
     Width        amplitude.
9    Sweep Rate   This control adjusts the rate of the internal sweep generator and the
                  repetition rate of the burst gate.
10   Sweep        Push in for internal sweep. This button activates the sweep rate and
     Button       sweep width controls. When the button is set out, the function generator
                  accepts signals from its external sweep input connector on the rear panel.
11   Symmetry     Pushing this button in divides the frequency of the output signal by ten
     Button       and allows the symmetry of the signal to be varied using the symmetry
                  knob (see item 4). Table 1 shows effects of adjusting the symmetry on
                  waveforms.
12   Volts Out    Push in for amplitude control range of 0 to 2 Vp-p, open circuit, or 0 to 1
     Button       Vp-p into a 50 Ω load. Set to the out position for an amplitude control
                  range of 0 to 20 Vp-p, in an open circuit, or 0 to 10 Vp-p to a 50 Ω load
13   Sync (Ttl)   BNC output connector for TTL signals.
     Output
14   Main         BNC output connector for sine wave, square wave and sawtooth wave
     Output       signals.
15   Power        Push in to turn function generator on. A secondpush turns the function
     Button       generator off.
EXPERIMENT 1 : introduction to electric and electronic devices

Contenu connexe

Tendances

Phase Locked Loop with Filter Banks for High Data Rate Satellite Link
Phase Locked Loop with Filter Banks for High Data Rate Satellite LinkPhase Locked Loop with Filter Banks for High Data Rate Satellite Link
Phase Locked Loop with Filter Banks for High Data Rate Satellite Link
chiragwarty
 
Atlas Trigger Distributor PCB
Atlas Trigger Distributor PCBAtlas Trigger Distributor PCB
Atlas Trigger Distributor PCB
Matthew Bledsoe
 
Comandos at modem_lucent_venus_crm
Comandos at modem_lucent_venus_crmComandos at modem_lucent_venus_crm
Comandos at modem_lucent_venus_crm
micro micro
 
PLL & DLL DESIGN IN SIMULINK MATLAB
PLL & DLL DESIGN IN SIMULINK MATLABPLL & DLL DESIGN IN SIMULINK MATLAB
PLL & DLL DESIGN IN SIMULINK MATLAB
kartik pal
 

Tendances (20)

Phase Locked Loop with Filter Banks for High Data Rate Satellite Link
Phase Locked Loop with Filter Banks for High Data Rate Satellite LinkPhase Locked Loop with Filter Banks for High Data Rate Satellite Link
Phase Locked Loop with Filter Banks for High Data Rate Satellite Link
 
B737NG IRS
B737NG IRSB737NG IRS
B737NG IRS
 
Atlas Trigger Distributor PCB
Atlas Trigger Distributor PCBAtlas Trigger Distributor PCB
Atlas Trigger Distributor PCB
 
Directed decision phase locked loop
Directed decision phase locked loopDirected decision phase locked loop
Directed decision phase locked loop
 
Flowchart
FlowchartFlowchart
Flowchart
 
Introduction to pll
Introduction to pllIntroduction to pll
Introduction to pll
 
Passive electrical filters
Passive electrical filtersPassive electrical filters
Passive electrical filters
 
My power electronic inventions
My power electronic inventionsMy power electronic inventions
My power electronic inventions
 
Ea3
Ea3Ea3
Ea3
 
Phase locked loop
Phase locked loopPhase locked loop
Phase locked loop
 
Comandos at modem_lucent_venus_crm
Comandos at modem_lucent_venus_crmComandos at modem_lucent_venus_crm
Comandos at modem_lucent_venus_crm
 
000682
000682000682
000682
 
Non ideal effects of pll
Non ideal effects of pllNon ideal effects of pll
Non ideal effects of pll
 
Flip Flops
Flip FlopsFlip Flops
Flip Flops
 
Digital timer
Digital timerDigital timer
Digital timer
 
PLL & DLL DESIGN IN SIMULINK MATLAB
PLL & DLL DESIGN IN SIMULINK MATLABPLL & DLL DESIGN IN SIMULINK MATLAB
PLL & DLL DESIGN IN SIMULINK MATLAB
 
Pll
PllPll
Pll
 
How to control a robot?
How to control a robot?How to control a robot?
How to control a robot?
 
Galil legacy catalog
Galil legacy catalogGalil legacy catalog
Galil legacy catalog
 
Kannad 406 af compact
Kannad 406 af compactKannad 406 af compact
Kannad 406 af compact
 

En vedette (7)

I-V characteristics of SCR final
I-V characteristics of SCR finalI-V characteristics of SCR final
I-V characteristics of SCR final
 
Chapter17
Chapter17Chapter17
Chapter17
 
Power electronics
Power electronicsPower electronics
Power electronics
 
8 k light (boardworks)
8 k light (boardworks)8 k light (boardworks)
8 k light (boardworks)
 
7 j electrical circuits (boardworks)
7 j electrical circuits (boardworks)7 j electrical circuits (boardworks)
7 j electrical circuits (boardworks)
 
7 l the solar system & beyond (boardworks)
7 l the solar system & beyond (boardworks)7 l the solar system & beyond (boardworks)
7 l the solar system & beyond (boardworks)
 
Voltage regulator
Voltage regulatorVoltage regulator
Voltage regulator
 

Similaire à EXPERIMENT 1 : introduction to electric and electronic devices

Emi cathode ray oscilloscope
Emi cathode ray oscilloscopeEmi cathode ray oscilloscope
Emi cathode ray oscilloscope
yssb91
 
Emicathoderayoscilloscope 120625075906-phpapp01
Emicathoderayoscilloscope 120625075906-phpapp01Emicathoderayoscilloscope 120625075906-phpapp01
Emicathoderayoscilloscope 120625075906-phpapp01
HassanNawazish
 
Icel os 21-mesco_ao-1221_minipa_mo-1225_yb4328_2x5mv,20mhz_portable_oscillosc...
Icel os 21-mesco_ao-1221_minipa_mo-1225_yb4328_2x5mv,20mhz_portable_oscillosc...Icel os 21-mesco_ao-1221_minipa_mo-1225_yb4328_2x5mv,20mhz_portable_oscillosc...
Icel os 21-mesco_ao-1221_minipa_mo-1225_yb4328_2x5mv,20mhz_portable_oscillosc...
vobetinha
 
Florida Institute of Technology © 2020 by J. GeringE
Florida Institute of Technology       © 2020 by J. GeringEFlorida Institute of Technology       © 2020 by J. GeringE
Florida Institute of Technology © 2020 by J. GeringE
ShainaBoling829
 
cathode ray oscilloscope &function generator
cathode ray oscilloscope &function generatorcathode ray oscilloscope &function generator
cathode ray oscilloscope &function generator
megha agrawal
 

Similaire à EXPERIMENT 1 : introduction to electric and electronic devices (20)

Emi cathode ray oscilloscope
Emi cathode ray oscilloscopeEmi cathode ray oscilloscope
Emi cathode ray oscilloscope
 
Emicathoderayoscilloscope 120625075906-phpapp01
Emicathoderayoscilloscope 120625075906-phpapp01Emicathoderayoscilloscope 120625075906-phpapp01
Emicathoderayoscilloscope 120625075906-phpapp01
 
Icel os 21-mesco_ao-1221_minipa_mo-1225_yb4328_2x5mv,20mhz_portable_oscillosc...
Icel os 21-mesco_ao-1221_minipa_mo-1225_yb4328_2x5mv,20mhz_portable_oscillosc...Icel os 21-mesco_ao-1221_minipa_mo-1225_yb4328_2x5mv,20mhz_portable_oscillosc...
Icel os 21-mesco_ao-1221_minipa_mo-1225_yb4328_2x5mv,20mhz_portable_oscillosc...
 
Electronics Lab Equipment.ppt
Electronics Lab Equipment.pptElectronics Lab Equipment.ppt
Electronics Lab Equipment.ppt
 
Electronics Lab Equipment.ppt
Electronics Lab Equipment.pptElectronics Lab Equipment.ppt
Electronics Lab Equipment.ppt
 
Oscilloscope
OscilloscopeOscilloscope
Oscilloscope
 
Cathode Ray Oscilloscope
Cathode Ray OscilloscopeCathode Ray Oscilloscope
Cathode Ray Oscilloscope
 
Ja303
Ja303Ja303
Ja303
 
Florida Institute of Technology © 2020 by J. GeringE
Florida Institute of Technology       © 2020 by J. GeringEFlorida Institute of Technology       © 2020 by J. GeringE
Florida Institute of Technology © 2020 by J. GeringE
 
cathode ray oscilloscope &function generator
cathode ray oscilloscope &function generatorcathode ray oscilloscope &function generator
cathode ray oscilloscope &function generator
 
AMEK Mastering Compressor Manual.pdf
AMEK Mastering Compressor Manual.pdfAMEK Mastering Compressor Manual.pdf
AMEK Mastering Compressor Manual.pdf
 
Cathode ray oscilloscope
Cathode ray oscilloscopeCathode ray oscilloscope
Cathode ray oscilloscope
 
Unmanned Ground Vehicle
Unmanned Ground VehicleUnmanned Ground Vehicle
Unmanned Ground Vehicle
 
Ceng4480 a1
Ceng4480 a1Ceng4480 a1
Ceng4480 a1
 
Oscilloscope
OscilloscopeOscilloscope
Oscilloscope
 
Accoustic Junkies
Accoustic JunkiesAccoustic Junkies
Accoustic Junkies
 
Oscilloscope:
Oscilloscope:Oscilloscope:
Oscilloscope:
 
Study of CRO and measusre the voltage and frequency
Study of CRO and measusre the voltage and frequencyStudy of CRO and measusre the voltage and frequency
Study of CRO and measusre the voltage and frequency
 
54261502
5426150254261502
54261502
 
CapTouch®Programmable Controller for Single-Electrode Capacitance Sensors
CapTouch®Programmable Controller for Single-Electrode Capacitance SensorsCapTouch®Programmable Controller for Single-Electrode Capacitance Sensors
CapTouch®Programmable Controller for Single-Electrode Capacitance Sensors
 

Dernier

The basics of sentences session 3pptx.pptx
The basics of sentences session 3pptx.pptxThe basics of sentences session 3pptx.pptx
The basics of sentences session 3pptx.pptx
heathfieldcps1
 

Dernier (20)

This PowerPoint helps students to consider the concept of infinity.
This PowerPoint helps students to consider the concept of infinity.This PowerPoint helps students to consider the concept of infinity.
This PowerPoint helps students to consider the concept of infinity.
 
ICT role in 21st century education and it's challenges.
ICT role in 21st century education and it's challenges.ICT role in 21st century education and it's challenges.
ICT role in 21st century education and it's challenges.
 
SOC 101 Demonstration of Learning Presentation
SOC 101 Demonstration of Learning PresentationSOC 101 Demonstration of Learning Presentation
SOC 101 Demonstration of Learning Presentation
 
REMIFENTANIL: An Ultra short acting opioid.pptx
REMIFENTANIL: An Ultra short acting opioid.pptxREMIFENTANIL: An Ultra short acting opioid.pptx
REMIFENTANIL: An Ultra short acting opioid.pptx
 
Basic Civil Engineering first year Notes- Chapter 4 Building.pptx
Basic Civil Engineering first year Notes- Chapter 4 Building.pptxBasic Civil Engineering first year Notes- Chapter 4 Building.pptx
Basic Civil Engineering first year Notes- Chapter 4 Building.pptx
 
How to Manage Global Discount in Odoo 17 POS
How to Manage Global Discount in Odoo 17 POSHow to Manage Global Discount in Odoo 17 POS
How to Manage Global Discount in Odoo 17 POS
 
How to Create and Manage Wizard in Odoo 17
How to Create and Manage Wizard in Odoo 17How to Create and Manage Wizard in Odoo 17
How to Create and Manage Wizard in Odoo 17
 
The basics of sentences session 3pptx.pptx
The basics of sentences session 3pptx.pptxThe basics of sentences session 3pptx.pptx
The basics of sentences session 3pptx.pptx
 
Beyond_Borders_Understanding_Anime_and_Manga_Fandom_A_Comprehensive_Audience_...
Beyond_Borders_Understanding_Anime_and_Manga_Fandom_A_Comprehensive_Audience_...Beyond_Borders_Understanding_Anime_and_Manga_Fandom_A_Comprehensive_Audience_...
Beyond_Borders_Understanding_Anime_and_Manga_Fandom_A_Comprehensive_Audience_...
 
ICT Role in 21st Century Education & its Challenges.pptx
ICT Role in 21st Century Education & its Challenges.pptxICT Role in 21st Century Education & its Challenges.pptx
ICT Role in 21st Century Education & its Challenges.pptx
 
NO1 Top Black Magic Specialist In Lahore Black magic In Pakistan Kala Ilam Ex...
NO1 Top Black Magic Specialist In Lahore Black magic In Pakistan Kala Ilam Ex...NO1 Top Black Magic Specialist In Lahore Black magic In Pakistan Kala Ilam Ex...
NO1 Top Black Magic Specialist In Lahore Black magic In Pakistan Kala Ilam Ex...
 
Wellbeing inclusion and digital dystopias.pptx
Wellbeing inclusion and digital dystopias.pptxWellbeing inclusion and digital dystopias.pptx
Wellbeing inclusion and digital dystopias.pptx
 
On_Translating_a_Tamil_Poem_by_A_K_Ramanujan.pptx
On_Translating_a_Tamil_Poem_by_A_K_Ramanujan.pptxOn_Translating_a_Tamil_Poem_by_A_K_Ramanujan.pptx
On_Translating_a_Tamil_Poem_by_A_K_Ramanujan.pptx
 
Holdier Curriculum Vitae (April 2024).pdf
Holdier Curriculum Vitae (April 2024).pdfHoldier Curriculum Vitae (April 2024).pdf
Holdier Curriculum Vitae (April 2024).pdf
 
Sensory_Experience_and_Emotional_Resonance_in_Gabriel_Okaras_The_Piano_and_Th...
Sensory_Experience_and_Emotional_Resonance_in_Gabriel_Okaras_The_Piano_and_Th...Sensory_Experience_and_Emotional_Resonance_in_Gabriel_Okaras_The_Piano_and_Th...
Sensory_Experience_and_Emotional_Resonance_in_Gabriel_Okaras_The_Piano_and_Th...
 
Jamworks pilot and AI at Jisc (20/03/2024)
Jamworks pilot and AI at Jisc (20/03/2024)Jamworks pilot and AI at Jisc (20/03/2024)
Jamworks pilot and AI at Jisc (20/03/2024)
 
Sociology 101 Demonstration of Learning Exhibit
Sociology 101 Demonstration of Learning ExhibitSociology 101 Demonstration of Learning Exhibit
Sociology 101 Demonstration of Learning Exhibit
 
2024-NATIONAL-LEARNING-CAMP-AND-OTHER.pptx
2024-NATIONAL-LEARNING-CAMP-AND-OTHER.pptx2024-NATIONAL-LEARNING-CAMP-AND-OTHER.pptx
2024-NATIONAL-LEARNING-CAMP-AND-OTHER.pptx
 
Micro-Scholarship, What it is, How can it help me.pdf
Micro-Scholarship, What it is, How can it help me.pdfMicro-Scholarship, What it is, How can it help me.pdf
Micro-Scholarship, What it is, How can it help me.pdf
 
Unit 3 Emotional Intelligence and Spiritual Intelligence.pdf
Unit 3 Emotional Intelligence and Spiritual Intelligence.pdfUnit 3 Emotional Intelligence and Spiritual Intelligence.pdf
Unit 3 Emotional Intelligence and Spiritual Intelligence.pdf
 

EXPERIMENT 1 : introduction to electric and electronic devices

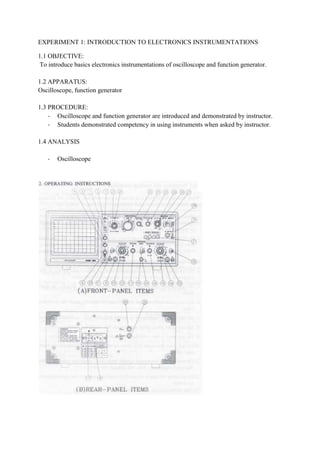
  • 1. EXPERIMENT 1: INTRODUCTION TO ELECTRONICS INSTRUMENTATIONS 1.1 OBJECTIVE: To introduce basics electronics instrumentations of oscilloscope and function generator. 1.2 APPARATUS: Oscilloscope, function generator 1.3 PROCEDURE: - Oscilloscope and function generator are introduced and demonstrated by instructor. - Students demonstrated competency in using instruments when asked by instructor. 1.4 ANALYSIS - Oscilloscope
  • 2. ITEM FUNCTION 1 Power switch Push in to turn instrument power on and off 2 Power lamp Lights when power is on. 3 Inten control Adjust the brightness of the CRT display, increase brightness . 4 Focus control To obtain maximum trace sharp. 5 Rotation control Allow screwdriver adjustment of trace alignment with regard to the horizontal line of graticule CRT. 6 Illum control To adjust graticul illumination for photographing CRT display. 7 Voltage selector Permits changing the operating voltage range. 8 Power connector Permits removal or replacement of AC power record. 9 CH1 or X IN connector For applying an input signal to vertical-amplifier channel 1, or to x-axis (horizontal) amplifier during X-Y operation 10 CH2 or Y IN connector For applying an input signal to vertical amplifier channel 2, or to Y-axis (vertical) amplifier during X-Y operation. 11 CH1 AC/ GND /DC To select the method of coupling the input signal to the switch CH1 vertical amplifier. AC position inserts a capacitor between the input connector and amplifier to block any DC component in the input signal. GND position connects the amplifier to ground. Instead of the input connector, so a ground reference can be established. DC position connects the amplifier directly to its input connector, thus passing all signal components on the amplifier. 12 CH2 AC / GND / DC To select the method of coupling the input signal to the switch CH2 vertical amplifier. 13 CH1 volts/div switch To select the calibrated deflection factor of the input signal fed to the CH1 vertical amplifier. 14 CH2 volts/div switch To select the calibrated deflection factor of the input signal fed to the CH2 vertical amplifier 15 Variable control (on Provide continuously variable adjustment of deflection variable) factor between steps of the volts /div switches. Volts/div calibrations are accurately only when the variable controls are click stopped in their fully clockwise position. 16 Variable control (on (same as 15) variable) 17 CH1 position control For vertically positioning the CH1 trace on the CRT screen, Clockwise rotation moves the trace up, counterclockwise rotation moves the trace down. 18 CH2 position For vertically positioning the CH2 trace on the CRT screen. Clockwise rotation moves the trace up, counterclockwise rotation moves the trace downward. 18 Pull CH2 inv switch (on When pulled, the polarity of the CH2 signal is inverted CH2 position control) 19 V mode switch When pulled, the polarity of the CH2 signal is inverted.To select the vertical-amplifier display
  • 3. mode.CH1 position displays only the channel 1 Input signal on the CRT screen.CH2 position displays only the channel 2. Input signal on the CRT screen dual. 20 21 Horiz display switches To select the sweep mode.A pushbutton sweeps the CRT at the main (A).Timebase rate when pressed. A INT pushbutton sweeps the CRT at the main (A) timebase rate when pressed, and the B timebase intensifies a section of the trace(s) The location of the intensified section is determined by the delay time pos control. B pushbutton sweeps the CRT at the rate selected. By the B time/div switch, after a delay determined by the A time/div switch and the delay time pos control. X-Y push button provides X-Y operation. B TRIG’D pushbutton sweeps the CRT at the rate selected by the B time dib switch when triggered by the first trigger pulse occurring after the delay time determined by the A time/div switch and the delay time pos control. 22 A time/div switch To select either the calibrated sweep rate of the main (A) timebase, the delay-time range for delayed-sweep operation. 23 B time/div switch To select the calibrated sweep rate of the delayed (B) timebase. 24 Delay time pos control To determine the exact starting point within the A timebase delay range at which the B timebase will begin sweepin 25 A variable control Provides continuously variable adjustment of sweep rate between steps of the A time/div switch. Time/div calibrations are accurate only when the A variable control is click-stopped fully clockwise. 26 Horizontal position control To adjust the horizontal position of the traces control displayed on the CRT. Clockwise rotation moves the traces to the right, counterclockwise rotation moves the traces to the left. 27 Trigger mode switch To select the sweep triggering mode. Auto position selects free-running sweep where a baseline is displayed in the absense of a signal. This condition automatically reverts to triggered sweep when a trigger signal of 25 Hz or higher is received and other trigger controls and properly set. NORM position produces sweep only when a trigger signal is received and other controls are properly set.No trace is visible if any trigger requirement is missing. This mode must be used when the signal frequency is 25 Hz or lower. TV-V position is used for observing a composite video signal at the frame rate. TV- H position is used for observing a compositevideo signal at the frame rate. 28 Trigger source switch To conveniently select the trigger source. CH1 position selects the channel 1 signal as the trigger source. CH2
  • 4. position selects the channel 2 signal as the trigger source. Line position selects a trigger derived from the AC power line. This permits the scope to sta-bilize display line- related components of a signal even if they are very small compared to other components of the signal. Ext position selects the signal applied to the ext trig in connector. 29 Hold off control Allows triggering on certain complex signals by changing the holdoff (dead) time of the main (A) sweep.This avoids triggering on intermediate trigger points within the repetition cycle of the desired display. The holdoff time increases with clockwise rotation. NORM is a position at full counterclockwise rotation that is used for ordinary signals. 30 Trigger level control To select the trigger-signal amplitude at which triggering occurs. When rotated clockwise, the trigger point moves toward the positive peak of the trigger signal. When this control is rotated counterclockwise, the trigger point moves toward the negative peak of the trigger signal. 30 Trigger slope switch To select the positive or negative slope of the trigger (on level control) signal for initiating sweep. Pushed in, the switch selects the positive (+) slope. When pulled, this switch selects the negative (-) slope. 31 Ext trig in connector For applying external trigger signal to the trigger circuits. 32 Ext blanking input For applying signal to intensity modulate the CRT. Trace connector brightness is reduced with a positive signal, and increased with a negative signal. 33 Cal connector Provides a fast-rise square wave of precise amplitude for probe adjustment and vertical amplifier calibration. 34 Ground connector Provides an attachment point for a separate ground lead. - Function generator ITEM FUNCTION 1 Power ON When lighted, indicates a power on condition. light 2 Amplitude This variable control, depending on the position of the volts out button, Control determines the level of the signal at the main output connector. 3 DC offset Pull out this control to activate. The DC offset control sets the DC level
  • 5. and polarity of the signal at the main output. When the control is pressed in, the signal is centered at zero VDC. 4 Symmetry This knob changes the duty cycle of a square wave signal or the rise and Knob fall times of sawtooth and sine wave signals. This feature is called symmetry because it affects the visual symmetry of the wave form along its longitudinal axis. The knob has no effect unless the symmetry button (see item 11) is pushed in. When the symmetry knob is at the center position, the symmetry of the waveform is unaffected. Rotating the knob clockwise has an increasing effect on the waveform; rotating the knob counterclockwise has the opposite effect. (table 1 ) 5 Range (Hz) These buttons determine the frequency range of the signal at the main Buttons output connector. 6 Function The sine, square or sawtooth buttons select the type of signal provided at Buttons the main output connector 7 Frequency This variable control determines the frequency of the signal at the main Control output connector within the range set by the range buttons. 8 Sweep This control adjusts the sweep amplitude . This control adjusts the sweep Width amplitude. 9 Sweep Rate This control adjusts the rate of the internal sweep generator and the repetition rate of the burst gate. 10 Sweep Push in for internal sweep. This button activates the sweep rate and Button sweep width controls. When the button is set out, the function generator accepts signals from its external sweep input connector on the rear panel. 11 Symmetry Pushing this button in divides the frequency of the output signal by ten Button and allows the symmetry of the signal to be varied using the symmetry knob (see item 4). Table 1 shows effects of adjusting the symmetry on waveforms. 12 Volts Out Push in for amplitude control range of 0 to 2 Vp-p, open circuit, or 0 to 1 Button Vp-p into a 50 Ω load. Set to the out position for an amplitude control range of 0 to 20 Vp-p, in an open circuit, or 0 to 10 Vp-p to a 50 Ω load 13 Sync (Ttl) BNC output connector for TTL signals. Output 14 Main BNC output connector for sine wave, square wave and sawtooth wave Output signals. 15 Power Push in to turn function generator on. A secondpush turns the function Button generator off.