Kaipu Lm20 Z-Wave Plus door contact user guide
•
0 j'aime•1,437 vues

Kaipu Lm20 Z-Wave Plus door and windows magnetic contact user guide

Recommandé
Recommandé
Contenu connexe
Tendances
Tendances (20)
En vedette
En vedette (8)
Similaire à Kaipu Lm20 Z-Wave Plus door contact user guide
Similaire à Kaipu Lm20 Z-Wave Plus door contact user guide (20)
Plus de Domotica daVinci
Plus de Domotica daVinci (20)
Dernier
Dernier (20)
Kaipu Lm20 Z-Wave Plus door contact user guide
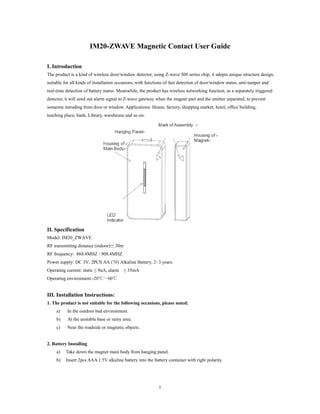
- 1. 1 IM20-ZWAVE Magnetic Contact User Guide I. Introduction The product is a kind of wireless door/window detector, using Z-wave 500 series chip, it adopts unique structure design, suitable for all kinds of installation occasions, with functions of fast detection of door/window status, anti-tamper and real-time detection of battery status. Meanwhile, the product has wireless networking function, as a separately triggered detector, it will send out alarm signal to Z-wave gateway when the magnet part and the emitter separated, to prevent someone intruding from door or window. Applications: House, factory, shopping market, hotel, office building, teaching place, bank, Library, warehouse and so on. II. Specification Model: IM20_ZWAVE RF transmitting distance (indoor):≤ 30m RF frequency: 868.4MHZ / 908.4MHZ Power supply: DC 3V, 2PCS AA (7#) Alkaline Battery, 2~3 years. Operating current: static ≤ 9uA, alarm ≤ 35mA Operating environment:-20℃~60℃ III. Installation Instructions: 1. The product is not suitable for the following occasions, please noted: a) In the outdoor bad environment. b) At the unstable base or rainy area. c) Near the roadside or magnetic objects. 2. Battery Installing a) Take down the magnet main body from hanging panel. b) Insert 2pcs AAA 1.5V alkaline battery into the battery container with right polarity.
- 2. 2 c) Put the main body part into the hanging panel, keep the bottom line horizontally aligning with location hole; pull down to fix it. 3. Screw Fixing a) Take out the tapered screws and expansion tube from PE bag, and then take down the hanging panels of door contact main body and magnet separately. b) Make location holes by scribing lines on fixed or movable door/window in parallel, keep the distance of main body and magnet≤6mm.If on the wooden wall, twist the screws directly; while on the concrete wall, use an electric drill to make aФ6MM hole, then insert the expansion tube into the hole. c) Make the smooth sides of hanging panels against the wall, and align the holes of hanging panels & expansion tube; then twisting screws with cross screwdriver.
- 3. 3 d) Put the main body on the hanging panel, align the downside of main body at the underneath location hole of hanging panel, pull down to fix the main body. e) Put the magnet on the magnet hanging panel, align the downside of magnet at the underneath location hole of hanging panel, pull down to fix the magnet 4. Foam Rubber Adhesive Fixing a) Take out the rubber foam from PE bag. b) Tear off one side release paper from rubber foam; stick them to the back side of main body & magnet respectively. c) Make location holes by scribing lines on the fixed or movable door/window in parallel, the distance for main body and magnet: ≤6MM. d) Tear off remaining rubber foam release paper on the main body and magnet; stick them to the fixed or movable door/window. IV. IM20-ZWAVE Operation Instruction 1. ZWAVE basic operations 1.1 Wireless network registration and delete a) Network register: Activate the master gateway into register status, please press the anti-tamper switch 3 times repeatedly within 1.5 seconds to register, the right LED indicator blinking in the process and turns off LED indicator if registration completed. b) Network delete: Activate the master gateway into delete status, please press the anti- tamper switch 3 times repeatedly in 1.5 seconds to delete.
- 4. 4 1.2 Door sensor alarm information and connection The product supports 2 connection groups, group 1 support one device to receive alarm information, group 2 supports two devices, when the door sensor triggered, then send out “BASIC SET” command to control the device in group 2. 1.3 Factory reset Press the tamper switch 6 times repeatedly in 2 seconds to restore the factory setting. 1.4 Activated Operation a) Manually activation Press the tamper switch one time quickly, the device sends out the activated information automatically, and have 10s to receive the gateway setting information after activated. b) Automatically activation The device automatically activates every 24 h as default, and has 10 s to receive the gateway setting information, the max value of report time is 120h, the minimum value of report time is 30 minutes. V. ZWAVE report information 1. Group 1 a) The sensor status report: Binary Sensor Report When the sensor triggered or return to normal, it will send “Binary Sensor Report” Command to the device in group 1. When the magnetic sensor alarming: [Command Class Sensor Binary,Sensor Binary Report, Value = 0xFF,Type =0x0A (Door/Window)] When the magnetic sensor return to normal: [Command Class Sensor Binary,Sensor Binary Report, Value = 0x00,Type =0A (Door/Window)] b) Tamper event report: Sensor Binary Report It will send “Sensor Binary Report” command to the device in group one when the anti tamper switch of the sensor dismantled. Anti-tamper returns to normal status (press the tamper switch and last 5s) [Command Class Sensor Binary,Sensor Binary Report, value = 0x00,type =08(Tamper)]
- 5. 5 c) Anti-tamper alarm: [Command Class Sensor Binary,Sensor Binary Report, value = 0xFF,type =08(Tamper)] d) Low battery report: Battery Report After activated from sleep mode, the sensor check its battery status, if low battery, sending the “Binary Sensor Report” command to the group 1 device every 1 hour. [Command Class Battery, Battery Report, Battery Level = 0xFF(Low battery warning)] 2. Group 2 When the door sensor triggered or return to normal status, it sends out “BASIC SET” command to the devices in group 2, the command contains the adjustable parameter (refer to the Configuration Instruction 1), for example: when the door sensor triggered and sent out the adjustable parameter “BASIC SET” command to the connected light in group 2, set the light brightness by the parameter value (1-100), when it is over the setting turn-off time (default is 10s, refer to the Configuration Instruction 2), the device will send “BASIC SET” command to the device in group 2 to turn off the light. When the door sensor triggered: [Command Class Basic,Basic Set, Value = 0xFF(default 0xFF, configurable, refer to Configuration Instruction 1)] When the light turn-off time time-out: [Command Class Basic,Basic Set, Value = 0x00] VI. Configuration Instruction The follow configuration setting data has 1 byte 1. Basic Set Level 1.1 Basic Set parameter setting, the receivers make relevant adjustment according to parameter value Function Parameter Byte Range Default Basic Set Level 1 1 1-100 0xFF 2. Lighting turn-off time setting When the device triggered and sends out “BASIC SET” to the lightings, the light turns on and off as the set time. The minimum value is 1, means the light bright time is 1*10s (10seconds), and turn off after 10 seconds, if the value is t, means the bright time is t*10s, turn off after t*10 seconds. Function Parameter Size Range Default Turn Off Light Time 2 1 1-255 1 3. Disable the door sensor alarm function Function Parameter Size Range Default Door/Window 3 1 0x01/0x00 0x00( enabled)
- 6. 6 4. Door sensor report time 4.1 Door sensor auto report status time setting The minimum time is 1 hour, as setting is 12, means 1*12h (12 hours), if set as t, means 1*t h (t hours) Function Parameter Size Range Default Auto report battery status time 5 1 0-24 hours 6 hours VII. Z-Wave door sensor commands 1. Generic Deice Type = GENERIC_TYPE_SENSOR_BINARY 2. Specific Device Type = SPECIFIC_TYPE_ROUTING_SENSOR_BINARY 3. Support Command Class = 4. COMMAND_CLASS_ASSOCIATION_V2, 5. COMMAND_CLASS_WAKE_UP_V2, 6. COMMAND_CLASS_BATTERY, 7. COMMAND_CLASS_SENSOR_BINARY_V2, 8. COMMAND_CLASS_MANUFACTURER_SPECIFIC_V2, 9. COMMAND_CLASS_VERSION_V2, 10. COMMAND_CLASS_BASIC, Ⅷ. Limitations Please be certain that our product is reliable. However, its transmission capacity and installing condition will make the detector limited in a certain range. Here are some possible situations: 1. Indoor environmental limit, as the interference from same RF frequency, and complicate geographical environment, etc. 2. Low battery of the detector Note: Please understand the company has no obligation for the effect results from customer’s incorrect operation.