forensic facial reconstruction
•
59 j'aime•17,265 vues

this presentation deals with the forensic aspects of identification using various 2D & 3D techniques, including the facial approximation methods..... The efforts of Dr. R V Singh and Ms. Alka Gupta in making of this presentation is appreciated..

Recommandé
Contenu connexe
Tendances
Tendances (20)
Similaire à forensic facial reconstruction
Similaire à forensic facial reconstruction (20)
Plus de Saurabh Bhargava
Plus de Saurabh Bhargava (13)
Dernier
Dernier (20)
forensic facial reconstruction
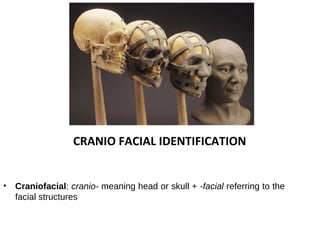
- 1. CRANIO FACIAL IDENTIFICATION • Craniofacial: cranio- meaning head or skull + -facial referring to the facial structures
- 2. Facial Muscles • The facial muscles are subcutaneous (just under the skin) muscles that control facial expression. • The facial muscles are a group of striated skeletal muscles innervated by the facial nerve (cranial nerve VII). • The facial muscles are innervated by facial nerve (cranial nerve VII), with each nerve serving one side of the face.
- 3. Facial Muscles • Occipitofrontalis muscle • Temporoparietalis muscle • Procerus muscle • Nasalis muscle • Depressor septi nasi muscle • Orbicularis oculi muscle • Corrugator supercilii muscle • Depressor supercilii muscle • Auricular muscles (anterior, superior and posterior) • Orbicularis oris muscle • Depressor anguli oris muscle • Risorius • Zygomaticus major muscle • Zygomaticus minor muscle • Levator labii superioris • Levator labii superioris alaeque nasi muscle • Depressor labii inferioris muscle • Levator anguli oris • Buccinator muscle • Mentalis • Platysma
- 6. •Frontalis allows us to raise eyebrows (in surprise) and wrinkle forehead •Orbicularis Oculi allows us to close our eyes, squint, blink, and wink •Orbicularis Oris "kissing" muscle •Buccinator flattens the cheek (whistling, blowing a trumpet); also a chewing muscle, compresses the cheek to hold food between the teeth during chewing •Zygomaticus smile (raises the corners of the mouth) •Masseter prime mover chewing; closes the jaw by elevating the mandible •Temporalis acts as a synergist of the masseter in closing the jaw •Sternocleidomastoid flex your neck; "prayer" muscles, bowing your head; if just one contracts, the head is rotated toward the opposite side •Platysma pulls mouth down
- 10. Factors influencing the witness’ ability to recall the face • time lapsed between incident and the interview; • degree of physical trauma involved (passive to violent); • whether the person was a victim or a witness; • day-time/night-time—lighting conditions; • distance from offender; • use of weapons by offender; • use of disguises by offender; • duration of commission of offence; • period offender observed; • witness observation capabilities; • witness' ability to retain the image; • witness' ability to recall and describe; • the age or demeanour of the witness; • the willingness of the witness to cooperate; • whether the offender was seen on more than one occasion; and • whether the offender is known (by sight) to the witness.
- 12. Cranio Facial Identification • Facial identification refers to manual examination of two face images or a live subject and a facial image to determine whether they are same persons or not. • Facial identification methods can generally be classified into the following three categories: 1.Cranio facial superimposition techniques 2.Cranio facial restoration techniques 3.Cranio facial reconstruction techniques Forensic facial reconstruction is the process of creating the face of an individual on a skull for the purpose of identifying an unknown person.
- 13. METHODS OF FACIAL IDENTIFICATION 1. Superimposition (Cranio-facial superimposition) 1. Skull/Photo superimposing 2. Video (Skull/photo) superimposition 3. Radiographic superimposition (X-ray) or Roentgenographic 2. Facial Restoration (Repair) 3. Facial Reconstruction (Rebuilding) 1. 2-D (Drawing and Tracing methods) 2. 3-D (Anatomical and Somatometric) 3. Computer aided 3-D
- 14. Procedural Considerations Few critical variables must be considered: – Orientation – positioning – size – distortion – features to be used for comparison The importance of each of these issues for the results and accuracy of superimposition studies has been discussed since the technique was first proposed, and continues to be debated today.
- 15. Methods of Superimposition Superimposition: the method of laying one picture or image over the top of another is called superimposition. The first documented use of photographic superimposition in a medical-legal context has been attributed to Glaister and Brash for their 1937 analysis of the 1935 Buck Ruxton case. Buck Ruxton _ Murderpedia, the encycloped Comparisons were made between photographs of two recovered skulls and antemortem photos of two missing women, Buck Ruxton’s wife Isabella, and her housemaid Mary Rogerson. Skull Photo superimposing
- 16. Frankfort stand Camera Placeme nt 1 2 Skull video superimposition
- 17. Camera Placement • The basic procedure for comparison requires two video cameras, one directed at the skull and one directed at the comparison photograph. • The first video camera points directly downward at the skull. • A second video camera points at the antemortem photographic image affixed to a vertical bulletin board. • Both images are projected onto a monitor placed near the skull so that the assistant, usually the forensic artist, can easily view the superimposition in progress while maneuvering the skull. • The skull is superimposed and blended with the photographic image, both on the monitor used by the assistant and on monitors in a nearby control room where the anthropologist views them.
- 18. Methods of video superimposition are 1. Blending (Merging) or fading 2. Sweeping (Taping) – Vertical sweeps – Horizontal sweeps – Diagonal sweeps – Box sweep
- 19. Blending or fading A Blending of the photo and skull is manipulated in the control room starting with the photo image only, and then slowly and progressively increasing the superimposed image of the skull. The blending progresses until the skull dominates the superimposition and finally terminates with a skull-only image.
- 20. Sweeping • In sweeping procedures several types of superimposition taping methods are used. Common methods: 1. Horizontal 2. Diagonal 3. Box sweep 4. Vertical
- 22. Facial Reconstruction or Approximation • Presently, the term “face reconstruction” is widely replaced by more accurate term “face approximation”. The reason is simple. The term “reconstruction” can be understood as “restoration” but also “the exact recreation of ante mortem look”. • It is impossible to obtain exact appearance, because some of the features can not be predicted only from skull. • In the best case, the practitioner can only approximate to the real appearance. • Techniques of facial approximation are used mainly in Forensic Anthropology.
- 23. What is FFR Forensic facial reconstruction (or forensic facial approximation) is the process of recreating the face of an individual (whose identity is often not known) from their skeletal remains through a blend of artistry, forensic science, anthropology, osteology, and anatomy. It is easily the most subjective as well as one of the most controversial—technique in the field of forensic anthropology. Despite the controversy, facial reconstruction has proved successful frequently enough that research and methodological developments continue to be advanced.
- 24. Methods of Forensic Facial Reconstruction (FFR) FFR 2-Dimensional Facial Reconstruction 3-Dimensional Facial Reconstruction 1. Manual (Drawing/sketching) 2. Computerized 1. Tissue Depth or Morphometric Method (AMERICAN) 2. Anatomical or Muscle to muscle or Morphoscopic Method (RUSSIAN) 3. Combination Method or Manchester Method (WORLDWIDE) Computerized 3DR
- 26. How To Start… 1. Receiving, Protecting and storing of skull 2. Preliminary data collection (A/S/R/S) 3. Combined job (Anthropologist/Odontologist/Artist) 4. Applying Basic techniques of facial Reconstruction
- 27. Basics of FFR • Osteological Examination: Size, shape and proportionate measurements to discern age, sex, stature, race, antemortem health, pathology, trauma and other habits etc of the person are best used to reconstruct a face. • Cephalometric/Radiographic analysis: Some features which are not visible to naked eyes can be discovered with help of radiographic techniques. • Soft Tissue Thickness: According to Michael Anderson, the tissue depth method uses average skin-thickness measurements at specific points on the skull to guide the soft- tissue reconstruction. Skin-depth measurements have been collected on the human face at 21 points for males and females for the three racial groups.
- 28. Precautions 1. It is recommended that the artist inquire about any potential need for DNA specimens before handling a skull without gloves. 2. Above all, the skull should always be treated with respect. It is what remains of a living, breathing human life and should not be an object for jokes and pranks.
- 29. Handling of Skull • The skull should always be handled with care: Remember that a skull entrusted to you should never be altered or damaged, nor should any minute bits of possible evidentiary information be lost. • Never pick up a skull in the facial area by placing your fingers into the orbits of the eyes or in the nasal aperture. • Cradle the skull with both hands or, if necessary, a good one- handed grip can be made with your thumb in the foramen magnum with the palm of your hand supporting the base of the
- 30. Gluing the Mandible to the Cranium General Dental Assessment: Once the teeth are secured in the skull, the artist should carefully evaluate the dentition for potentially useful information before gluing the mandible to the cranium. Ideally a dentist or odontologist is consulted to perform a dental analysis.
- 31. Correct Positioning: When gluing the mandible, the spacing of these structures should be simulated to correspond with the living condition; thus a few millimeters should be allowed between the condyle and the fossa (Figure 11.8). Spacing can be accomplished with clay, cotton, gauze, or other materials.
- 32. 2-D Reconstructions • Two-dimensional facial reconstructions are based on ante mortem photographs, and the skull. Occasionally skull radiographs are used but this is not ideal since many cranial structures are not visible or at the correct scale. • A commonly used method of 2D facial reconstruction was pioneered by Karen T. Taylor of Austin, Texas during the 1980s. Taylor's method involves adhering tissue depth markers on an unidentified skull at various anthropological landmarks, then photographing the skull. • Recently developed, the F.A.C.E. (Facial Automated Composition and Editing) and C.A.R.E.S. computer software programs quickly produce two-dimensional facial approximations that can be edited and manipulated with relative ease. These programs may help speed the reconstruction process and allow subtle variations to be applied to the drawing, though they may produce more generic images than hand-drawn artwork.
- 33. Acetate Method of Tracing
- 34. 3-Dimensional reconstructions • Three-dimensional facial reconstructions are the sculptures (made from casts of cranial remains) created with modeling clay and other materials) high-resolution, three-dimensional computer images. Like two-dimensional reconstructions, three-dimensional reconstructions usually require both an artist and a forensic anthropologist.
- 35. Methods 1. American method or Morphometric method 2. European or Russian method or Morphoscopic Method 3. Manchester or combined method
- 36. The materials needed for this exercise are: 1. A skull 2. A scalpel or knife 3. small metric ruler 4. Several boxes of eraser refills, one-fourth inch in diameter 5. A diagram for placement of average tissue depth markers 6. Glue (Duco™ cement or crazy glue) 7. Non-hardening clay such as Permoplast Modeling Clay™
- 37. Tissue Depth Method (American) Morphometric method • Average tissue depth is determined for 21 precise anatomical points (landmarks) on skull. • Pioneer in this field was Dr. Wilton Krogman in 1940 and Betty Pat Gatliff in 1970.
- 39. The Concept • In forensic facial reconstruction, or rather, forensic reconstruction of soft facial parts the basic premise is that in certain anatomical points of the skull there are definable soft tissue thicknesses. • In several studies, these were measured, and the mean thickness for the respective point (so called landmarks) were calculated. • The measurements used to be taken on dead bodies, with needles, MRI, or CT. • The imaging methods provided an opportunity to perform measurements in living subjects, to be able to exclude postmortem changes and artifacts.
- 42. Anatomical or Morphoscopic Method Russian or Europen • This is a method of rebuilding a face, muscle by muscle, generally attributed to renowned Russian anthropologist Mikhail M. Gerasimov in 1930-1970. • Reconstructs the face by sculpting muscles, glands and cartilage on the skull, in effect “fleshing out” the skull. The skull gives information about the origins and insertions of the facial muscles, or where the muscles begin and end. These parameters, interpreted by a specialist with a thorough knowledge of human and comparative anatomy and biomechanics, provide the information necessary to produce a competent reconstruction from a skull.
- 47. Manchester or Combination Method • Regarding the choice between the anatomical method and the tissue depth method, Michael Anderson states, “It should be noted that these two methods are not mutually exclusive or contradictory. Many reconstruction practitioners use a combination of both.” • It is our belief, too, that the wise reconstruction artist takes advantage of the best aspects of each method. Therefore, a combination approach is likely the best approach. • It is the stage where all the precisely calculated anatomical modeling is covered up by a layer of clay, laid over its surface to simulate the outer layers of subcutaneous tissues and skin. … apply this layer as wide strips of clay, allowing them to mirror the form underneath but always using the measurements to guide their thickness. This ensures that the hand of the artist does not and cannot influence the final shape of the head and face. The measurements still rule supreme.
- 49. The 3-Dimensional Clay Reconstruction The skull was mounted onto a pole in the Frankfurt Plane using plaster-of paris. Tissue depth data was chosen depending on the age, sex, and ancestry. Tissue depth markers were placed at common facial anthropological points. 1. Pegging the Skull
- 50. 2. The Neck The neck was sculpted around the pole using a block of clay that was wide enough to support the head. The sternocleidomastoid was formed by a large sausage-shaped piece of clay that was attached so as to appear vertical from the side, but sloping slightly inwards when viewed from the front.
- 51. 3. The Temporalis Muscle The temporalis muscle was built up by adding clay to the side of the skull, filling the space behind the zygomatic arch and progressively getting thinnner towards the inferior temporal line, recreating the natural curve of the head.
- 52. 4.The Positioning of the Eye Globe The globes used to represent eyes were 25mm in diameter, which is the standard diameter for an adult. These were positioned in each orbit so that they were slightly closer to the top than the bottom, and slightly closer to the lateral wall than the medial. The projection of the eye was determined by creating a tangent between the middle of the upper border of the orbit and the middle of the lower border of the orbit. The eye was then positioned in the orbit until the flat plane of the iris protruded to the tangent.
- 53. 5.The Orbicularis Oris Muscle and Buccinator Muscles The orbicularis oris was formed by initially rolling two pieces of clay into sausage shapes and placing them across the area where the upper and lower teeth would have been. This muscle is formed as a thick oval shape to represent the space between the teeth and the muscle, and the muscle itself.
- 54. 6. The Orbicularis Oculi Muscle The orbicularis oculi is a circular muscle which runs around the orbit of the eye. This was sculpted by rolling a piece of clay into a sausage shape and placing it around the orbit before flattening the clay so it follows the shape of the orbit and bends in towards the eyeball. The eyelids were then formed by creating two smaller sausage-shapes, which were positioned across the eyeball according to the position of the malar tubercle and lacrimal crest.
- 55. 7. The Nose The nose was sculpted according to the description suggested when predicting the facial features. Measurements were carried out using the standards set to ensure that the nasal tip and the projection of the nose were accurate. After the nose was sculpted, further measurements were used to ensure that the height, length and depth of the nose were correct. The width of the nose was determined by the maximum aperture width (MAW), which is found to be three-fifths of the maximum nasal width.
- 56. 8. The Ears The ears were modelled according to the description predicted: large protruding ears that are adherent (meaning they dont have lobes). The ears were postioned according to Gerasimov (1971), who stated that the angle of the ear can be determined by the angle of the jawline.The angle of the Ear
- 57. 9. The Parotid Gland The parotid gland (highlighted in blue) was sculpted using irregular lumps of clay to create a lobulated mass that originates below the external auditory meatus and spreads across the masseter muscle remaining just below the zygomatic arch, and covers the area between the mandible and the sternocleidomastoid.
- 58. 10. The Zygomaticus Major and Minor Muscles The zygomaticus muscles are both sculpted using thin strips of clay which are supported from behind by extra clay so that they don't collapse under the weight of the skin layer. These muscles form the profile of the cheeks.
- 59. 11. The Skin Layer The final skin layer was applied according to the tissue depth pegs. Care was taken to ensure that the strips of clay followed the underlying muscle structure. The details of the face such as the mouth, eyes and eyebrows were modelled according to their predicted description. The surface of the head and neck was smoothed and patted with a damp sponge to achieve a matted texture similar to the texture of skin.
- 60. Important Tips.. • The three most important things to know are the sex, race, and age of the skull. • When using a plastic lab skull, determine the most likely sex of the person from which the plastic skull was modeled. • Work the clay smoothly from start to finish, following the curve of the bone. • Be especially careful to follow the curve of the bone along the jaw line as this area can spread out quickly if you are not paying attention. • Use each other as models or use photographs when shaping the lips, nose, eyelids, and mouth.
- 61. Daubert Standard • In the U.S., the Daubert Standard is a legal precedent set in 1993 by the Supreme Court regarding the admissibility of expert witness testimony during legal proceedings. • When multiple forensic artists produce approximations for the same set of skeletal remains, no two reconstructions are ever the same and the data from which approximations are created are largely incomplete. Because of this, forensic facial reconstruction does not uphold the Daubert Standard, is not included as one of the legally recognized techniques for positive identification, and is not admissible as expert witness testimony. Currently, reconstructions are only produced to aid the process of positive identification in conjunction with verified methods.
- 62. FFR Status in India • Facial Reconstruction is not technically implemented in India and other developing countries due to : 1. Lack of Facial Tissue Thickness Data 2. Lack of Facial Feature Data 3. High Cost of Purchasable Solutions 4. Requires a lot of time 5. Less productive 6. Lack of Expertise