1. 8-15-07 Rev3 1
Introduction to Word 2007
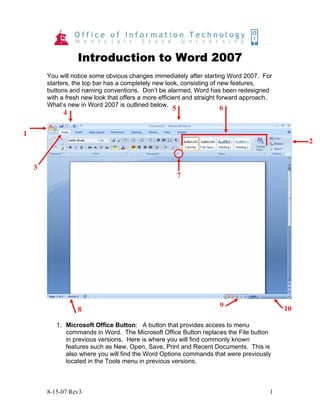
You will notice some obvious changes immediately after starting Word 2007. For
starters, the top bar has a completely new look, consisting of new features,
buttons and naming conventions. Don’t be alarmed, Word has been redesigned
with a fresh new look that offers a more efficient and straight forward approach.
What’s new in Word 2007 is outlined below.
1. Microsoft Office Button: A button that provides access to menu
commands in Word. The Microsoft Office Button replaces the File button
in previous versions. Here is where you will find commonly known
features such as New, Open, Save, Print and Recent Documents. This is
also where you will find the Word Options commands that were previously
located in the Tools menu in previous versions.
1
2
3
4
5 6
7
8
9 10
2. 2
2. Ribbon: An area across the top of the screen that makes almost all the
capabilities of Word available in a single area. The Ribbon replaces the
menus and toolbars in previous versions. The Ribbon exposes most of
the features that used to be hidden in File menus. The Ribbon makes it
easier to see and find commands to format your document. The Ribbon
can be reduced to a single line of tabs by pressing CTRL + F1.
3. Tab: An area on the Ribbon that contains buttons that are organized in
groups. The default tabs are Home, Insert, Page Layout, Reference,
Mailings, Review and View.
4. Quick Access Toolbar: A customizable toolbar at the top of an active
document. By default the Quick Access Toolbar displays the Save, Undo,
and Repeat buttons and is used for easy access to frequently used
commands. To customize this toolbar click on the dropdown arrow and
select the commands you want to add.
5. Title Bar: A horizontal bar at the top of an active document. This bar
displays the name of the document and application. At the right end of the
Title Bar is the Minimize, Restore and Close buttons.
6. Groups Categories: A Group of buttons on a tab that are exposed and
easily accessible. These buttons were formally embedded in menus on
the Menu Bar.
7. Dialog Box Launcher: A button that launches a dialog box containing
options for refining a command.
8. Status Bar: A horizontal bar at the bottom of an active window that gives
details about the active document.
9. View Toolbar: A toolbar that enables, adjusts, and displays different
views of a document’s content.
10.Zoom Button: A button that magnifies or reduces the contents in the
document window.
3. 3
The New Word Environment
The new Word environment has been designed so that its powerful features are
easier to find when you need them. This design reflects the way in which people
generally work with the program. In previous versions, commands were primarily
located in a Menu list. In Word 2007 the commands are displayed on the Ribbon
for easy access.
Understanding the Ribbon
There are three basic components to the Ribbon:
• Tabs sit across the top of the Ribbon. Each one contains buttons that
are organized in groups.
• Groups are sets of related commands. They pull together all the
commands you're likely to need for a type of task, and they remain on
display and readily available, giving you rich visual aids.
• Commands are represented as Buttons. The term Buttons replaces
the term Icon in previous versions.
Contextual Tabs are designed to appear on the Ribbon when certain objects or
commands are selected. These tabs provide easy access to options specific to
the selected object or command. For example, the commands for editing a
picture will not be available until the picture is selected, at which time the Picture
Tools tab will appear.
To Create a New Word Document:
1) Click the Microsoft Office
Button
2) Click New
3) Select Blank Document
4) Click on Create
Tabs
Commands Group
4. 4
Navigating in a Document
The following table lists ways to navigate in a document using your keyboard to
move the insertion point in an active document:
To Display Different Views:
1) Click the View tab, in the Documents Views group
2) Click on the desired view
~OR~
3) Click a View Button on the View Toolbar in the lower right corner of the
Status Bar
5. 5
• Print Layout View: Shows a document as it appears on a printed page.
• Full Screen Reading View: Displays as much of the content of the
document as will fit in the screen.
• Web Layout View: Shows a document as it appears in a web browser.
• Outline View: Shows the structure of a document, which consist of
heading and body text.
• Draft View: Displays the content of a document with a basic layout.
• Zoom: Magnifies or reduces the contents in the document window.
Editing and Proofing Documents
Selecting Text
• Select a word: Click and drag or double-click on the word
• Select a sentence: Click and drag or click in the sentence while holding
down the CTRL key
• Select a paragraph: Click and drag or triple-click in the paragraph or
double-click in the selection area to the left of the paragraph
• Select a block of text: Click and drag or click to the left of the first word,
hold down the SHIFT key, and then immediately click to the right of the
last word
• Select a line: Click and drag or click in the selection to the left of the line
• Select an entire document: Triple-click in the selection area or hit the
CTRL + A keys
• Deleting text: Select the text and hit the DELETE key
• Undo an action: On the Quick Access Toolbar click the Undo key
Deleting Text
When deleting text in your document you can either use the Delete key or the
Backspace key. The Delete key deletes text to the right of your cursor while the
Backspace key deletes text to the left of your cursor.
6. 6
Cut, Copy and Paste
Often times you will need to move text from one location in a document to
another, or to a different application. In this case you will perform a Cut and
Paste. To reproduce a specific part of a document and place it elsewhere, you
will perform a Copy and Paste.
To Cut Text:
1) Select the text you want to move
2) Click on the Cut icon located on the Home tab in the Clipboard group
To Copy Text:
1) Select the text you want to copy
2) Click on the Copy icon located on the Home tab in the Clipboard group
To Paste Text:
1) Click in the area of the document where you want to paste your text
2) Click on the Paste icon located on the Home tab in the Clipboard group
Formatting a Document
To Make Font Changes:
1) Select the desired text that you want to format
2) Make your font changes using one of the methods listed below
Commands for font formatting can be found on the Home tab in the Font group.
For more font formatting options click on the Dialog Box Launcher in the lower-
right corner of the group. This will launch the Font dialog box.
7. 7
You can also use the MiniToolbar. The Mini Toolbar is activated when you
select text to be formatted. This toolbar is miniature and semi-transparent to help
you work with fonts, font styles, font sizing, alignment, text color, indent levels,
and bullet features.
Live Preview
Using Live Preview temporarily applies formatting on selected text or objects
whenever a formatting command is hovered. This allows you to quickly see how
the formatting options will look before they are made.
1) Select the desired text that you want to format
2) On the Home tab, in the Font group, do any of the following:
a. Click the arrow next to the Font box and move the pointer over the
fonts that you want to preview.
b. Click the arrow next to the Font Size box and move the pointer
over the font sizes that you want to preview.
c. Click the arrow next to the Text Highlight Color button and move
the pointer over the highlight or fill colors that you want to preview.
d. Click the arrow next to the Font Color button and move the pointer
over the font colors that you want to preview.
When you finish previewing the formatting choices, do one of the following:
• To apply the previewed formatting, click the selected font name, size, or
color in the list.
• To cancel live previewing without applying any changes, press ESC.
Formatting a Paragraph
A paragraph is a select group of text that can have its own formatting
characteristics, such as alignment, spacing and styles.
1) Select the desired paragraph(s) that you want to format
2) Make your paragraph formatting selections using one of the methods listed
below
Commands for paragraph formatting can be found on the Home tab in the
Paragraph group.
8. 8
For more paragraph formatting options click on the Dialog Box Launcher in the
lower-right corner of the group. This will launch the Paragraph dialog box. You
can also use the Mini Toolbar for paragraph alignment, indent levels, and bullet
features.
Previewing and Printing a Document
Click the Microsoft Office Button, point to print and select one of the following
options:
• Print allows you to select a printer, number of copies, and other printing
options before printing.
• Quick Print allows you to send the document directly to the default printer
without making changes.
• Preview allows you to preview and make changes to pages before
printing.
Saving and Closing a New Document
To Save a New Document
1) On the Quick Access Toolbar, cick the Save button
~OR~
2) Click the Microsoft Office Button
3) Click Save As, the Save As dialog box will appear
4) In the File Name field, type the name of the document
10. 10
To Close a Document
1) Click the Microsoft Office Button, and then click Close
2) If a Microsoft Office Word dialogue box appears displaying a “Do you want
to save…?” message:
Click Yes to save, No to discard, or Cancel to close the dialogue box.
Converting a Document
To convert a document created in an earlier version of Word:
1) Click the Microsoft Office Button, and then click Convert.
NOTE: Convert will only become an option after a document created in
an earlier version of Word is opened.
2) The following message will appear:
3) Click OK
4) Click the Microsoft Office Button
5) Click Save
NOTE: By default, when you open Word 97-2003 documents, Compatibility
Mode is turned on and will be displayed in the Title Bar of the document
window. This mode will allow you to open, edit and save Word 97-2003
documents, but you won’t be able to use any of the Office Word 2007
features.
11. 11
Saving a Word 2007 Document in an Earlier Version of
Word
1) In Word 2007, click the Microsoft Office Button
2) Point to Save As
3) Click Word 97-2003 Document
4) The Save As dialog box opens with the Save As type filled in as: Word 97-
2003 Document
5) Type the name of the document in the File Name section
6) Click Save