SlideShare une entreprise Scribd logo
1  sur  8
Télécharger pour lire hors ligne
Updating procedure for IRD_390, IRD_420, IRD420T,       IRD_420SM, IRD450CI, U4101, U4105, and IRD120:  Procedimiento para actualización para IRD_390, IRD_420,  IRD420T, IRD_420SM, IRD450CI, U4101, U4105 y IRD120:1. Update from PC to receiver:                1. Actualización de PC a receptor:Necessary material:                           Material necesario:  •   STB5518 software for PC.                   •    STB5518 software.  •   PC with serial port, COM_1 or COM_2.       •    PC con puerto serie, COM_1 o COM_2.  •   Windows 98 or XP.                          •    Sistema operativo Windows 98 o XP.  •   Serial cable “NULL MODEM”.                 •    Cable puerto serie “NULL MODEM”.                                       PIN2    PIN3                                       PIN3    PIN2                                       PIN5    PIN51.1 Software update from PC to                1.1 Actualización del software deReceiver:                                     PC a Receptor:   Nota Informativa: Tras la actualización del receptor, sólo se modificará elSoftware y NO los datos de la memoria tales como canales de TV/Radio, listadode FAV y Configuración.   Note: Once you have update the software, all data in data base as TVchannels, Radio channels, FAV list and configuration will not be affected.                                                                                 Página 1 de 8                     http://krimo666.mylivepage.com/
Set the program:                                   Preparar el programa:  •   Connect serial cable between PC and            •   Conectar el cable serie entre el PC y el      receiver.                                          receptor.  •   Execute ST5518.                                •   Ejecutar ST5518.  •   Select communication port.                     •   Seleccionar      el      puerto      de                                                         comunicaciones.  •   Select download software (PC>>>STB)            •   Seleccionar     “download     software”      from option menu.                                  (PC>>>STB) del menú de opciones.  •   Select .BIN file for updating using            •   Seleccionar el fichero .BIN a cargar      <Browse> button.                                   utilizando el botón <Browse>.Prepare IRD for receiving SW:                      Preparar el IRD para la actualización                                                   del solftware:  •   Turn on the receiver.                          •   Poner en marcha el receptor.  •   Go to Stand by mode by pressing                •   Dejar el receptor en modo Stand by      POWER key in front panel or by using               utilizando la tecla de POWER del      RCU;.for IRD 120 only this last option.            frontal o el botón del mando a distancia;                                                         para el IRD120 utilizar esta ultima                                                         opción.Updating IRD:                                      Actualizando receptor:  •   From ST5518 program, select START              •   Desde el programa ST5518, seleccionar      button.                                            de la barra de botones, START.  •   If all steps have been follower correctly,     •   Si se han seguido los pasos      receiver update will start.                        mencionados correctamente, comenzará  •   While receiver is updating, an “A”                 la actualización del receptor.      followed by number will appear. This           •   Mientras      el    receptor    se    esta      number will increase as update goes on.            actualizando veremos que el frontal                                                         muestra una “A” seguida de una                                                         numeración que va incrementando su                                                         valor a lo largo de la actualización.                                                                                          Página 2 de 8                       http://krimo666.mylivepage.com/
¡¡¡ATENCIÓN!!!! Una vez finalizado el proceso de carga, no toque el receptor mientrasaparezca el mensaje “Waiting for erasing flash and writing data….”, ya que esto provocaría dañosirreversibles en la memoria de este.    ¡¡¡ATENTION!!!! Once the update process has finish, do not touch receiver until “Waitingfor erasing flash and writing data….” message appears, it will cause irreversible damage tomemory.   •   Once flash writing is finished receiver      •   Una vez finalizada la escritura en la       will be correctly updated. Front panel           flash y por tanto actualizado el receptor,       will show –End . Next turn off and on            en el frontal mostrará –End , indicando       the receiver and new software will be            que la carga del software ha finalizado.       uploaded from flash memory. We can               A continuación encendemos el receptor       check new software has been updated              para que el nuevo software sea leído.       correctly by: MAIN MENU                          Podemos comprobar que el nuevo       SYSTEM ABOUT IRD.                                software ha sido cargado correctamente                                                        accediendo al MENÚ PRINCIPAL                                                        SISTEMA ACERCA DE IRD.                                                                                         Página 3 de 8                       http://krimo666.mylivepage.com/
How to make a Backup of the                       Cómo hacer una Copia de SeguridadDataBase:                                         de la Base de Datos.   Nota Informativa1: La base de Datos está compuesta por todos aquellos datos que no formanparte del software como lo son:   -   Listado de canales de TV   -   Listado de canales de Radio   -   OSD (idioma y color de los menús)   -   Ajuste de Sistema   -   Control Paterno   -   Instalación de TP o de MUX.   Nota Informativa2: Todos los receptores digitales mostrados en la cabecera de este documento,tienen dos zonas de memoria donde se guardan los Datos. A la primera zona de memoria se leconoce como “memoria activa” y es la parte de memoria sobre la que interactuamos. Cuandomovemos un canal del listado general de canales o lo borramos, estamos moviendo o borrandoinformación de la memoria activa.A la segunda zona de memoria se le conoce como “memoria pasiva” y corresponde a la copia deseguridad que se efectúa tras seleccionar la opción de Menú. MENÚ DE SISTEMA            SALVARY GUARDAR CONFIG SALVAR PROG&CONFIG.  Note 1: The database is composed by all dates that are not part of the software like they are it:   -   TV List Channels   -   Radio List Channels   -   OSD (languaje and color of the MENU)   -   System Setting   -   Parental Control   -   Installation of TP or MUX.   Note 2: All the digital receivers shown in the head of this document, have two areas wherethey save the Data. To the first area is known as “active memory” that corresponds to the list ofchannels shown in TV Channel or Radio Channel. When we moved or erased one or severalchannels of the general list, we are moving or erasing information of the active memory.To the second area is known as “passive memory” and it corresponds to the backup copy that ismade after selecting the option of Menu SYSTEM MENU              USER SAVE & LOAD            SAVEPROG&CONFIG.   •   Repeat the same steps that in Update           • Seguir los mismos pasos que en       from PC to Receiver, to connect the PC             Actualización de PC a Receptor, para       and the receiver.                                  conectar el PC y el receptor.   •   From the program STB5518 select the            •   Desde      el    programa      STB5518       option Upload Dates (STB         PC) of            seleccionar la opción Upload Data       the Menu Options.                                  (STB PC) del menú de Opciones.   •   Turn on the reciver and go to Stand-By.        •   Encender el receptor y dejarlo en Stand-   •   From the program STB5518, to select                By.       of the bar of botons, Stat.                    •   Desde     el     programa      STB5518,                                                          seleccionar de la barra de botones, Start.                                                                                           Página 4 de 8                        http://krimo666.mylivepage.com/
•   While is sending data from PC, the        •   Mientras se está efectuando el volcado        frontal of the receiver will show a “F”       de datos al PC, el frontal del receptor        followed by a numeration that goes            mostrará un “F” seguida de una        increasing its value along the upgrade.       numeración que va incrementando su                                                      valor a lo largo de la actualización.•  When it has concluded the sending of data, • Una vez finalizado el volcado de datos,   it will assign a name to the file, with      asignará un nombre al fichero resultante,   extension. SDX.                              con extensión .SDX.   ¡¡¡ATENCIÓN!!!! Sólo se guardarán en el fichero resultante aquellos datos quepertenezcan a la “memoria activa” y no a la “memoria pasiva” ya que estosúltimos permanecen en el receptor.   ¡¡¡ATENTIÓN!!!! In the file with extension .SDX, will save only the data thatare in the “active memory” and not in the “passive memory”.1.2 Update DataBase from PC to 1.2 Actualizar la Base de Datos deReceiver.                      PC a ReceptorTo upgrade the Database using a PC, the same Para actualizar la Base de Datos utilizando unsteps will be continued that for the backup PC, se seguirán los mismos pasos que para lacopy:                                        copia de seguridad:    • Select the menu option: Download          • Seleccionar la opción de menú:       Dates (PC STB).                              Download Data (PC STB).    • Leave the receiver in Stand-By.           • Dejar el receptor en Stand-By.    • Choose the data file [with name.SDX]      • Escoger el fichero de datos [con       by selecting the button < Browse >.          nombre.SDX], seleccionando el botón    • Press Start button.                           <Browse>.                                                • Seleccionar de la barra de botones,                                                    Start.                                                                                    Página 5 de 8                        http://krimo666.mylivepage.com/
Once concluded the writing in the memory and        Una vez finalizada la escritura en la memoria ytherefore update the database of the receiver, in   por tanto actualizada la base de datos delfrontal panel will show –End. Next we turn on       receptor, en el frontal mostrará         –Endthe receiver so that the new database is reading.   indicando que la carga ha finalizado. A                                                    continuación encendemos el receptor para que                                                    la nueva base de datos sea leída.2. Update from receiver to receiver:                2. Actualización          de    receptor       a                                                    receptor:Necessary material:                         Material necesario:  • A receiver with the last version or the   • Un receptor con la última versión o la     most recent. It    will be MASTER           más reciente. A este receptor lo     receiver.                                   llamaremos MAESTRO.  • Serial Cable "NULL MODEM."                • Cable serie “NULL MODEM”.  • The receiver to upgrade. It will be       • El receptor a actualizar. A este receptor     SLAVE receiver.                             lo llamaremos ESCLAVO.                  Unir los dos receptores con el                  cable serie ( ver detalle)                  To link the two receivers with the                  cable series (to see detail)                                                                                          Página 6 de 8                        http://krimo666.mylivepage.com/
•   Turn on the receiver MASTER by                 •    Encender el receptor MAESTRO       switch in the rear panel and to leave it            mediante el interruptor trasero y dejarlo       in Stand-by pressing the key POWER.                 en Stand-by apretando la tecla POWER.   •   Next turn on the receiver SLAVE.               •    A continuación encender el receptor   •   At this time the MASTER´s display                   ESCLAVO.       indicates a H and the receiver SLAVE           •    En este momento el display del       shows 0000.                                         MAESTRO indica una H y el receptor                                                           ESCLAVO muestra 0000.2.1 Software Update from Receiver 2.1 Actualización de Software deto Receiver:                      receptor a receptor:The upgrade by DATE TRANSFER it is made            Si se han seguido los pasos correctamente ya sesending a code to the receiver using the remote    puede actualizar el receptor ESCLAVO.control.                                           La actualización por DATA TRANSFER seThis code can be one of the following ones:        hace mediante un código que se envía al                                                   receptor utilizando el mando a distancia.           123 upgrade only of the Software        Este código puede ser uno de los siguientes:           456 upgrade only of the Database (it       Includes configuration)                               123 Actualización sólo del Software           369 upgrade of the Software and of                456 Actualización sólo de la Base de       the Database (it Includes configuration).          Datos (Incluye configuración)                                                             369 Actualización del Software y deTo upgrade the receiving SLAVEs software, it             la    Base      de   Datos     (Incluyewould be enough with sending the receiver                 configuración).MASTER the keys combination 123.Once sent the code 123, it will be seen in         Para actualizar el software del receptorMASTERs front panel a "F” followed by a           ESCLAVO, bastaría con enviar al receptornumeration that goes increasing their value        MAESTRO la combinación de teclas 123.along the upgrade.                                 Una vez enviado el código 123, se verá en elFor the receiving SLAVE it will be seen in the     frontal de MAESTRO una “F ” seguida de unafront panel one “A” followed by a numeration       numeración que va incrementando su valor a lothat goes increasing their value at the same       largo de la actualización.time that makes it the MASTER.                     Para el receptor ESCLAVO se verá en el frontal                                                   una “A ” seguida de una numeración que va                                                   incrementando su valor al mismo tiempo que lo                                                   hace el IRD MAESTRO.       Front Panel SLAVE / Detalle ESCLAVO                Front Panel MASTER / Detalle MAESTRO       Front Panel SLAVE / Detalle ESCLAVO                Front Panel MASTER / Detalle MAESTROOnce concluded the DATA TRANSFER will              Una vez finalizada la Transferencia de Datossee the following:                                 veremos lo siguiente:Front Panel of the MASTER –End                     Frontal del IRD MAESTRO –EndFront Panel of the SLAVE   A “P” followed          Frontal del ESCLAVO     Una “P ” seguida de                                                                                           Página 7 de 8                        http://krimo666.mylivepage.com/
by a numeration in decrement.                      una numeración en decremento.  ¡¡¡ATENCIÓN!!!! Mientras el ESCLAVO muestre una “P ” en el frontal, NOAPAGUE EL RECEPTOR ya que se perderían datos de la memoria y el receptorNO se encendería.   ¡¡¡ATENTION!!!! While the SLAVE shows a “P” in the front panel, dont TURNOFF THE RECEIVER since they would get lost data of the memory and thereceiver would not TURN ON.Lastly, in the SLAVEs front panel we will see a   Por último, en el frontal del ESCLAVO–End indicating us that the one DATA               veremos un –End indicándonos que el DATATRANSFER it has concluded. It is only to turn      TRANSFER ha finalizado. Sólo queda apagar /off / on the receiver with the switch in back      encender el receptor con el interruptorpanel.                                             trasero…2.2 Update DataBase from Receiver 2.2 Actualizar la Base de Datos deto Receiver.                      Receptor a Receptor   Nota Informativa: Al igual que para la actualización de la Base de Datosdesde PC, para el Data Transfer sólo se actualiza la “memoria activa”.Recordemos también que al actualizar la Base de Datos de nuestro receptor, laconfiguración de éste quedará como la del receptor MAESTRO.   Note: The same as for the upgrade of the Database from PC, for the DataTransfer the “active memory” is only upgraded.Remember also that when upgrading the Database of our receiver, theconfiguration of this will be as that of the receiver MASTER.To upgrade the Database for Transfer it Dates      Para actualizar la Base de Datos por Datathey will repeat the same steps that for the       Transfer se repetirán los mismos pasos que paraupgrade of the software, but in this case, the     la actualización del software, pero en este caso,code to send is the 456.                           el código a enviar es el 456.                                                                                           Página 8 de 8                        http://krimo666.mylivepage.com/

Contenu connexe

En vedette

Marcellin Tt Vhb Du Poynard 2009
Marcellin Tt Vhb Du Poynard 2009Marcellin Tt Vhb Du Poynard 2009
Marcellin Tt Vhb Du Poynard 2009
odeckmyn
 
Ensalada de papa con jamón
Ensalada de papa con jamón  Ensalada de papa con jamón
Ensalada de papa con jamón
karencruzr
 
Transferencia de archivos
Transferencia de archivosTransferencia de archivos
Transferencia de archivos
elteme
 
Técnicas narrativas
Técnicas narrativasTécnicas narrativas
Técnicas narrativas
marioli123
 
Secuencias de scratch
Secuencias de scratchSecuencias de scratch
Secuencias de scratch
sandraya39
 
Universidad nacional de chimborazo
Universidad  nacional de  chimborazoUniversidad  nacional de  chimborazo
Universidad nacional de chimborazo
Dxryo Guxngx
 

En vedette (20)

Marcellin Tt Vhb Du Poynard 2009
Marcellin Tt Vhb Du Poynard 2009Marcellin Tt Vhb Du Poynard 2009
Marcellin Tt Vhb Du Poynard 2009
 
Ensalada de papa con jamón
Ensalada de papa con jamón  Ensalada de papa con jamón
Ensalada de papa con jamón
 
Apresentação Joomla!Day Brasil 2010
Apresentação Joomla!Day Brasil 2010Apresentação Joomla!Day Brasil 2010
Apresentação Joomla!Day Brasil 2010
 
Transferencia de archivos
Transferencia de archivosTransferencia de archivos
Transferencia de archivos
 
Técnicas narrativas
Técnicas narrativasTécnicas narrativas
Técnicas narrativas
 
Andrea Paz Lam CV
Andrea Paz Lam CVAndrea Paz Lam CV
Andrea Paz Lam CV
 
Historia de blogger
Historia de bloggerHistoria de blogger
Historia de blogger
 
Jcsanpedro
JcsanpedroJcsanpedro
Jcsanpedro
 
Psiquiatria
PsiquiatriaPsiquiatria
Psiquiatria
 
Janitzio
JanitzioJanitzio
Janitzio
 
¿ que es un BLOG?
¿ que es un BLOG?¿ que es un BLOG?
¿ que es un BLOG?
 
Informatica 6
Informatica 6Informatica 6
Informatica 6
 
The cranberries
The cranberriesThe cranberries
The cranberries
 
Alimentos
AlimentosAlimentos
Alimentos
 
Informatica 10
Informatica 10Informatica 10
Informatica 10
 
Exposi1
Exposi1Exposi1
Exposi1
 
Secuencias de scratch
Secuencias de scratchSecuencias de scratch
Secuencias de scratch
 
Manuela echeverry 8 1
Manuela echeverry 8 1Manuela echeverry 8 1
Manuela echeverry 8 1
 
Universidad nacional de chimborazo
Universidad  nacional de  chimborazoUniversidad  nacional de  chimborazo
Universidad nacional de chimborazo
 
Medicina
Medicina Medicina
Medicina
 

Similaire à Man Fte Maximal Newline Complete V01

Descargar y descomprimir cmap tools portable
Descargar y descomprimir cmap tools portableDescargar y descomprimir cmap tools portable
Descargar y descomprimir cmap tools portable
OEI Capacitación
 
Instalación y configuración de WSUS (Windows Server Update Services)
Instalación y configuración de WSUS (Windows Server Update Services)Instalación y configuración de WSUS (Windows Server Update Services)
Instalación y configuración de WSUS (Windows Server Update Services)
jhony_publi
 
Presentacion final instalacion de ubuntu servers 10.04
Presentacion final instalacion de ubuntu servers 10.04Presentacion final instalacion de ubuntu servers 10.04
Presentacion final instalacion de ubuntu servers 10.04
Hugo Ramirez
 
Herramientas informáticas
Herramientas informáticasHerramientas informáticas
Herramientas informáticas
ri_juega
 
Sasdasdasdasdasdadas
SasdasdasdasdasdadasSasdasdasdasdasdadas
Sasdasdasdasdasdadas
Iago_valdomar
 
Sasdasdasdasdasdadas
SasdasdasdasdasdadasSasdasdasdasdasdadas
Sasdasdasdasdasdadas
Iago_valdomar
 
Como instalar y descargar videos con atube catcher
Como instalar y descargar videos con atube catcher Como instalar y descargar videos con atube catcher
Como instalar y descargar videos con atube catcher
OEI Capacitación
 
Karol deber 16 10-2011
Karol deber 16 10-2011Karol deber 16 10-2011
Karol deber 16 10-2011
karolflaquita
 

Similaire à Man Fte Maximal Newline Complete V01 (20)

Cargar Firmware Con Arioner En Teka
Cargar Firmware Con Arioner En TekaCargar Firmware Con Arioner En Teka
Cargar Firmware Con Arioner En Teka
 
Man Jtag T Boston New Usals
Man Jtag T Boston New UsalsMan Jtag T Boston New Usals
Man Jtag T Boston New Usals
 
Cuestionario carmen pugachi
Cuestionario carmen pugachiCuestionario carmen pugachi
Cuestionario carmen pugachi
 
Descargar y descomprimir cmap tools portable
Descargar y descomprimir cmap tools portableDescargar y descomprimir cmap tools portable
Descargar y descomprimir cmap tools portable
 
Instalación y configuración de WSUS (Windows Server Update Services)
Instalación y configuración de WSUS (Windows Server Update Services)Instalación y configuración de WSUS (Windows Server Update Services)
Instalación y configuración de WSUS (Windows Server Update Services)
 
Presentacion final instalacion de ubuntu servers 10.04
Presentacion final instalacion de ubuntu servers 10.04Presentacion final instalacion de ubuntu servers 10.04
Presentacion final instalacion de ubuntu servers 10.04
 
Presentacion final instalacion de ubuntu servers 10.04
Presentacion final instalacion de ubuntu servers 10.04Presentacion final instalacion de ubuntu servers 10.04
Presentacion final instalacion de ubuntu servers 10.04
 
Herramientas informáticas
Herramientas informáticasHerramientas informáticas
Herramientas informáticas
 
Acabadoxa
AcabadoxaAcabadoxa
Acabadoxa
 
Español
EspañolEspañol
Español
 
Momentum.
Momentum.Momentum.
Momentum.
 
Modo Servicio y Ajustes de Televisores Philips
Modo Servicio y Ajustes de Televisores PhilipsModo Servicio y Ajustes de Televisores Philips
Modo Servicio y Ajustes de Televisores Philips
 
Jtag Para Fcis7000
Jtag Para Fcis7000Jtag Para Fcis7000
Jtag Para Fcis7000
 
Sasdasdasdasdas
SasdasdasdasdasSasdasdasdasdas
Sasdasdasdasdas
 
Sasdasdasdasdasdadas
SasdasdasdasdasdadasSasdasdasdasdasdadas
Sasdasdasdasdasdadas
 
Sasdasdasdasdasdadas
SasdasdasdasdasdadasSasdasdasdasdasdadas
Sasdasdasdasdasdadas
 
Sasdasdasdasdas
SasdasdasdasdasSasdasdasdasdas
Sasdasdasdasdas
 
Como instalar y descargar videos con atube catcher
Como instalar y descargar videos con atube catcher Como instalar y descargar videos con atube catcher
Como instalar y descargar videos con atube catcher
 
Karol deber 16 10-2011
Karol deber 16 10-2011Karol deber 16 10-2011
Karol deber 16 10-2011
 
Karol deber 16 10-2011
Karol deber 16 10-2011Karol deber 16 10-2011
Karol deber 16 10-2011
 

Dernier

FORTI-MAYO 2024.pdf.CIENCIA,EDUCACION,CULTURA
FORTI-MAYO 2024.pdf.CIENCIA,EDUCACION,CULTURAFORTI-MAYO 2024.pdf.CIENCIA,EDUCACION,CULTURA
FORTI-MAYO 2024.pdf.CIENCIA,EDUCACION,CULTURA
El Fortí
 
Concepto y definición de tipos de Datos Abstractos en c++.pptx
Concepto y definición de tipos de Datos Abstractos en c++.pptxConcepto y definición de tipos de Datos Abstractos en c++.pptx
Concepto y definición de tipos de Datos Abstractos en c++.pptx
Fernando Solis
 
Curso = Metodos Tecnicas y Modelos de Enseñanza.pdf
Curso = Metodos Tecnicas y Modelos de Enseñanza.pdfCurso = Metodos Tecnicas y Modelos de Enseñanza.pdf
Curso = Metodos Tecnicas y Modelos de Enseñanza.pdf
Francisco158360
 

Dernier (20)

FORTI-MAYO 2024.pdf.CIENCIA,EDUCACION,CULTURA
FORTI-MAYO 2024.pdf.CIENCIA,EDUCACION,CULTURAFORTI-MAYO 2024.pdf.CIENCIA,EDUCACION,CULTURA
FORTI-MAYO 2024.pdf.CIENCIA,EDUCACION,CULTURA
 
Qué es la Inteligencia artificial generativa
Qué es la Inteligencia artificial generativaQué es la Inteligencia artificial generativa
Qué es la Inteligencia artificial generativa
 
Concepto y definición de tipos de Datos Abstractos en c++.pptx
Concepto y definición de tipos de Datos Abstractos en c++.pptxConcepto y definición de tipos de Datos Abstractos en c++.pptx
Concepto y definición de tipos de Datos Abstractos en c++.pptx
 
Estrategia de prompts, primeras ideas para su construcción
Estrategia de prompts, primeras ideas para su construcciónEstrategia de prompts, primeras ideas para su construcción
Estrategia de prompts, primeras ideas para su construcción
 
Abril 2024 - Maestra Jardinera Ediba.pdf
Abril 2024 -  Maestra Jardinera Ediba.pdfAbril 2024 -  Maestra Jardinera Ediba.pdf
Abril 2024 - Maestra Jardinera Ediba.pdf
 
SEPTIMO SEGUNDO PERIODO EMPRENDIMIENTO VS
SEPTIMO SEGUNDO PERIODO EMPRENDIMIENTO VSSEPTIMO SEGUNDO PERIODO EMPRENDIMIENTO VS
SEPTIMO SEGUNDO PERIODO EMPRENDIMIENTO VS
 
Prueba libre de Geografía para obtención título Bachillerato - 2024
Prueba libre de Geografía para obtención título Bachillerato - 2024Prueba libre de Geografía para obtención título Bachillerato - 2024
Prueba libre de Geografía para obtención título Bachillerato - 2024
 
2024 KIT DE HABILIDADES SOCIOEMOCIONALES.pdf
2024 KIT DE HABILIDADES SOCIOEMOCIONALES.pdf2024 KIT DE HABILIDADES SOCIOEMOCIONALES.pdf
2024 KIT DE HABILIDADES SOCIOEMOCIONALES.pdf
 
LA LITERATURA DEL BARROCO 2023-2024pptx.pptx
LA LITERATURA DEL BARROCO 2023-2024pptx.pptxLA LITERATURA DEL BARROCO 2023-2024pptx.pptx
LA LITERATURA DEL BARROCO 2023-2024pptx.pptx
 
SESION DE PERSONAL SOCIAL. La convivencia en familia 22-04-24 -.doc
SESION DE PERSONAL SOCIAL.  La convivencia en familia 22-04-24  -.docSESION DE PERSONAL SOCIAL.  La convivencia en familia 22-04-24  -.doc
SESION DE PERSONAL SOCIAL. La convivencia en familia 22-04-24 -.doc
 
Infografía EE con pie del 2023 (3)-1.pdf
Infografía EE con pie del 2023 (3)-1.pdfInfografía EE con pie del 2023 (3)-1.pdf
Infografía EE con pie del 2023 (3)-1.pdf
 
Dinámica florecillas a María en el mes d
Dinámica florecillas a María en el mes dDinámica florecillas a María en el mes d
Dinámica florecillas a María en el mes d
 
SEXTO SEGUNDO PERIODO EMPRENDIMIENTO.pptx
SEXTO SEGUNDO PERIODO EMPRENDIMIENTO.pptxSEXTO SEGUNDO PERIODO EMPRENDIMIENTO.pptx
SEXTO SEGUNDO PERIODO EMPRENDIMIENTO.pptx
 
PINTURA DEL RENACIMIENTO EN ESPAÑA (SIGLO XVI).ppt
PINTURA DEL RENACIMIENTO EN ESPAÑA (SIGLO XVI).pptPINTURA DEL RENACIMIENTO EN ESPAÑA (SIGLO XVI).ppt
PINTURA DEL RENACIMIENTO EN ESPAÑA (SIGLO XVI).ppt
 
Feliz Día de la Madre - 5 de Mayo, 2024.pdf
Feliz Día de la Madre - 5 de Mayo, 2024.pdfFeliz Día de la Madre - 5 de Mayo, 2024.pdf
Feliz Día de la Madre - 5 de Mayo, 2024.pdf
 
Curso = Metodos Tecnicas y Modelos de Enseñanza.pdf
Curso = Metodos Tecnicas y Modelos de Enseñanza.pdfCurso = Metodos Tecnicas y Modelos de Enseñanza.pdf
Curso = Metodos Tecnicas y Modelos de Enseñanza.pdf
 
ACRÓNIMO DE PARÍS PARA SU OLIMPIADA 2024. Por JAVIER SOLIS NOYOLA
ACRÓNIMO DE PARÍS PARA SU OLIMPIADA 2024. Por JAVIER SOLIS NOYOLAACRÓNIMO DE PARÍS PARA SU OLIMPIADA 2024. Por JAVIER SOLIS NOYOLA
ACRÓNIMO DE PARÍS PARA SU OLIMPIADA 2024. Por JAVIER SOLIS NOYOLA
 
PLAN DE REFUERZO ESCOLAR MERC 2024-2.docx
PLAN DE REFUERZO ESCOLAR MERC 2024-2.docxPLAN DE REFUERZO ESCOLAR MERC 2024-2.docx
PLAN DE REFUERZO ESCOLAR MERC 2024-2.docx
 
OCTAVO SEGUNDO PERIODO. EMPRENDIEMIENTO VS
OCTAVO SEGUNDO PERIODO. EMPRENDIEMIENTO VSOCTAVO SEGUNDO PERIODO. EMPRENDIEMIENTO VS
OCTAVO SEGUNDO PERIODO. EMPRENDIEMIENTO VS
 
PIAR v 015. 2024 Plan Individual de ajustes razonables
PIAR v 015. 2024 Plan Individual de ajustes razonablesPIAR v 015. 2024 Plan Individual de ajustes razonables
PIAR v 015. 2024 Plan Individual de ajustes razonables
 

Man Fte Maximal Newline Complete V01

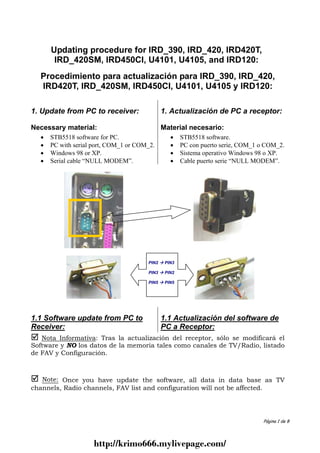
  • 1. Updating procedure for IRD_390, IRD_420, IRD420T, IRD_420SM, IRD450CI, U4101, U4105, and IRD120: Procedimiento para actualización para IRD_390, IRD_420, IRD420T, IRD_420SM, IRD450CI, U4101, U4105 y IRD120:1. Update from PC to receiver: 1. Actualización de PC a receptor:Necessary material: Material necesario: • STB5518 software for PC. • STB5518 software. • PC with serial port, COM_1 or COM_2. • PC con puerto serie, COM_1 o COM_2. • Windows 98 or XP. • Sistema operativo Windows 98 o XP. • Serial cable “NULL MODEM”. • Cable puerto serie “NULL MODEM”. PIN2 PIN3 PIN3 PIN2 PIN5 PIN51.1 Software update from PC to 1.1 Actualización del software deReceiver: PC a Receptor: Nota Informativa: Tras la actualización del receptor, sólo se modificará elSoftware y NO los datos de la memoria tales como canales de TV/Radio, listadode FAV y Configuración. Note: Once you have update the software, all data in data base as TVchannels, Radio channels, FAV list and configuration will not be affected. Página 1 de 8 http://krimo666.mylivepage.com/
  • 2. Set the program: Preparar el programa: • Connect serial cable between PC and • Conectar el cable serie entre el PC y el receiver. receptor. • Execute ST5518. • Ejecutar ST5518. • Select communication port. • Seleccionar el puerto de comunicaciones. • Select download software (PC>>>STB) • Seleccionar “download software” from option menu. (PC>>>STB) del menú de opciones. • Select .BIN file for updating using • Seleccionar el fichero .BIN a cargar <Browse> button. utilizando el botón <Browse>.Prepare IRD for receiving SW: Preparar el IRD para la actualización del solftware: • Turn on the receiver. • Poner en marcha el receptor. • Go to Stand by mode by pressing • Dejar el receptor en modo Stand by POWER key in front panel or by using utilizando la tecla de POWER del RCU;.for IRD 120 only this last option. frontal o el botón del mando a distancia; para el IRD120 utilizar esta ultima opción.Updating IRD: Actualizando receptor: • From ST5518 program, select START • Desde el programa ST5518, seleccionar button. de la barra de botones, START. • If all steps have been follower correctly, • Si se han seguido los pasos receiver update will start. mencionados correctamente, comenzará • While receiver is updating, an “A” la actualización del receptor. followed by number will appear. This • Mientras el receptor se esta number will increase as update goes on. actualizando veremos que el frontal muestra una “A” seguida de una numeración que va incrementando su valor a lo largo de la actualización. Página 2 de 8 http://krimo666.mylivepage.com/
  • 3. ¡¡¡ATENCIÓN!!!! Una vez finalizado el proceso de carga, no toque el receptor mientrasaparezca el mensaje “Waiting for erasing flash and writing data….”, ya que esto provocaría dañosirreversibles en la memoria de este. ¡¡¡ATENTION!!!! Once the update process has finish, do not touch receiver until “Waitingfor erasing flash and writing data….” message appears, it will cause irreversible damage tomemory. • Once flash writing is finished receiver • Una vez finalizada la escritura en la will be correctly updated. Front panel flash y por tanto actualizado el receptor, will show –End . Next turn off and on en el frontal mostrará –End , indicando the receiver and new software will be que la carga del software ha finalizado. uploaded from flash memory. We can A continuación encendemos el receptor check new software has been updated para que el nuevo software sea leído. correctly by: MAIN MENU Podemos comprobar que el nuevo SYSTEM ABOUT IRD. software ha sido cargado correctamente accediendo al MENÚ PRINCIPAL SISTEMA ACERCA DE IRD. Página 3 de 8 http://krimo666.mylivepage.com/
  • 4. How to make a Backup of the Cómo hacer una Copia de SeguridadDataBase: de la Base de Datos. Nota Informativa1: La base de Datos está compuesta por todos aquellos datos que no formanparte del software como lo son: - Listado de canales de TV - Listado de canales de Radio - OSD (idioma y color de los menús) - Ajuste de Sistema - Control Paterno - Instalación de TP o de MUX. Nota Informativa2: Todos los receptores digitales mostrados en la cabecera de este documento,tienen dos zonas de memoria donde se guardan los Datos. A la primera zona de memoria se leconoce como “memoria activa” y es la parte de memoria sobre la que interactuamos. Cuandomovemos un canal del listado general de canales o lo borramos, estamos moviendo o borrandoinformación de la memoria activa.A la segunda zona de memoria se le conoce como “memoria pasiva” y corresponde a la copia deseguridad que se efectúa tras seleccionar la opción de Menú. MENÚ DE SISTEMA SALVARY GUARDAR CONFIG SALVAR PROG&CONFIG. Note 1: The database is composed by all dates that are not part of the software like they are it: - TV List Channels - Radio List Channels - OSD (languaje and color of the MENU) - System Setting - Parental Control - Installation of TP or MUX. Note 2: All the digital receivers shown in the head of this document, have two areas wherethey save the Data. To the first area is known as “active memory” that corresponds to the list ofchannels shown in TV Channel or Radio Channel. When we moved or erased one or severalchannels of the general list, we are moving or erasing information of the active memory.To the second area is known as “passive memory” and it corresponds to the backup copy that ismade after selecting the option of Menu SYSTEM MENU USER SAVE & LOAD SAVEPROG&CONFIG. • Repeat the same steps that in Update • Seguir los mismos pasos que en from PC to Receiver, to connect the PC Actualización de PC a Receptor, para and the receiver. conectar el PC y el receptor. • From the program STB5518 select the • Desde el programa STB5518 option Upload Dates (STB PC) of seleccionar la opción Upload Data the Menu Options. (STB PC) del menú de Opciones. • Turn on the reciver and go to Stand-By. • Encender el receptor y dejarlo en Stand- • From the program STB5518, to select By. of the bar of botons, Stat. • Desde el programa STB5518, seleccionar de la barra de botones, Start. Página 4 de 8 http://krimo666.mylivepage.com/
  • 5. While is sending data from PC, the • Mientras se está efectuando el volcado frontal of the receiver will show a “F” de datos al PC, el frontal del receptor followed by a numeration that goes mostrará un “F” seguida de una increasing its value along the upgrade. numeración que va incrementando su valor a lo largo de la actualización.• When it has concluded the sending of data, • Una vez finalizado el volcado de datos, it will assign a name to the file, with asignará un nombre al fichero resultante, extension. SDX. con extensión .SDX. ¡¡¡ATENCIÓN!!!! Sólo se guardarán en el fichero resultante aquellos datos quepertenezcan a la “memoria activa” y no a la “memoria pasiva” ya que estosúltimos permanecen en el receptor. ¡¡¡ATENTIÓN!!!! In the file with extension .SDX, will save only the data thatare in the “active memory” and not in the “passive memory”.1.2 Update DataBase from PC to 1.2 Actualizar la Base de Datos deReceiver. PC a ReceptorTo upgrade the Database using a PC, the same Para actualizar la Base de Datos utilizando unsteps will be continued that for the backup PC, se seguirán los mismos pasos que para lacopy: copia de seguridad: • Select the menu option: Download • Seleccionar la opción de menú: Dates (PC STB). Download Data (PC STB). • Leave the receiver in Stand-By. • Dejar el receptor en Stand-By. • Choose the data file [with name.SDX] • Escoger el fichero de datos [con by selecting the button < Browse >. nombre.SDX], seleccionando el botón • Press Start button. <Browse>. • Seleccionar de la barra de botones, Start. Página 5 de 8 http://krimo666.mylivepage.com/
  • 6. Once concluded the writing in the memory and Una vez finalizada la escritura en la memoria ytherefore update the database of the receiver, in por tanto actualizada la base de datos delfrontal panel will show –End. Next we turn on receptor, en el frontal mostrará –Endthe receiver so that the new database is reading. indicando que la carga ha finalizado. A continuación encendemos el receptor para que la nueva base de datos sea leída.2. Update from receiver to receiver: 2. Actualización de receptor a receptor:Necessary material: Material necesario: • A receiver with the last version or the • Un receptor con la última versión o la most recent. It will be MASTER más reciente. A este receptor lo receiver. llamaremos MAESTRO. • Serial Cable "NULL MODEM." • Cable serie “NULL MODEM”. • The receiver to upgrade. It will be • El receptor a actualizar. A este receptor SLAVE receiver. lo llamaremos ESCLAVO. Unir los dos receptores con el cable serie ( ver detalle) To link the two receivers with the cable series (to see detail) Página 6 de 8 http://krimo666.mylivepage.com/
  • 7. Turn on the receiver MASTER by • Encender el receptor MAESTRO switch in the rear panel and to leave it mediante el interruptor trasero y dejarlo in Stand-by pressing the key POWER. en Stand-by apretando la tecla POWER. • Next turn on the receiver SLAVE. • A continuación encender el receptor • At this time the MASTER´s display ESCLAVO. indicates a H and the receiver SLAVE • En este momento el display del shows 0000. MAESTRO indica una H y el receptor ESCLAVO muestra 0000.2.1 Software Update from Receiver 2.1 Actualización de Software deto Receiver: receptor a receptor:The upgrade by DATE TRANSFER it is made Si se han seguido los pasos correctamente ya sesending a code to the receiver using the remote puede actualizar el receptor ESCLAVO.control. La actualización por DATA TRANSFER seThis code can be one of the following ones: hace mediante un código que se envía al receptor utilizando el mando a distancia. 123 upgrade only of the Software Este código puede ser uno de los siguientes: 456 upgrade only of the Database (it Includes configuration) 123 Actualización sólo del Software 369 upgrade of the Software and of 456 Actualización sólo de la Base de the Database (it Includes configuration). Datos (Incluye configuración) 369 Actualización del Software y deTo upgrade the receiving SLAVEs software, it la Base de Datos (Incluyewould be enough with sending the receiver configuración).MASTER the keys combination 123.Once sent the code 123, it will be seen in Para actualizar el software del receptorMASTERs front panel a "F” followed by a ESCLAVO, bastaría con enviar al receptornumeration that goes increasing their value MAESTRO la combinación de teclas 123.along the upgrade. Una vez enviado el código 123, se verá en elFor the receiving SLAVE it will be seen in the frontal de MAESTRO una “F ” seguida de unafront panel one “A” followed by a numeration numeración que va incrementando su valor a lothat goes increasing their value at the same largo de la actualización.time that makes it the MASTER. Para el receptor ESCLAVO se verá en el frontal una “A ” seguida de una numeración que va incrementando su valor al mismo tiempo que lo hace el IRD MAESTRO. Front Panel SLAVE / Detalle ESCLAVO Front Panel MASTER / Detalle MAESTRO Front Panel SLAVE / Detalle ESCLAVO Front Panel MASTER / Detalle MAESTROOnce concluded the DATA TRANSFER will Una vez finalizada la Transferencia de Datossee the following: veremos lo siguiente:Front Panel of the MASTER –End Frontal del IRD MAESTRO –EndFront Panel of the SLAVE A “P” followed Frontal del ESCLAVO Una “P ” seguida de Página 7 de 8 http://krimo666.mylivepage.com/
  • 8. by a numeration in decrement. una numeración en decremento. ¡¡¡ATENCIÓN!!!! Mientras el ESCLAVO muestre una “P ” en el frontal, NOAPAGUE EL RECEPTOR ya que se perderían datos de la memoria y el receptorNO se encendería. ¡¡¡ATENTION!!!! While the SLAVE shows a “P” in the front panel, dont TURNOFF THE RECEIVER since they would get lost data of the memory and thereceiver would not TURN ON.Lastly, in the SLAVEs front panel we will see a Por último, en el frontal del ESCLAVO–End indicating us that the one DATA veremos un –End indicándonos que el DATATRANSFER it has concluded. It is only to turn TRANSFER ha finalizado. Sólo queda apagar /off / on the receiver with the switch in back encender el receptor con el interruptorpanel. trasero…2.2 Update DataBase from Receiver 2.2 Actualizar la Base de Datos deto Receiver. Receptor a Receptor Nota Informativa: Al igual que para la actualización de la Base de Datosdesde PC, para el Data Transfer sólo se actualiza la “memoria activa”.Recordemos también que al actualizar la Base de Datos de nuestro receptor, laconfiguración de éste quedará como la del receptor MAESTRO. Note: The same as for the upgrade of the Database from PC, for the DataTransfer the “active memory” is only upgraded.Remember also that when upgrading the Database of our receiver, theconfiguration of this will be as that of the receiver MASTER.To upgrade the Database for Transfer it Dates Para actualizar la Base de Datos por Datathey will repeat the same steps that for the Transfer se repetirán los mismos pasos que paraupgrade of the software, but in this case, the la actualización del software, pero en este caso,code to send is the 456. el código a enviar es el 456. Página 8 de 8 http://krimo666.mylivepage.com/