Image Editing Basics Workshop
•
1 j'aime•543 vues

This is the step by step workshop for image editing basics session. This was run at the CNAQ in Doha, Qatar for college staff.

Recommandé
Contenu connexe
Similaire à Image Editing Basics Workshop
Similaire à Image Editing Basics Workshop (20)
Plus de John Allan
Plus de John Allan (20)
Dernier
Dernier (20)
Image Editing Basics Workshop
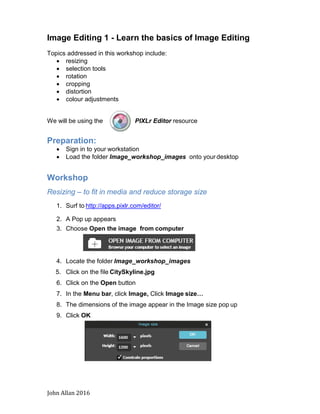
- 1. John Allan 2016 Image Editing 1 - Learn the basics of Image Editing Topics addressed in this workshop include: • resizing • selection tools • rotation • cropping • distortion • colour adjustments We will be using the PIXLr Editor resource Preparation: • Sign in to your workstation • Load the folder Image_workshop_images onto your desktop Workshop Resizing – to fit in media and reduce storage size 1. Surf to http://apps.pixlr.com/editor/ 2. A Pop up appears 3. Choose Open the image from computer 4. Locate the folder Image_workshop_images 5. Click on the file CitySkyline.jpg 6. Click on the Open button 7. In the Menu bar, click Image, Click Image size… 8. The dimensions of the image appear in the Image size pop up 9. Click OK
- 2. John Allan 2016 10.To determine the current storage size of the image, click File, clickSave 11.Note: With Jpeg files (most photographs are saved with this format) The higher the quality setting, the more file storage required. Normally the Quality setting for web based images is between 80 and 100 12.It is your job to find a balance between aesthetic value vs file size. 13.Jot the file size down on a piece of paper. 14.Click Cancel 15.On the menu bar, click Image 16.Click Image size… 17.Ensure that the Constrain proportions check box is ticked 18.Change the Width to 400 pixels 19.Note that the Height setting is automatically changed to 300 Pixels 20.Click on the OK button 21.On the menu bar, click View 22.Click Actual Pixels 23.To determine the current storage size of the image, click File, clickSave 24.Note the difference. It is quite substantial. 25.In the Name field change the name to CitySkyline_small 26.Click OK 27.Select a suitable location then click Save 28.Close the file
- 3. John Allan 2016 Rotating – correct images with odd orientation 1. Choose Open the image from computer 2. Locate the folder Image_workshop_images Click on the file Wind_mill.jpg 3. Click on the Open button 4. In the Menu bar, click Image 5. Click Rotate canvas 90 CW 6. Click File, click Save 7. Click OK 8. Select a suitable location then click Save 9. Close the file
- 4. John Allan 2016 Selection Tools – choosing what to change The section tools are: crop (see next section), marquee, lasso, wand Marquee 1. Choose Open Image From Computer 2. Locate the folder Image_workshop_images 3. Click on the file tower.jpg 4. Click Open 5. On the toolbar (on the left) choose the Marquee tool 6. Click and drag to select a rectangular section of the clock tower At this point we will change the selected portion of the image using a predetermined feature or “filter” 7. On the Menu bar, choose Filter then click Hope 8. On the Menu bar, Click Edit, Deselect All 9. Click File, click Save 10. Click OK 11. Select a suitable location then click Save 12. Close the file Note: The marquee tool can also select circles if the modifier ellipsis is selected
- 5. John Allan 2016 Lasso 1. Choose Open Image From Computer 2. Locate the folder Image_workshop_images 3. Click on the file rubber_duck.jpg 4. Click Open 5. On the toolbar (on the left) choose the Lasso tool 6. Click and drag to trace a selection path around the duck At this point we will invert the section to include the background then change the background using a predetermined feature or “filter” 7. On the Menu bar, click Edit, Invert selection 8. On the Menu bar, choose Filter then click Kaleidoscope 9. Click Ok 10.On the Menu bar, Click Edit, Deselect All 11.Click File, click Save 12.Click OK 13. Select a suitable location then click Save 14.Close the file Note: The lasso tool can also select with angles and straight lines if the modifier polygonal is selected
- 6. John Allan 2016 Wand (magic wand) 1. Choose Open Image From Computer 2. Locate the folder Image_workshop_images 3. Click on the file villa.jpg 4. Click Open 5. On the toolbar (on the left) choose the Wand tool 6. On the modifier tool bar, set Tolerance to 40 pixels 7. Click on the sky in the image At this point we will remove the sky then change the background to a night sky 8. Press the Delete key, the sky should turn white 9. At the bottom of the Toolbar, ensure the Main color chip is black 10.On the Toolbar, choose the Paint bucket tool 11.Click in the selected area (the sky) 12.On the Menu bar, Click Edit, Deselect All 13.Click File, click Save 14.Click OK 15.Select a suitable location then click Save 16.Close the file
- 7. John Allan 2016 Cropping Tool 1. Choose File, Open Image From computer 2. Locate the folder Image_workshop_images 3. Click on the file Moon.jpg 4. Click Open 5. On the Tool bar click crop 6. Drag the mouse pointer around the moon so reduce the black background 7. The crop bounding box appears 8. Press the Enter key 9. The result is a more dominant moon. 10.Click File on the Menu bar 11.Click Close 12.Click No
- 8. John Allan 2016 Distort 1. Choose File, Open Image From Computer 2. Locate the folder Image_workshop_images 3. Click on the file jump.jpg 4. Click Open 5. On the Menu bar, click Edit 6. Select Free distort… 7. Drag the corner nodes inwards 8. When satisfied with the result, press the Enter key 9. Click File on the Menu bar 10.Click Close 11.Click No
- 9. John Allan 2016 Colour adjustment 1. Choose File, Open Image From Editor 2. Locate the folder Image_workshop_images 3. Click on the file two_cats_before.jpg 4. Click Open 5. On the Menu bar, click Adjustment 6. Click Auto levels Note: If this always happened the other adjustment tools would not be necessary 7. On the Menu bar, click Adjustment 8. Click Brightness and Contrast 9. A pop up appears 10.Slide the Brightness setting to 50 11.Slide the Brightness setting to -50 12. Return the Brightness setting to 0 13.Slide the Contrast setting to 100 14.Slide the Contrast setting to -70 15. Return the Contrast setting to 0 16. Click Cancel 17.On the Menu bar, click Adjustment 18.There are 16 features in the Adjustments menu explore a few. Note that the changes are additive. 19.When you are finished, close the file. * All images Free Copyright from MorgueFile.com
- 10. John Allan 2016 Challenge activity Use the skills /tools learned to change this image to the image below. 1. Choose File, Open Image From Computer 2. Locate the folder Image_workshop_images 3. Click on the file Pixlr_challenge.jpg