Create a test in blackboard
•Télécharger en tant que PPTX, PDF•
2 j'aime•410 vues

Create a test in blackboard

Recommandé
Contenu connexe
Tendances
Tendances (11)
En vedette
Similaire à Create a test in blackboard
Similaire à Create a test in blackboard (20)
Dernier
Dernier (20)
Create a test in blackboard
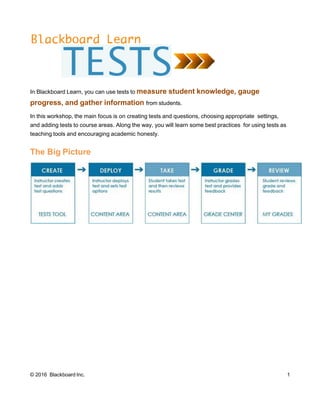
- 1. In Blackboard Learn, you can use tests to measure student knowledge, gauge progress, and gather information from students. In this workshop, the main focus is on creating tests and questions, choosing appropriate settings, and adding tests to course areas. Along the way, you will learn some best practices for using tests as teaching tools and encouraging academic honesty. The Big Picture © 2016 Blackboard Inc. 1
- 2. Table of Contents STEP ONE: CREATE the TEST 3 ACCESS the TESTS TOOL 4 ADD a TEST 5 SPECIFY QUESTION SETTINGS 6 ADD QUESTIONS 7 QUESTION TYPES 9 ASSIGN POINTS 11 STEP TWO: DEPLOY the TEST 13 ADD TESTS to CONTENT AREAS 14 TEST OPTIONS PAGE 15 TRY IT 16 GOING FURTHER .........................................................................Error! Bookmark not defined. © 2016 Blackboard Inc. 2
- 3. STEP ONE: CREATE the TEST The first step in a test’s lifecycle is to create the test. When creating a test, you need to do the following actions: Add the test. Specify the question settings. Add the questions. Order the questions. © 2016 Blackboard Inc. 3
- 4. ACCESS the TESTS TOOL On the Control Panel, expand the Course Tools section and select Tests, Surveys, and Pools. On the Tests, Surveys, and Pools page, click Tests. The Tests page displays all existing tests. The Deployed column lists where you added the test in your course. You can also build new tests. © 2016 Blackboard Inc. 4
- 5. ADD a TESTQuickSteps The Facts When you add a test, you can include the following basic information: Name of the test. Description, which appears under the title in a content area and at the top of the test after it is started. Instructions, which appear at the top of the test after it is started. Do It 1. On the Tests page, click Build Test on the action bar. 2. On the Test Information page, type a Name, Description, and Instructions. You can use the content editor functions to format the text and include files, images, web links, multimedia, and mashups. 3. Click Submit. NOTE: A description and instructions are optional, but recommended. After adding the test information, the Test Canvas appears, displaying the test name, description, and instructions. The next step in the test creation process is selecting the question settings. Help Create Tests Test Canvas © 2016 Blackboard Inc. 5
- 6. SPECIFY QUESTION SETTINGSQuickSteps The Facts The second step in creating a test is to specify the test’s question settings. Question settings control the options available when creating test questions. Your selections include whether to provide the following information when creating questions: Feedback for individual answers Images, files, and web links in feedback and answers Question metadata, such as categories, topics, levels of difficulty, and keywords Scoring defaults, such as a default point value, or partial or negative credit foranswers Specifics for how answers are displayed, such as random ordering of answers Do It 1. On the Control Panel, expand the Course Tools section and click Tests, Surveys, and Pools. 2. On the Tests, Surveys, and Pools page, click Tests. 3. On the Tests page, access the test's contextual menu and click Edit. 4. On the Test Canvas, click Question Settings on the action bar. 5. On the Test Question Settings page, make your selections. 6. Click Submit. Help Question Settings Question Metadata © 2016 Blackboard Inc. 6
- 7. ADD QUESTIONS You can add new questions to your test in two ways. 1: Create Question Drop-down List On the Test Canvas, point to Create Question on the action bar to access the drop-down list. The questions are listed in alphabetical order. Select the type of question you want to add to your test. The question is added to the bottom of the list of questions. © 2016 Blackboard Inc. 7
- 8. 2: Add Question Feature You can add new questions exactly where you want them on the Test Canvas. Click the plus sign before or after another question and choose a question type. You can also reuse questions from other tests or pools, and upload questions from your computer. These functions are presented last in this workshop. © 2016 Blackboard Inc. 8
- 9. QUESTION TYPES The following table summarizes the question types available in Blackboard Learn. To learn more about each question and see an example in Blackboard Help, click the link in the Question Types column. Question Types Description Calculated Formula Students are required to make a calculation and respond with a numeric answer. NEW: You can select the number of decimals or significant figures for the correct answers generated by the system. Calculated Numeric Students are required to make a numeric answer. Either/Or Students are asked to respond using a selection of predefined two- choice answers. Essay Students write a detailed response to a question or statement. File Response Students are required to upload a file from their computers or from Course Files/Content Collection as the answer to the question. Fill in the Blank Students type text or numbers to complete a statement. Fill in Multiple Blanks Students complete the sentence by typing the appropriate word or phrase for each blank. Hot Spot Students are presented with an image and are asked to select a particular area. Jumbled Sentence Students complete a sentence by selecting words or phrases from a drop- down list. Matching Students are presented with two lists of items and must pair items from one list with the other list. Multiple Choice Students select the single correct answer from a series of answers. © 2016 Blackboard Inc. 9
- 10. Question Types Description Multiple Answer Students select one or more correct answers from a series of answers. Opinion Scale/Likert Students answer based on attitudes or reactions using a comparable scale. Ordering Students are presented with a list of items to place in order according to criteria specified in the question. Quiz Bowl Students are presented with an answer they must provide the question to. Short Answer Students enter an answer into one or more text boxes. True/False Students select the validity of a statement. The process for adding questions to tests is similar for each question type. At a minimum, you must add the following information: Question text Answer Point value Depending on the test’s question settings, you may add more information for each question. For example, you may also select the display order for the answers of a specific question. NOTE: You can associate rubrics with Essay, File Response, or Short Answer questions. © 2016 Blackboard Inc. 10
- 11. ASSIGN POINTSQuickSteps The Facts After selecting the questions, you can assign or edit point values. Do It 1. On the Test Canvas, click a question’s current point value to access the Update Points pop-up box. 2. Edit the points. 3. Click Submit. Help Add Questions © 2016 Blackboard Inc. 11
- 12. BEST PRACTICE Test higher levels of learning by adding videos to your tests. Video is ideal for providing visual cues and testing observation skills, evaluation skills, and comprehension. Use the mashups function in the content editor to add YouTube™ videos to your test questions. A mashup combines elements from two or more sources. When you view a YouTube video in a Blackboard Learn course as part of the course content, you are experiencing a mashup. Mashups also include Flickr® photos and SlideShare presentations. TIP: After selecting a YouTube video, choose No for the Show YouTube Information option if you do not want to show YouTube’s suggested videos at the end of playback. © 2016 Blackboard Inc. 12
- 13. STEP TWO: DEPLOY the TEST Now that you have learned how to create tests and add questions, the next step is to deploy the test: 1. Add the test to a content area, learning module, lesson plan, or folder. 2. Make the test available to students by editing test options. In addition to setting availability, you can also edit the self-assessment, presentation, and feedback options. Carefully selecting the options most appropriate for your course can enhance student learning and encourage academic honesty. © 2016 Blackboard Inc. 13
- 14. ADD TESTS to CONTENT AREASQuickSteps The Facts You can add each test only once to a specific content area, learning module, lesson plan, or folder. In the Grade Center, a column is created automatically for each test you deploy in your course. Do It 1. Change Edit Mode to ON and access the content area where you want to add the test. 2. On the action bar, point to Assessments and click Test. 3. On the Create Test page, select a test from the Add Test box. 4. Click Submit. The Test Options page appears. Help Deploy Tests © 2016 Blackboard Inc. 14
- 15. TEST OPTIONS PAGE Test options allow you to edit the name and description of a test. Other options control the availability, presentation, and feedback. These options are available only after a test is deployed to a content area. Reminder: When you add a test to a content area, it is "deployed." To edit options for a deployed test, access a test's contextual menu and select Edit the Test Options. If you change the name or description of the test, the changes appear in the content area and the Grade Center column is updated with the new name. Availability Test availability is set after you add a test to a content area. When you make a test unavailable, it is deployed to a content area, but a link does not appear to students. When Edit Mode is ON, instructors and course builders can see unavailable tests. All the test options are discussed in the following Blackboard Help links. Test Options Edit Tests © 2016 Blackboard Inc. 15
- 16. TRY IT For this activity, use your Practice Course. From the Assessments content area, access the following tests and edit the settings as directed. Practice Quiz Make the test available to students. Allow three attempts. Do not include the score in the Grade Center. Change the test results and feedback options. Unit 4 Quiz Add an announcement to alert students to its availability. Set the timer and turn on Auto-Submit. Change the Test Presentation mode to All at Once. © 2016 Blackboard Inc. 16
- 17. Grade Center Interface In the image below, key areas of the Grade Center are identified. Action bar: Rows preceding the grid information containing functions and drop-down lists specific to the current page, such as Create Column, Create Calculated Column, Manage, Reports, Filter, and Work Offline. Grade Information Bar: When you point to a column using your mouse, information about that column will display here. Information may include: possible points, type, number of submissions and/or attempts needing grading, and when it was last updated. Information will vary depending on the type of tool used to create column. Grid/spreadsheet: Columns, rows, and cells that make up the current view of the Grade Center data. Scroll bars: Use the horizontal and vertical scroll bars to navigate through the Grade Center columns and rows. If you leave the Grade Center and return, the horizontal and vertical scroll bars will be in the same position as the last view. The view will remain the same until you scroll once again or log out. Icon Legend: Explanation of the symbols used in the cells. Edit Rows Displayed: You can change the number of rows appearing in the grid. In the box, type a number between 5 and 50, and click Go. © 2016 Blackboard Inc. 17
- 18. Detailed Grade Center Overview Grade Center Icons The following table describes the icons that are viewable in the Grade Center. Symbol Description Item has been submitted. This item is waiting to be reviewed by the instructor. – (dash) Item has not been completed. Attempt is in progress. Item has been completed, but will not receive a grade. For example, a check mark icon indicates a student has completed a survey. Error. This icon appears if there has been a problem with the Grade Center communicating with the server to save data, such as an interruption of network communication. Redo the action once communication has been established again. Grade exempted for this user. If this item is not completed, it will not affect the grade. © 2016 Blackboard Inc. 18
- 19. GRADING TESTS Depending upon the type of questions, some tests will automatically grade themselves while others will require manual grading. There are several options to do this depending upon the test. Grading Tests Attempts You can view and grade tests from the Grade Center, where a column is created automatically for each test. You can also access submissions on the Needs Grading page. Some types of questions, such as True/False and Multiple Choice, are graded automatically. Others, such as Short Answer and Essay, must be graded manually. Navigate to the Full Grade Center. Click the contextual menu for the test column that needs to be graded. Choose Grade Attempts or Grade with User Names Hidden. The Grade page appears with or without the student’s name visible. Scroll through all attempts using the arrows. © 2016 Blackboard Inc. 19
- 20. Grading Tests Grading Test by Question You can view and grade tests by question, which allows you to view and score the same question for each student in succession. Grading by question allows you to concentrate on the answers for a single question at a time, and formulate an idea of how the group performed on that particular question. On the Control Panel, expand the Grade Center section and select Needs Grading. Click the contextual menu of the test you want to grade. Click Grade by Question. © 2016 Blackboard Inc. 20
- 21. The Grade Question page will show. Click Grade Responses Anonymously if you do not want to see student’s name. To display the attempts, click the number in the Responses column. © 2016 Blackboard Inc. 21
- 22. © 2016 Blackboard Inc. 22
- 23. Clearing Test Attempts You can clear a test attempt, allowing a student to retake a test. For example, if a student encountered technical problems and only partially completed a test, clear the grade to allow a retake. If you clear a grade that has a previous attempt, the previous attempt is now the grade. From the Grade Center, click the contextual menu for the attempt you want to clear. Click View Grade Details. C. Click Clear Attempt. A warning message appears. Click OK to continue. The grade is cleared on the Grade Details page and the action is recorded under Grade History. The grade is also cleared in the Grade Center column. © 2016 Blackboard Inc. 23
- 24. Overriding Grades Use the override function to ignore the results of all attempts and display a grade you manually enter. The override grade takes precedence over all other grade entries, including attempts a student submits after the override grade is entered. To override a grade: Click the contextual menu item for the grade you want to override. Click View Grade Details. Click Manual Override and type a new grade into the box. You can also provide Feedback to the Learner or Grading Notes. Click Save when finished. The override icon will appear in the upper left corner of the grade (yellow triangle) as well as the new grade. © 2016 Blackboard Inc. 24
- 25. Overriding Grades Exempting a Grade You can exempt any grade from a student’s record. When you exempt, the grade is not deleted, it is just ignored in all Grade Center calculations. You might exempt grades for students add a course late or require other accommodations. You might also exempt students from a grade because their performance is superior and you want to reward their work. To exempt a grade: Click the contextual menu for the grade item you want to exempt. Click Exempt Grade. A circle with striped lines will now be visible. Calculate and Exempt Grades © 2016 Blackboard Inc. 25
- 26. © 2016 Blackboard Inc. 26 Q & A
- 27. © 2016 Blackboard Inc. 27 BlackboardHelp Test Question Status Test Results Grade Tests Resolve Student Issues With Tests My Grades Student View: Tests Bibliography 1Roediger, H. L. & Karpicke, J. D. (2006). Test-enhanced learning: Taking memory tests improves long-term retention. Psychological Science, 17, issue 3. 2Tuckman, B. (2000). Using frequent testing to increase students’ motivation to achieve. Paper presented at the 7th biannual International Conference on Motivation, Leuven, Belgium. 3Chickering, A. W. & Gamson, Z. F. (1987). Seven principles for good practice in undergraduate education. American Association of Higher Education Bulletin, 3-7. 4Rowe, N. C. (2004). Cheating in Online Student Assessment: Beyond Plagiarism. Online Journal of Distance Learning Administration Volume 7, Number 2.