SlideShare une entreprise Scribd logo
1  sur  22
Télécharger pour lire hors ligne
Model #: BF1030T / BF1042T / BF842T / BF1556T 5-18
BINOCULAR OWNER’S GUIDE
FORGE
™
2
Thank you for purchasing your new Bushnell® Forge™ binoculars.
This manual will help you optimize your viewing experience by explaining how you can adjust the binocular to your eyes,
and how to care for this instrument. Read the instructions carefully before using your binocular.
NEVER LOOK DIRECTLY AT THE SUN WITH YOUR BINOCULAR,
AS IT MAY CAUSE SERIOUS DAMAGE TO YOUR EYES
EYECUP ADJUSTMENT
Your Bushnell Forge binocular is fitted with eyecups (Fig. 1, next page) that provide a comfortable view of the full image
and help to exclude extraneous light. For use without eyeglasses or sunglasses, twist up the eyecups (Fig. 2). This will place
your eyes farther from the binocular’s ocular lenses, at the correct eye relief distance, allowing you to see the full field of
view.
IPD (INTERPUPILLARY DISTANCE) ADJUSTMENT
The spacing between the pupils of your eyes, called “interpupillary distance,” varies from person to person. To match your
binoculars to your IPD or “eye to eye” width:
1. Point them at a white wall or blank area of the sky. Hold the binoculars and view through them as you normally would.
Don’t worry about focus yet.
2. Grasp each side of the binocular firmly. Move the left and right sides closer together or farther apart (Fig. 3, next
page) until you see a single image with no shaded areas.
FOCUS AND DIOPTER ADJUSTMENT
1. First, adjust the eyecups and IPD as described in the previous sections.
2. Using the attached lens cap or your hand, cover the objective lens on the right side
of the binocular.
3. Using the center focus knob, focus on a distant object with fine detail (e.g., brick
wall, tree branches, etc) until it appears as sharp as possible when viewed through
the left side of the binocular.
4. Uncover the objective lens on the right side, and cover the left objective lens while
continuing to view the same object.
5. Rotate the diopter adjustment ring located directly below the right eyecup (Fig. 4),
NOT the center focus knob to bring the object into focus in the right side of the
binocular. Be sure to unlock the diopter ring first by pulling it up (see Fig. 4, 10x30
model does not have a locking diopter ring). Avoid over-turning or forcing the
diopter mechanism. If you are unable to bring the object into focus for your right
Fig.4 Diopter Adjustment Ring
(10x42model,unlocked)
A
C
B
D
E
F
G
PARTS GUIDE
*Locatedundercaponallmodelsexcept10x30.
Ocular Lens A
Center Focus Knob B
Twist-Up Eyecups C
Tripod Adapter Socket* D
Objective Lens E
Diopter Adjustment Ring F
Objective Lens Covers G
ENGLISH
3
eye by adjusting the diopter ring, make sure the left side is still in focus (repeat steps #2-4 if necessary). The diopter
adjustment essentially provides “fine focus” on one side of the binocular (right only) to allow for slight differences in
the vision of your left and right eyes.
6. Your binocular should now be adjusted for your eyes. Focusing for any distance can now be done simply by turning
the center focus knob. Make a note of your diopter setting (position of plus and minus marks on diopter ring relative
to index mark on binocular below the ring) for future reference in case the ring is moved accidentally or by another
person using your binocular. The diopter ring can be pushed down to lock it in place (on 8x42, 10x42 and 15x56
models) after you have adjusted it for your eyesight.
NECKSTRAP ATTACHMENT
To attach the neckstrap, thread the ends of the neckstrap through the strap lug (Fig. 5) on each side of the binocular,
then back through the plastic buckle on the strap (Fig. 6). Adjust the position of the binoculars on your chest as they hang
around your neck to your preference, by changing the length of the strap section which passes through the strap channel
and buckle by an equal amount on each side. If you prefer to use an aftermarket strap that has metal O-rings, attach them
to a plastic zip tie placed on the strap lugs rather than installing them directly on the lug, to avoid damaging the finish on
the binocular via contact with the rings.
Forge binoculars also include a binocular harness (Fig. 7, below & next page), which provides a more comfortable option
when you’ll be using your optics all day, by taking the weight off your neck. Just remove the standard strap and loop the
harness attachments through the strap lugs instead, then snap the clips into the corresponding attachments on the harness
straps (Fig. 8).
TRIPOD MOUNTING (8x42, 10x42 and 15x56 models only)
To attach the binocular to a tripod or monopod, unscrew or pull off the cap which covers the threaded socket at the far end
of the center hinge (Fig. 9), and set it aside in a safe place. Use a compatible binocular tripod adapter accessory (90o
angle
bracket), such as the Bushnell #161002CM, to attach your full size Forge binocular to any standard tripod in a horizontal
position to provide a stable image during prolonged viewing.
Fig.3
Interpupillary
Distance Adjustment
Wide IPD
Narrow IPD
Wide IPD
Narrow IPD
Fig.2 Eyecup in“Up”Position
(forusewithouteyeglasses)
Fig.1 Eyecup in“Down”Position
(forusewitheyeglasses)
Fig.1
Fig.9 Tripod Socket Cap
Fig.5 Strap Lug
Fig.6 Strap & Buckle
Fig.7 Harness
Fig.8 Harness
Attachment
4
WATERPROOF / FOGPROOF
Getting caught in a heavy downpour of rain, or accidentally submerging your Forge binocular in water during a boating
excursion won’t be a problem. The binocular is manufactured and tested to withstand water exposure to IPX7 standards.
Fogproof protection is achieved from dry nitrogen purging that removes all internal air, which can retain moisture.
All exterior lens surfaces have our new EXO Barrier™ coating (in addition to full multi-coating). EXO Barrier, quite simply,
is the best protective lens coating technology Bushnell has ever developed. Added at the end of the coating process,
EXO Barrier molecularly bonds to the lens and fills the microscopic pores in the glass. The result is an ultra-slick coating
that repels water, oil, fog, dust and debris - rain, snow, fingerprints and dirt will not stick. EXO Barrier is built to last: the
bonded coating will not fade with the passage of time or normal wear and tear.
CARE OF THE OPTICS
1.	 Your Bushnell Forge binocular will provide years of trouble-free service if it receives the normal care you would give
any fine optical instrument.
2.	 Avoid sharp impacts. Set the binocular down gently on hard surfaces.
3.	 Tug on the strap after attaching, making sure it is securely fastened to the binocular before placing it around your neck.
4.	 Store your binocular in a cool, dry place whenever possible.
CLEANING
1.	 First, blow or brush away any dust or debris on the lens (using “canned air” or a soft lens brush).
2.	 To remove dirt or finger prints, clean with the supplied soft storage bag (made of washable micro-fiber cloth), rubbing
in a circular motion. Use of a coarse cloth (including paper towels) or unnecessary rubbing may scratch the lens surface
and eventually cause permanent damage. The included storage bag/micro-fiber cloth is ideal for the routine cleaning
of your optics. Simply breathe lightly on the lens to provide a slight amount of moisture, then gently rub the lens with
the micro-fiber cloth.
3.	 For a more thorough cleaning, photographic lens tissue and photographic lens cleaning fluid or isopropyl alcohol may
be used. Always apply the fluid to the cleaning cloth – never directly on the lens.
4.	 To prevent potential damage to the optical coatings on the binocular’s lens surfaces, never use household window
cleaning liquids. Avoid using facial tissue or clothing that may have fibers which can be abrasive and hold oils or dirt.
Technical Specifications
SKU
Magnification
Objective
Diameter
Prism
System
Field
of
view
ft@1000yds
/
m@1000m
Exit
Pupil
(mm)
Eye
Relief
(mm)
Close
Focus
(ft/m)
Length
(in/mm)
Weight
(oz
/g)
BF1030T 10x 30 MM Roof 330 / 110 3.0 18 7 / 2.1 4.8/122 13.7 / 388
BF842T 8x 42 MM Roof 426 / 142 5.1 19 10 / 3 6.7/170 30.8 / 873
BF1042T 10x 42 MM Roof 340 / 113 4.2 18 10 / 3 6.7/170 30.4 / 862
BF1556T 15x 56 MM Roof 235 / 78 3.7 21 12 / 3.6 8.9/226 51.0 / 1446
Fig.7 Binocular Harness (in use)
5
Products manufactured on or after April 2017 are covered by the Bushnell Ironclad Warranty. The
Ironclad Warranty is a full lifetime warranty that covers the lifetime of this Product. Each Product has
a defined lifetime; lifetimes can range from 1 to 30 years. This Product’s lifetime can be found at the
website listed below and/or on the Bushnell webpage specific to this Product.
We warrant that this Product is free from defects in materials and workmanship and will meet all
represented performance standards for the lifetime of this Product. If this Product isn’t working
properly due to a covered defect, we will, at our option, either repair or replace it and ship it back to
you at no charge. This warranty is fully transferable and does not require a receipt, warranty card, or
product registration. This warranty does not cover the following: electronic components; batteries;
cosmetic damage; damage caused by failing to properly maintain the product; loss; theft; damage as
a result of unauthorized repair, modification, or disassembly; intentional damage, misuse, or abuse;
and ordinary wear and tear. This Warranty will be void if the date stamp or other serialization codes
have been removed from the Product.
To view the full warranty and find details on how to request service under the warranty, go to our
website at www.bushnell.com/warranty. Alternatively, you can request a copy of the warranty by
calling us at 1-800-423-3537 or writing to us at one of the following addresses:
IN U.S.A. Send To:				IN CANADA Send To: 	
Bushnell Holdings, Inc.			 Bushnell Holdings, Inc.
Attn.: Repairs					Attn.: Repairs
9200 Cody					 140 Great Gulf Drive, Unit B
Overland Park, Kansas 66214			 Vaughan, Ontario L4K 5W1
For products purchased outside the United States or Canada please contact your local dealer for
applicable warranty information.
This warranty gives you specific legal rights.
You may have other rights which vary from country to country.
©2018 Bushnell Outdoor Products
6
Nous vous remercions de nous avoir fait confiance en achetant les nouvelles jumelles Bushnell® Forge™.
Ce manuel vous expliquera comment régler les jumelles à votre vue, ainsi que l'entretien de cet instrument, afin de vous
permettre d'obtenir une expérience visuelle optimale. Lisez attentivement les instructions avant d'utiliser vos jumelles.
NE JAMAIS REGARDER DIRECTEMENT LE SOLEIL AVEC LES JUMELLES,
SOUS PEINE DE SUBIR DES LÉSIONS OCULAIRES IRRÉVERSIBLES
RÉGLAGE DE L'ŒILLETON
Vos jumelles Bushnell Forge sont équipées d'œilletons (Fig. 1, page suivante) pour votre confort visuel et pour vous protéger de
la lumière extérieure. Pour une utilisation avec des lunettes de vue ou des lunettes de soleil, faites tourner les œilletons (Fig. 2).
Ceci éloignera vos yeux des lentilles oculaires de la jumelle, à la bonne distance de dégagement oculaire, vous permettant de
voir le champ de vision complet.
AJUSTEMENT DE LA DISTANCE INTERPUPILLAIRE
La distance entre les pupilles des yeux, également appelée «  distance interpupillaire  », varie d'une personne à une autre.
Pour régler les jumelles selon votre distance interpupillaire, ou « largeur d'œil à œil » :
1. Orientez les jumelles vers un mur blanc ou une partie blanche dans le ciel. Tenez les jumelles et regardez à travers comme
vous le feriez normalement. Ne vous préoccupez pas encore de la mise au point.
2. Tenez fermement les jumelles de chaque côté. Rapprochez ou éloignez les côtés gauche et droit (Fig. 3, page suivante)
jusqu'à ce que vous puissiez voir une seule image sans zone d'ombre.
RÉGLAGE DE LA DIOPTRIE ET MISE AU POINT
1. Ajustez tout d'abord les œilletons et la distance interpupillaire en suivant les instructions des sections précédentes.
2. À l'aide du cache objectif intégré ou de votre main, couvrez l'optique droit des jumelles.
3. À l'aide de la roulette de mise au point, faites la mise au point sur un objet lointain doté
de nombreux détails (par exemple, un mur de briques, la branche d'un arbre, etc.)
jusqu'à ce que celui-ci soit le plus net possible lorsque vous regardez dans la partie
gauche des jumelles.
4. Retirez le cache de la lentille droite et couvrez la lentille gauche tout en continuant
d'observer le même objet.
5. Tournez la bague de réglage de la dioptrie située directement sous l'œilleton droit (Fig.
4), PAS la molette de mise au point centrale pour mettre l'objet au point dans le côté
droit des jumelles. Veillez à débloquer la bague dioptrique first by pulling it up (voir Fig.
4, le modèle 10x30 ne comporte pas de bague dioptrique de blocage). Évitez de trop
tourner ou de forcer sur le mécanisme de dioptrie. Si vous ne parvenez pas à  régler la
bague de dioptrie afin de mettre l'objet au point pour votre œil droit, assurez-vous que
le côté gauche est toujours mis au point (recommencez les étapes 2 à 4 si nécessaire).
Le réglage de la dioptrie offre essentiellement une « mise au point précise » d'un côté
des jumelles (droit uniquement) pour permettre de légère différences de vision entre
votre œil droit et votre œil gauche.
Fig. 4 Bague de réglage de la dioptrie
(modèle10x42,déverrouillé)
A
C
B
D
E
F
G
GUIDE DES PIÈCES
*Situésouslecapuchonsurtousles
modèlesàl'exceptiondu10 x 30.
Lentille oculaire A
Roulette centrale de mise
au point
B
Œilletons rotatifs C
Adaptateur de trépied* D
Objectifs E
Bague de réglage
de la dioptrie
F
Caches objectifs G
FRANÇAIS
7
6. Vos jumelles sont maintenant ajustées à votre vue. Vous pouvez à présent effectuer la mise au point de n'importe quel objet
en tournant tout simplement la roulette centrale de mise au point. Prenez note de votre réglage de dioptrie (position des
marques plus et moins sur la bague de dioptrie par rapport au repère sur les jumelles sous la bague) pour référence future
si la bague est déplacée accidentellement ou par une autre personne utilisant vos jumelles. Lorsque la bague de réglage
de la dioptrie est réglée à votre vue, poussez la bague vers le bas pour la verrouiller (sur les modèles 8x42, 10x42 et 15x56).
ATTACHES DE LA SANGLE
Pour fixer la bandoulière, faites passer les extrémités de celle-ci dans les attaches prévues à cet effet (Fig. 5) de chaque côté
des jumelles, puis de nouveau dans la boucle en plastique de la bandoulière (Fig. 6). Ajustez la position des jumelles à votre
goût sur votre poitrine tandis qu'elles pendent autour de votre cou, en changeant la longueur de la partie de la bandoulière
qui passe dans les attaches et dans la boucle d'une longueur égale de chaque côté. Si vous préférez utiliser une bandoulière
dotée d'anneaux métalliques, fixez-les à la fermeture en plastique située sur les attaches de la bandoulière et non directement
sur l'attache, pour éviter que les anneaux n'endommagent la finition des jumelles.
Les jumelles Forge incluent aussi un harnais pour jumelles (Fig. 7, below & next page), qui permet une option plus confortable
lorsque vous utilisez vos jumelles toute la journée, en soulageant le poids sur votre cou. Retirez la sangle standard et à la
place bouclez les fixations du harnais à travers les attaches de la bandoulière, puis enclenchez les clips dans les fixations
correspondantes sur les sangles du harnais (Fig. 8).
INSTALLATION DU TRÉPIED (modèles 8x42, 10x42 et 15x56 uniquement)
Pour fixer les jumelles sur un trépied ou monopode, dévissez ou retirez le capuchon qui couvre le manchon à vis à l'extrémité
de la charnière centrale (Fig. 9) et déposez-le en lieu sûr. Utilisez un adaptateur de trépied pour jumelles compatible (support
à angle de 90 o
) tel que le modèle Bushnell n° 161002CM, pour fixer vos jumelles Forge taille intégrale en position horizontale
sur un trépied standard afin d'obtenir une image stable lors de l'observation prolongée.
Fig. 3
Inter-pupillaire
Ajustement de la distance
Grande distance interpupillaire
Petite distance interpupillaire
Grande distance interpupillaire
Petite distance interpupillaire
Fig. 2 Œilleton en position haute
(pourutilisationsans
lunettes de vue)
Fig. 1 Œilleton en position basse
(pourutilisationaveclunettesdevue)
Fig. 9 Manchon de fixation
du trépied avec capuchon
Fig. 5 Attache de
bandoulière Fig.6 Attache et boucle
Fig.7 Harnais
Fig.8 Harnais
Pièce jointe
8
ÉTANCHÉITÉ / ANTIBUÉE
En cas de fortes pluies ou si vous immergez accidentellement vos jumelles Forge dans l'eau pendant une expédition en mer, ce n'est
pas un problème. Les jumelles sont fabriquées et testées pour résister à l'exposition à l'eau selon les normes IPX7. La protection
anti-buée est obtenue par purge à l'azote à sec pour ôter tout l'air interne, qui peut retenir l'humidité.
Toutes les surfaces extérieures des lentilles comportent notre nouveau revêtement EXO Barrier™ (outre un multi-revêtement
intégral). EXO Barrier, est tout simplement la meilleure technologie de revêtement de protection des lentilles jamais développée
par Bushnell. Ajouté à la fin du processus de protection, EXO Barrier se lie moléculairement à la lentille et remplit les pores
microscopiques dans le verre. Il en résulte une protection ultra-fine qui repousse l'eau, l'huile, le brouillard, la poussière et les
débris - la pluie, la neige, les traces de doigts et la saleté n'adhèrent pas. EXO Barrier est fabriqué pour durer : la protection collée
ne s'atténue pas avec le passage de temps ou en raison de l'usure normale.
ENTRETIEN DES OPTIQUES
1.	 Grâce à un entretien approprié à tout instrument optique de pointe, vous pourrez profiter de vos jumelles Forge pendant
de longues années.
2.	 Évitez les chocs violents. Posez délicatement vos jumelles sur les surfaces dures.
3.	 Tirez sur la sangle après l'avoir fixée pour vous assurer qu'elle est bien attachée aux jumelles avant de mettre ces dernières
autour de votre cou.
4.	 Rangez vos jumelles dans un endroit frais et sec autant que possible.
NETTOYAGE
1.	 Tout d'abord, soufflez ou époussetez la poussière ou les saletés qui encombrent l'objectif (à l'aide d'un gaz dépoussiérant
ou d'un pinceau de nettoyage optique doux).
2.	 Pour retirer les impuretés ou traces de doigts, nettoyez avec le doux sac de rangement (en tissu microfibre lavable) fourni,
en frottant à l'aide de mouvements circulaires. L'utilisation d'un chiffon rêche (notamment les papiers absorbants) ou un
frottement non nécessaire peut rayer la surface de l'objectif et causer des dégâts permanents. Le sac de rangement/tissu
en microfibre fourni avec vos jumelles convient parfaitement au nettoyage régulier de vos optiques. Il vous suffit de souffler
légèrement sur l'objectif pour apporter un peu d'humidité, puis de frotter délicatement avec la lingette en microfibre.
3.	 Pour un nettoyage plus complet, vous pouvez également utiliser un chiffon spécial et du liquide de nettoyage pour objectif
photographique, ou de l'alcool isopropylique. Appliquez toujours le liquide sur le chiffon de nettoyage, jamais directement
sur l'objectif.
4.	 Pour éviter d'endommager les revêtements optiques sur les surfaces des lentilles de la jumelle, n'utilisez jamais de liquides
ménagers de nettoyage des vitres. Évitez d'utiliser des mouchoirs en papier ou des vêtements qui peuvent contenir des
fibres abrasives et retenir les huiles ou la saleté.
Caractéristiques techniques
Modèle
Grossissement
Diamètre
de
l'objectif
Type
de
prismes
Champ
de
vision
pieds x 1000 yards/
m x 1 000 m
Pupille
de
sortie
(mm)
Dégagement
oculaire
(mm)
Mise
au
point
mini-
male
(au
mètre)
Longueur
(pouces/
mm)
Poids
(oz./g)
BF1030T 10x 30 mm Toit 330 / 110 3,0 18 7 / 2,1 4,8 / 122 13,7 / 388
BF842T 8x 42 mm Toit 426 / 142 5,1 19 10 / 3 6,7 / 170 30,8 / 873
BF1042T 10x 42 mm Toit 340 / 113 4,2 18 10 / 3 6,7 / 170 30,4 / 862
BF1556T 15x 56 mm Toit 235 / 78 3,7 21 12 / 3,6 8,9 / 226 51,0 / 1 446
Fig.7 Harnais binoculaire (utilisé)
9
Les produits fabriqués à partir d'avril 2017 sont couverts par la garantie Bushnell Ironclad. La garantie
Ironclad est une garantie à vie totale, qui couvre l'ensemble de la durée de vie du produit. Chacun de
nos produits dispose d'une durée de vie définie, comprise entre 1 et 30 ans. La durée de vie de ce
produit est consultable à l'adresse ci-dessous ou sur la page spécifique à ce produit sur le site Bushnell.
Nous garantissons que ce produit est exempt de défauts de fabrication et de matériaux défectueux,
et qu'il répond à toutes les normes de performances définies pour la durée de vie de ce produit.
Si ce produit ne fonctionne pas comme il le devrait en raison d'un défaut couvert par cette garantie,
le produit sera remplacé ou réparé gratuitement (à notre discrétion), et vous sera réexpédié sans
frais. Cette garantie est entièrement transférable et ne nécessite aucun reçu, carte de garantie ou
enregistrement du produit. Cette garantie ne couvre aucun des éléments suivants : composants
électroniques ;pilesetbatteries ;dégâtsesthétiques ;dommagescausésparundéfautd'entretiendu
produit ; perte ; vol ; dommages résultant d'une réparation, d'une modification ou d'un démontage
non autorisé  ; dommages, utilisation mauvaise et/ou abusive intentionnelle  ; usure normale du
produit ou de ses composants. Si la date de fabrication ou tout autre numéro de série sont retirés
du produit, la garantie sera annulée.
Pour consulter la garantie complète ou trouver des informations sur les services de garantie à votre
disposition, visitez notre site Web à l'adresse www.bushnell.com/warranty. Vous pouvez également
nous demander une copie de la garantie en nous appelant au 1-800-423-3537, ou en nous écrivant
à l'une des adresses suivantes :
Aux U.S.A. Envoyé à :				AU CANADA Envoyé à : 	
Bushnell Holdings, Inc.			 Bushnell Holdings, Inc.
Attn.: Repairs					Attn.: Repairs
9200 Cody					 140 Great Gulf Drive, Unit B
Overland Park, Kansas 66214			 Vaughan, Ontario L4K 5W1
Pour les produits achetés à l’extérieur des Etats-Unis ou du Canada,veuillez contacter votre revendeur
local pour obtenir les conditions de garantit applicables.
Cette garantie vous confère des droits légaux spécifiques.
Vous pouvez avoir d’autres droits qui variant d’un pays à l’autre.
©2018 Bushnell Outdoor Products
10
Gracias por comprar sus nuevos prismáticos Bushnell® Forge™.
Este manual le ayudará a optimizar su experiencia de visión explicándole cómo puede ajustar los prismáticos a sus ojos,
así como los cuidados que precisa este instrumento. Lea atentamente las instrucciones antes de usar sus prismáticos.
PELIGRO
NO MIRE NUNCA DIRECTAMENTE AL SOL CON LOS PRISMÁTICOS,
PUEDE CAUSAR GRAVES DAÑOS A LA VISTA
AJUSTE DE LA COPA OCULAR
Sus prismáticos Bushnell Forge están provistos de copas oculares (fig. 1, página siguiente) que dan una visión cómoda
de toda la imagen y ayudan a excluir la luz ajena. Para usar sin gafas ni gafas de sol, suba las copas oculares (fig. 2). Esto
colocará sus ojos más lejos de los lentes oculares de los prismáticos, a la distancia de alivio ocular correcta, permitiéndole
ver todo el campo de visión.
AJUSTE IPD (DISTANCIA INTERPUPILAR)
El espacio entre las pupilas de sus ojos, llamado "distancia interpupilar", varía de persona a persona. Para que los
prismáticos coincidan con su IPD o ancho de "ojo a ojo":
1. Póngalos en dirección a una pared blanca o un área en blanco del cielo. Sostenga los prismáticos y mire a través de
ellos como lo haría normalmente. No se preocupe por enfocar todavía.
2. Sujete firmemente cada lado de los prismáticos. Acerque o separe los lados derecho e izquierdo (fig. 3, siguiente página)
hasta que vea una sola imagen sin áreas sombreadas.
AJUSTE DE FOCO Y DIOPTRÍA
1. Primero, ajuste las copas oculares y la IPD como se describe en las secciones anteriores.
2. Usando la tapa de la lente adjunta o su mano, cubra la lente del objetivo en el lado
derecho de los prismáticos.
3. Usando el botón de foco central, enfoque un objeto distante con detalle (p.e. una
pared de ladrillos, las ramas de un árbol, etc.) hasta que aparezca lo más preciso
posible al verlo a través del lado izquierdo de los prismáticos.
4. Destape la lente del objetivo del lado derecho y cubra la del lado izquierdo
mientras sigue mirando el mismo objeto.
5. Gire el anillo de ajuste dióptrico ubicado directamente debajo de la copa ocular
derecha (fig. 4), NO el botón de enfoque central para enfocar el objeto en el lado
derecho de los prismáticos. Asegúrese de desbloquear primero el anillo dióptrico
tirando de él hacia arriba (véase la fig. 4; el modelo de 10x30 no tiene anillo
dióptrico bloqueable). Evite forzar o girar demasiado el mecanismo de dioptría.
Si no puede enfocar el objeto para su ojo derecho ajustando el anillo de dioptría,
asegúrese de que el lado izquierdo sigue enfocado (repita los pasos 2-4 si es
necesario). El ajuste de dioptría esencialmente provee "enfoque fino" en un lado de
Fig.4 Anillo de ajuste dioptría
(Modelode10x42,desbloqueado)
A
C
B
D
E
F
G
GUÍA DE REPUESTOS
*Ubicadodebajodelatapaentodoslosmodelos
exceptoel10x30.
Lentes oculares A
Botón de foco central B
Copas oculares giratorias C
Toma para adaptador de trípode* D
Lente del objetivo E
Anillo de ajuste dioptría F
Cubierta de la lente del objetivo G
ESPAÑOL
11
los prismáticos (solo derecho) para permitir las pequeñas diferencias de visión de sus ojos izquierdo y derecho.
6. Los prismáticos deberían ahora estar ajustados a sus ojos. Enfocar a cualquier distancia ahora puede hacerse simplemente
girando el botón de foco central. Tome nota de la configuración de su dioptría (la posición de las marcas de positivo
y negativo en el anillo de dioptrías con respecto a la marca de referencia en los prismáticos debajo del anillo) para
referencia futura en caso de que se mueva el anillo accidentalmente u otra persona utilice sus prismáticos. El anillo
dióptrico se puede empujar hacia abajo para bloquearlo (en los modelos de 8x42, 10x42 y 15x56) después de ajustarlo
a su vista.
COLOCACIÓN DE LA CORREA DEL CUELLO
Para poner la correa del cuello, pase los extremos de la correa por el asa de la correa (fig. 5) a cada lado de los prismáticos,
luego retroceda a través de la hebilla de plástico que hay en la correa (fig. 6). Ajuste la posición de los prismáticos en su
pecho mientras cuelgan de su cuello como prefiera, cambiando la longitud de la sección de correa que atraviesa el canal
y la hebilla de la correa la misma cantidad en cada lado. Si prefiere usar una correa de posventa con anillos metálicos,
engánchelos en una cremallera de plástico que hay en las lengüetas en vez de instalarlas directamente en ella, para evitar
dañar el acabado de los prismáticos por contacto con los anillos.
Los prismáticos Forge también cuentan con un arnés (fig. 7, a continuación y en la página siguiente) que proporciona
una opción más cómoda cuando se usa la óptica todo el día, ya que descarga el peso del cuello. Basta retirar la correa
de serie y sustituirla por el arnés enrollando sus anclajes en las lengüetas y fijando los clips al correspondiente anclaje de
las correas del arnés (fig. 8).
MONTAJE DEL TRÍPODE (solo para modelos de 8x42, 10x42 y 15x56)
Para colocar los prismáticos sobre un trípode o un monopié, desenrosque o quite el tapón que cubre la toma roscada
en el extremo final del pivote central (fig. 9) y guárdelo en un lugar seguro. Use un accesorio adaptador compatible
con el trípode de los prismáticos (escuadra de fijación a 90º
), como el Bushnell modelo n.º 161002CM, para colocar los
prismáticos Forge de tamaño completo en cualquier trípode estándar en posición horizontal para conseguir una imagen
estable durante un avistamiento prolongado.
Fig.3
Ajuste de
distancia interpupilar
IPD ancho
IPD estrecho
IPD ancho
IPD estrecho
Fig.2 Copa ocular en posición "Arriba"
(parausosingafas)
Fig.2
Fig.1 Copa ocular en posición "Abajo"
(parausocongafas)
Fig.1
Fig.9 Tapón de encaje
de trípode
Fig.6 Correa y hebilla
Fig.5 Lengüeta
de correa
Fig.7 Arnés
Fig.8 Arnés
Anclaje
12
A PRUEBA DE AGUA/DE NIEBLA
Que le pille un gran aguacero o que por accidente se le caigan al agua los prismáticos Forge durante una excursión en barca ya no
será un problema. Los prismáticos están fabricados y probados para resistir exposiciones al agua conforme a las normas IPX7. La
protección contra la niebla se consigue con purga de nitrógeno seco que elimina todo el aire interno, que puede contener humedad.
Todas las superficies exteriores de lente presentan nuestro nuevo revestimiento EXO Barrier™ (además del multicapa
completo). Resumiendo, EXO Barrier es la mejor tecnología de revestimiento protector para lentes que Bushnell haya
desarrollado hasta la fecha. La EXO Barrier, que se añade al final del proceso de revestimiento, se adhiere a la lente a
nivel molecular y rellena los poros microscópicos del cristal. El resultado es un revestimiento ultraliso que repele agua,
aceite, niebla, polvo y otros residuos, para que lluvia, nieve, huellas dactilares y polvo no se adhieran. La EXO Barrier está
diseñada para durar: el revestimiento adherente no se pierde con el paso del tiempo ni con el uso y desgaste normales.
CUIDADO DE LA ÓPTICA
1.	 Sus prismáticos Bushnell Forge no le darán ningún problema durante años si reciben el cuidado normal que le daría
a cualquier instrumento de óptica precisa.
2.	 Evite impactos fuertes. Coloque los prismáticos suavemente sobre superficies duras.
3.	 Tire de la correa después de colocarla para asegurarse de que está bien encajada en los prismáticos antes
de ponérsela en el cuello.
4.	 Guarde sus prismáticos en un lugar seco y fresco siempre que sea posible.
LIMPIEZA
1.	 Primero, sople o cepille cualquier polvo o suciedad en las lentes (use "aire envasado" o un cepillo suave para lentes).
2.	 Para eliminar la suciedad o las huellas dactilares, límpielas con la bolsa suave de almacenamiento suministrada
(hecha de paño de microfibra lavable), frotando con un movimiento circular. El uso de un paño áspero (incluyendo
los pañuelos de papel) o frotar innecesariamente puede arañar la superficie de la lente y, tal vez, causar un daño
permanente. La bolsa de almacenamiento/paño de microfibra incluida es ideal para la limpieza de rutina de su óptica.
Simplemente eche su aliento sobre la lente para proveer algo de humedad y luego frote suavemente la lente con el
paño de microfibra.
3.	 Para una limpieza más a fondo, se puede usar papel para lentes fotográficas y alcohol isopropílico o fluido de limpieza
de lentes fotográficas. Aplique siempre el fluido en el paño de limpieza, nunca directamente sobre la lente.
4.	 Para evitar daños potenciales a los revestimientos ópticos en las superficies de las lentes de los prismáticos, nunca use
líquidos de limpieza de ventanas domésticos. Evite usar pañuelos faciales o ropa que pueda tener fibras que puedan
ser abrasivas y que contengan aceites o suciedad.
Especificaciones técnicas
SKU
Aumento
Diámetro
del
obje-
tivo
Sistema
de
prisma
Campo
de
visión
ft@1000yds/
m@1000m
Pupila
de
salida
(mm)
Alivio
visual
(mm)
Enfoque
(ft/m)
Longitud
(in/mm)
Peso
(oz/g)
BF1030T 10x 30 MM Techo 330 / 110 3.0 18 7 / 2.1 4.8/122 13.7 / 388
BF842T 8x 42 MM Techo 426 / 142 5.1 19 10 / 3 6.7/170 30.8 / 873
BF1042T 10x 42 MM Techo 340 / 113 4.2 18 10 / 3 6.7/170 30.4 / 862
BF1556T 15x 56 MM Techo 235 / 78 3.7 21 12 / 3.6 8.9/226 51.0 / 1446
Fig.7 Arnés para prismáticos (en uso)
13
Los productos fabricados a partir de abril de 2017 están cubiertos por la Garantía Ironclad de
Bushnell. La Garantía Ironclad es una garantía de por vida que cubre la vida útil de este Producto.
Cada producto tiene una vida definida; las vidas pueden variar de 1 a 30 años. La vida útil de este
producto se puede encontrar en el sitio web que se detalla a continuación y/o en la página web de
Bushnell específica para este Producto.
Garantizamos que este producto está libre de defectos en materiales y mano de obra y cumplirá con
todos los estándares de rendimiento representados durante la vida útil de este producto. Si este
Producto no funciona correctamente debido a un defecto cubierto, nosotros, a nuestra discreción, lo
repararemosoloreemplazaremosyseloenviaremossincargo.Estagarantíaestotalmentetransferible
y no requiere recibo, tarjeta de garantía ni registro de productos. Esta garantía no cubre lo siguiente:
componentes electrónicos; baterías; daño estético; daño causado por no mantener adecuadamente
el producto; pérdida; robo; daños como resultado de una reparación, modificación o desensamblaje
no autorizado; daño intencional, mal uso o abuso; y el desgaste normal. Esta Garantía será nula si el
sello de fecha u otros códigos de serialización han sido eliminados del Producto.
Para ver la garantía completa y encontrar detalles sobre cómo solicitar el servicio bajo la garantía,
visite nuestro sitio web en www.bushnell.com/warranty. Alternativamente,puede solicitar una copia
de la garantía llamándonos al 1-800-423-3537 o escribiéndonos a una de las siguientes direcciones:
EN ESTADOS UNIDOS enviar a		 EN CANADÁ enviar a: 	
Bushnell Holdings, Inc.			 Bushnell Holdings, Inc.
Attn.: Repairs					Attn.: Repairs
9200 Cody					 140 Great Gulf Drive, Unit B
Overland Park, Kansas 66214			 Vaughan, Ontario L4K 5W1
Para los productos comprados fuera de Estados Unidos o Canadá, póngase en contacto con su
distribuidor local para obtener información sobre la garantía aplicable.
Esta garantía le otorga derechos legales específicos.
Es posible que tenga otros derechos que varíen de un país a otro.
© 2018 Bushnell Outdoor Products
14
Vielen Dank für den Kauf Ihres neuen Bushnell® Forge™ Fernglases.
Diese Bedienungsanleitung hilft Ihnen bei der Optimierung Ihres Sichterlebnisses, indem sie Ihnen erläutert, wie Sie das Fernglas
an Ihre Augen anpassen und das Instrument pflegen können. Bitte lesen Sie diese Anweisungen sorgfältig durch, bevor Sie das
Fernglas benutzen.
GEFAHR SCHAUEN SIE MIT IHREM FERNGLAS NIEMALS DIREKT IN DIE SONNE
DIES KANN ERNSTHAFTE SCHÄDEN AN IHREN AUGEN VERURSACHEN
ANPASSUNG DER AUGENMUSCHEL
Ihr Bushnell Forge Fernglas ist mit Augenmuscheln ausgestattet (Abb. 1, nächste Seite), die eine komfortable Sicht auf das
komplette Bild bieten und helfen, unerwünschten Lichteinfall fernzuhalten. Drehen Sie für die Verwendung ohne Brille oder
Sonnenbrille die Augenmuscheln nach oben (Abb. 2). Dadurch werden Ihre Augen weiter weg von den Okularlinsen des
Fernglases in den korrekten Augenabstand gebracht, so dass Sie das gesamte Sichtfeld sehen können.
IPD (PUPILLENDISTANZ/INTERPUPILLARY DISTANCE) ANPASSUNG
Der Abstand zwischen den Pupillen der Augen, genannt Pupillendistanz, ist bei jedem Menschen unterschiedlich. So passen Sie
das Fernglas an Ihre IPD oder Ihren „Auge-zu-Auge“-Abstand an:
1. Richten Sie es auf eine weiße Wand oder einen freien Bereich des Himmels. Halten Sie das Fernglas und schauen Sie ganz
normal hindurch. Kümmern Sie sich noch nicht um den Fokus.
2. Halten Sie beide Seiten des Fernglases gut fest. Bringen Sie die linke und die rechte Seite näher zusammen oder weiter
auseinander, (Abb. 3, nächste Seite) bis Sie ein einziges Bild ohne Schattenbereiche sehen.
ANPASSUNG DES FOKUS UND DIOPTRIEN
1. Passen Sie zuerst die Augenmuscheln und die IPD an, wie in den vorangegangenen
Abschnitten beschrieben.
2. Decken Sie mit Hilfe des befestigten Objektivdeckels oder Ihrer Hand die Objektivlinse
auf der rechten Seite des Fernglases ab.
3. Konzentrieren Sie sich auf ein weit entferntes Objekt mit feinen Details (z.B. eine
Ziegelmauer, Äste, usw.) und drehen Sie den zentralen Fokusregler, bis es so scharf wie
möglich erscheint, wenn Sie durch die linke Seite des Fernglases schauen.
4. Legen Sie die rechte Objektivlinse frei und decken Sie die linke ab, während Sie
weiterhin dasselbe Objekt anschauen.
5. Drehen Sie den Dioptrieneinstellring direkt unter der rechten Augenmuschel (Abb. 4),
NICHT den mittleren Fokusknopf, um das Objekt auf der rechten Seite des Fernglases
scharf zu stellen. Stellen Sie sicher, dass Sie den Dioptrienring zuerst entriegeln,
indem Sie ihn nach oben ziehen (siehe Abb. 4, Modell 10x30 verfügt über keinen
verriegelnden Dioptrienring). Vermeiden Sie ein Überdrehen oder Forcieren des
Dioptrienmechanismus. Falls es Ihnen nicht gelingt, das Objekt durch Anpassung des
Abb.4 Dioptrienanpassungsring
(Modell10x42,entriegelt)
A
C
B
D
E
F
G
BAUTEILE
*befindetsichbeiallenModellenaußer
10x30unterderKappe.
Okularlinse A
Zentraler Fokusregler B
Augenmuscheln
(dreh- und arretierbar)
C
Stativadapterbuchse* D
Objektivlinse E
Dioptrienanpassungsring F
Objektivschutzkappen G
DEUTSCH
15
Dioptrienrings für Ihr rechtes Auge scharf zu stellen, überprüfen Sie, ob die linke Seite immer noch scharf ist (wiederholen Sie
gegebenenfalls Schritte 2 – 4). Die Dioptrienanpassung sorgt im Grunde für den „Feinfokus“ auf einer Seite des Fernglases
(nur rechts), um leichte Unterschiede in der Sehkraft Ihres linken und rechten Auges zu berücksichtigen.
6. Ihr Fernglas sollte nun an Ihre Augen angepasst sein. Sie können es nun auf jede Distanz scharf stellen, indem Sie einfach
den zentralen Fokusregler drehen. Notieren Sie sich Ihre Dioptrieneinstellung (Position der Plus- und Minusmarkierungen
am Dioptrienring in Bezug auf die Indexmarkierung am Fernglas unter dem Ring) für eine spätere Bezugnahme, falls der
Ring versehentlich oder von einer anderen Person, die Ihr Fernglas benutzt, bewegt wurde. Der Dioptrienring kann zur
Arretierung nach unten gedrückt werden (bei den Modellen 8x42, 10x42 und 15x56), nachdem Sie ihn an Ihre Sehkraft
angepasst haben.
BEFESTIGUNG DES TRAGERIEMENS
Um den Trageriemen zu befestigen, fädeln Sie dessen Enden durch die Riemenösen (Abb. 5) auf jeder Seite des Fernglases
und dann zurück durch die Kunststoffschnalle am Riemen (Abb. 6). Passen Sie die Position des Fernglases auf Ihrer Brust Ihrer
Präferenz entsprechend an, indem Sie die Länge des Riementeils, der durch die Schlaufenführung und die Schnalle führt, auf
beiden Seiten um gleich viel verändern. Wenn Sie lieber einen Zubehörriemen mit O-Ringen aus Metall verwenden möchten,
befestigen Sie sie mittels Kabelbindern an den Ösen, statt sie direkt an den Ösen festzumachen, um eine Beschädigung des
Lacks auf dem Fernglas durch Kontakt mit den Ringen zu vermeiden.
Forge Ferngläser beinhalten auch einen Fernglasgurt (Abb. 7, unten und nächste Seite), welcher bei einer ganztägigen
Verwendung der Optik eine bequemere Option bietet, indem er das Gewicht vom Hals nimmt. Entfernen Sie einfach den
Standardriemen, führen Sie stattdessen die Gurtbefestigungen durch die Riemenösen und rasten Sie die Clips in den
entsprechenden Befestigungen an den Gurtriemen ein (Abb. 8).
BEFESTIGUNG AUF EINEM STATIV (nur Modelle 8x42, 10x42 und 15x56)
Um das Fernglas auf einem Drei- oder Einbeinstativ zu befestigen, schrauben oder ziehen Sie die Kappe ab, die die Gewindemuffe
auf der hinteren Seite des mittleren Scharniers abdeckt (Abb. 9), und legen Sie sie an einem sicheren Platz ab. Verwenden Sie
einen kompatiblen Fernglas-Stativ-Adapter (90o
Befestigungswinkel), wie etwa das Bushnell-Modell 161002CM, um Ihr Forge-
Fernglas auf einem beliebigen Standardstativ in einer horizontalen Position zu befestigen, um bei längerer Betrachtung für ein
stabiles Bild zu sorgen.
Abb.3
Augenabstand (IPD – Interpupillary Distance)
Abstandanpassung
Weite IPD
Enge IPD
Weite IPD
Enge IPD
Fig.2 Augenmuschel in der
“oben”-Position
(fürdieVerwendungohneBrille)
Abb.1 Augenmuschel in der
“unten”-Position
(fürdieVerwendungmitBrille)
Fig.9 Kappe der Stativfassung
Abb.5 Riemenöse
Fig.6 Riemen & Schnalle
Abb.7 Gurt
Abb.8 Gurt
Befestigung
16
WASSERDICHT/BESCHLÄGT NICHT
Wenn Sie in einen heftigen Regenguss geraten oder das Forge-Fernglas bei einem Bootsausflug aus Versehen in Wasser tauchen,ist
das kein Problem. Das Fernglas wurde hergestellt und getestet, um Wassereinwirkung entsprechend Standard IPX7 zu widerstehen.
Der Schutz vor Beschlagen wird durch Spülung mit trockenem Stickstoff erreicht, wodurch die gesamte Feuchtigkeit enthaltende
Luft aus dem Inneren entfernt wird.
Alle äußeren Linsenoberflächen verfügen über unsere neue EXO Barrier™-Beschichtung (zusätzlich zur vollständigen Mehrfach-
Beschichtung). EXO Barrier ist schlichtweg die beste Linsenschutzbeschichtungstechnologie, die Bushnell je entwickelt hat. EXO
Barrier wird am Ende des Beschichtungsprozesses hinzugefügt, verbindet sich auf molekularer Ebene mit der Linse und füllt die
mikroskopischen Poren des Glases aus. Das Ergebnis ist eine ultraglatte Beschichtung, die Wasser, Öl, Nebel, Staub und Schmutz
abstößt – Regen, Schnee, Fingerabdrücke und Schmutz bleiben nicht haften. EXO Barrier ist langanhaltend: die gebundene
Beschichtung vergeht mit der Zeit und bei normaler Abnutzung nicht.
PFLEGE DER OPTIK
1.	 Ihr Bushnell Forge Fernglas wird Ihnen Jahre lang problemlos gute Dienste leisten, wenn es die normale Pflege bekommt,
welches Sie jedem feinen optischen Gerät zukommen lassen würden.
2.	 Vermeiden Sie harte Stöße. Legen Sie das Fernglas behutsam auf harten Oberflächen ab.
3.	 Ziehen Sie am Riemen, nachdem Sie ihn befestigt haben, und prüfen Sie, ob er sicher am Fernglas befestigt ist, bevor Sie
ihn sich umlegen.
4.	 Lagern Sie Ihr Fernglas wenn immer möglich an einem kühlen, trockenen Ort.
REINIGUNG
1.	 Pusten oder pinseln Sie zuerst Staub und Schmutz auf der Linse ab (indem Sie einen Pustebalg oder einen weichen
Linsenpinsel verwenden).
2.	 Entfernen Sie Schmutz oder Fingerabdrücke mit dem mitgelieferten weichen Aufbewahrungsbeutel (aus waschbarem
Mikrofasertuch) durch kreisförmiges Wischen. Durch ein grobes Tuch (einschließlich Papiertücher) oder unnötiges
Reiben können Kratzer auf der Linsenoberfläche entstehen, die zu dauerhaften Schäden führen können. Der mitgelieferte
Aufbewahrungsbeutel/Mikrofasertuch ist ideal für die routinemäßige Reinigung der Optik. Hauchen Sie die Linse leicht an,
um für eine geringe Menge an Feuchtigkeit zu sorgen und wischen Sie die Linse behutsam mit dem Mikrofasertuch ab.
3.	 Für eine gründlichere Reinigung können Sie Tücher oder Reinigungsmittel für fotografische Linsen oder Isopropanol
verwenden. Tragen Sie das Reinigungsmittel immer auf das Reinigungstuch auf – niemals direkt auf die Linse.
4.	 Um eine mögliche Beschädigung der optischen Beschichtungen auf den Linsenoberflächen des Fernglases zu vermeiden,
verwenden Sie niemals haushaltsübliche Fensterreiniger. Vermeiden Sie die Verwendung von Kosmetiktüchern oder
Kleidungsstücken, die abrasive Fasern oder Öle oder Schmutz enthalten können.
Technische Daten
SKU
Vergrößerung
Objektivdurchmesser
Prismensystem
Sichtfeld
ft@1000
yds/
m@1000
m
Austrittspupille
(mm)
Augenabstand
(mm)
Naher
Fokus
(ft/m)
Länge
(in/mm)
Gewicht
(oz/g)
BF1030T 10x 30 MM Dachkant 330 / 110 3,0 18 7 / 2,1 4,8 / 122 13,7 / 388
BF842T 8x 42 MM Dachkant 426 / 142 5,1 19 10 / 3 6,7 / 170 30,8 / 873
BF1042T 10x 42 MM Dachkant 340 / 113 4,2 18 10 / 3 6,7 / 170 30,4 / 862
BF1556T 15x 56 MM Dachkant 235 / 78 3,7 21 12 / 3,6 8,9 / 226 51,0 / 1.446
Abb.7 Fernglasgurt (in Gebrauch)
17
Produkte, die ab April 2017 hergestellt wurden, fallen unter die Bushnell Ironclad-Garantie. Die
Ironclad-Garantie ist eine lebenslange Garantie, die sich über die Lebensdauer dieses Produkts
erstreckt. Jedes Produkt hat eine definierte Lebensdauer; die Lebensdauer kann von 1 bis 30 Jahren
reichen. Die Lebensdauer dieses Produkts finden Sie auf der unten angegebenen Website und/
oder auf der für dieses Produkt spezifischen Bushnell-Webseite.
Wir gewährleisten,dass dieses Produkt frei von Material- und Verarbeitungsfehlern ist und alle für die
Lebensdauer dieses Produkts geltenden Leistungsstandards erfüllt. Wenn dieses Produkt aufgrund
eines von der Garantie abgedeckten Defektes nicht ordnungsgemäß funktioniert, reparieren oder
ersetzen wir es nach unserem Dafürhalten und senden es kostenlos an Sie zurück. Diese Garantie ist
vollständigübertragbarunderfordertkeineQuittung,GarantiekarteoderProduktregistrierung.Diese
Garantie gilt nicht für Folgendes: elektronische Komponenten, Batterien, kosmetischer Schäden,
durch nicht ordnungsgemäße Wartung entstandene Schäden, Verlust, Diebstahl, Schäden durch
unbefugte Reparatur, Änderung oder Demontage, vorsätzliche Beschädigung, missbräuchliche
oder unsachgemäße Verwendung und gewöhnlicher Verschleiß. Diese Garantie erlischt, wenn der
Datumsstempel oder andere Seriennummern vom Produkt entfernt wurden.
Um die vollständige Garantie einzusehen und Informationen darüber zu erhalten, wie Sie
einen Service im Rahmen der Garantie anfordern können, besuchen Sie unsere Website unter
www.bushnell.com/warranty. Alternativ können Sie eine Kopie der Garantie anfordern, indem Sie
uns unter +1 80 04 23 35 37 anrufen oder uns unter einer der folgenden Adressen schreiben:
Adresse für die USA:				Adresse für KANADA: 	
Bushnell Holdings, Inc.			 Bushnell Holdings, Inc.
Attn.: Repairs					Attn.: Repairs
9200 Cody					 140 Great Gulf Drive, Unit B
Overland Park, Kansas 66214			 Vaughan, Ontario L4K 5W1
Wenden Sie sich bei Produkten, die außerhalb der USA oder Kanada erworben wurden, bitte an
Ihren Händler vor Ort, um die jeweils gültigen Garantieinformationen zu erfragen.
Diese Garantie gewährt Ihnen bestimmte gesetzlich verankerte Rechte.
Unter Umständen haben Sie noch weitere Rechte, die von Land zu Land variieren.
© 2018 Bushnell Outdoor Products
18
Grazie per aver acquistato il nuovo binocolo Bushnell® Forge™.
Nel presente manuale viene illustrato come regolare il binocolo per ottimizzare l'esperienza di visione e come prendersi
cura di questo strumento. Prima di utilizzare il binocolo, leggere attentamente le istruzioni.
PERICOLO
NON GUARDARE MAI IL SOLE DIRETTAMENTE CON IL BINOCOLO,
POICHÉ PUÒ CAUSARE GRAVI DANNI AGLI OCCHI
REGOLAZIONE DELLA CONCHIGLIA OCULARE
Il binocolo Bushnell Forge è dotato di conchiglie oculari (Fig. 1, pagina successiva) che assicurano una comoda
osservazione dell'intera immagine e aiutano a escludere la luce estranea. Per l'utilizzo senza gli occhiali da vista o gli
occhiali da sole, ritrarre le conchiglie oculari (Fig. 2). In questo modo gli occhi saranno più lontani dalle lenti oculari del
binocolo e sarà possibile vedere l'intero campo visivo, alla corretta distanza di rilievo oculare.
REGOLAZIONE DELLA DISTANZA INTERPUPILLARE
La distanza tra le pupille degli occhi, denominata "distanza interpupillare", varia da una persona all'altra. Per regolare
il binocolo in base alla propria distanza interpupillare o alla larghezza tra gli occhi, seguire la procedura descritta.
1. Puntare il binocolo verso una parete bianca o un'area vuota del cielo. Guardare attraverso il binocolo come si
farebbe normalmente. Non preoccuparsi ancora della messa a fuoco.
2. Afferrare saldamente il binocolo dai lati. Avvicinare i lati destro e sinistro o allontanarli (Fig. 3, pagina successiva)
fino a quando non si vede una sola immagine, senza zone d'ombra.
REGOLAZIONE DIOTTRICA E DELLA MESSA A FUOCO
1. Regolare innanzitutto le conchiglie oculari e la distanza interpupillare, come
descritto nelle sezioni precedenti.
2. Utilizzando il coprilente attaccato o la mano, coprire la lente dell'obiettivo sul lato
destro del binocolo.
3. Usando la manopola centrale di messa a fuoco, mettere a fuoco un oggetto distante
ricco di particolari (ad esempio, un muro di mattoni, i rami di un albero e così via) finché
non appare il più nitido possibile guardandolo attraverso il lato sinistro del binocolo.
4. Scoprire la lente dell'obiettivo sul lato destro e coprire quella sul lato sinistro,
continuando a guardare lo stesso oggetto.
5. Ruotare l'anello di regolazione diottrica situato sotto la conchiglia oculare destra
(Fig. 4), NON la manopola centrale di messa a fuoco, per mettere a fuoco l'oggetto
sul lato destro del binocolo. Accertarsi di sbloccare l'anello di regolazione diottrica
innanzitutto tirandolo verso l'alto (Vedi Fig. 4, il modello 10x30 non è dotato di anello
di regolazione diottrica bloccante). Evitare di ruotare eccessivamente o di forzare
il meccanismo diottrico. Se non si riesce a mettere a fuoco l'oggetto con l'occhio destro
Fig.4 Anello di regolazione diottrica
(modello10x42,senzablocco)
A
C
B
D
E
F
G
GUIDA ALLE PARTI
*Situatosottoiltapposututtiimodellieccettoi
modelli10x30.
Lente oculare A
Manopola centrale di messa a fuoco B
Conchiglie oculari retrattili C
Presadell'adattatorepertreppiede* D
Lente dell'obiettivo E
Anello di regolazione diottrica F
Coprilenti G
ITALIANO
19
regolando l'anello di regolazione diottrica, assicurarsi che il lato sinistro sia ancora a fuoco. Se necessario, ripetere i passaggi
da 2 a 4. La regolazione diottrica fornisce essenzialmente la "messa a fuoco fine" su un lato del binocolo (solo destro) per
tenere conto delle lievi differenze nella vista tra l'occhio sinistro e quello destro.
6. A questo punto il binocolo dovrebbe essere regolato per i propri occhi. È ora possibile eseguire la messa a fuoco per
qualsiasi distanza ruotando semplicemente la manopola centrale di messa a fuoco. Prendere nota dell'impostazione
diottrica (posizione dei segni più e meno sull'anello di regolazione diottrica rispetto alla tacca indice sotto l'anello del
binocolo) per riferimento futuro nel caso in cui l'anello venga spostato per errore o da un'altra persona che utilizza
il binocolo. L'anello di regolazione diottrica può essere premuto per bloccarlo in posizione (sui modelli 8x42, 10x42
and 15x56) dopo averlo regolato per la propria vista.
ACCESSORIO TRACOLLA
Per fissare la tracolla, inserire le estremità della tracolla negli occhielli (Fig. 5) ai lati del binocolo, quindi farle passare
indietro attraverso la fibbia di plastica sulla cinghia (Fig. 6). Regolare la posizione del binocolo sul petto in base alle
proprie preferenze, modificando la lunghezza della parte di cinghia che passa attraverso la guida e la fibbia di una misura
uguale su entrambi i lati. Se si preferisce utilizzare una tracolla non originale dotata di anelli in metallo, fissarli a una fascetta
di plastica posta sugli occhielli della cinghia anziché fissarla direttamente sugli occhielli in modo da evitare di danneggiare
la finitura del binocolo a causa del contatto con gli anelli.
I binocoli Forge includono una cintura del binocolo (Fig. 7, sotto e pagina seguente), che offre maggiore comodità quando
si utilizza l'ottica tutto il giorno, riducendo il peso sul collo. È sufficiente rimuovere la cinghia standard e allacciare invece la
tracolla attraverso gli occhielli della cinghia, poi far scattare le clip nei fissaggi corrispondenti sui cinturini della tracolla (Fig. 8).
MONTAGGIO SU TREPPIEDE (solo modelli 8x42, 10x42 e 15x56)
Per montare il binocolo su un treppiede o un monopiede, allentare o rimuovere il tappo che copre la presa filettata all'estremità
della cerniera centrale (Fig. 9) e riporlo in un luogo sicuro. Utilizzare un adattatore per treppiede compatibile (staffa a 90o
 gradi),
come ad esempio il modello n. 161002CM di Bushnell, per fissare il binocolo Forge in scala reale a qualsiasi treppiede standard
in posizione orizzontale in modo da garantire che, durante l'osservazione prolungata, l'immagine sia stabile.
Fig.3
Regolazione della
distanza interpupillare
Distanza intepupillare ampia
Distanzainterpupillarestretta
Distanza intepupillare ampia
Distanzainterpupillarestretta
Fig.2 Conchiglia oculare
in posizione "sollevata"
(perl'usosenzaocchiali)
Fig.1 Conchiglia oculare in
posizione "abbassata"
(perl'usoconocchiali)
Fig.9 Tappo presa
per treppiede
Fig.5 Occhiello
per cinghia Fig.6 Cinghia e fibbia
Fig.7 Tracolla
Fig.8 Tracolla
Cinghia
20
MODELLI IMPERMEABILI/ANTI-APPANNAMENTO
Che si sia sorpresi da un forte acquazzone o si abbia inavvertitamente immerso nell'acqua il binocolo Forge durante
un'escursione in barca, non è un problema. Il binocolo è prodotto e testato per resistere all'esposizione all'acqua secondo
gli standard IPX7. La protezione anti-appannamento è ottenuta tramite lo spurgo con azoto secco che rimuove tutta l'aria
interna, che può trattenere l'umidità.
Le superfici di tutte le lenti esterne sono dotate di un nuovo rivestimento EXO Barrier™ (oltre al rivestimento multi-strato).
EXO Barrier, semplicemente, è la migliore tecnologia di rivestimento protettivo che Bushnell abbia mai sviluppato.
Aggiunta alla fine del processo di rivestimento, EXO Barrier forma legami molecolari con le lenti e riempie i pori
microscopici del vetro. Il risultato è un rivestimento multi-strato repellente per acqua, olio, nebbia, polvere e detriti:
pioggia, neve, impronte digitali e sporcizia non si attaccheranno. EXO Barrier è creata per durare: il rivestimento legato
non si attenua con il passare del tempo o la normale usura.
MANUTENZIONE DELLE OTTICHE
1.	 Il binocolo Bushnell Forge assicura lunga durata senza inconvenienti se si eseguono le normali procedure di pulizia
e manutenzione necessarie per qualsiasi altro strumento ottico di precisione.
2.	 Evitare il contatto con oggetti affilati. Sulle superfici dure appoggiare il binocolo delicatamente.
3.	 Tirare la tracolla dopo averla allacciata e assicurarsi che sia fissata saldamente al binocolo prima di sistemarlo intorno al collo.
4.	 Conservare il binocolo in un luogo fresco e asciutto, quando possibile.
PULIZIA
1.	 Innanzitutto rimuovere polvere e detriti sulle lenti soffiando o spazzolando (con "aria compressa" o una spazzola
morbida per lenti).
2.	 Per rimuovere la sporcizia o le impronte digitali, pulire con la custodia morbida in dotazione (in panno di microfibra
lavabile), strofinando con movimento circolare. L'utilizzo di un panno ruvido (compresi asciugamani di carta)
o l'eccessivo strofinamento può graffiare la superficie delle lenti e causare danni permanenti. La custodia o il panno
in microfibra in dotazione sono ideali per la pulizia ordinaria delle ottiche. È sufficiente inumidire la lente con il fiato
e strofinarla delicatamente con il panno in microfibra.
3.	 Per una pulizia più accurata, possono essere utilizzati dei tessuti specifici per obiettivi fotografici e detergenti liquidi
per la pulizia di obiettivi di tipo fotografico o alcol isopropilico. Applicare sempre il fluido sul panno detergente e mai
direttamente sulle lenti.
4.	 Per evitare possibili danni ai rivestimenti ottici sulle superfici delle lenti del binocolo, non utilizzare detergenti per i vetri
di casa. Non usare fazzoletti di carta o pezzi di indumenti che possono essere abrasivi e trattenere olio o sporcizia.
Specifiche tecniche
SKU
Ingrandimento
Diametro
obiettivo
Sistema
prisma
Campo
visivo
piedi
x
1.000
iarde/
m
x
1.000
m
Pupilla
di
uscita
(mm)
Rilievo
oculare
(mm)
Distanza
minima
di
focalizzazione
(piedi/m)
Lunghezza
(pollici/mm)
Peso
(once/g)
BF1030T 10x 30 mm A tetto 330 / 110 3.0 18 7 / 2.1 4.8/122 13.7 / 388
BF842T 8x 42 mm A tetto 426 / 142 5.1 19 10 / 3 6.7/170 30.8 / 873
BF1042T 10x 42 mm A tetto 340 / 113 4.2 18 10 / 3 6.7/170 30.4 / 862
BF1556T 15x 56 mm A tetto 235 / 78 3.7 21 12 / 3.6 8.9/226 51.0 / 1446
Fig.7Tracolla binocolo (in uso)
21
Iprodottifabbricatiapartiredaaprile2017sonocopertidallaGaranziaBushnellIronclad. LaGaranzia
Ironclad è una garanzia a vita completa che copre la vita utile di questo prodotto. Ogni prodotto ha
una durata di vita definita, che può variare da 1 a 30 anni. La durata di questo prodotto è riportata
sul sito Web elencato di seguito e/o sulla pagina Web Bushnell specifica di questo prodotto.
Si garantisce che questo prodotto è esente da difetti di materiali e di lavorazione e che soddisferà
tutti gli standard di prestazioni rappresentati per tutta la durata di vita del prodotto. Se questo
prodotto non funziona correttamente a causa di un difetto coperto provvederemo, a nostra esclusiva
discrezione, a ripararlo o sostituirlo e rispedirlo gratuitamente. Questa garanzia è completamente
trasferibile e non richiede ricevuta, scheda di garanzia o registrazione del prodotto. La presente
garanzia non copre quanto segue: componenti elettronici, batterie, danni estetici, danni causati dalla
mancata corretta manutenzione del prodotto, perdita, furto, danni dovuti a riparazione, modifica o
smontaggio non autorizzati, danni intenzionali, uso improprio o abuso e normale usura. La presente
Garanzia decade se la data stampata o altri codici di serializzazione sono stati rimossi dal prodotto.
Per visualizzare la garanzia completa e trovare dettagli su come richiedere l'assistenza in garanzia,
visitare il nostro sito Web all'indirizzo www.bushnell.com/warranty. In alternativa, è possibile
richiedere una copia della garanzia chiamandoci al numero 1-800-423-3537 o scrivendoci a uno dei
seguenti indirizzi:
Negli U.S.A. spedire a:			 IN CANADA spedire a: 	
Bushnell Holdings, Inc.			 Bushnell Holdings, Inc.
Attn.: Repairs					Attn.: Repairs
9200 Cody					 140 Great Gulf Drive, Unit B
Overland Park, Kansas 66214			 Vaughan, Ontario L4K 5W1
Per prodotti acquistati fuori da Stati Uniti o Canada, rivolgersi al rivenditore per le clausole pertinenti
della garanzia.
La presente garanzia ti riconosce specifici diritti legali.
Potresti avere altri diritti, i quali variano da paese a paese.
©2018 Bushnell Outdoor Products
Bushnell,™, ®, denote trademarks of Bushnell Outdoor Products
www.bushnell.com
9200 Cody, Overland Park, KS 66214

Contenu connexe

Tendances

Instructions TASCO Binoculars | Optics Trade
Instructions TASCO Binoculars | Optics TradeInstructions TASCO Binoculars | Optics Trade
Instructions TASCO Binoculars | Optics TradeOptics-Trade
 
Instruction Manual | Celestron Regal M2 Spotting Scopes | Optics Trade
Instruction Manual | Celestron Regal M2 Spotting Scopes | Optics TradeInstruction Manual | Celestron Regal M2 Spotting Scopes | Optics Trade
Instruction Manual | Celestron Regal M2 Spotting Scopes | Optics TradeOptics-Trade
 
Instructions BUSHNELL Marine Binoculars | Optics Trade
Instructions BUSHNELL Marine Binoculars | Optics TradeInstructions BUSHNELL Marine Binoculars | Optics Trade
Instructions BUSHNELL Marine Binoculars | Optics TradeOptics-Trade
 
Instructions BUSHNELL Fusion 1 Mile ARC Laser Rangefinder Binoculars | Optics...
Instructions BUSHNELL Fusion 1 Mile ARC Laser Rangefinder Binoculars | Optics...Instructions BUSHNELL Fusion 1 Mile ARC Laser Rangefinder Binoculars | Optics...
Instructions BUSHNELL Fusion 1 Mile ARC Laser Rangefinder Binoculars | Optics...Optics-Trade
 
Instructions HAWKE Monoculars | Optics Trade
Instructions HAWKE Monoculars | Optics TradeInstructions HAWKE Monoculars | Optics Trade
Instructions HAWKE Monoculars | Optics TradeOptics-Trade
 
Instructions MINOX MS 8x25 | Optics Trade
Instructions MINOX MS 8x25 | Optics TradeInstructions MINOX MS 8x25 | Optics Trade
Instructions MINOX MS 8x25 | Optics TradeOptics-Trade
 
Instructions HAWKE Binoculars | Optics Trade
Instructions HAWKE Binoculars | Optics TradeInstructions HAWKE Binoculars | Optics Trade
Instructions HAWKE Binoculars | Optics TradeOptics-Trade
 
Instructions BUSHNELL Legend Ultra HD 10x42 Monocular | Optics Trade
Instructions BUSHNELL Legend Ultra HD 10x42 Monocular | Optics TradeInstructions BUSHNELL Legend Ultra HD 10x42 Monocular | Optics Trade
Instructions BUSHNELL Legend Ultra HD 10x42 Monocular | Optics TradeOptics-Trade
 
Instructions STEINER Safari Ultrasharp Binoculars | Optics Trade
Instructions STEINER Safari Ultrasharp Binoculars | Optics TradeInstructions STEINER Safari Ultrasharp Binoculars | Optics Trade
Instructions STEINER Safari Ultrasharp Binoculars | Optics TradeOptics-Trade
 
Instruction Manual | Celestron Cavalry Binoculars & Monoculars | Optics Trade
Instruction Manual | Celestron Cavalry Binoculars & Monoculars | Optics TradeInstruction Manual | Celestron Cavalry Binoculars & Monoculars | Optics Trade
Instruction Manual | Celestron Cavalry Binoculars & Monoculars | Optics TradeOptics-Trade
 
Instructions BUSHNELL Illuminated Red Dot Scope | Optics Trade
Instructions BUSHNELL Illuminated Red Dot Scope | Optics TradeInstructions BUSHNELL Illuminated Red Dot Scope | Optics Trade
Instructions BUSHNELL Illuminated Red Dot Scope | Optics TradeOptics-Trade
 
Instructions NIKON Force XR Handgun Scope | Optics Trade
Instructions NIKON Force XR Handgun Scope | Optics TradeInstructions NIKON Force XR Handgun Scope | Optics Trade
Instructions NIKON Force XR Handgun Scope | Optics TradeOptics-Trade
 
Instruction manual | National Geographic 8-25x25 Zoom Monocular | Optics Trade
Instruction manual | National Geographic 8-25x25 Zoom Monocular | Optics TradeInstruction manual | National Geographic 8-25x25 Zoom Monocular | Optics Trade
Instruction manual | National Geographic 8-25x25 Zoom Monocular | Optics TradeOptics-Trade
 
Instructions LEICA Trinovid BCA 20, 25mm | Optics Trade
Instructions LEICA Trinovid BCA 20, 25mm | Optics TradeInstructions LEICA Trinovid BCA 20, 25mm | Optics Trade
Instructions LEICA Trinovid BCA 20, 25mm | Optics TradeOptics-Trade
 
Instructions BUSHNELL Legend Ultra HD Spotting Scopes | Optics Trade
Instructions BUSHNELL Legend Ultra HD Spotting Scopes | Optics TradeInstructions BUSHNELL Legend Ultra HD Spotting Scopes | Optics Trade
Instructions BUSHNELL Legend Ultra HD Spotting Scopes | Optics TradeOptics-Trade
 
Instruction manual | Kahles Helia Binoculars | Optics Trade
Instruction manual | Kahles Helia Binoculars | Optics TradeInstruction manual | Kahles Helia Binoculars | Optics Trade
Instruction manual | Kahles Helia Binoculars | Optics TradeOptics-Trade
 
Instructions LEICA Monovid 20mm | Optics Trade
Instructions LEICA Monovid 20mm | Optics TradeInstructions LEICA Monovid 20mm | Optics Trade
Instructions LEICA Monovid 20mm | Optics TradeOptics-Trade
 
Instruction Manual | Celestron Ultima Spotting Scopes | Optics Trade
Instruction Manual | Celestron Ultima Spotting Scopes | Optics TradeInstruction Manual | Celestron Ultima Spotting Scopes | Optics Trade
Instruction Manual | Celestron Ultima Spotting Scopes | Optics TradeOptics-Trade
 
Instructions LEICA Duovid 42, 50mm | Optics Trade
Instructions LEICA Duovid 42, 50mm | Optics TradeInstructions LEICA Duovid 42, 50mm | Optics Trade
Instructions LEICA Duovid 42, 50mm | Optics TradeOptics-Trade
 
Instructions MINOX BN 7x50 DC | Optics Trade
Instructions MINOX BN 7x50 DC | Optics TradeInstructions MINOX BN 7x50 DC | Optics Trade
Instructions MINOX BN 7x50 DC | Optics TradeOptics-Trade
 

Tendances (20)

Instructions TASCO Binoculars | Optics Trade
Instructions TASCO Binoculars | Optics TradeInstructions TASCO Binoculars | Optics Trade
Instructions TASCO Binoculars | Optics Trade
 
Instruction Manual | Celestron Regal M2 Spotting Scopes | Optics Trade
Instruction Manual | Celestron Regal M2 Spotting Scopes | Optics TradeInstruction Manual | Celestron Regal M2 Spotting Scopes | Optics Trade
Instruction Manual | Celestron Regal M2 Spotting Scopes | Optics Trade
 
Instructions BUSHNELL Marine Binoculars | Optics Trade
Instructions BUSHNELL Marine Binoculars | Optics TradeInstructions BUSHNELL Marine Binoculars | Optics Trade
Instructions BUSHNELL Marine Binoculars | Optics Trade
 
Instructions BUSHNELL Fusion 1 Mile ARC Laser Rangefinder Binoculars | Optics...
Instructions BUSHNELL Fusion 1 Mile ARC Laser Rangefinder Binoculars | Optics...Instructions BUSHNELL Fusion 1 Mile ARC Laser Rangefinder Binoculars | Optics...
Instructions BUSHNELL Fusion 1 Mile ARC Laser Rangefinder Binoculars | Optics...
 
Instructions HAWKE Monoculars | Optics Trade
Instructions HAWKE Monoculars | Optics TradeInstructions HAWKE Monoculars | Optics Trade
Instructions HAWKE Monoculars | Optics Trade
 
Instructions MINOX MS 8x25 | Optics Trade
Instructions MINOX MS 8x25 | Optics TradeInstructions MINOX MS 8x25 | Optics Trade
Instructions MINOX MS 8x25 | Optics Trade
 
Instructions HAWKE Binoculars | Optics Trade
Instructions HAWKE Binoculars | Optics TradeInstructions HAWKE Binoculars | Optics Trade
Instructions HAWKE Binoculars | Optics Trade
 
Instructions BUSHNELL Legend Ultra HD 10x42 Monocular | Optics Trade
Instructions BUSHNELL Legend Ultra HD 10x42 Monocular | Optics TradeInstructions BUSHNELL Legend Ultra HD 10x42 Monocular | Optics Trade
Instructions BUSHNELL Legend Ultra HD 10x42 Monocular | Optics Trade
 
Instructions STEINER Safari Ultrasharp Binoculars | Optics Trade
Instructions STEINER Safari Ultrasharp Binoculars | Optics TradeInstructions STEINER Safari Ultrasharp Binoculars | Optics Trade
Instructions STEINER Safari Ultrasharp Binoculars | Optics Trade
 
Instruction Manual | Celestron Cavalry Binoculars & Monoculars | Optics Trade
Instruction Manual | Celestron Cavalry Binoculars & Monoculars | Optics TradeInstruction Manual | Celestron Cavalry Binoculars & Monoculars | Optics Trade
Instruction Manual | Celestron Cavalry Binoculars & Monoculars | Optics Trade
 
Instructions BUSHNELL Illuminated Red Dot Scope | Optics Trade
Instructions BUSHNELL Illuminated Red Dot Scope | Optics TradeInstructions BUSHNELL Illuminated Red Dot Scope | Optics Trade
Instructions BUSHNELL Illuminated Red Dot Scope | Optics Trade
 
Instructions NIKON Force XR Handgun Scope | Optics Trade
Instructions NIKON Force XR Handgun Scope | Optics TradeInstructions NIKON Force XR Handgun Scope | Optics Trade
Instructions NIKON Force XR Handgun Scope | Optics Trade
 
Instruction manual | National Geographic 8-25x25 Zoom Monocular | Optics Trade
Instruction manual | National Geographic 8-25x25 Zoom Monocular | Optics TradeInstruction manual | National Geographic 8-25x25 Zoom Monocular | Optics Trade
Instruction manual | National Geographic 8-25x25 Zoom Monocular | Optics Trade
 
Instructions LEICA Trinovid BCA 20, 25mm | Optics Trade
Instructions LEICA Trinovid BCA 20, 25mm | Optics TradeInstructions LEICA Trinovid BCA 20, 25mm | Optics Trade
Instructions LEICA Trinovid BCA 20, 25mm | Optics Trade
 
Instructions BUSHNELL Legend Ultra HD Spotting Scopes | Optics Trade
Instructions BUSHNELL Legend Ultra HD Spotting Scopes | Optics TradeInstructions BUSHNELL Legend Ultra HD Spotting Scopes | Optics Trade
Instructions BUSHNELL Legend Ultra HD Spotting Scopes | Optics Trade
 
Instruction manual | Kahles Helia Binoculars | Optics Trade
Instruction manual | Kahles Helia Binoculars | Optics TradeInstruction manual | Kahles Helia Binoculars | Optics Trade
Instruction manual | Kahles Helia Binoculars | Optics Trade
 
Instructions LEICA Monovid 20mm | Optics Trade
Instructions LEICA Monovid 20mm | Optics TradeInstructions LEICA Monovid 20mm | Optics Trade
Instructions LEICA Monovid 20mm | Optics Trade
 
Instruction Manual | Celestron Ultima Spotting Scopes | Optics Trade
Instruction Manual | Celestron Ultima Spotting Scopes | Optics TradeInstruction Manual | Celestron Ultima Spotting Scopes | Optics Trade
Instruction Manual | Celestron Ultima Spotting Scopes | Optics Trade
 
Instructions LEICA Duovid 42, 50mm | Optics Trade
Instructions LEICA Duovid 42, 50mm | Optics TradeInstructions LEICA Duovid 42, 50mm | Optics Trade
Instructions LEICA Duovid 42, 50mm | Optics Trade
 
Instructions MINOX BN 7x50 DC | Optics Trade
Instructions MINOX BN 7x50 DC | Optics TradeInstructions MINOX BN 7x50 DC | Optics Trade
Instructions MINOX BN 7x50 DC | Optics Trade
 

Similaire à Bushnell Forge Binoculars Instruction Manual | Optics Trade

Instruction Manual | Nikon Prostaff P7 Binoculars | Optics Trade
 Instruction Manual | Nikon Prostaff P7 Binoculars | Optics Trade Instruction Manual | Nikon Prostaff P7 Binoculars | Optics Trade
Instruction Manual | Nikon Prostaff P7 Binoculars | Optics TradeOptics-Trade
 
Instruction Manual | Alpen Optics Apex XP Binoculars | Optics Trade
Instruction Manual | Alpen Optics Apex XP Binoculars | Optics TradeInstruction Manual | Alpen Optics Apex XP Binoculars | Optics Trade
Instruction Manual | Alpen Optics Apex XP Binoculars | Optics TradeOptics-Trade
 
Instruction Manual | Alpen Optics Teton Binoculars | Optics Trade
Instruction Manual | Alpen Optics Teton Binoculars | Optics TradeInstruction Manual | Alpen Optics Teton Binoculars | Optics Trade
Instruction Manual | Alpen Optics Teton Binoculars | Optics TradeOptics-Trade
 
Instructions BUSHNELL Legend Ultra HD Riflescope | Optics Trade
Instructions BUSHNELL Legend Ultra HD Riflescope | Optics TradeInstructions BUSHNELL Legend Ultra HD Riflescope | Optics Trade
Instructions BUSHNELL Legend Ultra HD Riflescope | Optics TradeOptics-Trade
 
Instruction Manual | Nikon Monarch M5 Binoculars | Optics Trade
Instruction Manual | Nikon Monarch M5 Binoculars | Optics TradeInstruction Manual | Nikon Monarch M5 Binoculars | Optics Trade
Instruction Manual | Nikon Monarch M5 Binoculars | Optics TradeOptics-Trade
 
Instruction Manual | Nikon Prostaff P3 Binoculars | Optics Trade
Instruction Manual | Nikon Prostaff P3 Binoculars | Optics TradeInstruction Manual | Nikon Prostaff P3 Binoculars | Optics Trade
Instruction Manual | Nikon Prostaff P3 Binoculars | Optics TradeOptics-Trade
 
Forge Riflescopes Instruction Manual | Optics Trade
Forge Riflescopes Instruction Manual | Optics TradeForge Riflescopes Instruction Manual | Optics Trade
Forge Riflescopes Instruction Manual | Optics TradeOptics-Trade
 
Instructions Bushnell TRS 25 Red Dot | Optics Trade
Instructions Bushnell TRS 25 Red Dot | Optics TradeInstructions Bushnell TRS 25 Red Dot | Optics Trade
Instructions Bushnell TRS 25 Red Dot | Optics TradeOptics-Trade
 
Instructions BUSHNELL TRS-25 Red Dot Sight | Optics Trade
Instructions BUSHNELL TRS-25 Red Dot Sight | Optics TradeInstructions BUSHNELL TRS-25 Red Dot Sight | Optics Trade
Instructions BUSHNELL TRS-25 Red Dot Sight | Optics TradeOptics-Trade
 
Instructions STEINER Binoculars | Optics Trade
Instructions STEINER Binoculars | Optics TradeInstructions STEINER Binoculars | Optics Trade
Instructions STEINER Binoculars | Optics TradeOptics-Trade
 
Instructions STEINER Navigator Pro Binoculars | Optics Trade
Instructions STEINER Navigator Pro Binoculars | Optics TradeInstructions STEINER Navigator Pro Binoculars | Optics Trade
Instructions STEINER Navigator Pro Binoculars | Optics TradeOptics-Trade
 
Nitro Riflescopes Instruction Manual | Optics Trade
Nitro Riflescopes Instruction Manual | Optics TradeNitro Riflescopes Instruction Manual | Optics Trade
Nitro Riflescopes Instruction Manual | Optics TradeOptics-Trade
 
Bushnell Prime Spotting Scopes Instruction Manual | Optics Trade
Bushnell Prime Spotting Scopes Instruction Manual | Optics TradeBushnell Prime Spotting Scopes Instruction Manual | Optics Trade
Bushnell Prime Spotting Scopes Instruction Manual | Optics TradeOptics-Trade
 
Bushnell Prime Spotting Scopes Instruction Manual | Optics Trade
Bushnell Prime Spotting Scopes Instruction Manual | Optics TradeBushnell Prime Spotting Scopes Instruction Manual | Optics Trade
Bushnell Prime Spotting Scopes Instruction Manual | Optics TradeOptics-Trade
 
Prime Riflescopes Instruction Manual | Optics Trade
Prime Riflescopes Instruction Manual | Optics TradePrime Riflescopes Instruction Manual | Optics Trade
Prime Riflescopes Instruction Manual | Optics TradeOptics-Trade
 
Instructions NIKON Bolt XR Crossbow Scope | Optics Trade
Instructions NIKON Bolt XR Crossbow Scope | Optics TradeInstructions NIKON Bolt XR Crossbow Scope | Optics Trade
Instructions NIKON Bolt XR Crossbow Scope | Optics TradeOptics-Trade
 
Instruction Manual | Bushnell Legend Riflescopes | Optics Trade
Instruction Manual | Bushnell Legend Riflescopes | Optics TradeInstruction Manual | Bushnell Legend Riflescopes | Optics Trade
Instruction Manual | Bushnell Legend Riflescopes | Optics TradeOptics-Trade
 
Instruction manual | Athlon | Spotting Scopes | Optics Trade
Instruction manual | Athlon | Spotting Scopes | Optics TradeInstruction manual | Athlon | Spotting Scopes | Optics Trade
Instruction manual | Athlon | Spotting Scopes | Optics TradeOptics-Trade
 
Instruction Manual | Athlon Midas G2 UHD PRO | Optics Trade
Instruction Manual | Athlon Midas G2 UHD PRO | Optics TradeInstruction Manual | Athlon Midas G2 UHD PRO | Optics Trade
Instruction Manual | Athlon Midas G2 UHD PRO | Optics TradeOptics-Trade
 
Instructions MINOX Macroscopes | Optics Trade
Instructions MINOX Macroscopes | Optics TradeInstructions MINOX Macroscopes | Optics Trade
Instructions MINOX Macroscopes | Optics TradeOptics-Trade
 

Similaire à Bushnell Forge Binoculars Instruction Manual | Optics Trade (20)

Instruction Manual | Nikon Prostaff P7 Binoculars | Optics Trade
 Instruction Manual | Nikon Prostaff P7 Binoculars | Optics Trade Instruction Manual | Nikon Prostaff P7 Binoculars | Optics Trade
Instruction Manual | Nikon Prostaff P7 Binoculars | Optics Trade
 
Instruction Manual | Alpen Optics Apex XP Binoculars | Optics Trade
Instruction Manual | Alpen Optics Apex XP Binoculars | Optics TradeInstruction Manual | Alpen Optics Apex XP Binoculars | Optics Trade
Instruction Manual | Alpen Optics Apex XP Binoculars | Optics Trade
 
Instruction Manual | Alpen Optics Teton Binoculars | Optics Trade
Instruction Manual | Alpen Optics Teton Binoculars | Optics TradeInstruction Manual | Alpen Optics Teton Binoculars | Optics Trade
Instruction Manual | Alpen Optics Teton Binoculars | Optics Trade
 
Instructions BUSHNELL Legend Ultra HD Riflescope | Optics Trade
Instructions BUSHNELL Legend Ultra HD Riflescope | Optics TradeInstructions BUSHNELL Legend Ultra HD Riflescope | Optics Trade
Instructions BUSHNELL Legend Ultra HD Riflescope | Optics Trade
 
Instruction Manual | Nikon Monarch M5 Binoculars | Optics Trade
Instruction Manual | Nikon Monarch M5 Binoculars | Optics TradeInstruction Manual | Nikon Monarch M5 Binoculars | Optics Trade
Instruction Manual | Nikon Monarch M5 Binoculars | Optics Trade
 
Instruction Manual | Nikon Prostaff P3 Binoculars | Optics Trade
Instruction Manual | Nikon Prostaff P3 Binoculars | Optics TradeInstruction Manual | Nikon Prostaff P3 Binoculars | Optics Trade
Instruction Manual | Nikon Prostaff P3 Binoculars | Optics Trade
 
Forge Riflescopes Instruction Manual | Optics Trade
Forge Riflescopes Instruction Manual | Optics TradeForge Riflescopes Instruction Manual | Optics Trade
Forge Riflescopes Instruction Manual | Optics Trade
 
Instructions Bushnell TRS 25 Red Dot | Optics Trade
Instructions Bushnell TRS 25 Red Dot | Optics TradeInstructions Bushnell TRS 25 Red Dot | Optics Trade
Instructions Bushnell TRS 25 Red Dot | Optics Trade
 
Instructions BUSHNELL TRS-25 Red Dot Sight | Optics Trade
Instructions BUSHNELL TRS-25 Red Dot Sight | Optics TradeInstructions BUSHNELL TRS-25 Red Dot Sight | Optics Trade
Instructions BUSHNELL TRS-25 Red Dot Sight | Optics Trade
 
Instructions STEINER Binoculars | Optics Trade
Instructions STEINER Binoculars | Optics TradeInstructions STEINER Binoculars | Optics Trade
Instructions STEINER Binoculars | Optics Trade
 
Instructions STEINER Navigator Pro Binoculars | Optics Trade
Instructions STEINER Navigator Pro Binoculars | Optics TradeInstructions STEINER Navigator Pro Binoculars | Optics Trade
Instructions STEINER Navigator Pro Binoculars | Optics Trade
 
Nitro Riflescopes Instruction Manual | Optics Trade
Nitro Riflescopes Instruction Manual | Optics TradeNitro Riflescopes Instruction Manual | Optics Trade
Nitro Riflescopes Instruction Manual | Optics Trade
 
Bushnell Prime Spotting Scopes Instruction Manual | Optics Trade
Bushnell Prime Spotting Scopes Instruction Manual | Optics TradeBushnell Prime Spotting Scopes Instruction Manual | Optics Trade
Bushnell Prime Spotting Scopes Instruction Manual | Optics Trade
 
Bushnell Prime Spotting Scopes Instruction Manual | Optics Trade
Bushnell Prime Spotting Scopes Instruction Manual | Optics TradeBushnell Prime Spotting Scopes Instruction Manual | Optics Trade
Bushnell Prime Spotting Scopes Instruction Manual | Optics Trade
 
Prime Riflescopes Instruction Manual | Optics Trade
Prime Riflescopes Instruction Manual | Optics TradePrime Riflescopes Instruction Manual | Optics Trade
Prime Riflescopes Instruction Manual | Optics Trade
 
Instructions NIKON Bolt XR Crossbow Scope | Optics Trade
Instructions NIKON Bolt XR Crossbow Scope | Optics TradeInstructions NIKON Bolt XR Crossbow Scope | Optics Trade
Instructions NIKON Bolt XR Crossbow Scope | Optics Trade
 
Instruction Manual | Bushnell Legend Riflescopes | Optics Trade
Instruction Manual | Bushnell Legend Riflescopes | Optics TradeInstruction Manual | Bushnell Legend Riflescopes | Optics Trade
Instruction Manual | Bushnell Legend Riflescopes | Optics Trade
 
Instruction manual | Athlon | Spotting Scopes | Optics Trade
Instruction manual | Athlon | Spotting Scopes | Optics TradeInstruction manual | Athlon | Spotting Scopes | Optics Trade
Instruction manual | Athlon | Spotting Scopes | Optics Trade
 
Instruction Manual | Athlon Midas G2 UHD PRO | Optics Trade
Instruction Manual | Athlon Midas G2 UHD PRO | Optics TradeInstruction Manual | Athlon Midas G2 UHD PRO | Optics Trade
Instruction Manual | Athlon Midas G2 UHD PRO | Optics Trade
 
Instructions MINOX Macroscopes | Optics Trade
Instructions MINOX Macroscopes | Optics TradeInstructions MINOX Macroscopes | Optics Trade
Instructions MINOX Macroscopes | Optics Trade
 

Plus de Optics-Trade

Technical Data | ThermTec Wild 650L | Optics Trade
Technical Data | ThermTec Wild 650L | Optics TradeTechnical Data | ThermTec Wild 650L | Optics Trade
Technical Data | ThermTec Wild 650L | Optics TradeOptics-Trade
 
Technical Data | ThermTec Wild 635L | Optics Trade
Technical Data | ThermTec Wild 635L | Optics TradeTechnical Data | ThermTec Wild 635L | Optics Trade
Technical Data | ThermTec Wild 635L | Optics TradeOptics-Trade
 
Technical Data | ThermTec Wild 650 | Optics Trade
Technical Data | ThermTec Wild 650 | Optics TradeTechnical Data | ThermTec Wild 650 | Optics Trade
Technical Data | ThermTec Wild 650 | Optics TradeOptics-Trade
 
Technical Data | ThermTec Wild 635 | Optics Trade
Technical Data | ThermTec Wild 635 | Optics TradeTechnical Data | ThermTec Wild 635 | Optics Trade
Technical Data | ThermTec Wild 635 | Optics TradeOptics-Trade
 
Technical Data | ThermTec Wild 335 | Optics Trade
Technical Data | ThermTec Wild 335 | Optics TradeTechnical Data | ThermTec Wild 335 | Optics Trade
Technical Data | ThermTec Wild 335 | Optics TradeOptics-Trade
 
Technical Data | ThermTec Wild 325 | Optics Trade
Technical Data | ThermTec Wild 325 | Optics TradeTechnical Data | ThermTec Wild 325 | Optics Trade
Technical Data | ThermTec Wild 325 | Optics TradeOptics-Trade
 
Instruction Manual | ThermTec Wild Thermal Monoculars | Optics Trade
Instruction Manual | ThermTec Wild Thermal Monoculars | Optics TradeInstruction Manual | ThermTec Wild Thermal Monoculars | Optics Trade
Instruction Manual | ThermTec Wild Thermal Monoculars | Optics TradeOptics-Trade
 
Technical Data | ThermTec Hunt 335 | Optics Trade
Technical Data | ThermTec Hunt 335 | Optics TradeTechnical Data | ThermTec Hunt 335 | Optics Trade
Technical Data | ThermTec Hunt 335 | Optics TradeOptics-Trade
 
Instruction Manual | ThermTec Hunt Thermal Clip-On Series | Optics Trade
Instruction Manual | ThermTec Hunt Thermal Clip-On Series | Optics TradeInstruction Manual | ThermTec Hunt Thermal Clip-On Series | Optics Trade
Instruction Manual | ThermTec Hunt Thermal Clip-On Series | Optics TradeOptics-Trade
 
Instruction Manual | Steiner eRanger LRF 10x42 | Optics Trade
Instruction Manual | Steiner eRanger LRF 10x42 | Optics TradeInstruction Manual | Steiner eRanger LRF 10x42 | Optics Trade
Instruction Manual | Steiner eRanger LRF 10x42 | Optics TradeOptics-Trade
 
Flyer | Guide DN Series Handheld Digital Binoculars | Optics Trade
Flyer | Guide DN Series Handheld Digital Binoculars | Optics TradeFlyer | Guide DN Series Handheld Digital Binoculars | Optics Trade
Flyer | Guide DN Series Handheld Digital Binoculars | Optics TradeOptics-Trade
 
Quick Start Guide | Guide TB Series | Optics Trade
Quick Start Guide | Guide TB Series | Optics TradeQuick Start Guide | Guide TB Series | Optics Trade
Quick Start Guide | Guide TB Series | Optics TradeOptics-Trade
 
Instruction Manual | Pard FD1 Digital NV Front Attachment | Optics Trade
Instruction Manual | Pard FD1 Digital NV Front Attachment | Optics TradeInstruction Manual | Pard FD1 Digital NV Front Attachment | Optics Trade
Instruction Manual | Pard FD1 Digital NV Front Attachment | Optics TradeOptics-Trade
 
Instruction Manual | EOTech Vudu X 2-12x40 | Optics Trade
Instruction Manual | EOTech Vudu X 2-12x40 | Optics TradeInstruction Manual | EOTech Vudu X 2-12x40 | Optics Trade
Instruction Manual | EOTech Vudu X 2-12x40 | Optics TradeOptics-Trade
 
Instruction Manual | EOTech Vudu X 1-6x24 | Optics Trade
Instruction Manual | EOTech Vudu X 1-6x24 | Optics TradeInstruction Manual | EOTech Vudu X 1-6x24 | Optics Trade
Instruction Manual | EOTech Vudu X 1-6x24 | Optics TradeOptics-Trade
 
Instruction Manual | Nightforce CFS 6-36x50 F1 | Optics Trade
Instruction Manual | Nightforce CFS 6-36x50 F1 | Optics TradeInstruction Manual | Nightforce CFS 6-36x50 F1 | Optics Trade
Instruction Manual | Nightforce CFS 6-36x50 F1 | Optics TradeOptics-Trade
 
Instruction Manual | Athlon Cronus Tactical G2 ED 7-42x60 | Optics Trade
Instruction Manual | Athlon Cronus Tactical G2 ED 7-42x60 | Optics TradeInstruction Manual | Athlon Cronus Tactical G2 ED 7-42x60 | Optics Trade
Instruction Manual | Athlon Cronus Tactical G2 ED 7-42x60 | Optics TradeOptics-Trade
 
Insrtuction Manual | Swarovski CL Companion Habicht | Optics Trade
Insrtuction Manual | Swarovski CL Companion Habicht | Optics TradeInsrtuction Manual | Swarovski CL Companion Habicht | Optics Trade
Insrtuction Manual | Swarovski CL Companion Habicht | Optics TradeOptics-Trade
 
Technical Data | Swarovski CL Companion Habicht | Optics Trade
Technical Data | Swarovski CL Companion Habicht | Optics TradeTechnical Data | Swarovski CL Companion Habicht | Optics Trade
Technical Data | Swarovski CL Companion Habicht | Optics TradeOptics-Trade
 
Catalog 2024 | Shield Sights | Optics Trade
Catalog 2024 | Shield Sights | Optics TradeCatalog 2024 | Shield Sights | Optics Trade
Catalog 2024 | Shield Sights | Optics TradeOptics-Trade
 

Plus de Optics-Trade (20)

Technical Data | ThermTec Wild 650L | Optics Trade
Technical Data | ThermTec Wild 650L | Optics TradeTechnical Data | ThermTec Wild 650L | Optics Trade
Technical Data | ThermTec Wild 650L | Optics Trade
 
Technical Data | ThermTec Wild 635L | Optics Trade
Technical Data | ThermTec Wild 635L | Optics TradeTechnical Data | ThermTec Wild 635L | Optics Trade
Technical Data | ThermTec Wild 635L | Optics Trade
 
Technical Data | ThermTec Wild 650 | Optics Trade
Technical Data | ThermTec Wild 650 | Optics TradeTechnical Data | ThermTec Wild 650 | Optics Trade
Technical Data | ThermTec Wild 650 | Optics Trade
 
Technical Data | ThermTec Wild 635 | Optics Trade
Technical Data | ThermTec Wild 635 | Optics TradeTechnical Data | ThermTec Wild 635 | Optics Trade
Technical Data | ThermTec Wild 635 | Optics Trade
 
Technical Data | ThermTec Wild 335 | Optics Trade
Technical Data | ThermTec Wild 335 | Optics TradeTechnical Data | ThermTec Wild 335 | Optics Trade
Technical Data | ThermTec Wild 335 | Optics Trade
 
Technical Data | ThermTec Wild 325 | Optics Trade
Technical Data | ThermTec Wild 325 | Optics TradeTechnical Data | ThermTec Wild 325 | Optics Trade
Technical Data | ThermTec Wild 325 | Optics Trade
 
Instruction Manual | ThermTec Wild Thermal Monoculars | Optics Trade
Instruction Manual | ThermTec Wild Thermal Monoculars | Optics TradeInstruction Manual | ThermTec Wild Thermal Monoculars | Optics Trade
Instruction Manual | ThermTec Wild Thermal Monoculars | Optics Trade
 
Technical Data | ThermTec Hunt 335 | Optics Trade
Technical Data | ThermTec Hunt 335 | Optics TradeTechnical Data | ThermTec Hunt 335 | Optics Trade
Technical Data | ThermTec Hunt 335 | Optics Trade
 
Instruction Manual | ThermTec Hunt Thermal Clip-On Series | Optics Trade
Instruction Manual | ThermTec Hunt Thermal Clip-On Series | Optics TradeInstruction Manual | ThermTec Hunt Thermal Clip-On Series | Optics Trade
Instruction Manual | ThermTec Hunt Thermal Clip-On Series | Optics Trade
 
Instruction Manual | Steiner eRanger LRF 10x42 | Optics Trade
Instruction Manual | Steiner eRanger LRF 10x42 | Optics TradeInstruction Manual | Steiner eRanger LRF 10x42 | Optics Trade
Instruction Manual | Steiner eRanger LRF 10x42 | Optics Trade
 
Flyer | Guide DN Series Handheld Digital Binoculars | Optics Trade
Flyer | Guide DN Series Handheld Digital Binoculars | Optics TradeFlyer | Guide DN Series Handheld Digital Binoculars | Optics Trade
Flyer | Guide DN Series Handheld Digital Binoculars | Optics Trade
 
Quick Start Guide | Guide TB Series | Optics Trade
Quick Start Guide | Guide TB Series | Optics TradeQuick Start Guide | Guide TB Series | Optics Trade
Quick Start Guide | Guide TB Series | Optics Trade
 
Instruction Manual | Pard FD1 Digital NV Front Attachment | Optics Trade
Instruction Manual | Pard FD1 Digital NV Front Attachment | Optics TradeInstruction Manual | Pard FD1 Digital NV Front Attachment | Optics Trade
Instruction Manual | Pard FD1 Digital NV Front Attachment | Optics Trade
 
Instruction Manual | EOTech Vudu X 2-12x40 | Optics Trade
Instruction Manual | EOTech Vudu X 2-12x40 | Optics TradeInstruction Manual | EOTech Vudu X 2-12x40 | Optics Trade
Instruction Manual | EOTech Vudu X 2-12x40 | Optics Trade
 
Instruction Manual | EOTech Vudu X 1-6x24 | Optics Trade
Instruction Manual | EOTech Vudu X 1-6x24 | Optics TradeInstruction Manual | EOTech Vudu X 1-6x24 | Optics Trade
Instruction Manual | EOTech Vudu X 1-6x24 | Optics Trade
 
Instruction Manual | Nightforce CFS 6-36x50 F1 | Optics Trade
Instruction Manual | Nightforce CFS 6-36x50 F1 | Optics TradeInstruction Manual | Nightforce CFS 6-36x50 F1 | Optics Trade
Instruction Manual | Nightforce CFS 6-36x50 F1 | Optics Trade
 
Instruction Manual | Athlon Cronus Tactical G2 ED 7-42x60 | Optics Trade
Instruction Manual | Athlon Cronus Tactical G2 ED 7-42x60 | Optics TradeInstruction Manual | Athlon Cronus Tactical G2 ED 7-42x60 | Optics Trade
Instruction Manual | Athlon Cronus Tactical G2 ED 7-42x60 | Optics Trade
 
Insrtuction Manual | Swarovski CL Companion Habicht | Optics Trade
Insrtuction Manual | Swarovski CL Companion Habicht | Optics TradeInsrtuction Manual | Swarovski CL Companion Habicht | Optics Trade
Insrtuction Manual | Swarovski CL Companion Habicht | Optics Trade
 
Technical Data | Swarovski CL Companion Habicht | Optics Trade
Technical Data | Swarovski CL Companion Habicht | Optics TradeTechnical Data | Swarovski CL Companion Habicht | Optics Trade
Technical Data | Swarovski CL Companion Habicht | Optics Trade
 
Catalog 2024 | Shield Sights | Optics Trade
Catalog 2024 | Shield Sights | Optics TradeCatalog 2024 | Shield Sights | Optics Trade
Catalog 2024 | Shield Sights | Optics Trade
 

Bushnell Forge Binoculars Instruction Manual | Optics Trade

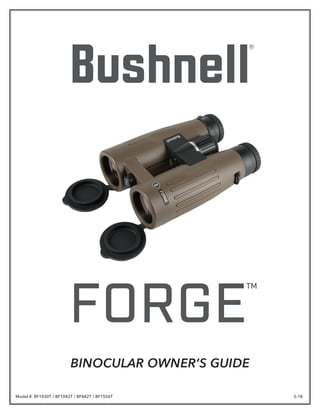
  • 1. Model #: BF1030T / BF1042T / BF842T / BF1556T 5-18 BINOCULAR OWNER’S GUIDE FORGE ™
  • 2. 2 Thank you for purchasing your new Bushnell® Forge™ binoculars. This manual will help you optimize your viewing experience by explaining how you can adjust the binocular to your eyes, and how to care for this instrument. Read the instructions carefully before using your binocular. NEVER LOOK DIRECTLY AT THE SUN WITH YOUR BINOCULAR, AS IT MAY CAUSE SERIOUS DAMAGE TO YOUR EYES EYECUP ADJUSTMENT Your Bushnell Forge binocular is fitted with eyecups (Fig. 1, next page) that provide a comfortable view of the full image and help to exclude extraneous light. For use without eyeglasses or sunglasses, twist up the eyecups (Fig. 2). This will place your eyes farther from the binocular’s ocular lenses, at the correct eye relief distance, allowing you to see the full field of view. IPD (INTERPUPILLARY DISTANCE) ADJUSTMENT The spacing between the pupils of your eyes, called “interpupillary distance,” varies from person to person. To match your binoculars to your IPD or “eye to eye” width: 1. Point them at a white wall or blank area of the sky. Hold the binoculars and view through them as you normally would. Don’t worry about focus yet. 2. Grasp each side of the binocular firmly. Move the left and right sides closer together or farther apart (Fig. 3, next page) until you see a single image with no shaded areas. FOCUS AND DIOPTER ADJUSTMENT 1. First, adjust the eyecups and IPD as described in the previous sections. 2. Using the attached lens cap or your hand, cover the objective lens on the right side of the binocular. 3. Using the center focus knob, focus on a distant object with fine detail (e.g., brick wall, tree branches, etc) until it appears as sharp as possible when viewed through the left side of the binocular. 4. Uncover the objective lens on the right side, and cover the left objective lens while continuing to view the same object. 5. Rotate the diopter adjustment ring located directly below the right eyecup (Fig. 4), NOT the center focus knob to bring the object into focus in the right side of the binocular. Be sure to unlock the diopter ring first by pulling it up (see Fig. 4, 10x30 model does not have a locking diopter ring). Avoid over-turning or forcing the diopter mechanism. If you are unable to bring the object into focus for your right Fig.4 Diopter Adjustment Ring (10x42model,unlocked) A C B D E F G PARTS GUIDE *Locatedundercaponallmodelsexcept10x30. Ocular Lens A Center Focus Knob B Twist-Up Eyecups C Tripod Adapter Socket* D Objective Lens E Diopter Adjustment Ring F Objective Lens Covers G ENGLISH
  • 3. 3 eye by adjusting the diopter ring, make sure the left side is still in focus (repeat steps #2-4 if necessary). The diopter adjustment essentially provides “fine focus” on one side of the binocular (right only) to allow for slight differences in the vision of your left and right eyes. 6. Your binocular should now be adjusted for your eyes. Focusing for any distance can now be done simply by turning the center focus knob. Make a note of your diopter setting (position of plus and minus marks on diopter ring relative to index mark on binocular below the ring) for future reference in case the ring is moved accidentally or by another person using your binocular. The diopter ring can be pushed down to lock it in place (on 8x42, 10x42 and 15x56 models) after you have adjusted it for your eyesight. NECKSTRAP ATTACHMENT To attach the neckstrap, thread the ends of the neckstrap through the strap lug (Fig. 5) on each side of the binocular, then back through the plastic buckle on the strap (Fig. 6). Adjust the position of the binoculars on your chest as they hang around your neck to your preference, by changing the length of the strap section which passes through the strap channel and buckle by an equal amount on each side. If you prefer to use an aftermarket strap that has metal O-rings, attach them to a plastic zip tie placed on the strap lugs rather than installing them directly on the lug, to avoid damaging the finish on the binocular via contact with the rings. Forge binoculars also include a binocular harness (Fig. 7, below & next page), which provides a more comfortable option when you’ll be using your optics all day, by taking the weight off your neck. Just remove the standard strap and loop the harness attachments through the strap lugs instead, then snap the clips into the corresponding attachments on the harness straps (Fig. 8). TRIPOD MOUNTING (8x42, 10x42 and 15x56 models only) To attach the binocular to a tripod or monopod, unscrew or pull off the cap which covers the threaded socket at the far end of the center hinge (Fig. 9), and set it aside in a safe place. Use a compatible binocular tripod adapter accessory (90o angle bracket), such as the Bushnell #161002CM, to attach your full size Forge binocular to any standard tripod in a horizontal position to provide a stable image during prolonged viewing. Fig.3 Interpupillary Distance Adjustment Wide IPD Narrow IPD Wide IPD Narrow IPD Fig.2 Eyecup in“Up”Position (forusewithouteyeglasses) Fig.1 Eyecup in“Down”Position (forusewitheyeglasses) Fig.1 Fig.9 Tripod Socket Cap Fig.5 Strap Lug Fig.6 Strap & Buckle Fig.7 Harness Fig.8 Harness Attachment
  • 4. 4 WATERPROOF / FOGPROOF Getting caught in a heavy downpour of rain, or accidentally submerging your Forge binocular in water during a boating excursion won’t be a problem. The binocular is manufactured and tested to withstand water exposure to IPX7 standards. Fogproof protection is achieved from dry nitrogen purging that removes all internal air, which can retain moisture. All exterior lens surfaces have our new EXO Barrier™ coating (in addition to full multi-coating). EXO Barrier, quite simply, is the best protective lens coating technology Bushnell has ever developed. Added at the end of the coating process, EXO Barrier molecularly bonds to the lens and fills the microscopic pores in the glass. The result is an ultra-slick coating that repels water, oil, fog, dust and debris - rain, snow, fingerprints and dirt will not stick. EXO Barrier is built to last: the bonded coating will not fade with the passage of time or normal wear and tear. CARE OF THE OPTICS 1. Your Bushnell Forge binocular will provide years of trouble-free service if it receives the normal care you would give any fine optical instrument. 2. Avoid sharp impacts. Set the binocular down gently on hard surfaces. 3. Tug on the strap after attaching, making sure it is securely fastened to the binocular before placing it around your neck. 4. Store your binocular in a cool, dry place whenever possible. CLEANING 1. First, blow or brush away any dust or debris on the lens (using “canned air” or a soft lens brush). 2. To remove dirt or finger prints, clean with the supplied soft storage bag (made of washable micro-fiber cloth), rubbing in a circular motion. Use of a coarse cloth (including paper towels) or unnecessary rubbing may scratch the lens surface and eventually cause permanent damage. The included storage bag/micro-fiber cloth is ideal for the routine cleaning of your optics. Simply breathe lightly on the lens to provide a slight amount of moisture, then gently rub the lens with the micro-fiber cloth. 3. For a more thorough cleaning, photographic lens tissue and photographic lens cleaning fluid or isopropyl alcohol may be used. Always apply the fluid to the cleaning cloth – never directly on the lens. 4. To prevent potential damage to the optical coatings on the binocular’s lens surfaces, never use household window cleaning liquids. Avoid using facial tissue or clothing that may have fibers which can be abrasive and hold oils or dirt. Technical Specifications SKU Magnification Objective Diameter Prism System Field of view ft@1000yds / m@1000m Exit Pupil (mm) Eye Relief (mm) Close Focus (ft/m) Length (in/mm) Weight (oz /g) BF1030T 10x 30 MM Roof 330 / 110 3.0 18 7 / 2.1 4.8/122 13.7 / 388 BF842T 8x 42 MM Roof 426 / 142 5.1 19 10 / 3 6.7/170 30.8 / 873 BF1042T 10x 42 MM Roof 340 / 113 4.2 18 10 / 3 6.7/170 30.4 / 862 BF1556T 15x 56 MM Roof 235 / 78 3.7 21 12 / 3.6 8.9/226 51.0 / 1446 Fig.7 Binocular Harness (in use)
  • 5. 5 Products manufactured on or after April 2017 are covered by the Bushnell Ironclad Warranty. The Ironclad Warranty is a full lifetime warranty that covers the lifetime of this Product. Each Product has a defined lifetime; lifetimes can range from 1 to 30 years. This Product’s lifetime can be found at the website listed below and/or on the Bushnell webpage specific to this Product. We warrant that this Product is free from defects in materials and workmanship and will meet all represented performance standards for the lifetime of this Product. If this Product isn’t working properly due to a covered defect, we will, at our option, either repair or replace it and ship it back to you at no charge. This warranty is fully transferable and does not require a receipt, warranty card, or product registration. This warranty does not cover the following: electronic components; batteries; cosmetic damage; damage caused by failing to properly maintain the product; loss; theft; damage as a result of unauthorized repair, modification, or disassembly; intentional damage, misuse, or abuse; and ordinary wear and tear. This Warranty will be void if the date stamp or other serialization codes have been removed from the Product. To view the full warranty and find details on how to request service under the warranty, go to our website at www.bushnell.com/warranty. Alternatively, you can request a copy of the warranty by calling us at 1-800-423-3537 or writing to us at one of the following addresses: IN U.S.A. Send To: IN CANADA Send To: Bushnell Holdings, Inc. Bushnell Holdings, Inc. Attn.: Repairs Attn.: Repairs 9200 Cody 140 Great Gulf Drive, Unit B Overland Park, Kansas 66214 Vaughan, Ontario L4K 5W1 For products purchased outside the United States or Canada please contact your local dealer for applicable warranty information. This warranty gives you specific legal rights. You may have other rights which vary from country to country. ©2018 Bushnell Outdoor Products
  • 6. 6 Nous vous remercions de nous avoir fait confiance en achetant les nouvelles jumelles Bushnell® Forge™. Ce manuel vous expliquera comment régler les jumelles à votre vue, ainsi que l'entretien de cet instrument, afin de vous permettre d'obtenir une expérience visuelle optimale. Lisez attentivement les instructions avant d'utiliser vos jumelles. NE JAMAIS REGARDER DIRECTEMENT LE SOLEIL AVEC LES JUMELLES, SOUS PEINE DE SUBIR DES LÉSIONS OCULAIRES IRRÉVERSIBLES RÉGLAGE DE L'ŒILLETON Vos jumelles Bushnell Forge sont équipées d'œilletons (Fig. 1, page suivante) pour votre confort visuel et pour vous protéger de la lumière extérieure. Pour une utilisation avec des lunettes de vue ou des lunettes de soleil, faites tourner les œilletons (Fig. 2). Ceci éloignera vos yeux des lentilles oculaires de la jumelle, à la bonne distance de dégagement oculaire, vous permettant de voir le champ de vision complet. AJUSTEMENT DE LA DISTANCE INTERPUPILLAIRE La distance entre les pupilles des yeux, également appelée «  distance interpupillaire  », varie d'une personne à une autre. Pour régler les jumelles selon votre distance interpupillaire, ou « largeur d'œil à œil » : 1. Orientez les jumelles vers un mur blanc ou une partie blanche dans le ciel. Tenez les jumelles et regardez à travers comme vous le feriez normalement. Ne vous préoccupez pas encore de la mise au point. 2. Tenez fermement les jumelles de chaque côté. Rapprochez ou éloignez les côtés gauche et droit (Fig. 3, page suivante) jusqu'à ce que vous puissiez voir une seule image sans zone d'ombre. RÉGLAGE DE LA DIOPTRIE ET MISE AU POINT 1. Ajustez tout d'abord les œilletons et la distance interpupillaire en suivant les instructions des sections précédentes. 2. À l'aide du cache objectif intégré ou de votre main, couvrez l'optique droit des jumelles. 3. À l'aide de la roulette de mise au point, faites la mise au point sur un objet lointain doté de nombreux détails (par exemple, un mur de briques, la branche d'un arbre, etc.) jusqu'à ce que celui-ci soit le plus net possible lorsque vous regardez dans la partie gauche des jumelles. 4. Retirez le cache de la lentille droite et couvrez la lentille gauche tout en continuant d'observer le même objet. 5. Tournez la bague de réglage de la dioptrie située directement sous l'œilleton droit (Fig. 4), PAS la molette de mise au point centrale pour mettre l'objet au point dans le côté droit des jumelles. Veillez à débloquer la bague dioptrique first by pulling it up (voir Fig. 4, le modèle 10x30 ne comporte pas de bague dioptrique de blocage). Évitez de trop tourner ou de forcer sur le mécanisme de dioptrie. Si vous ne parvenez pas à  régler la bague de dioptrie afin de mettre l'objet au point pour votre œil droit, assurez-vous que le côté gauche est toujours mis au point (recommencez les étapes 2 à 4 si nécessaire). Le réglage de la dioptrie offre essentiellement une « mise au point précise » d'un côté des jumelles (droit uniquement) pour permettre de légère différences de vision entre votre œil droit et votre œil gauche. Fig. 4 Bague de réglage de la dioptrie (modèle10x42,déverrouillé) A C B D E F G GUIDE DES PIÈCES *Situésouslecapuchonsurtousles modèlesàl'exceptiondu10 x 30. Lentille oculaire A Roulette centrale de mise au point B Œilletons rotatifs C Adaptateur de trépied* D Objectifs E Bague de réglage de la dioptrie F Caches objectifs G FRANÇAIS
  • 7. 7 6. Vos jumelles sont maintenant ajustées à votre vue. Vous pouvez à présent effectuer la mise au point de n'importe quel objet en tournant tout simplement la roulette centrale de mise au point. Prenez note de votre réglage de dioptrie (position des marques plus et moins sur la bague de dioptrie par rapport au repère sur les jumelles sous la bague) pour référence future si la bague est déplacée accidentellement ou par une autre personne utilisant vos jumelles. Lorsque la bague de réglage de la dioptrie est réglée à votre vue, poussez la bague vers le bas pour la verrouiller (sur les modèles 8x42, 10x42 et 15x56). ATTACHES DE LA SANGLE Pour fixer la bandoulière, faites passer les extrémités de celle-ci dans les attaches prévues à cet effet (Fig. 5) de chaque côté des jumelles, puis de nouveau dans la boucle en plastique de la bandoulière (Fig. 6). Ajustez la position des jumelles à votre goût sur votre poitrine tandis qu'elles pendent autour de votre cou, en changeant la longueur de la partie de la bandoulière qui passe dans les attaches et dans la boucle d'une longueur égale de chaque côté. Si vous préférez utiliser une bandoulière dotée d'anneaux métalliques, fixez-les à la fermeture en plastique située sur les attaches de la bandoulière et non directement sur l'attache, pour éviter que les anneaux n'endommagent la finition des jumelles. Les jumelles Forge incluent aussi un harnais pour jumelles (Fig. 7, below & next page), qui permet une option plus confortable lorsque vous utilisez vos jumelles toute la journée, en soulageant le poids sur votre cou. Retirez la sangle standard et à la place bouclez les fixations du harnais à travers les attaches de la bandoulière, puis enclenchez les clips dans les fixations correspondantes sur les sangles du harnais (Fig. 8). INSTALLATION DU TRÉPIED (modèles 8x42, 10x42 et 15x56 uniquement) Pour fixer les jumelles sur un trépied ou monopode, dévissez ou retirez le capuchon qui couvre le manchon à vis à l'extrémité de la charnière centrale (Fig. 9) et déposez-le en lieu sûr. Utilisez un adaptateur de trépied pour jumelles compatible (support à angle de 90 o ) tel que le modèle Bushnell n° 161002CM, pour fixer vos jumelles Forge taille intégrale en position horizontale sur un trépied standard afin d'obtenir une image stable lors de l'observation prolongée. Fig. 3 Inter-pupillaire Ajustement de la distance Grande distance interpupillaire Petite distance interpupillaire Grande distance interpupillaire Petite distance interpupillaire Fig. 2 Œilleton en position haute (pourutilisationsans lunettes de vue) Fig. 1 Œilleton en position basse (pourutilisationaveclunettesdevue) Fig. 9 Manchon de fixation du trépied avec capuchon Fig. 5 Attache de bandoulière Fig.6 Attache et boucle Fig.7 Harnais Fig.8 Harnais Pièce jointe
  • 8. 8 ÉTANCHÉITÉ / ANTIBUÉE En cas de fortes pluies ou si vous immergez accidentellement vos jumelles Forge dans l'eau pendant une expédition en mer, ce n'est pas un problème. Les jumelles sont fabriquées et testées pour résister à l'exposition à l'eau selon les normes IPX7. La protection anti-buée est obtenue par purge à l'azote à sec pour ôter tout l'air interne, qui peut retenir l'humidité. Toutes les surfaces extérieures des lentilles comportent notre nouveau revêtement EXO Barrier™ (outre un multi-revêtement intégral). EXO Barrier, est tout simplement la meilleure technologie de revêtement de protection des lentilles jamais développée par Bushnell. Ajouté à la fin du processus de protection, EXO Barrier se lie moléculairement à la lentille et remplit les pores microscopiques dans le verre. Il en résulte une protection ultra-fine qui repousse l'eau, l'huile, le brouillard, la poussière et les débris - la pluie, la neige, les traces de doigts et la saleté n'adhèrent pas. EXO Barrier est fabriqué pour durer : la protection collée ne s'atténue pas avec le passage de temps ou en raison de l'usure normale. ENTRETIEN DES OPTIQUES 1. Grâce à un entretien approprié à tout instrument optique de pointe, vous pourrez profiter de vos jumelles Forge pendant de longues années. 2. Évitez les chocs violents. Posez délicatement vos jumelles sur les surfaces dures. 3. Tirez sur la sangle après l'avoir fixée pour vous assurer qu'elle est bien attachée aux jumelles avant de mettre ces dernières autour de votre cou. 4. Rangez vos jumelles dans un endroit frais et sec autant que possible. NETTOYAGE 1. Tout d'abord, soufflez ou époussetez la poussière ou les saletés qui encombrent l'objectif (à l'aide d'un gaz dépoussiérant ou d'un pinceau de nettoyage optique doux). 2. Pour retirer les impuretés ou traces de doigts, nettoyez avec le doux sac de rangement (en tissu microfibre lavable) fourni, en frottant à l'aide de mouvements circulaires. L'utilisation d'un chiffon rêche (notamment les papiers absorbants) ou un frottement non nécessaire peut rayer la surface de l'objectif et causer des dégâts permanents. Le sac de rangement/tissu en microfibre fourni avec vos jumelles convient parfaitement au nettoyage régulier de vos optiques. Il vous suffit de souffler légèrement sur l'objectif pour apporter un peu d'humidité, puis de frotter délicatement avec la lingette en microfibre. 3. Pour un nettoyage plus complet, vous pouvez également utiliser un chiffon spécial et du liquide de nettoyage pour objectif photographique, ou de l'alcool isopropylique. Appliquez toujours le liquide sur le chiffon de nettoyage, jamais directement sur l'objectif. 4. Pour éviter d'endommager les revêtements optiques sur les surfaces des lentilles de la jumelle, n'utilisez jamais de liquides ménagers de nettoyage des vitres. Évitez d'utiliser des mouchoirs en papier ou des vêtements qui peuvent contenir des fibres abrasives et retenir les huiles ou la saleté. Caractéristiques techniques Modèle Grossissement Diamètre de l'objectif Type de prismes Champ de vision pieds x 1000 yards/ m x 1 000 m Pupille de sortie (mm) Dégagement oculaire (mm) Mise au point mini- male (au mètre) Longueur (pouces/ mm) Poids (oz./g) BF1030T 10x 30 mm Toit 330 / 110 3,0 18 7 / 2,1 4,8 / 122 13,7 / 388 BF842T 8x 42 mm Toit 426 / 142 5,1 19 10 / 3 6,7 / 170 30,8 / 873 BF1042T 10x 42 mm Toit 340 / 113 4,2 18 10 / 3 6,7 / 170 30,4 / 862 BF1556T 15x 56 mm Toit 235 / 78 3,7 21 12 / 3,6 8,9 / 226 51,0 / 1 446 Fig.7 Harnais binoculaire (utilisé)
  • 9. 9 Les produits fabriqués à partir d'avril 2017 sont couverts par la garantie Bushnell Ironclad. La garantie Ironclad est une garantie à vie totale, qui couvre l'ensemble de la durée de vie du produit. Chacun de nos produits dispose d'une durée de vie définie, comprise entre 1 et 30 ans. La durée de vie de ce produit est consultable à l'adresse ci-dessous ou sur la page spécifique à ce produit sur le site Bushnell. Nous garantissons que ce produit est exempt de défauts de fabrication et de matériaux défectueux, et qu'il répond à toutes les normes de performances définies pour la durée de vie de ce produit. Si ce produit ne fonctionne pas comme il le devrait en raison d'un défaut couvert par cette garantie, le produit sera remplacé ou réparé gratuitement (à notre discrétion), et vous sera réexpédié sans frais. Cette garantie est entièrement transférable et ne nécessite aucun reçu, carte de garantie ou enregistrement du produit. Cette garantie ne couvre aucun des éléments suivants : composants électroniques ;pilesetbatteries ;dégâtsesthétiques ;dommagescausésparundéfautd'entretiendu produit ; perte ; vol ; dommages résultant d'une réparation, d'une modification ou d'un démontage non autorisé  ; dommages, utilisation mauvaise et/ou abusive intentionnelle  ; usure normale du produit ou de ses composants. Si la date de fabrication ou tout autre numéro de série sont retirés du produit, la garantie sera annulée. Pour consulter la garantie complète ou trouver des informations sur les services de garantie à votre disposition, visitez notre site Web à l'adresse www.bushnell.com/warranty. Vous pouvez également nous demander une copie de la garantie en nous appelant au 1-800-423-3537, ou en nous écrivant à l'une des adresses suivantes : Aux U.S.A. Envoyé à : AU CANADA Envoyé à : Bushnell Holdings, Inc. Bushnell Holdings, Inc. Attn.: Repairs Attn.: Repairs 9200 Cody 140 Great Gulf Drive, Unit B Overland Park, Kansas 66214 Vaughan, Ontario L4K 5W1 Pour les produits achetés à l’extérieur des Etats-Unis ou du Canada,veuillez contacter votre revendeur local pour obtenir les conditions de garantit applicables. Cette garantie vous confère des droits légaux spécifiques. Vous pouvez avoir d’autres droits qui variant d’un pays à l’autre. ©2018 Bushnell Outdoor Products
  • 10. 10 Gracias por comprar sus nuevos prismáticos Bushnell® Forge™. Este manual le ayudará a optimizar su experiencia de visión explicándole cómo puede ajustar los prismáticos a sus ojos, así como los cuidados que precisa este instrumento. Lea atentamente las instrucciones antes de usar sus prismáticos. PELIGRO NO MIRE NUNCA DIRECTAMENTE AL SOL CON LOS PRISMÁTICOS, PUEDE CAUSAR GRAVES DAÑOS A LA VISTA AJUSTE DE LA COPA OCULAR Sus prismáticos Bushnell Forge están provistos de copas oculares (fig. 1, página siguiente) que dan una visión cómoda de toda la imagen y ayudan a excluir la luz ajena. Para usar sin gafas ni gafas de sol, suba las copas oculares (fig. 2). Esto colocará sus ojos más lejos de los lentes oculares de los prismáticos, a la distancia de alivio ocular correcta, permitiéndole ver todo el campo de visión. AJUSTE IPD (DISTANCIA INTERPUPILAR) El espacio entre las pupilas de sus ojos, llamado "distancia interpupilar", varía de persona a persona. Para que los prismáticos coincidan con su IPD o ancho de "ojo a ojo": 1. Póngalos en dirección a una pared blanca o un área en blanco del cielo. Sostenga los prismáticos y mire a través de ellos como lo haría normalmente. No se preocupe por enfocar todavía. 2. Sujete firmemente cada lado de los prismáticos. Acerque o separe los lados derecho e izquierdo (fig. 3, siguiente página) hasta que vea una sola imagen sin áreas sombreadas. AJUSTE DE FOCO Y DIOPTRÍA 1. Primero, ajuste las copas oculares y la IPD como se describe en las secciones anteriores. 2. Usando la tapa de la lente adjunta o su mano, cubra la lente del objetivo en el lado derecho de los prismáticos. 3. Usando el botón de foco central, enfoque un objeto distante con detalle (p.e. una pared de ladrillos, las ramas de un árbol, etc.) hasta que aparezca lo más preciso posible al verlo a través del lado izquierdo de los prismáticos. 4. Destape la lente del objetivo del lado derecho y cubra la del lado izquierdo mientras sigue mirando el mismo objeto. 5. Gire el anillo de ajuste dióptrico ubicado directamente debajo de la copa ocular derecha (fig. 4), NO el botón de enfoque central para enfocar el objeto en el lado derecho de los prismáticos. Asegúrese de desbloquear primero el anillo dióptrico tirando de él hacia arriba (véase la fig. 4; el modelo de 10x30 no tiene anillo dióptrico bloqueable). Evite forzar o girar demasiado el mecanismo de dioptría. Si no puede enfocar el objeto para su ojo derecho ajustando el anillo de dioptría, asegúrese de que el lado izquierdo sigue enfocado (repita los pasos 2-4 si es necesario). El ajuste de dioptría esencialmente provee "enfoque fino" en un lado de Fig.4 Anillo de ajuste dioptría (Modelode10x42,desbloqueado) A C B D E F G GUÍA DE REPUESTOS *Ubicadodebajodelatapaentodoslosmodelos exceptoel10x30. Lentes oculares A Botón de foco central B Copas oculares giratorias C Toma para adaptador de trípode* D Lente del objetivo E Anillo de ajuste dioptría F Cubierta de la lente del objetivo G ESPAÑOL
  • 11. 11 los prismáticos (solo derecho) para permitir las pequeñas diferencias de visión de sus ojos izquierdo y derecho. 6. Los prismáticos deberían ahora estar ajustados a sus ojos. Enfocar a cualquier distancia ahora puede hacerse simplemente girando el botón de foco central. Tome nota de la configuración de su dioptría (la posición de las marcas de positivo y negativo en el anillo de dioptrías con respecto a la marca de referencia en los prismáticos debajo del anillo) para referencia futura en caso de que se mueva el anillo accidentalmente u otra persona utilice sus prismáticos. El anillo dióptrico se puede empujar hacia abajo para bloquearlo (en los modelos de 8x42, 10x42 y 15x56) después de ajustarlo a su vista. COLOCACIÓN DE LA CORREA DEL CUELLO Para poner la correa del cuello, pase los extremos de la correa por el asa de la correa (fig. 5) a cada lado de los prismáticos, luego retroceda a través de la hebilla de plástico que hay en la correa (fig. 6). Ajuste la posición de los prismáticos en su pecho mientras cuelgan de su cuello como prefiera, cambiando la longitud de la sección de correa que atraviesa el canal y la hebilla de la correa la misma cantidad en cada lado. Si prefiere usar una correa de posventa con anillos metálicos, engánchelos en una cremallera de plástico que hay en las lengüetas en vez de instalarlas directamente en ella, para evitar dañar el acabado de los prismáticos por contacto con los anillos. Los prismáticos Forge también cuentan con un arnés (fig. 7, a continuación y en la página siguiente) que proporciona una opción más cómoda cuando se usa la óptica todo el día, ya que descarga el peso del cuello. Basta retirar la correa de serie y sustituirla por el arnés enrollando sus anclajes en las lengüetas y fijando los clips al correspondiente anclaje de las correas del arnés (fig. 8). MONTAJE DEL TRÍPODE (solo para modelos de 8x42, 10x42 y 15x56) Para colocar los prismáticos sobre un trípode o un monopié, desenrosque o quite el tapón que cubre la toma roscada en el extremo final del pivote central (fig. 9) y guárdelo en un lugar seguro. Use un accesorio adaptador compatible con el trípode de los prismáticos (escuadra de fijación a 90º ), como el Bushnell modelo n.º 161002CM, para colocar los prismáticos Forge de tamaño completo en cualquier trípode estándar en posición horizontal para conseguir una imagen estable durante un avistamiento prolongado. Fig.3 Ajuste de distancia interpupilar IPD ancho IPD estrecho IPD ancho IPD estrecho Fig.2 Copa ocular en posición "Arriba" (parausosingafas) Fig.2 Fig.1 Copa ocular en posición "Abajo" (parausocongafas) Fig.1 Fig.9 Tapón de encaje de trípode Fig.6 Correa y hebilla Fig.5 Lengüeta de correa Fig.7 Arnés Fig.8 Arnés Anclaje
  • 12. 12 A PRUEBA DE AGUA/DE NIEBLA Que le pille un gran aguacero o que por accidente se le caigan al agua los prismáticos Forge durante una excursión en barca ya no será un problema. Los prismáticos están fabricados y probados para resistir exposiciones al agua conforme a las normas IPX7. La protección contra la niebla se consigue con purga de nitrógeno seco que elimina todo el aire interno, que puede contener humedad. Todas las superficies exteriores de lente presentan nuestro nuevo revestimiento EXO Barrier™ (además del multicapa completo). Resumiendo, EXO Barrier es la mejor tecnología de revestimiento protector para lentes que Bushnell haya desarrollado hasta la fecha. La EXO Barrier, que se añade al final del proceso de revestimiento, se adhiere a la lente a nivel molecular y rellena los poros microscópicos del cristal. El resultado es un revestimiento ultraliso que repele agua, aceite, niebla, polvo y otros residuos, para que lluvia, nieve, huellas dactilares y polvo no se adhieran. La EXO Barrier está diseñada para durar: el revestimiento adherente no se pierde con el paso del tiempo ni con el uso y desgaste normales. CUIDADO DE LA ÓPTICA 1. Sus prismáticos Bushnell Forge no le darán ningún problema durante años si reciben el cuidado normal que le daría a cualquier instrumento de óptica precisa. 2. Evite impactos fuertes. Coloque los prismáticos suavemente sobre superficies duras. 3. Tire de la correa después de colocarla para asegurarse de que está bien encajada en los prismáticos antes de ponérsela en el cuello. 4. Guarde sus prismáticos en un lugar seco y fresco siempre que sea posible. LIMPIEZA 1. Primero, sople o cepille cualquier polvo o suciedad en las lentes (use "aire envasado" o un cepillo suave para lentes). 2. Para eliminar la suciedad o las huellas dactilares, límpielas con la bolsa suave de almacenamiento suministrada (hecha de paño de microfibra lavable), frotando con un movimiento circular. El uso de un paño áspero (incluyendo los pañuelos de papel) o frotar innecesariamente puede arañar la superficie de la lente y, tal vez, causar un daño permanente. La bolsa de almacenamiento/paño de microfibra incluida es ideal para la limpieza de rutina de su óptica. Simplemente eche su aliento sobre la lente para proveer algo de humedad y luego frote suavemente la lente con el paño de microfibra. 3. Para una limpieza más a fondo, se puede usar papel para lentes fotográficas y alcohol isopropílico o fluido de limpieza de lentes fotográficas. Aplique siempre el fluido en el paño de limpieza, nunca directamente sobre la lente. 4. Para evitar daños potenciales a los revestimientos ópticos en las superficies de las lentes de los prismáticos, nunca use líquidos de limpieza de ventanas domésticos. Evite usar pañuelos faciales o ropa que pueda tener fibras que puedan ser abrasivas y que contengan aceites o suciedad. Especificaciones técnicas SKU Aumento Diámetro del obje- tivo Sistema de prisma Campo de visión ft@1000yds/ m@1000m Pupila de salida (mm) Alivio visual (mm) Enfoque (ft/m) Longitud (in/mm) Peso (oz/g) BF1030T 10x 30 MM Techo 330 / 110 3.0 18 7 / 2.1 4.8/122 13.7 / 388 BF842T 8x 42 MM Techo 426 / 142 5.1 19 10 / 3 6.7/170 30.8 / 873 BF1042T 10x 42 MM Techo 340 / 113 4.2 18 10 / 3 6.7/170 30.4 / 862 BF1556T 15x 56 MM Techo 235 / 78 3.7 21 12 / 3.6 8.9/226 51.0 / 1446 Fig.7 Arnés para prismáticos (en uso)
  • 13. 13 Los productos fabricados a partir de abril de 2017 están cubiertos por la Garantía Ironclad de Bushnell. La Garantía Ironclad es una garantía de por vida que cubre la vida útil de este Producto. Cada producto tiene una vida definida; las vidas pueden variar de 1 a 30 años. La vida útil de este producto se puede encontrar en el sitio web que se detalla a continuación y/o en la página web de Bushnell específica para este Producto. Garantizamos que este producto está libre de defectos en materiales y mano de obra y cumplirá con todos los estándares de rendimiento representados durante la vida útil de este producto. Si este Producto no funciona correctamente debido a un defecto cubierto, nosotros, a nuestra discreción, lo repararemosoloreemplazaremosyseloenviaremossincargo.Estagarantíaestotalmentetransferible y no requiere recibo, tarjeta de garantía ni registro de productos. Esta garantía no cubre lo siguiente: componentes electrónicos; baterías; daño estético; daño causado por no mantener adecuadamente el producto; pérdida; robo; daños como resultado de una reparación, modificación o desensamblaje no autorizado; daño intencional, mal uso o abuso; y el desgaste normal. Esta Garantía será nula si el sello de fecha u otros códigos de serialización han sido eliminados del Producto. Para ver la garantía completa y encontrar detalles sobre cómo solicitar el servicio bajo la garantía, visite nuestro sitio web en www.bushnell.com/warranty. Alternativamente,puede solicitar una copia de la garantía llamándonos al 1-800-423-3537 o escribiéndonos a una de las siguientes direcciones: EN ESTADOS UNIDOS enviar a EN CANADÁ enviar a: Bushnell Holdings, Inc. Bushnell Holdings, Inc. Attn.: Repairs Attn.: Repairs 9200 Cody 140 Great Gulf Drive, Unit B Overland Park, Kansas 66214 Vaughan, Ontario L4K 5W1 Para los productos comprados fuera de Estados Unidos o Canadá, póngase en contacto con su distribuidor local para obtener información sobre la garantía aplicable. Esta garantía le otorga derechos legales específicos. Es posible que tenga otros derechos que varíen de un país a otro. © 2018 Bushnell Outdoor Products
  • 14. 14 Vielen Dank für den Kauf Ihres neuen Bushnell® Forge™ Fernglases. Diese Bedienungsanleitung hilft Ihnen bei der Optimierung Ihres Sichterlebnisses, indem sie Ihnen erläutert, wie Sie das Fernglas an Ihre Augen anpassen und das Instrument pflegen können. Bitte lesen Sie diese Anweisungen sorgfältig durch, bevor Sie das Fernglas benutzen. GEFAHR SCHAUEN SIE MIT IHREM FERNGLAS NIEMALS DIREKT IN DIE SONNE DIES KANN ERNSTHAFTE SCHÄDEN AN IHREN AUGEN VERURSACHEN ANPASSUNG DER AUGENMUSCHEL Ihr Bushnell Forge Fernglas ist mit Augenmuscheln ausgestattet (Abb. 1, nächste Seite), die eine komfortable Sicht auf das komplette Bild bieten und helfen, unerwünschten Lichteinfall fernzuhalten. Drehen Sie für die Verwendung ohne Brille oder Sonnenbrille die Augenmuscheln nach oben (Abb. 2). Dadurch werden Ihre Augen weiter weg von den Okularlinsen des Fernglases in den korrekten Augenabstand gebracht, so dass Sie das gesamte Sichtfeld sehen können. IPD (PUPILLENDISTANZ/INTERPUPILLARY DISTANCE) ANPASSUNG Der Abstand zwischen den Pupillen der Augen, genannt Pupillendistanz, ist bei jedem Menschen unterschiedlich. So passen Sie das Fernglas an Ihre IPD oder Ihren „Auge-zu-Auge“-Abstand an: 1. Richten Sie es auf eine weiße Wand oder einen freien Bereich des Himmels. Halten Sie das Fernglas und schauen Sie ganz normal hindurch. Kümmern Sie sich noch nicht um den Fokus. 2. Halten Sie beide Seiten des Fernglases gut fest. Bringen Sie die linke und die rechte Seite näher zusammen oder weiter auseinander, (Abb. 3, nächste Seite) bis Sie ein einziges Bild ohne Schattenbereiche sehen. ANPASSUNG DES FOKUS UND DIOPTRIEN 1. Passen Sie zuerst die Augenmuscheln und die IPD an, wie in den vorangegangenen Abschnitten beschrieben. 2. Decken Sie mit Hilfe des befestigten Objektivdeckels oder Ihrer Hand die Objektivlinse auf der rechten Seite des Fernglases ab. 3. Konzentrieren Sie sich auf ein weit entferntes Objekt mit feinen Details (z.B. eine Ziegelmauer, Äste, usw.) und drehen Sie den zentralen Fokusregler, bis es so scharf wie möglich erscheint, wenn Sie durch die linke Seite des Fernglases schauen. 4. Legen Sie die rechte Objektivlinse frei und decken Sie die linke ab, während Sie weiterhin dasselbe Objekt anschauen. 5. Drehen Sie den Dioptrieneinstellring direkt unter der rechten Augenmuschel (Abb. 4), NICHT den mittleren Fokusknopf, um das Objekt auf der rechten Seite des Fernglases scharf zu stellen. Stellen Sie sicher, dass Sie den Dioptrienring zuerst entriegeln, indem Sie ihn nach oben ziehen (siehe Abb. 4, Modell 10x30 verfügt über keinen verriegelnden Dioptrienring). Vermeiden Sie ein Überdrehen oder Forcieren des Dioptrienmechanismus. Falls es Ihnen nicht gelingt, das Objekt durch Anpassung des Abb.4 Dioptrienanpassungsring (Modell10x42,entriegelt) A C B D E F G BAUTEILE *befindetsichbeiallenModellenaußer 10x30unterderKappe. Okularlinse A Zentraler Fokusregler B Augenmuscheln (dreh- und arretierbar) C Stativadapterbuchse* D Objektivlinse E Dioptrienanpassungsring F Objektivschutzkappen G DEUTSCH
  • 15. 15 Dioptrienrings für Ihr rechtes Auge scharf zu stellen, überprüfen Sie, ob die linke Seite immer noch scharf ist (wiederholen Sie gegebenenfalls Schritte 2 – 4). Die Dioptrienanpassung sorgt im Grunde für den „Feinfokus“ auf einer Seite des Fernglases (nur rechts), um leichte Unterschiede in der Sehkraft Ihres linken und rechten Auges zu berücksichtigen. 6. Ihr Fernglas sollte nun an Ihre Augen angepasst sein. Sie können es nun auf jede Distanz scharf stellen, indem Sie einfach den zentralen Fokusregler drehen. Notieren Sie sich Ihre Dioptrieneinstellung (Position der Plus- und Minusmarkierungen am Dioptrienring in Bezug auf die Indexmarkierung am Fernglas unter dem Ring) für eine spätere Bezugnahme, falls der Ring versehentlich oder von einer anderen Person, die Ihr Fernglas benutzt, bewegt wurde. Der Dioptrienring kann zur Arretierung nach unten gedrückt werden (bei den Modellen 8x42, 10x42 und 15x56), nachdem Sie ihn an Ihre Sehkraft angepasst haben. BEFESTIGUNG DES TRAGERIEMENS Um den Trageriemen zu befestigen, fädeln Sie dessen Enden durch die Riemenösen (Abb. 5) auf jeder Seite des Fernglases und dann zurück durch die Kunststoffschnalle am Riemen (Abb. 6). Passen Sie die Position des Fernglases auf Ihrer Brust Ihrer Präferenz entsprechend an, indem Sie die Länge des Riementeils, der durch die Schlaufenführung und die Schnalle führt, auf beiden Seiten um gleich viel verändern. Wenn Sie lieber einen Zubehörriemen mit O-Ringen aus Metall verwenden möchten, befestigen Sie sie mittels Kabelbindern an den Ösen, statt sie direkt an den Ösen festzumachen, um eine Beschädigung des Lacks auf dem Fernglas durch Kontakt mit den Ringen zu vermeiden. Forge Ferngläser beinhalten auch einen Fernglasgurt (Abb. 7, unten und nächste Seite), welcher bei einer ganztägigen Verwendung der Optik eine bequemere Option bietet, indem er das Gewicht vom Hals nimmt. Entfernen Sie einfach den Standardriemen, führen Sie stattdessen die Gurtbefestigungen durch die Riemenösen und rasten Sie die Clips in den entsprechenden Befestigungen an den Gurtriemen ein (Abb. 8). BEFESTIGUNG AUF EINEM STATIV (nur Modelle 8x42, 10x42 und 15x56) Um das Fernglas auf einem Drei- oder Einbeinstativ zu befestigen, schrauben oder ziehen Sie die Kappe ab, die die Gewindemuffe auf der hinteren Seite des mittleren Scharniers abdeckt (Abb. 9), und legen Sie sie an einem sicheren Platz ab. Verwenden Sie einen kompatiblen Fernglas-Stativ-Adapter (90o Befestigungswinkel), wie etwa das Bushnell-Modell 161002CM, um Ihr Forge- Fernglas auf einem beliebigen Standardstativ in einer horizontalen Position zu befestigen, um bei längerer Betrachtung für ein stabiles Bild zu sorgen. Abb.3 Augenabstand (IPD – Interpupillary Distance) Abstandanpassung Weite IPD Enge IPD Weite IPD Enge IPD Fig.2 Augenmuschel in der “oben”-Position (fürdieVerwendungohneBrille) Abb.1 Augenmuschel in der “unten”-Position (fürdieVerwendungmitBrille) Fig.9 Kappe der Stativfassung Abb.5 Riemenöse Fig.6 Riemen & Schnalle Abb.7 Gurt Abb.8 Gurt Befestigung
  • 16. 16 WASSERDICHT/BESCHLÄGT NICHT Wenn Sie in einen heftigen Regenguss geraten oder das Forge-Fernglas bei einem Bootsausflug aus Versehen in Wasser tauchen,ist das kein Problem. Das Fernglas wurde hergestellt und getestet, um Wassereinwirkung entsprechend Standard IPX7 zu widerstehen. Der Schutz vor Beschlagen wird durch Spülung mit trockenem Stickstoff erreicht, wodurch die gesamte Feuchtigkeit enthaltende Luft aus dem Inneren entfernt wird. Alle äußeren Linsenoberflächen verfügen über unsere neue EXO Barrier™-Beschichtung (zusätzlich zur vollständigen Mehrfach- Beschichtung). EXO Barrier ist schlichtweg die beste Linsenschutzbeschichtungstechnologie, die Bushnell je entwickelt hat. EXO Barrier wird am Ende des Beschichtungsprozesses hinzugefügt, verbindet sich auf molekularer Ebene mit der Linse und füllt die mikroskopischen Poren des Glases aus. Das Ergebnis ist eine ultraglatte Beschichtung, die Wasser, Öl, Nebel, Staub und Schmutz abstößt – Regen, Schnee, Fingerabdrücke und Schmutz bleiben nicht haften. EXO Barrier ist langanhaltend: die gebundene Beschichtung vergeht mit der Zeit und bei normaler Abnutzung nicht. PFLEGE DER OPTIK 1. Ihr Bushnell Forge Fernglas wird Ihnen Jahre lang problemlos gute Dienste leisten, wenn es die normale Pflege bekommt, welches Sie jedem feinen optischen Gerät zukommen lassen würden. 2. Vermeiden Sie harte Stöße. Legen Sie das Fernglas behutsam auf harten Oberflächen ab. 3. Ziehen Sie am Riemen, nachdem Sie ihn befestigt haben, und prüfen Sie, ob er sicher am Fernglas befestigt ist, bevor Sie ihn sich umlegen. 4. Lagern Sie Ihr Fernglas wenn immer möglich an einem kühlen, trockenen Ort. REINIGUNG 1. Pusten oder pinseln Sie zuerst Staub und Schmutz auf der Linse ab (indem Sie einen Pustebalg oder einen weichen Linsenpinsel verwenden). 2. Entfernen Sie Schmutz oder Fingerabdrücke mit dem mitgelieferten weichen Aufbewahrungsbeutel (aus waschbarem Mikrofasertuch) durch kreisförmiges Wischen. Durch ein grobes Tuch (einschließlich Papiertücher) oder unnötiges Reiben können Kratzer auf der Linsenoberfläche entstehen, die zu dauerhaften Schäden führen können. Der mitgelieferte Aufbewahrungsbeutel/Mikrofasertuch ist ideal für die routinemäßige Reinigung der Optik. Hauchen Sie die Linse leicht an, um für eine geringe Menge an Feuchtigkeit zu sorgen und wischen Sie die Linse behutsam mit dem Mikrofasertuch ab. 3. Für eine gründlichere Reinigung können Sie Tücher oder Reinigungsmittel für fotografische Linsen oder Isopropanol verwenden. Tragen Sie das Reinigungsmittel immer auf das Reinigungstuch auf – niemals direkt auf die Linse. 4. Um eine mögliche Beschädigung der optischen Beschichtungen auf den Linsenoberflächen des Fernglases zu vermeiden, verwenden Sie niemals haushaltsübliche Fensterreiniger. Vermeiden Sie die Verwendung von Kosmetiktüchern oder Kleidungsstücken, die abrasive Fasern oder Öle oder Schmutz enthalten können. Technische Daten SKU Vergrößerung Objektivdurchmesser Prismensystem Sichtfeld ft@1000 yds/ m@1000 m Austrittspupille (mm) Augenabstand (mm) Naher Fokus (ft/m) Länge (in/mm) Gewicht (oz/g) BF1030T 10x 30 MM Dachkant 330 / 110 3,0 18 7 / 2,1 4,8 / 122 13,7 / 388 BF842T 8x 42 MM Dachkant 426 / 142 5,1 19 10 / 3 6,7 / 170 30,8 / 873 BF1042T 10x 42 MM Dachkant 340 / 113 4,2 18 10 / 3 6,7 / 170 30,4 / 862 BF1556T 15x 56 MM Dachkant 235 / 78 3,7 21 12 / 3,6 8,9 / 226 51,0 / 1.446 Abb.7 Fernglasgurt (in Gebrauch)
  • 17. 17 Produkte, die ab April 2017 hergestellt wurden, fallen unter die Bushnell Ironclad-Garantie. Die Ironclad-Garantie ist eine lebenslange Garantie, die sich über die Lebensdauer dieses Produkts erstreckt. Jedes Produkt hat eine definierte Lebensdauer; die Lebensdauer kann von 1 bis 30 Jahren reichen. Die Lebensdauer dieses Produkts finden Sie auf der unten angegebenen Website und/ oder auf der für dieses Produkt spezifischen Bushnell-Webseite. Wir gewährleisten,dass dieses Produkt frei von Material- und Verarbeitungsfehlern ist und alle für die Lebensdauer dieses Produkts geltenden Leistungsstandards erfüllt. Wenn dieses Produkt aufgrund eines von der Garantie abgedeckten Defektes nicht ordnungsgemäß funktioniert, reparieren oder ersetzen wir es nach unserem Dafürhalten und senden es kostenlos an Sie zurück. Diese Garantie ist vollständigübertragbarunderfordertkeineQuittung,GarantiekarteoderProduktregistrierung.Diese Garantie gilt nicht für Folgendes: elektronische Komponenten, Batterien, kosmetischer Schäden, durch nicht ordnungsgemäße Wartung entstandene Schäden, Verlust, Diebstahl, Schäden durch unbefugte Reparatur, Änderung oder Demontage, vorsätzliche Beschädigung, missbräuchliche oder unsachgemäße Verwendung und gewöhnlicher Verschleiß. Diese Garantie erlischt, wenn der Datumsstempel oder andere Seriennummern vom Produkt entfernt wurden. Um die vollständige Garantie einzusehen und Informationen darüber zu erhalten, wie Sie einen Service im Rahmen der Garantie anfordern können, besuchen Sie unsere Website unter www.bushnell.com/warranty. Alternativ können Sie eine Kopie der Garantie anfordern, indem Sie uns unter +1 80 04 23 35 37 anrufen oder uns unter einer der folgenden Adressen schreiben: Adresse für die USA: Adresse für KANADA: Bushnell Holdings, Inc. Bushnell Holdings, Inc. Attn.: Repairs Attn.: Repairs 9200 Cody 140 Great Gulf Drive, Unit B Overland Park, Kansas 66214 Vaughan, Ontario L4K 5W1 Wenden Sie sich bei Produkten, die außerhalb der USA oder Kanada erworben wurden, bitte an Ihren Händler vor Ort, um die jeweils gültigen Garantieinformationen zu erfragen. Diese Garantie gewährt Ihnen bestimmte gesetzlich verankerte Rechte. Unter Umständen haben Sie noch weitere Rechte, die von Land zu Land variieren. © 2018 Bushnell Outdoor Products
  • 18. 18 Grazie per aver acquistato il nuovo binocolo Bushnell® Forge™. Nel presente manuale viene illustrato come regolare il binocolo per ottimizzare l'esperienza di visione e come prendersi cura di questo strumento. Prima di utilizzare il binocolo, leggere attentamente le istruzioni. PERICOLO NON GUARDARE MAI IL SOLE DIRETTAMENTE CON IL BINOCOLO, POICHÉ PUÒ CAUSARE GRAVI DANNI AGLI OCCHI REGOLAZIONE DELLA CONCHIGLIA OCULARE Il binocolo Bushnell Forge è dotato di conchiglie oculari (Fig. 1, pagina successiva) che assicurano una comoda osservazione dell'intera immagine e aiutano a escludere la luce estranea. Per l'utilizzo senza gli occhiali da vista o gli occhiali da sole, ritrarre le conchiglie oculari (Fig. 2). In questo modo gli occhi saranno più lontani dalle lenti oculari del binocolo e sarà possibile vedere l'intero campo visivo, alla corretta distanza di rilievo oculare. REGOLAZIONE DELLA DISTANZA INTERPUPILLARE La distanza tra le pupille degli occhi, denominata "distanza interpupillare", varia da una persona all'altra. Per regolare il binocolo in base alla propria distanza interpupillare o alla larghezza tra gli occhi, seguire la procedura descritta. 1. Puntare il binocolo verso una parete bianca o un'area vuota del cielo. Guardare attraverso il binocolo come si farebbe normalmente. Non preoccuparsi ancora della messa a fuoco. 2. Afferrare saldamente il binocolo dai lati. Avvicinare i lati destro e sinistro o allontanarli (Fig. 3, pagina successiva) fino a quando non si vede una sola immagine, senza zone d'ombra. REGOLAZIONE DIOTTRICA E DELLA MESSA A FUOCO 1. Regolare innanzitutto le conchiglie oculari e la distanza interpupillare, come descritto nelle sezioni precedenti. 2. Utilizzando il coprilente attaccato o la mano, coprire la lente dell'obiettivo sul lato destro del binocolo. 3. Usando la manopola centrale di messa a fuoco, mettere a fuoco un oggetto distante ricco di particolari (ad esempio, un muro di mattoni, i rami di un albero e così via) finché non appare il più nitido possibile guardandolo attraverso il lato sinistro del binocolo. 4. Scoprire la lente dell'obiettivo sul lato destro e coprire quella sul lato sinistro, continuando a guardare lo stesso oggetto. 5. Ruotare l'anello di regolazione diottrica situato sotto la conchiglia oculare destra (Fig. 4), NON la manopola centrale di messa a fuoco, per mettere a fuoco l'oggetto sul lato destro del binocolo. Accertarsi di sbloccare l'anello di regolazione diottrica innanzitutto tirandolo verso l'alto (Vedi Fig. 4, il modello 10x30 non è dotato di anello di regolazione diottrica bloccante). Evitare di ruotare eccessivamente o di forzare il meccanismo diottrico. Se non si riesce a mettere a fuoco l'oggetto con l'occhio destro Fig.4 Anello di regolazione diottrica (modello10x42,senzablocco) A C B D E F G GUIDA ALLE PARTI *Situatosottoiltapposututtiimodellieccettoi modelli10x30. Lente oculare A Manopola centrale di messa a fuoco B Conchiglie oculari retrattili C Presadell'adattatorepertreppiede* D Lente dell'obiettivo E Anello di regolazione diottrica F Coprilenti G ITALIANO
  • 19. 19 regolando l'anello di regolazione diottrica, assicurarsi che il lato sinistro sia ancora a fuoco. Se necessario, ripetere i passaggi da 2 a 4. La regolazione diottrica fornisce essenzialmente la "messa a fuoco fine" su un lato del binocolo (solo destro) per tenere conto delle lievi differenze nella vista tra l'occhio sinistro e quello destro. 6. A questo punto il binocolo dovrebbe essere regolato per i propri occhi. È ora possibile eseguire la messa a fuoco per qualsiasi distanza ruotando semplicemente la manopola centrale di messa a fuoco. Prendere nota dell'impostazione diottrica (posizione dei segni più e meno sull'anello di regolazione diottrica rispetto alla tacca indice sotto l'anello del binocolo) per riferimento futuro nel caso in cui l'anello venga spostato per errore o da un'altra persona che utilizza il binocolo. L'anello di regolazione diottrica può essere premuto per bloccarlo in posizione (sui modelli 8x42, 10x42 and 15x56) dopo averlo regolato per la propria vista. ACCESSORIO TRACOLLA Per fissare la tracolla, inserire le estremità della tracolla negli occhielli (Fig. 5) ai lati del binocolo, quindi farle passare indietro attraverso la fibbia di plastica sulla cinghia (Fig. 6). Regolare la posizione del binocolo sul petto in base alle proprie preferenze, modificando la lunghezza della parte di cinghia che passa attraverso la guida e la fibbia di una misura uguale su entrambi i lati. Se si preferisce utilizzare una tracolla non originale dotata di anelli in metallo, fissarli a una fascetta di plastica posta sugli occhielli della cinghia anziché fissarla direttamente sugli occhielli in modo da evitare di danneggiare la finitura del binocolo a causa del contatto con gli anelli. I binocoli Forge includono una cintura del binocolo (Fig. 7, sotto e pagina seguente), che offre maggiore comodità quando si utilizza l'ottica tutto il giorno, riducendo il peso sul collo. È sufficiente rimuovere la cinghia standard e allacciare invece la tracolla attraverso gli occhielli della cinghia, poi far scattare le clip nei fissaggi corrispondenti sui cinturini della tracolla (Fig. 8). MONTAGGIO SU TREPPIEDE (solo modelli 8x42, 10x42 e 15x56) Per montare il binocolo su un treppiede o un monopiede, allentare o rimuovere il tappo che copre la presa filettata all'estremità della cerniera centrale (Fig. 9) e riporlo in un luogo sicuro. Utilizzare un adattatore per treppiede compatibile (staffa a 90o  gradi), come ad esempio il modello n. 161002CM di Bushnell, per fissare il binocolo Forge in scala reale a qualsiasi treppiede standard in posizione orizzontale in modo da garantire che, durante l'osservazione prolungata, l'immagine sia stabile. Fig.3 Regolazione della distanza interpupillare Distanza intepupillare ampia Distanzainterpupillarestretta Distanza intepupillare ampia Distanzainterpupillarestretta Fig.2 Conchiglia oculare in posizione "sollevata" (perl'usosenzaocchiali) Fig.1 Conchiglia oculare in posizione "abbassata" (perl'usoconocchiali) Fig.9 Tappo presa per treppiede Fig.5 Occhiello per cinghia Fig.6 Cinghia e fibbia Fig.7 Tracolla Fig.8 Tracolla Cinghia
  • 20. 20 MODELLI IMPERMEABILI/ANTI-APPANNAMENTO Che si sia sorpresi da un forte acquazzone o si abbia inavvertitamente immerso nell'acqua il binocolo Forge durante un'escursione in barca, non è un problema. Il binocolo è prodotto e testato per resistere all'esposizione all'acqua secondo gli standard IPX7. La protezione anti-appannamento è ottenuta tramite lo spurgo con azoto secco che rimuove tutta l'aria interna, che può trattenere l'umidità. Le superfici di tutte le lenti esterne sono dotate di un nuovo rivestimento EXO Barrier™ (oltre al rivestimento multi-strato). EXO Barrier, semplicemente, è la migliore tecnologia di rivestimento protettivo che Bushnell abbia mai sviluppato. Aggiunta alla fine del processo di rivestimento, EXO Barrier forma legami molecolari con le lenti e riempie i pori microscopici del vetro. Il risultato è un rivestimento multi-strato repellente per acqua, olio, nebbia, polvere e detriti: pioggia, neve, impronte digitali e sporcizia non si attaccheranno. EXO Barrier è creata per durare: il rivestimento legato non si attenua con il passare del tempo o la normale usura. MANUTENZIONE DELLE OTTICHE 1. Il binocolo Bushnell Forge assicura lunga durata senza inconvenienti se si eseguono le normali procedure di pulizia e manutenzione necessarie per qualsiasi altro strumento ottico di precisione. 2. Evitare il contatto con oggetti affilati. Sulle superfici dure appoggiare il binocolo delicatamente. 3. Tirare la tracolla dopo averla allacciata e assicurarsi che sia fissata saldamente al binocolo prima di sistemarlo intorno al collo. 4. Conservare il binocolo in un luogo fresco e asciutto, quando possibile. PULIZIA 1. Innanzitutto rimuovere polvere e detriti sulle lenti soffiando o spazzolando (con "aria compressa" o una spazzola morbida per lenti). 2. Per rimuovere la sporcizia o le impronte digitali, pulire con la custodia morbida in dotazione (in panno di microfibra lavabile), strofinando con movimento circolare. L'utilizzo di un panno ruvido (compresi asciugamani di carta) o l'eccessivo strofinamento può graffiare la superficie delle lenti e causare danni permanenti. La custodia o il panno in microfibra in dotazione sono ideali per la pulizia ordinaria delle ottiche. È sufficiente inumidire la lente con il fiato e strofinarla delicatamente con il panno in microfibra. 3. Per una pulizia più accurata, possono essere utilizzati dei tessuti specifici per obiettivi fotografici e detergenti liquidi per la pulizia di obiettivi di tipo fotografico o alcol isopropilico. Applicare sempre il fluido sul panno detergente e mai direttamente sulle lenti. 4. Per evitare possibili danni ai rivestimenti ottici sulle superfici delle lenti del binocolo, non utilizzare detergenti per i vetri di casa. Non usare fazzoletti di carta o pezzi di indumenti che possono essere abrasivi e trattenere olio o sporcizia. Specifiche tecniche SKU Ingrandimento Diametro obiettivo Sistema prisma Campo visivo piedi x 1.000 iarde/ m x 1.000 m Pupilla di uscita (mm) Rilievo oculare (mm) Distanza minima di focalizzazione (piedi/m) Lunghezza (pollici/mm) Peso (once/g) BF1030T 10x 30 mm A tetto 330 / 110 3.0 18 7 / 2.1 4.8/122 13.7 / 388 BF842T 8x 42 mm A tetto 426 / 142 5.1 19 10 / 3 6.7/170 30.8 / 873 BF1042T 10x 42 mm A tetto 340 / 113 4.2 18 10 / 3 6.7/170 30.4 / 862 BF1556T 15x 56 mm A tetto 235 / 78 3.7 21 12 / 3.6 8.9/226 51.0 / 1446 Fig.7Tracolla binocolo (in uso)
  • 21. 21 Iprodottifabbricatiapartiredaaprile2017sonocopertidallaGaranziaBushnellIronclad. LaGaranzia Ironclad è una garanzia a vita completa che copre la vita utile di questo prodotto. Ogni prodotto ha una durata di vita definita, che può variare da 1 a 30 anni. La durata di questo prodotto è riportata sul sito Web elencato di seguito e/o sulla pagina Web Bushnell specifica di questo prodotto. Si garantisce che questo prodotto è esente da difetti di materiali e di lavorazione e che soddisferà tutti gli standard di prestazioni rappresentati per tutta la durata di vita del prodotto. Se questo prodotto non funziona correttamente a causa di un difetto coperto provvederemo, a nostra esclusiva discrezione, a ripararlo o sostituirlo e rispedirlo gratuitamente. Questa garanzia è completamente trasferibile e non richiede ricevuta, scheda di garanzia o registrazione del prodotto. La presente garanzia non copre quanto segue: componenti elettronici, batterie, danni estetici, danni causati dalla mancata corretta manutenzione del prodotto, perdita, furto, danni dovuti a riparazione, modifica o smontaggio non autorizzati, danni intenzionali, uso improprio o abuso e normale usura. La presente Garanzia decade se la data stampata o altri codici di serializzazione sono stati rimossi dal prodotto. Per visualizzare la garanzia completa e trovare dettagli su come richiedere l'assistenza in garanzia, visitare il nostro sito Web all'indirizzo www.bushnell.com/warranty. In alternativa, è possibile richiedere una copia della garanzia chiamandoci al numero 1-800-423-3537 o scrivendoci a uno dei seguenti indirizzi: Negli U.S.A. spedire a: IN CANADA spedire a: Bushnell Holdings, Inc. Bushnell Holdings, Inc. Attn.: Repairs Attn.: Repairs 9200 Cody 140 Great Gulf Drive, Unit B Overland Park, Kansas 66214 Vaughan, Ontario L4K 5W1 Per prodotti acquistati fuori da Stati Uniti o Canada, rivolgersi al rivenditore per le clausole pertinenti della garanzia. La presente garanzia ti riconosce specifici diritti legali. Potresti avere altri diritti, i quali variano da paese a paese. ©2018 Bushnell Outdoor Products
  • 22. ©2018 Bushnell Outdoor Products Bushnell,™, ®, denote trademarks of Bushnell Outdoor Products www.bushnell.com 9200 Cody, Overland Park, KS 66214