1. Build Your Own
Hydroelectric Generator Page 1 of 9
Micro-hydro Basics
M
ost machines that make electricity need
some form of mechanical energy to get
things started. Mechanical energy spins the
generator to make the electricity. In the case of
hydroelectricity, the mechanical energy comes from
large volumes of falling water. For more than 100
years, the simplest way to produce the volumes of
falling water needed to make electricity has been to
build a dam. A dam stops the natural flow of a river,
building up a deep reservoir behind it. However,
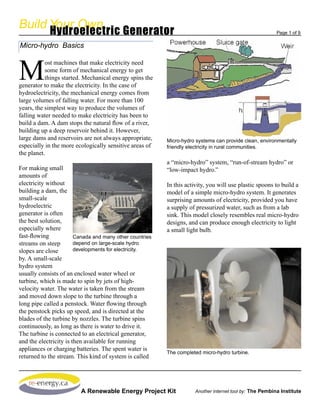
large dams and reservoirs are not always appropriate, Micro-hydro systems can provide clean, environmentally
especially in the more ecologically sensitive areas of friendly electricity in rural communities.
the planet.
a “micro-hydro” system, “run-of-stream hydro” or
For making small “low-impact hydro.”
amounts of
electricity without In this activity, you will use plastic spoons to build a
building a dam, the model of a simple micro-hydro system. It generates
small-scale surprising amounts of electricity, provided you have
hydroelectric a supply of pressurized water, such as from a lab
generator is often sink. This model closely resembles real micro-hydro
the best solution, designs, and can produce enough electricity to light
especially where a small light bulb.
fast-flowing Canada and many other countries
streams on steep depend on large-scale hydro
slopes are close developments for electricity.
by. A small-scale
hydro system
usually consists of an enclosed water wheel or
turbine, which is made to spin by jets of high-
velocity water. The water is taken from the stream
and moved down slope to the turbine through a
long pipe called a penstock. Water flowing through
the penstock picks up speed, and is directed at the
blades of the turbine by nozzles. The turbine spins
continuously, as long as there is water to drive it.
The turbine is connected to an electrical generator,
and the electricity is then available for running
appliances or charging batteries. The spent water is
The completed micro-hydro turbine.
returned to the stream. This kind of system is called
A Renewable Energy Project Kit Another internet tool by: The Pembina Institute
2. Build Your Own
Hydroelectric Generator Page 2 of 9
Making electricity current or AC. Household electrical current is alter-
We are surrounded by hundreds of appliances that nating current. Appliances have to be specially
use electricity to do work. But what is electricity? designed to use it. The other type of current is called
Basically, electricity is a flow of electrons in a metal direct current, because the electrons move in one
wire, or some other conductor. Electrons are tiny direction only. Most battery-powered appliances such
particles found inside atoms, one of the basic build- as calculators and portable CD players use direct
ing blocks of all matter. We call the flow of electrons current.
through any conductor a “current of electricity.”
Build It!
Each electron carries a tiny negative charge. When
electrons move through a conductor, they produce
an invisible field of magnetic force, similar to that
found around a magnet. The strength of that field
depends on how many electrons are in motion. You
can concentrate this field by winding the wire in
which the electrons move into a tight coil with many
turns. This causes many more electrons to be in
motion in a small space, resulting in a stronger field.
If you then place a piece of iron in the middle of the
coil, the electromagnetic field will turn the iron into
a powerful magnet.
While it is true that electrons moving through a con-
ductor produce a magnetic field, the reverse is also
true. You can make electrons move in a wire by
“pushing” them with a moving magnet, which is
how an electrical generator works. Electrical gen-
erators usually contain powerful magnets that rotate
very close to dense coils of insulated wire. The coils Safety Precautions
develop a flow of electrons that becomes an electrical Electric drills can cause serious eye and hand inju-
current when the generator is connected to an electric ries. Eye protection is required, and leather gloves
circuit. are recommended when drilling small parts such
as corks. A cork borer can be used as a substitute
You will be building an electrical generator as part of but it also has risks for injury.
this project. It uses moving magnets to create a cur-
rent of electricity in coils of wire. This generator is Hot glue guns can cause superficial burns. Be sure
technically called an alternator because the electrons glue guns are warmed up only when needed, and
move back and forth in the wire, rather than flowing unplugged immediately after. Hot glue can stick to
in just one direction as they do from a battery. A skin and clothing.
meter connected to the wire would show that the
charge of the wire switches or alternates between Utility knives can be hazardous. Expose only as
positive and negative as the electrons change direc- much blade as you need to cut the material, and
tions. Such an electrical current is called alternating fully retract the blade when not it’s not in use.
A Renewable Energy Project Kit Another internet tool by: The Pembina Institute
3. Build Your Own
Hydroelectric Generator Page 3 of 9
Tools Materials
• Electric drill, with ¼” drill bit • Paper Templates: Please download the following
• Scissors templates separately and print according to the
• Electrical tape printing instructions.
• Ruler Micro-hydro template (74K)
• 10 cm (3.5 inch ) nail or awl Important: Printing Instructions
• Hot glue gun, with 3 glue sticks • 4L plastic jug (rectangular style, from vinegar,
• White glue windshield washer fluid, or similar-see illustration)
• 10 plastic spoons
• Utility knife
• 1 large cork (3.5 to 5 cm)
• Pencil sharpener • Enameled magnet wire, 24 gage
• Permanent felt tip marker (approx. 100 m)
• Magnetic compass • Foamcore or heavyweight corrugated cardboard
• Wire cutters (approximately 22 cm by 30 cm)
• Gloves • 6 mm (1/4 inch) wooden dowel (20 cm long)
• Safety glasses • 4 ceramic or rare earth magnets (18mm or larger)
• clear vinyl tubing (6 cm long, ¼” inside diameter)
• 4 brass paper fasteners
A. Prepare the Disks
The generator we are building has two basic parts-the
rotor and the stator. The stator is the part that remains
stationary and has coils of wire to collect electricity. 2. When the glue has dried, use the utility knife
The rotor is the part that moves. It is equipped with to cut the rotor and stator disks from the cardboard
powerful magnets that will induce current of electric- sheet. Carefully trim the edges. Also, be careful not
ity in the coils. to damage the tabletop with the utility knife. Work on
a piece of scrap wood or a cutting board.
1. Glue the template sheet to the cardboard with
white glue. Be sure to spread a thin layer of 3. Using an awl or sharp nail, punch a small hole
glue evenly over the entire back of the template. through the rotor disk at its exact center, as shown.
Using the utility knife, make a larger (1 cm) hole at
the center of the stator disk.
Cover the back of the template with a thin, even layer
of glue.
A Renewable Energy Project Kit Another internet tool by: The Pembina Institute
4. Build Your Own
Hydroelectric Generator Page 4 of 9
4. Carefully slip the coil off the jig and secure it
B. The Stator using two pieces of the electrical tape you set aside
1. Prepare a jig for winding your coils by cutting a 3 in step 2 above.
cm by 16cm piece of cardboard, folding it in half and
securing with a small piece of electrical tape. 5. Using a small patch of emery cloth or sand paper,
remove the enamel insulation from the ends of each
2. Cut 8 short (4 cm) strips of electrical tape and lead, exposing about 1 cm of bare wire. Be sure the
set these aside. wire is completely bare!
3. Leaving a lead of about 10 cm, start winding the 6. Repeat steps 1 through 5 to make three more
first coil on the jig. Wrap the wire neatly onto the jig, coils.
forming a tight coil. Use 200 wraps or turns.
7. Lay the coils loosely on the disk in the position
shown by the template. Arrange the coils so their
windings alternate between clockwise and counter-
clockwise, as shown on the template. THIS IS VERY
IMPORTANT! Arrange and connect the coils so that
an electron would follow the path shown by the
arrows, starting with the counterclockwise coil on the
left hand side.
8. When you are sure you have them arranged cor-
rectly, connect the coils by twisting the bared ends
together, covering the connections with small pieces
of electrical tape.
9. Check your connections: Set your multi-meter
for measuring electrical resistance (ohms). If your
connections are good, there should be little resistance
A Renewable Energy Project Kit Another internet tool by: The Pembina Institute
5. Build Your Own
Hydroelectric Generator Page 5 of 9
to the movement of electrons, and the meter should 11. With the utility knife, cut 4 slits through the
produce a reading of about 10 ohms or less. To check cardboard between the magnets as shown on the
this, touch or connect the probes to the two free template. These slits will be used to fasten the stator
ends of the wires from the coils. If the coils are not to the plastic container later.
properly connected, the reading will be a very large
number, or infinity. C. The Rotor
1. Obtain 4 magnets.
Using the magnetic
compass, determine
the polarity of each
face, and mark the
south pole of two
magnets and the north
pole of the remaining
two using a felt pen.
Checking the polarity of one
2. Warm up your hot face of a magnet using a
glue gun, and prepare compass.
to attach the magnets to
the rotor disk. The magnets must be arranged so that
Check to make sure you have good connections between their polarity alternates (i.e. N-S-N-S). Their position
the coils. and polarity are indicated on the template.
3. Squeeze a small (1cm) blob of hot glue on the
10. Once you are confident the coils are properly spot where the first magnet will go. Quickly press
positioned and connected, glue them to the stator a magnet with its washer onto the blob, as shown
disk. Lift each coil up a little and apply a large blob below. Allow the glue to solidify before moving onto
of glue to the template where the coil touches. Let the the next magnet.
glue solidify before gluing the next coil.
A Renewable Energy Project Kit Another internet tool by: The Pembina Institute
6. Build Your Own
Hydroelectric Generator Page 6 of 9
2. Center the wide end of the cork on the marking
guide on the template page, and mark the cork with
a pen or pencil.
3. Place the cork wide-end down on a cutting board.
Use the utility knife to cut shallow slits into the cork
where the spoons will be inserted. USE CAUTION!
4. Obtain 8 plastic spoons. Using the wire cutters,
cut the spoon handles leaving a 1 cm stem on the
bowl of the spoon.
5. Be sure the glue gun is warmed up and that you
have a glue stick or two handy.
4. Repeat this for the remaining 3 magnets, making 6. Insert the first spoon into the cork, using the
sure to alternate north and south poles as you go. turbine template as a guide. Push the stem of the
spoon into the cork to a depth of about 1 cm.
D. The Shaft
1. Cut the dowel down to 20cm in length.
2. Using a pencil sharpener put a point on each end
of the wooden dowel (it is not necessary to make a
sharp point-blunt will do).
E. The Turbine
1. Drill a ¼” (6mm) hole through the CENTER of
the large cork, or use a cork borer to make the hole.
7. Repeat step 6 with the remaining 7 spoons. Adjust
the angle and depth of the spoons so they are evenly
spaced and all project from the cork at the same
angle.
8. When you are satisfied with your turbine, add
some hot glue to each spoon to secure it on the cork.
F. The Housing
A Renewable Energy Project Kit Another internet tool by: The Pembina Institute
7. Build Your Own
Hydroelectric Generator Page 7 of 9
F. The Housing
1. Obtain the plastic container and tear off any labels the container so that its center hole is over the hole in
that might be attached to the sides. Using scissors or the container. Push the nail (or awl) through each slit
a utility knife, cut part of the bottom off, as shown on the stator disk to mark the locations of these slits
in the photo below. on the side of the plastic container.
5. Using the utility knife, make 4 small slits on the
side of the container, corresponding with those on the
stator disk.
6. Using the brass fold-over tabs, securely mount the
stator disk to the side of the plastic container. Bend
the tabs flat on the inside of the container, as shown.
2. Using a ruler, find the center of the side as accu-
rately as you can. Mark this point with the permanent
marker. Repeat for the other side.
3. At the mark on each side of the container, drill a
¼” (6mm) hole through the plastic.
4. Lay the stator with its attached coils on the side of
A Renewable Energy Project Kit Another internet tool by: The Pembina Institute
8. Build Your Own
Hydroelectric Generator Page 8 of 9
G. Final Assembly
1. With scissors, cut the vinyl tubing into two small
lengths, each 1 cm long.
2. Slide the shaft into the plastic container through
the hole in the stator. Inside the container, slide one
piece of tubing onto the shaft.
3. Position the turbine inside the container so the
spoons face the neck of the bottle.
The magnets should be close to, but not touching the coils
as they turn.
8. Slide the rotor disk onto the shaft. Position it so
that the magnets come to within 2 or 3 millimetres
of the coils. Spin the shaft to be sure the magnets do
not strike the coils.
9. Check the rotor disk to see that it spins true.
Turn the shaft slowly and note any wobble. Adjust
the angle of the disk on the shaft as necessary.
10. When the rotor disk spins without wobbling, fix
4. Push the shaft through the turbine’s cork. Work it in position with hot glue applied to the point where
the cork and the tubing down the shaft so the shaft the shaft passes through the reinforcing disks.
comes out the other side of the container and projects
by about 4 cm.
5. Adjust the position of the turbine so the spoons
line up with the neck of the container.
6. Adjust the position of the tubing so that it comes
close to but does not touch the inside of the container.
7. Slide the second section of tubing over the end
of the shaft as shown. The two pieces of tubing will
help to keep all parts of the turbine positioned cor-
rectly when it spins. Spin the shaft to be sure it turns
without binding, and that the turbine does not strike
Reinforce the rotor disk with hot glue.
the inside of the container as it spins.
A Renewable Energy Project Kit Another internet tool by: The Pembina Institute
9. Build Your Own
Hydroelectric Generator Page 9 of 9
Questions
1. What variables in a micro-hydro system
could you change to get more electricity from
it?
2. In what locations in Canada or other parts
of the world would micro hydro be a good
choice for clean energy?
3. What practical problems would you
encounter in setting up and running a micro-
hydro system in a rural area ?
4. Why are micro-hydro systems seen as
better for the environment compared with
Test It! large-scale dams?
If all has gone well with your construction, this
turbine should be able to produce significant amounts 5. Use the Internet to locate distributors
of electricity, depending on the speed of the water and manufacturers of micro-hydroelectric
striking the spoons. components. Use the search terms “micro-
hydro”, “pelton wheel”, and “run of stream.”
1. Place the neck of the plastic container under a
faucet and turn on the water. The rotor should spin Notes:
quickly!
2. Connect your micro-hydro turbine to a multi-
meter and set the dial to read volts of alternating
current. Measure the voltage generated by the
operating turbine.
Contact us at: info@greenlearning.ca
A Renewable Energy Project Kit Another internet tool by: The Pembina Institute