Vishram Singh - Textbook of Anatomy Upper Limb and Thorax.. Volume 1 (1).pdf
Corel draw 12 notes
1. rock_siraj@ymail.com
CorelDraw 12 Tutorial
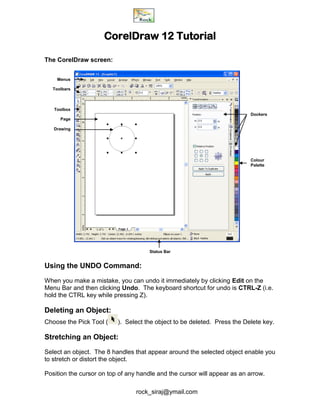
The CorelDraw screen:
Status Bar
Using the UNDO Command:
When you make a mistake, you can undo it immediately by clicking Edit on the
Menu Bar and then clicking Undo. The keyboard shortcut for undo is CTRL-Z (i.e.
hold the CTRL key while pressing Z).
Deleting an Object:
Choose the Pick Tool ( ). Select the object to be deleted. Press the Delete key.
Stretching an Object:
Select an object. The 8 handles that appear around the selected object enable you
to stretch or distort the object.
Position the cursor on top of any handle and the cursor will appear as an arrow.
Menus
Toolbars
Toolbox
Page
Drawing
Dockers
Colour
Palette
2. rock_siraj@ymail.com
To enlarge or reduce the object and maintain its proportions, place the cursor on
top of any one of the four corner handles. Drag the arrow cursor and you will
stretch the object, without any distortion.
Draw a star:
click and hold the mouse on the Basic Shapes tool ( )
choose the star shapes tool ( )
choose the 5-pointed star from the Shape Menu ( ) in the menu bar at the
top of the screen
click and drag the mouse to make a star shape
Practice stretching the star to make different
sizes and shapes. Try holding the SHIFT key
while dragging. To make copies, press the right
mouse button while still holding the left down.
To horizontally stretch and distort an object, drag the centre right (or left) handle.
Notice that the height stayed the same, but the
star was horizontally stretched or distorted.
To vertically stretch or distort an object, drag the center top (or bottom) handle.
Note that the distortion makes the star
stretch vertically, while retaining the same
width.
drag
dragdrag
drag
dragdrag
drag
drag
3. rock_siraj@ymail.com
Making a Mirror Image of an Object:
You will often find a graphic that would be more suitable to your needs if it was
reversed from its given orientation. Reflecting a graphic so that it faces a different
direction is an easy task. There are two methods that will do this for you.
Draw a thought bubble:
click and hold the mouse on the Basic Shapes tool
choose the callout shapes tool ( )
choose the thought bubble ( ) from the Shape Menu ( ) in the menu bar
at the top of the screen
click and drag the mouse to make a thought bubble
Let’s mirror the thought bubble so that it faces in the
opposite direction:
Select the object. Place the cursor on the centre
left handle.
The cursor becomes an arrow.
Drag the handle over and
beyond the centre right
handle. The new shape will
be shown in blue as you
drag.
Watch the status line until a
100% stretch has been
reached. The mirror image
will be placed beside the Start dragging here Stop dragging here
original location
If you want a copy made, click the right mouse button before releasing the left
button.
Making a Mirror Image Using the Transformation Docker:
Select the object that will be mirrored.
If you do not already see the Transformations Docker, select:
Arrange Transformations Scale
Make sure Scale and Mirror is selected:
4. rock_siraj@ymail.com
Select the Horizontal (or Vertical) mirror button and click
Apply.
The mirror copy will be in the same place as the original.
If you wish to have the original object left as well as the
mirror image, click Apply to Duplicate instead of Apply.
Rotating an Object (by hand):
To rotate an object requires special rotation arrows that will allow you to drag the
object through any angle desired. To obtain the rotation arrows, click on an object
when it is already selected. If the object you want to rotate is not selected, click on
it twice. After the first click, the usual 8 handles appear around the object. After
the second click, the rotation arrows appear in place of the handles.
Please the cursor on top of the corner arrow and
the cursor becomes a round arrow. Drag to rotate,
watching the status bar to see the number of
degrees of rotation.
A blue copy of the image will be shown to indicate
the where the final image will be located.
Release the mouse button and the image will be
rotated.
5. rock_siraj@ymail.com
Rotation an Object using the Transformation Docker:
Select the object that will be rotated (only once, so the 8 handles are shown).
Select Rotate in the Transformation Docker:
Type the number of degrees of rotation in the Angle box.
A positive angle will rotate the object counter clockwise;
negative angles will rotate the object clockwise.
Click Apply. If you wish to leave the original as well as the
rotated object, click Apply to Duplicate instead of Apply.
Using the Ellipse Tool:
Click on the Ellipse Tool ( ) in the Tool Bar. The cursor will become a “+”.
Click and drag diagonally with the “+” cursor. Release the mouse when the
desired ellipse is drawn.
Click and start dragging here
Stop dragging and release the
mouse here
To draw a circle, hold
down the CTRL key as
you drag the ellipse tool.
Release the mouse button
before lifting the CTRL
key.
To draw a circle from its
centre, press both the
CTRL and Shift keys down
as you drag the ellipse tool.
Release the mouse button
before lifting the CTRL key.
Drag diagonally
6. rock_siraj@ymail.com
Using the Colour Palette:
The colour palette appears on the right hand side of the screen.
To fill an object with colour, left click on any colour in the palette.
To have no fill in the object, left click on the X in the colour palette.
To change the outline colour of an object, right click on a colour.
To have no outline, right click on the X in the colour palette.
To view more of the colours in the palette, click on the expand button.
The outline width can be changed in the property toolbar:
The currently selected fill colour, outline colour and outline width are shown
in the status bar at the bottom right of the screen:
Reproduce the following using the ellipse tool and the colour palette:
overlapping circles in red ellipse with blue outline &
alternating colours yellow ellipse with green outline snowman
7. rock_siraj@ymail.com
Repeating a Task:
To repeat the last task that you did, press CTRL-R.
Make concentric circles:
Make one circle with no fill.
Select the circle.
Select Arrange Transformations Scale
Enter 120% for horizontal and vertical scale.
Click “Apply to Duplicate”.
Press CTRL-R several times
Scale a circle into an ellipse:
Draw one circle with no fill.
Scale the circle as above, but only put the horizontal scale to 120% (leave the
vertical at 100%)
8. rock_siraj@ymail.com
Moving Objects an Exact Distance:
When you need to move an object an exact distance,
choose Arrange Transformations Position
Specific horizontal and vertical movements can be
entered.
You can choose to move the original or to leave the
original and apply the movement to a duplicate.
Make a slinkey:
Make an ellipse with no fill
Select Arrange Transformations Position
Enter 0.1 for the vertical movement value
Click Apply to Duplicate
Press CTRL-R several times
The Centre of Rotation:
When you select an object then click it again to obtain the rotation
handles, CorelDraw shows you the center of rotation for the object.
Make this atomic symbol by rotation an ellipse with no fill by 120°
(360 ÷ 3). Add the 3 small black circles.
9. rock_siraj@ymail.com
Moving the Centre of Rotation:
You can move the center of rotation by
dragging it to a new location. Rotations will
now take place around this new center.
You can also set the center of rotation to
specific places (top, bottom, left, right and the
corners) by clicking on the grid in the
Transformation docker:
Create the following butterfly shape:
Draw an ellipse filled with white.
Select Modify Transformations Rotation
Click the bottom position in the grid to move the center of rotation to the bottom
Rotate the original ellipse by 45° (don’t create a duplicate)
Change the rotation angle to 90° (360° ÷ 4) and click Apply to duplicate three
times.
Notice that if you try to move the butterfly, it is easily ruined. You can Undo the
move using CTRL-Z if this happens, but it is better to group it all together into one
object.
Grouping Objects:
Several objects can be combined together into one new object to keep the parts
together.
Marquis select all the objects that are to be grouped and select Arrange Group.
Alternatively, you can use the keyboard shortcut CTRL-G.
You can always ungroup objects later by selecting Arrange Ungroup.
10. rock_siraj@ymail.com
Make a grouped daisy with eight petals:
Start with an ellipse with no fill and move the center of rotation
to the bottom.
To fit 8 petals in 360°, use an angle of 360° ÷ 8 = 45°.
When finished, marquis select the entire object and group it
together.
Make these daisies using the same method. Add a center to the daisies before
grouping it all together.
Black-eyed Susan Daisy:
12 orange petals & black center
Michaelmas Daisy:
36 thin mauve petals with yellow center
Arranging Objects:
When objects are created in CorelDraw, the newer objects are always placed on
top of other objects. Sometimes this can hide other objects. Often you need to
change the order that the objects appear. Use the options in the Arrange Order
menu to do this. They include:
To Front - Brings the selected object(s) to the very front
To Back - Sends the selected object(s) to the very back
Forward One - Brings the selected object(s) front one layer
Back One - Sends the selected object(s) back one layer
And another useful one is:
Reverse Order - Reverses the order of the selected objects
Use the Arrange to Front and Arrange to Back commands to make these graphics:
Rings Target Critter
11. rock_siraj@ymail.com
Interlocking Circles
Hint:
Start with a circle that has its center of rotation located well
outside of the circle.
For the 12 circles, calculate the angle using the same
method as for petals.
Using the Rectangle Tool:
Use the rectangle tool to draw these objects.
Start by drawing the smallest
rectangle. Select the rectangle to
obtain its handles. Drag the lower
right corner to make a larger
rectangle, and make a copy by
clicking the right mouse button.
Concentric squares and rectangles:
Hold Ctrl
to make a
perfect
square.
Hold shift
while
dragging
to align
centres.
To make round corners, use the “corner
roundness” control in the toolbar:
Make a window:
Draw one of the small squares and make the border thicker. Use Arrange
Transform Position to make duplicates of the square – first right, then down,
then left. Turn “Snap to Objects” on (View Snap to Objects). Draw a rectangle
the size of the full window. Use Arrange Transformations Scale to enlarge it
to 110%. Group it all together.
12. rock_siraj@ymail.com
Altering Clipart from the Symbols Library:
You can get clipart from the scrapbook by selecting Tools Scrapbook
Browse. Normally you would use the CorelDraw CD, but we do not have enough
copies to go around. I have stored some clipart on the computer. To get it, select:
Desktop My Computer Shared (S:) Wood Clipart
Then DRAG and DROP the clipart onto your page. Do not double click it –
that would open it up as a new document.
You can edit the clipart (add, delete, change colour, etc.) by ungrouping it first:
Arrange Ungroup. Usually after making changes, you group it together again.
Convert a zebra into a horse:
Find the zebra in
Animals/Wild/Zebra
Ungroup it and delete its
stripes (select and press
Delete).
Group it afterwards.
Using symbols:
Any letter or symbol that appears in any font can be inserted as a shape in
CorelDraw. Select Text Insert Character and drag a letter or symbol onto your
page. You can change the line or fill colour as with any other shape.
Good symbols can be found in the following fonts:
Symbol
Webdings
Wingdings There may be others, depending on what fonts
Wingdings 2 are installed on your computer.
Wingdings 3
Make the following playing cards using symbols for the letter or number and suit:
Draw the cards separately; when finished, overlap
them.
Make a rounded rectangle for the card.
Make sure you fill it with white.
The suit symbols are in the “symbol” font.
Group each card together when done.
13. rock_siraj@ymail.com
Applying an Envelope to Artistic Text:
Create artistic text by selecting the text tool and then simply clicking on your page
and typing something. Don’t drag a box, as that creates “paragraph text”.
To change the shape of the text, select Effects Envelope. With the text selected,
click “Add New” in the Envelope docker. Now drag the handles around your text
and see what happens!
Create a bowtie. Use a bold font like Arial Black and a
large font size (36 or more). Apply the envelope as
above, drag each corner out and push the edges in a bit.
Using an existing shape as an envelope:
Create artistic text as above. Near the text, draw a shape or get a symbol from a
font. Select the text and select Effects Envelope.
Click on the eyedropper tool ( ), then select your shape, then click Apply. The
shape will be used as an envelope for your text. Experiment with the options
(Putty, Vertical, Original, Horizontal).
Any shape can be used as an envelope, but some work better than others. Try
these:
Type the text.
Select Text Insert Character.
Choose the symbol font and
drag in the symbol.
Click on the text, select
Effects Envelope, click the
eyedropper, click on the shape
then click Apply.
14. rock_siraj@ymail.com
Fitting Text to a Path:
Create a shape (e.g. circle).
Create some text. With the text highlighted, select Text Fit Text to Path
Click on the shape.
You can change the way the text fits by using the Pick tool and selecting the text
fitted to a path. The property bar will give you the following options:
Blending Objects:
You can morph one clipart object into another
using the Blend tool.
Insert a caterpillar from Insects Crawling
MONARCHC.cdr
Insert a butterfly from Insects Flying
Butterf9.cdr
Using the Pick tool, highlight both, then select
Effects Blend
I used 8 steps in this example.
15. rock_siraj@ymail.com
Assignment:
Add Building assignment
Add Keyboard assignment
Make the following graphics using the rotation tools:
Draw one square and move the center or rotation
below it (to where the center of the graphic will be):
For 12 rectangles the angle will be 360/12 = 30.
Create one rectangle and move the center of
rotation as shown before duplicating:
Draw a square and rotate it 45 to get a diamond.
Then move the center of rotation and duplicate.
16. rock_siraj@ymail.com
Group a circle and a rectangle (or Draw a black circle with a white circle
thick line). on top. Group and duplicate as needed
Move the center of rotation and to create the pattern.
duplicate.
Use Sports/Jogging/running & Sports/Water/swandive
Set fill to "none" and border to black.
Move the center of rotation. Rotate this image before duplicating
Rotate by -20.
Fill in the last one with black. Add the diving board.
Using clipart from Fun_pepl, create a self-portrait.
Example: teacher when students are playing games.
17. rock_siraj@ymail.com
Modify the clipart Animals/Pets/dog_fite to separate the dogs:
Before After
Hints: Ungroup, then select pieces and move them with the arrow keys. Count
how many times you press the arrow key and repeat for other pieces.
Combine the cliparts Flags/FlyFlag/flag037 and Flags/FlyFlag/flag040 to make:
Mirror the American flag horizontally.
Rotate 40.
Combine parts of Police/burglar, Animals/pets/catfence and Home/Misc/misc0034:
to make:
Be sure to rotate the flashlight, and add extra boards to the fence.
Create for following fit text to path effects:
18. rock_siraj@ymail.com
Turn a child into an adult using the Blend tool.
The images are People/B&W/CHILDC.cdr and People/B&W/STANDING.cdr
Final challenge:
Draw the following optical illusions:
Turn on the grid by selecting:
View Grid and Ruler Setup
19. rock_siraj@ymail.com
Set spacing to 0.25 inches (or Frequency to 4 per inch).
Check off “Show Grid”, “Snap to Grid” and “Show grid as dots”
Now click on “Guidelines” (in the left panel) and check off “Show
Guidelines” and “Snap to Guidelines”.
Draw one cube like this: (you will likely want to zoom in to about 400%)
Start by drawing one surface. Use the “Bezier Tool”
which looks like: and is under freehand tools. It
allows you to draw closed shapes by clicking all the
corners, then clicking the original point again. After
drawing the shape, you can fill it. Repeat for the
other surfaces. You must click all 4 corners of the
surface and then click back on the original point
to create a closed shape that can be filled.
When finished, group the cube together.
Now set up some guidelines by selecting:
View Guidelines Setup …
Set a horizontal guideline at 1 inch. Add it.
Under "Guides" (in the left panel), add two
guides using "angle and 1 point". Set one at
(1,1) and 60 and the other at (4,1) and -60
(remember, equilateral triangles have angles of
60).
Copy and paste your cube, placing copies on
the guidelines, spacing them evenly, and using
the “To Back” and “To Front” buttons to correctly
layer them. Drag the cubes by their centre to
align them on the guides. More hints on next page
Other suggestions:
Select all the cubes in 1 row (click the first one, then hold shift and click the others).
Use Arrange Align and Distribute Align and Distribute to space them out
evenly.
OR put only the 3 corner cubes in place and use the blend tool to create the
others. You will then have to "break apart" and "ungroup" the result.
Last hint: you will need to ungroup one of the cubes to create the illusion!