Video Editing Basics for Teachers
•
0 j'aime•305 vues

This is How To document for teachers who are trying to improve their online and blended courses without purchasing complex software. Windows 10 arrives with the Photos Video Editor. It provides essential tools for teachers to edit their video for educational purposes.

Recommandé
Contenu connexe
Tendances
Tendances (20)
Similaire à Video Editing Basics for Teachers
Similaire à Video Editing Basics for Teachers (20)
Plus de John Allan
Plus de John Allan (20)
Dernier
Dernier (20)
Video Editing Basics for Teachers
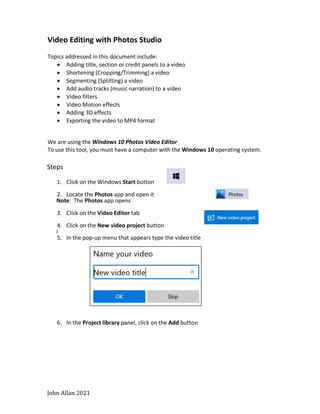
- 1. John Allan 2021 Video Editing with Photos Studio Topics addressed in this document include: • Adding title, section or credit panels to a video • Shortening (Cropping/Trimming) a video • Segmenting (Splitting) a video • Add audio tracks (music narration) to a video • Video filters • Video Motion effects • Adding 3D effects • Exporting the video to MP4 format We are using the Windows 10 Photos Video Editor To use this tool, you must have a computer with the Windows 10 operating system. Steps 1. Click on the Windows Start button 2. Locate the Photos app and open it Note: The Photos app opens 3. Click on the Video Editor tab 4. Click on the New video project button i 5. In the pop-up menu that appears type the video title 6. In the Project library panel, click on the Add button
- 2. John Allan 2021 7. In the drop-down menu, choose the source of a video clip Note: Usually it is From this PC 8. Locate and choose the name of the video clip 9. Click on the Open button 10. Repeat steps 6 to 9 for each of your project’s video clips Note: After the clips have been loaded into the Project library, they will appear as video clip thumbnails 11. Click on the video thumbnail that is the first to appear in the final video 12. Click on the Place in storyboard link Note: The video clip now appears in the Storyboard timeline 13. Repeat these steps for each video clip Note: The video clips now appear in the Storyboard timeline
- 3. John Allan 2021 Note: A preview of the video appears in the Preview player Note: the following sections are optional features that can be applied to create a video Add title card Note: This adds a static text title, scene introductions and video credits if required 1. In the Storyboard section, click on the Add title card icon 2. A title card appears in the Storyboard timeline with a default duration of 3 seconds 3. Click on the Duration icon
- 4. John Allan 2021 4. In the Duration pop-up, choose or type a time in seconds 5. Click on the Text icon 6. A text editor appears 7. Type text in the Title text box 8. Choose an Animated text style 9. Choose a Layout 10. Preview the animation
- 5. John Allan 2021 11. Click on the Done button 12. Click on the Background icon 13. Choose a colour chip 14. Click on the Done button Edit Video Clips Note: There are many video editing features including: • Trim • Split • Text • Motion • 3D Effects • Filters • Speed
- 6. John Allan 2021 Trim Trim allows you to slice off unwanted video segments from the front or at the end of a video clip. This is sometimes known as cropping a video. 1. In the Storyboard section, select a clip thumbnail 2. Click on the Trim icon 3. Drag the Start of Trim indicator to a suitable point on the video timeline 4. Drag the End of Trim indicator to a suitable point on the video timeline 5. Click on the Done button Note: The video clip has now been trimmed/cropped
- 7. John Allan 2021 Split Split allows you to segment a video clip into smaller clips. 1. In the Storyboard section, select a clip thumbnail 2. Click on the Split icon 3. Drag the Playback indicator to the point on the video time that the separation will occur 4. Click on the Done button Note: The video clip has now been made into two separate video clips
- 8. John Allan 2021 Text Text allows you to add text over the video clips using a variety of styles for a duration that you choose. 1. In the Storyboard section, select a clip thumbnail 2. Click on the Text icon 3. A text editor appears 4. Type text in the Title text box 5. Choose an Animated text style 6. Choose a Layout
- 9. John Allan 2021 7. On the video timeline, drag the Start and End of text points to indicate where the text will appear over the video clip 8. Click on the Done button Motion Text allows you to add a motion path through a video clip. You cannot set the duration, so the motion is gradual as the clip is playing. 1. In the Storyboard section, select a clip thumbnail 2. Click on the Motion icon 3. An editor appears 4. Choose one of the Motion thumbnails 5. Click on the Done button Note: The video clip will move gradually based on the Motion path selected
- 10. John Allan 2021 3D Effects This feature allows you to overlay animated graphics or insert 3D graphics over a video clip. If required a 3D graphic can be attached to specific point on the video and the 3D will follow the point throughout the clip 1. In the Storyboard section, select a clip thumbnail 2. Click on the 3D effects icon 3. An editor appears 4. Choose the Effects icon 5. Choose one of the effects 6. Choose a Volume level if available
- 11. John Allan 2021 7. Set the Duration of the 3D Effect using the timeline 8. Click on the Done button Note: The 3D effects feature also offers a 3D library with a bounty of 3D objects, this tutorial does not cover these Filters Filters allows you to add a different emotional setting to your videos through a variety of colour adjustments such as sepia to create the illusion of something that happened in the past. 1. In the Storyboard section, select a clip thumbnail 2. Click on the Filters icon 3. An editor appears 4. Choose one of the Filters thumbnails 5. Click on the Done button
- 12. John Allan 2021 Speed The speed feature allows you sped up or slow down a video. 1. In the Storyboard section, select a clip thumbnail 2. Click on the Speed icon 3. A pop-up editor appears 4. Use the slider to set a playback speed for the video clip 5. Click behind the pop-up 6. The speed of the clip has changed Rotate The Rotate feature allows you to rotate the orientation of the video. 1. In the Storyboard section, click on the Rotate icon 2. Continue to click on the Rotate icon until the orientation you require appears in the preview pane Add Background music 1. Above the Preview pane, click on the Background music icon 2. The Select background music pop-up appears, click on the play buttons to preview the audio clips 3. Check the Sync your video to the music’s beat if your video requires this option 4. Use the Music volume slider to adjust the sound level 5. Click on the Done button
- 13. John Allan 2021 Add Custom audio (Background music or narration) 1. Above the Preview pane, click on the Custom audio icon 2. Click on the Add audio file icon 3. Locate and add your audio file from your device 4. A thumbnail of the audio clip appears 5. Click on the audio icon in this thumbnail 6. Check the options if required, Fade in or Fade out 7. Use the Music volume slider to adjust the sound level 8. Click anywhere on the editor to close this menu 9. On the video timeline, drag the Start of audio clip to indicate where the sound will start to play in the video clip 10. Click on the Done button
- 14. John Allan 2021 Finishing the Video 1. Above the Preview pane, click on the Finish video icon 2. In the Finish your video pop-up, choose the video quality 3. Click on the Export button 4. Choose the video’s destination folder 5. Type a name for the video 6. Click on the Export button Note: Depending on the length and complexity of the video, this may take some time.