

Recommandé
Contenu connexe
En vedette
En vedette (19)
Similaire à Z-Wave Foxx Smart Switch Manual
Similaire à Z-Wave Foxx Smart Switch Manual (9)
Plus de Domotica daVinci
Plus de Domotica daVinci (20)
Z-Wave Foxx Smart Switch Manual
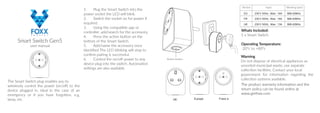
- 1. Smart Switch Gen5 user manual The Smart Switch plug enables you to wirelessly control the power (on/off) to the device plugged in, ideal in the case of an emergency or if you have forgotten, e.g. lamp, etc. 1. Plug the Smart Switch into the power socket the LED will blink. 2. Switch the socket on for power if required. 3. Using the compatible app or controller, add/search for the accessory. 4. Press the action button on the bottom of the Smart Switch. 5. Add/name the accessory once identified The LED blinking will stop to confirm pairing is successful. 6. Control the on/off power to any device plug into the switch. Automation settings are also available. Whats Included: 1 x Smart Switch Operating Temperature: -20°c to +80°c Warning Do not dispose of electrical appliances as unsorted municipal waste, use separate collection facilities. Contact your local government for information regarding the collection systems available. The product warranty information and the return policy can be found online at www.getfoxx.com Action button Europe Franc eUK EU FR UK 868.42MHz230 V 50Hz , Max: 16A 868.42MHz230 V 50Hz , Max: 16A 868.42MHz230 V 50Hz , Max: 13A Input Working bandVersion
- 2. FR: Branchez le Smart Switch dans la prise de courant, le voyant clignote. Mettez la prise de pouvoir, si nécessaire. Utilisation de l’application ou contrôleur com- patible, ajouter / recherche de l’accessoire. Appuyez sur le bouton d’action sur le fond de la Smart Switch. Ajouter / nommer l’accessoire une fois identifiés La LED clignotante va arrêter pour confirmer l’appariement est réussi. Contrôler le / hors tension à toute prise de l’appareil dans le commutateur. Paramètres d’automatisation sont également disponibles. La LED rouge sera présent que le capteur effectue sa configuration IT: Collegare il Smart Switch nella presa di corrente il LED lampeggia. Accendere la presa di alimentazione, se necessario. Utilizzando l’applicazione o controller compati- bile, aggiungere / ricerca per l’accessorio. Premere il pulsante di azione nella parte inferiore della Smart Switch. Aggiungere / nome dell’accessorio una volta identificato il LED lampeggiante si fermerà per confermare l’associazione è riuscita. Controllare il / l’alimentazione a qualsiasi connettore dispositivo nel commutatore. Impostazioni di automazione sono inoltre disponibili. DE: Stecken Sie den Smart Switch in die Steck- dose wird die LED blinken. Schalten Sie den Sockel auf die Macht, wenn erforderlich. Unter Verwendung der kompatiblen App oder Controller, fügen Sie / Suche nach dem Accessoire. Drücken Sie die Aktionstaste auf der Unterseite der Smart Switch. Hinzufügen / benennen Sie die Zubehör einmal identifiziert Die LED blinkt stoppt, um zu bestätigen Paarung erfolgreich ist. Steuern Sie die Ein / Aus-einem beliebigen Gerätestecker in den Schalter. Automation-Einstellungen sind ebenfalls erhältlich. ES: Conecte el Smart Switch en el enchufe eléctrico, el LED parpadeará. Cambie la toma de poder, si es necesario. Con la aplicación o controlador compatible, añadir / búsqueda del accesorio. Pulse el botón de acción en la parte inferior de la Smart Switch. Añadir / nombrar el accesorio una vez identificado el LED dejará de parpadear para confirmar vinculación se realiza correctamente. Controlar el de encendido / apagado a cualquier enchufe de dispositivo en el conmutador. Ajustes de automatización están también disponibles.