1. Technical Note
®
Rotor-Gene Q
Real-Time PCR Run Setup Instructions
for qBiomarker Mutation PCR Arrays
Before the Experiment
Please make sure the real-time PCR instrument is working properly. Refer to the manufacturer’s Installation and
Maintenance manual if needed.
Creation of PCR Protocol Template
1)
Open the Rotor-Gene Q Series Software 2.0 on the desktop of the computer that is connected to the RotorGene Q.
2) Select File New. The New Run dialog box will appear (Note: the New Run dialog box may open
automatically).
3) Under the Advanced tab, select Two Step and click New.
4) Under the Welcome to the Advanced Run Wizard! tab, select Rotor-Disc 100.
a) Ensure locking ring has been attached to the Rotor-Disc 100, check Locking Ring Attached box,
and click Next.
5) Under the Miscellaneous Options tab, set Reaction Volume (µL) to 20 and click Next.
6) Click Edit Profile.
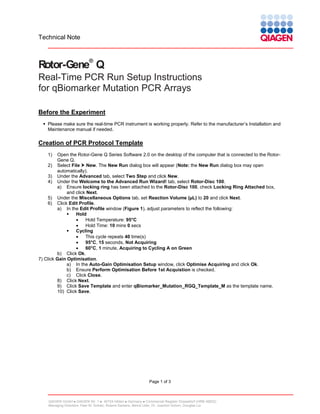
a) In the Edit Profile window (Figure 1), adjust parameters to reflect the following:
Hold
Hold Temperature: 95°C
Hold Time: 10 mins 0 secs
Cycling
This cycle repeats 40 time(s)
95°C, 15 seconds, Not Acquiring
60°C, 1 minute, Acquiring to Cycling A on Green
b) Click Ok.
7) Click Gain Optimisation.
a) In the Auto-Gain Optimisation Setup window, click Optimise Acquiring and click Ok.
b) Ensure Perform Optimisation Before 1st Acquistion is checked.
c) Click Close.
8) Click Next.
9) Click Save Template and enter qBiomarker_Mutation_RGQ_Template_M as the template name.
10) Click Save.
Page 1 of 3
QIAGEN GmbH QIAGEN Str. 1 40724 Hilden Germany Commercial Register Düsseldorf (HRB 45822)
Managing Directors: Peer M. Schatz, Roland Sackers, Bernd Uder, Dr. Joachim Schorr, Douglas Liu
2. Technical Note
Figure 1: Edit Profile Tab
Performing Real-Time PCR Detection
1)
2)
3)
If the Rotor-Gene Q is off, switch on the instrument, and ensure the standby light is lit.
Open the Rotor-Gene Q Series Software 2.0.
Under the New Run dialog box, click on the Quick Start tab, and select Open a Template In Another
Folder.
4) Click New.
5) Locate qBiomarker_Mutation_RGQ_Template_M Template file and click Open.
6) Under the 1. Rotor Selection tab, select Rotor-Disc 100.
a) Ensure locking ring has been attached to the Rotor-Disc 100, check Locking Ring Attached box,
and click Next.
7) Under 2. Confirm Profile tab, verify desired profile.
8) Click Start Run.
9) Enter name for run and click Save.
10) Rotor-Gene Q run will now commence.
After the PCR Run
1)
2)
3)
4)
5)
Click Bank On.
Click All On.
Select Analysis in program bar.
Under Quantitation tab, select Cycling A. Green.
Click Show.
Page 2 of 3
QIAGEN GmbH QIAGEN Str. 1 40724 Hilden Germany Commercial Register Düsseldorf (HRB 45822)
Managing Directors: Peer M. Schatz, Roland Sackers, Bernd Uder, Dr. Joachim Schorr, Douglas Liu
3. Technical Note
6)
Determine CT values. Manually define the threshold value by using the log view of the amplification plots.
Select a threshold value above the background signal. The threshold value should be in the lower half of
the linear phase of the amplification plot. A threshold setting of 0.03 is recommended as a reference.
7)
Export the result to an Excel spreadsheet by placing the mouse in the table of the C T values and clicking
Export to Excel.
Page 3 of 3
QIAGEN GmbH QIAGEN Str. 1 40724 Hilden Germany Commercial Register Düsseldorf (HRB 45822)
Managing Directors: Peer M. Schatz, Roland Sackers, Bernd Uder, Dr. Joachim Schorr, Douglas Liu